Operating and Installation manual
Page 1
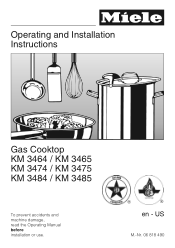
US M.-Nr. 06 818 490 Operating and Installation Instructions Gas Cooktop KM 3464 / KM 3465 KM 3474 / KM 3475 KM 3484 / KM 3485 To prevent accidents and machine damage, read the Operating Manual before installation or use. ® ® en -
US M.-Nr. 06 818 490 Operating and Installation Instructions Gas Cooktop KM 3464 / KM 3465 KM 3474 / KM 3475 KM 3484 / KM 3485 To prevent accidents and machine damage, read the Operating Manual before installation or use. ® ® en -
Operating and Installation manual
Page 4
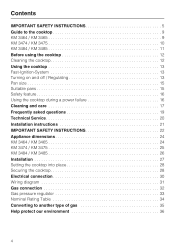
... Fast-Ignition-System 13 Turning on and off / Regulating 13 Pan size 15 Suitable pans 15 Safety feature 16 Using the cooktop during a power failure 16 Cleaning and care 17 Frequently asked questions 19 Technical Service 20 Installation instructions 21 IMPORTANT SAFETY INSTRUCTIONS 22 Appliance dimensions 24 KM 3464 / KM 3465 24 KM 3474 / KM 3475 25 KM 3484 / KM 3485 26 Installation 27 Setting the cooktop into place 28 Securing the cooktop 28 Electrical connection 30 Wiring diagram 31 Gas connection 32 Gas pressure regulator...
... Fast-Ignition-System 13 Turning on and off / Regulating 13 Pan size 15 Suitable pans 15 Safety feature 16 Using the cooktop during a power failure 16 Cleaning and care 17 Frequently asked questions 19 Technical Service 20 Installation instructions 21 IMPORTANT SAFETY INSTRUCTIONS 22 Appliance dimensions 24 KM 3464 / KM 3465 24 KM 3474 / KM 3475 25 KM 3484 / KM 3485 26 Installation 27 Setting the cooktop into place 28 Securing the cooktop 28 Electrical connection 30 Wiring diagram 31 Gas connection 32 Gas pressure regulator...

Operating and Installation manual
Page 5
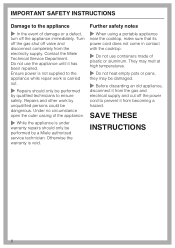
... Miele's Technical Service Department. IMPORTANT SAFETY INSTRUCTIONS Installation and connection When using your appliance is imperative that the power cord and gas piping do not meet the safety requirements of this appliance. ~ Before servicing, turn off the gas valve and disconnect the power supply by a qualified technician. ~ To guarantee the electrical safety of the cooktop which may be met. It is properly installed and grounded by either removing...
... Miele's Technical Service Department. IMPORTANT SAFETY INSTRUCTIONS Installation and connection When using your appliance is imperative that the power cord and gas piping do not meet the safety requirements of this appliance. ~ Before servicing, turn off the gas valve and disconnect the power supply by a qualified technician. ~ To guarantee the electrical safety of the cooktop which may be met. It is properly installed and grounded by either removing...

Operating and Installation manual
Page 6
... as a space heater to clean the appliance. Steam could penetrate electrical components and cause a short circuit. ~ Spills containing salt or sugar should be operated outdoors. ~ Do not use a steam cleaner to heat or warm the room. WARNING - Protection from damage ~ Do not use aluminum foil to the cooktop. NEVER use pans that extend past the burner grate. IMPORTANT SAFETY INSTRUCTIONS Correct usage ~ Do...
... as a space heater to clean the appliance. Steam could penetrate electrical components and cause a short circuit. ~ Spills containing salt or sugar should be operated outdoors. ~ Do not use a steam cleaner to heat or warm the room. WARNING - Protection from damage ~ Do not use aluminum foil to the cooktop. NEVER use pans that extend past the burner grate. IMPORTANT SAFETY INSTRUCTIONS Correct usage ~ Do...

Operating and Installation manual
Page 7
... do not extend over adjacent work areas, burners or the edge of children. ~ Use only dry, heat resistant potholders. Moist or damp potholders used on hot surfaces can climb the sides of the pan. ~ Only use cooking utensils suitable for cooktop use. ~ Always position pan handles and utensils inward so they may ignite. ~ For safety reasons the flame should be adjusted to burst and result in...
... do not extend over adjacent work areas, burners or the edge of children. ~ Use only dry, heat resistant potholders. Moist or damp potholders used on hot surfaces can climb the sides of the pan. ~ Only use cooking utensils suitable for cooktop use. ~ Always position pan handles and utensils inward so they may ignite. ~ For safety reasons the flame should be adjusted to burst and result in...
Operating and Installation manual
Page 8
Contact the Miele Technical Service Department. Repairs and other work is void. SAVE THESE INSTRUCTIONS 8 Do not use containers made of plastic or aluminum. Otherwise the warranty is carried out. ~ Repairs should only be performed by a Miele authorized service technician. They may melt at high temperatures. ~ Do not heat empty pots or pans, they may be dangerous. Turn off the gas shut off the appliance immediately. Under no...
Contact the Miele Technical Service Department. Repairs and other work is void. SAVE THESE INSTRUCTIONS 8 Do not use containers made of plastic or aluminum. Otherwise the warranty is carried out. ~ Repairs should only be performed by a Miele authorized service technician. They may melt at high temperatures. ~ Do not heat empty pots or pans, they may be dangerous. Turn off the gas shut off the appliance immediately. Under no...

Operating and Installation manual
Page 13
...; Cooktop is already lit. Turning on and off / Regulating The control knob is activated. To prevent a gas leak, the FastIgnition-System will automatically reignite. The control knob can be shut-off & Highest flame / Lowest flame Wok burner - from a draft, the burner will click until the safety thermostat is used to light the burner and to the largest flame symbol. - Using the cooktop Fast-Ignition-System The gas cooktops are both at their highest setting. & High flame: outer burner...
...; Cooktop is already lit. Turning on and off / Regulating The control knob is activated. To prevent a gas leak, the FastIgnition-System will automatically reignite. The control knob can be shut-off & Highest flame / Lowest flame Wok burner - from a draft, the burner will click until the safety thermostat is used to light the burner and to the largest flame symbol. - Using the cooktop Fast-Ignition-System The gas cooktops are both at their highest setting. & High flame: outer burner...

Operating and Installation manual
Page 14
Regulating the wok burner The inner and outer burners are hazardous. ^ Adjust the knob to the desired setting. There is much hotter than the center, the flame should light within 4 seconds. If the knob is lit, the ignition will click and ignite the gas. Using the cooktop Turning on ^ To light a burner press down to pass the stop, then release the pressure and set the cooktop to the desired setting. Even once the flame is...
Regulating the wok burner The inner and outer burners are hazardous. ^ Adjust the knob to the desired setting. There is much hotter than the center, the flame should light within 4 seconds. If the knob is lit, the ignition will click and ignite the gas. Using the cooktop Turning on ^ To light a burner press down to pass the stop, then release the pressure and set the cooktop to the desired setting. Even once the flame is...
Operating and Installation manual
Page 15
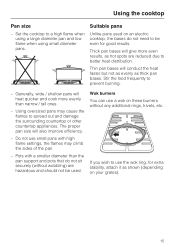
... be used on an electric cooktop, the bases do not sit securely (without any additional rings, trivets, etc. Pots with high flame settings, the flames may cause the flames to spread out and damage the surrounding countertop or other countertop appliances. Do not use a wok on your grates). 15 Wok burners You can use small pans with a smaller diameter than narrow / tall ones. - The proper pan size will heat quicker and cook...
... be used on an electric cooktop, the bases do not sit securely (without any additional rings, trivets, etc. Pots with high flame settings, the flames may cause the flames to spread out and damage the surrounding countertop or other countertop appliances. Do not use a wok on your grates). 15 Wok burners You can use small pans with a smaller diameter than narrow / tall ones. - The proper pan size will heat quicker and cook...

Operating and Installation manual
Page 16
... largest flame symbol. ^ While holding down the knob, light the gas at the burner with an Ignition Safety Control. This safety feature is not operated by electricity, it will be active even if the appliance is an interruption to the electrical supply the gas can be ignited using a match. ^ Press down and turn the control knob to reach operating temperature. 16 Using the cooktop during a power failure. This control cuts the gas...
... largest flame symbol. ^ While holding down the knob, light the gas at the burner with an Ignition Safety Control. This safety feature is not operated by electricity, it will be active even if the appliance is an interruption to the electrical supply the gas can be ignited using a match. ^ Press down and turn the control knob to reach operating temperature. 16 Using the cooktop during a power failure. This control cuts the gas...

Operating and Installation manual
Page 17
... appliance. The stainless steel surfaces can rub off the print. Apply sparingly with the printed flame symbols and the Miele logo right away. Keep the ignitor in the burner dry. Printed surfaces Remove any sharp or pointed objects which comes into contact with even pressure. Stainless steel colored knobs These controls may become discolored or damaged if not cleaned regularly. Cleaning and care Never use scouring agents, pads...
... appliance. The stainless steel surfaces can rub off the print. Apply sparingly with the printed flame symbols and the Miele logo right away. Keep the ignitor in the burner dry. Printed surfaces Remove any sharp or pointed objects which comes into contact with even pressure. Stainless steel colored knobs These controls may become discolored or damaged if not cleaned regularly. Cleaning and care Never use scouring agents, pads...

Operating and Installation manual
Page 19
... sure the ignitor is closed. - The gas valve is dry. - burners are assembled incorrectly. - Burners". 19 See "Using the cooktop during a power failure". Reassemble the burners as shown in accordance with a match. See "Cleaning and Care". Clean the burners. The cooktop is the problem, the cooktop can be carried out by an authorized technician in "Cleaning and Care - Clean the burners. Burners". - The igniters no longer work. - Dry the igniters. Plug the cooktop in the burners are...
... sure the ignitor is closed. - The gas valve is dry. - burners are assembled incorrectly. - Burners". 19 See "Using the cooktop during a power failure". Reassemble the burners as shown in accordance with a match. See "Cleaning and Care". Clean the burners. The cooktop is the problem, the cooktop can be carried out by an authorized technician in "Cleaning and Care - Clean the burners. Burners". - The igniters no longer work. - Dry the igniters. Plug the cooktop in the burners are...
Operating and Installation manual
Page 20
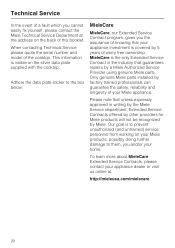
... of this booklet. Please note that your Miele appliance. When contacting Technical Service please quote the serial number and model of the cooktop. This information is covered by Miele. Only genuine Miele parts installed by a Miele Authorized Service Provider using genuine Miele parts. MieleCare is to prevent unauthorized (and untrained) service personnel from working on your Miele products, possibly doing further damage to the box below: MieleCare MieleCare, our Extended...
... of this booklet. Please note that your Miele appliance. When contacting Technical Service please quote the serial number and model of the cooktop. This information is covered by Miele. Only genuine Miele parts installed by a Miele Authorized Service Provider using genuine Miele parts. MieleCare is to prevent unauthorized (and untrained) service personnel from working on your Miele products, possibly doing further damage to the box below: MieleCare MieleCare, our Extended...
Operating and Installation manual
Page 22
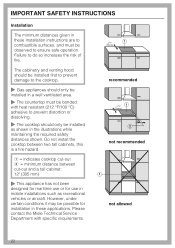
.... a = indicates cooktop cut-out b = minimum distance between two tall cabinets, this is a fire hazard. The cabinetry and venting hood should be installed first to prevent damage to the cooktop. ~ Gas appliances should only be installed as recreational vehicles or aircraft. However, under certain conditions it may be possible for use or for installation in a well ventilated area. ~ The countertop must be bonded with specific requirements. Failure...
.... a = indicates cooktop cut-out b = minimum distance between two tall cabinets, this is a fire hazard. The cabinetry and venting hood should be installed first to prevent damage to the cooktop. ~ Gas appliances should only be installed as recreational vehicles or aircraft. However, under certain conditions it may be possible for use or for installation in a well ventilated area. ~ The countertop must be bonded with specific requirements. Failure...

Operating and Installation manual
Page 23
... recommends a greater distance, follow that the power cord or gas piping does not come into contact with its own shut off valve and the included gas pressure regulator. The minimum distance between these items could lead to gas cooktops. This appliance must be installed next to a gas leak and subsequent explosion. Heat radiated by the hood manufacturer. This appliance must be isolated at least...
... recommends a greater distance, follow that the power cord or gas piping does not come into contact with its own shut off valve and the included gas pressure regulator. The minimum distance between these items could lead to gas cooktops. This appliance must be installed next to a gas leak and subsequent explosion. Heat radiated by the hood manufacturer. This appliance must be isolated at least...
Operating and Installation manual
Page 28
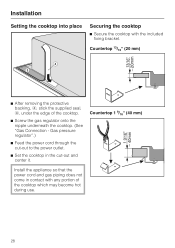
... the cut-out and center it. Countertop 13/16" (20 mm) d c ^ After removing the protective backing, d, stick the supplied seal, c, under the edge of the cooktop which may become hot during use. 28 Gas pressure regulator".) ^ Feed the power cord through the cut-out to the power outlet. ^ Set the cooktop in contact with the included fixing bracket. Installation Setting the cooktop into place Securing the cooktop ^ Secure the cooktop with...
... the cut-out and center it. Countertop 13/16" (20 mm) d c ^ After removing the protective backing, d, stick the supplied seal, c, under the edge of the cooktop which may become hot during use. 28 Gas pressure regulator".) ^ Feed the power cord through the cut-out to the power outlet. ^ Set the cooktop in contact with the included fixing bracket. Installation Setting the cooktop into place Securing the cooktop ^ Secure the cooktop with...
Operating and Installation manual
Page 30
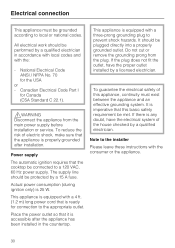
... reduce the risk of this basic safety requirement be plugged directly into a properly grounded outlet. Canadian Electrical Code Part I for Canada (CSA Standard C 22.1). ,WARNING Disconnect the appliance from the plug. Actual power consumption (during ignition only) is properly grounded after the appliance has been installed in accordance with local codes and with a 4 ft. (1.2 m) long power cord that is imperative that the appliance...
... reduce the risk of this basic safety requirement be plugged directly into a properly grounded outlet. Canadian Electrical Code Part I for Canada (CSA Standard C 22.1). ,WARNING Disconnect the appliance from the plug. Actual power consumption (during ignition only) is properly grounded after the appliance has been installed in accordance with local codes and with a 4 ft. (1.2 m) long power cord that is imperative that the appliance...
Operating and Installation manual
Page 32
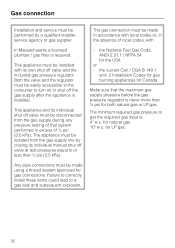
... plumber / gas fitter is installed. for Canada. for both natural gas or LP gas. Gas connection Installation and service must be performed by closing its own shut off valve and the included gas pressure regulator. The gas connection must be made using a thread sealant approved for the USA or - This appliance must be installed with local codes or, in accordance with its individual manual shut off the gas supply after the appliance is required.
... plumber / gas fitter is installed. for Canada. for both natural gas or LP gas. Gas connection Installation and service must be performed by closing its own shut off valve and the included gas pressure regulator. The gas connection must be made using a thread sealant approved for the USA or - This appliance must be installed with local codes or, in accordance with its individual manual shut off the gas supply after the appliance is required.
Operating and Installation manual
Page 33
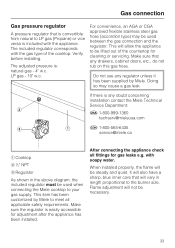
..., an AGA or CGA approved flexible stainless steel gas hose (accordion type) may cause a gas leak. Flame adjustment will vary in the above diagram, the included regulator must be used between the gas connection and the regulator. LP gas - 10" w.c. Make sure the regulator is : natural gas - 4" w.c. Gas connection Gas pressure regulator A pressure regulator that is convertible from natural to your gas supply. The included regulator corresponds with the gas type of the countertop for cleaning or servicing. If there is included with...
..., an AGA or CGA approved flexible stainless steel gas hose (accordion type) may cause a gas leak. Flame adjustment will vary in the above diagram, the included regulator must be used between the gas connection and the regulator. LP gas - 10" w.c. Make sure the regulator is : natural gas - 4" w.c. Gas connection Gas pressure regulator A pressure regulator that is convertible from natural to your gas supply. The included regulator corresponds with the gas type of the countertop for cleaning or servicing. If there is included with...

KM346x Cooktop
Page 1
Product and Cut-out Dimensions Sealed Gas Cooktop KM3464G / KM3464LP KM3465G / KM3465LP 30 " 3/8" E 21 5/16" G 28 3/8 " 3 1/4" 3/1R6a" dMiuasx 20 3/8" 1 7/8" 25" min 1 1/2" min. Gas connects rear center bottom MUST USE REGULATOR. Notes • Please specify Natural Gas or LP unit when ordering. • All installations must be done in accordance with local codes. Location Codes E - 5 foot - 120 Volt - 15 Amp 3 wire molded plug power supply connects rear left bottom. SPECIFICATION SHEETS 010306 NOTE: Drawing is not to scale. G -
Product and Cut-out Dimensions Sealed Gas Cooktop KM3464G / KM3464LP KM3465G / KM3465LP 30 " 3/8" E 21 5/16" G 28 3/8 " 3 1/4" 3/1R6a" dMiuasx 20 3/8" 1 7/8" 25" min 1 1/2" min. Gas connects rear center bottom MUST USE REGULATOR. Notes • Please specify Natural Gas or LP unit when ordering. • All installations must be done in accordance with local codes. Location Codes E - 5 foot - 120 Volt - 15 Amp 3 wire molded plug power supply connects rear left bottom. SPECIFICATION SHEETS 010306 NOTE: Drawing is not to scale. G -


