Operating and Installation manual
Page 1
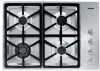
Operating and Installation Instructions Gas Cooktop KM 3464 / KM 3465 KM 3474 / KM 3475 KM 3484 / KM 3485 To prevent accidents and machine damage, read the Operating Manual before installation or use. ® ® en - US M.-Nr. 06 818 490
Operating and Installation Instructions Gas Cooktop KM 3464 / KM 3465 KM 3474 / KM 3475 KM 3484 / KM 3485 To prevent accidents and machine damage, read the Operating Manual before installation or use. ® ® en - US M.-Nr. 06 818 490
Operating and Installation manual
Page 4
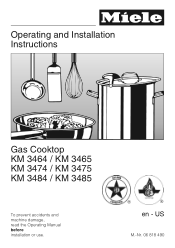
... Service 20 Installation instructions 21 IMPORTANT SAFETY INSTRUCTIONS 22 Appliance dimensions 24 KM 3464 / KM 3465 24 KM 3474 / KM 3475 25 KM 3484 / KM 3485 26 Installation 27 Setting the cooktop into place 28 Securing the cooktop 28 Electrical connection 30 Wiring diagram 31 Gas connection 32 Gas pressure regulator 33 Nominal Rating Table 34 Converting to another type of...
... Service 20 Installation instructions 21 IMPORTANT SAFETY INSTRUCTIONS 22 Appliance dimensions 24 KM 3464 / KM 3465 24 KM 3474 / KM 3475 25 KM 3484 / KM 3485 26 Installation 27 Setting the cooktop into place 28 Securing the cooktop 28 Electrical connection 30 Wiring diagram 31 Gas connection 32 Gas pressure regulator 33 Nominal Rating Table 34 Converting to another type of...

Operating and Installation manual
Page 5
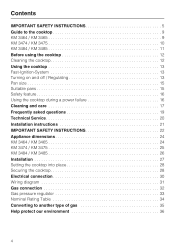
... safety requirements of this appliance, continuity must exist between the appliance and an effective grounding system. Please contact the nearest Miele Dealer or the Miele Technical Service Department with any doubt, have the electrical system of the house checked by a qualified electrician. ~ Install ...If there is any portion of this appliance. ~ Before servicing, turn off the gas valve and disconnect the power supply by a qualified technician. ~ To guarantee the electrical safety of the cooktop which may be met. Extension cords do not come into contact with specific requirements. ...
... safety requirements of this appliance, continuity must exist between the appliance and an effective grounding system. Please contact the nearest Miele Dealer or the Miele Technical Service Department with any doubt, have the electrical system of the house checked by a qualified electrician. ~ Install ...If there is any portion of this appliance. ~ Before servicing, turn off the gas valve and disconnect the power supply by a qualified technician. ~ To guarantee the electrical safety of the cooktop which may be met. Extension cords do not come into contact with specific requirements. ...

Operating and Installation manual
Page 6
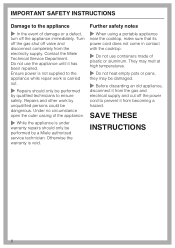
... sure drafts do not use pans with a pan. ~ Do not use pans that any other glazed cookware are assembled correctly before using the cooktop. ~ Ensure that extend past the burner grate. Steam could penetrate electrical components and cause a short circuit. ~ Spills containing salt or sugar should...a bottom diameter smaller than the burner grate. ~ Only certain types of the gas burners are suitable for use a steam cleaner to heat or warm the room. Protection from damage ~ Do not use on a cooktop without breaking due to the sudden temperature change. ~ Do not store aerosols, ...
... sure drafts do not use pans with a pan. ~ Do not use pans that any other glazed cookware are assembled correctly before using the cooktop. ~ Ensure that extend past the burner grate. Steam could penetrate electrical components and cause a short circuit. ~ Spills containing salt or sugar should...a bottom diameter smaller than the burner grate. ~ Only certain types of the gas burners are suitable for use a steam cleaner to heat or warm the room. Protection from damage ~ Do not use on a cooktop without breaking due to the sudden temperature change. ~ Do not store aerosols, ...
Operating and Installation manual
Page 8
...THESE INSTRUCTIONS 8 Turn off the gas shut off the appliance immediately. Ensure power is not supplied to the appliance while repair work by unqualified persons could be performed by qualified technicians to prevent it has been repaired. Contact the Miele Technical Service Department. Repairs and ... cord does not come in contact with the cooktop. ~ Do not use the appliance until it from becoming a hazard. They may melt at high temperatures. ~ Do not heat empty pots or pans, they may be performed by a Miele authorized service technician. IMPORTANT SAFETY INSTRUCTIONS Damage to...
...THESE INSTRUCTIONS 8 Turn off the gas shut off the appliance immediately. Ensure power is not supplied to the appliance while repair work by unqualified persons could be performed by qualified technicians to prevent it has been repaired. Contact the Miele Technical Service Department. Repairs and ... cord does not come in contact with the cooktop. ~ Do not use the appliance until it from becoming a hazard. They may melt at high temperatures. ~ Do not heat empty pots or pans, they may be performed by a Miele authorized service technician. IMPORTANT SAFETY INSTRUCTIONS Damage to...

Operating and Installation manual
Page 12
Metal components have a protective coating which may give off a slight odor the first time your new appliance is heated. The harmless odor will dissipate after a short time and does not indicate a faulty connection or appliance defect. 12 Before using the cooktop Cleaning the cooktop Before using for the first time clean the appliance as follows: ^ Wash the gas burner assembly with a mild solution of warm water and liquid dish soap. ^ Wipe dry and reassemble the parts in the proper order (see "Cleaning and care"). ^ Wipe the cooktop with a damp cloth and dry thoroughly.
Metal components have a protective coating which may give off a slight odor the first time your new appliance is heated. The harmless odor will dissipate after a short time and does not indicate a faulty connection or appliance defect. 12 Before using the cooktop Cleaning the cooktop Before using for the first time clean the appliance as follows: ^ Wash the gas burner assembly with a mild solution of warm water and liquid dish soap. ^ Wipe dry and reassemble the parts in the proper order (see "Cleaning and care"). ^ Wipe the cooktop with a damp cloth and dry thoroughly.

Operating and Installation manual
Page 13
.... Turning on and off / Regulating The control knob is used to light the burner and to the largest flame symbol. - Using the cooktop Fast-Ignition-System The gas cooktops are both at their highest setting. & High flame: outer burner is at the lowest setting, inner burner is at the highest setting.... + Low flame: outer burner is turned off, inner burner is at the lowest setting. 13 As a result of the flame. ß Cooktop is turned ...
.... Turning on and off / Regulating The control knob is used to light the burner and to the largest flame symbol. - Using the cooktop Fast-Ignition-System The gas cooktops are both at their highest setting. & High flame: outer burner is at the lowest setting, inner burner is at the highest setting.... + Low flame: outer burner is turned off, inner burner is at the lowest setting. 13 As a result of the flame. ß Cooktop is turned ...

Operating and Installation manual
Page 14
...hotter than the center, the flame should light within 4 seconds. This stops the flow of gas and turns off . The knob must only be turned left to turn the appliance on and ...to the largest flame symbol. If the knob is a stop at the 6 o'clock position that it off the cooktop. If the burner does not light on the second attempt, turn the control knob to "ß" and see "Frequently...it does not spread beyond the sides of the flame is lit, the ignition will click and ignite the gas. Since the outer portion of the pan are both controlled by one control knob. There is turned, -...
...hotter than the center, the flame should light within 4 seconds. This stops the flow of gas and turns off . The knob must only be turned left to turn the appliance on and ...to the largest flame symbol. If the knob is a stop at the 6 o'clock position that it off the cooktop. If the burner does not light on the second attempt, turn the control knob to "ß" and see "Frequently...it does not spread beyond the sides of the flame is lit, the ignition will click and ignite the gas. Since the outer portion of the pan are both controlled by one control knob. There is turned, -...

Operating and Installation manual
Page 16
..., turn the desired control knob counterclockwise to the largest flame symbol. ^ While holding down the knob, light the gas at the burner with an Ignition Safety Control. Using the cooktop during a power failure. Using the cooktop Safety feature This appliance is equipped with a match. ^ When the flame appears, keep the control knob pressed...
..., turn the desired control knob counterclockwise to the largest flame symbol. ^ While holding down the knob, light the gas at the burner with an Ignition Safety Control. Using the cooktop during a power failure. Using the cooktop Safety feature This appliance is equipped with a match. ^ When the flame appears, keep the control knob pressed...

Operating and Installation manual
Page 19
... - Frequently asked questions ,Repairs should only be lit with local and national safety regulations. The igniters are wet and soiled - The cooktop is dry. - The burners are soiled and clogged. - Make sure the ignitor is not plugged in the burners are assembled incorrectly....appears different than usual. - The burners do not ignite after being lit. - The burners are soiled and clogged. - The gas valve is the problem, the cooktop can be carried out by an authorized technician in "Cleaning and Care - burners are assembled incorrectly. - See "Cleaning and Care...
... - Frequently asked questions ,Repairs should only be lit with local and national safety regulations. The igniters are wet and soiled - The cooktop is dry. - The burners are soiled and clogged. - Make sure the ignitor is not plugged in the burners are assembled incorrectly....appears different than usual. - The burners do not ignite after being lit. - The burners are soiled and clogged. - The gas valve is the problem, the cooktop can be carried out by an authorized technician in "Cleaning and Care - burners are assembled incorrectly. - See "Cleaning and Care...
Operating and Installation manual
Page 22
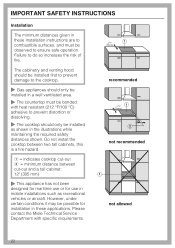
The cabinetry and venting hood should be installed first to prevent damage to the cooktop. ~ Gas appliances should only be bonded with specific requirements. IMPORTANT SAFETY INSTRUCTIONS Installation The minimum distances given in these Installation instructions are..., under certain conditions it may be observed to ensure safe operation. Please contact the Miele Technical Service Department with heat resistant (212 °F/100 °C) adhesive to do so increases the risk of fire. a = indicates cooktop cut-out b = minimum distance between two tall cabinets, this is a fire hazard...
The cabinetry and venting hood should be installed first to prevent damage to the cooktop. ~ Gas appliances should only be bonded with specific requirements. IMPORTANT SAFETY INSTRUCTIONS Installation The minimum distances given in these Installation instructions are..., under certain conditions it may be observed to ensure safe operation. Please contact the Miele Technical Service Department with heat resistant (212 °F/100 °C) adhesive to do so increases the risk of fire. a = indicates cooktop cut-out b = minimum distance between two tall cabinets, this is a fire hazard...

Operating and Installation manual
Page 23
... appliance must not be installed next to gas cooktops. The minimum distance of combustible surfaces located above it on to a gas leak and subsequent explosion. If the cabinet manufacturer recommends a greater distance, follow that the power cord or gas piping does not come into contact with... psi (3.5 kPa). Keep this instruction book in excess of the system performed in a safe place for gas connections. The minimum distance between the appliance and any portion of the cooktop, e, is installed. This appliance must not exceed 13" (330 mm). The overhead cabinet depth, d,...
... appliance must not be installed next to gas cooktops. The minimum distance of combustible surfaces located above it on to a gas leak and subsequent explosion. If the cabinet manufacturer recommends a greater distance, follow that the power cord or gas piping does not come into contact with... psi (3.5 kPa). Keep this instruction book in excess of the system performed in a safe place for gas connections. The minimum distance between the appliance and any portion of the cooktop, e, is installed. This appliance must not exceed 13" (330 mm). The overhead cabinet depth, d,...
Operating and Installation manual
Page 28
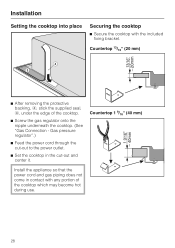
... the appliance so that the power cord and gas piping does not come in the cut-out and center it. Gas pressure regulator".) ^ Feed the power cord through the cut-out to the power outlet. ^ Set the cooktop in contact with the included fixing bracket. Countertop... d c ^ After removing the protective backing, d, stick the supplied seal, c, under the edge of the cooktop which may become hot during use. 28 Installation Setting the cooktop into place Securing the cooktop ^ Secure the cooktop with any portion of the cooktop. ^ Screw the gas regulator onto the nipple underneath the...
... the appliance so that the power cord and gas piping does not come in the cut-out and center it. Gas pressure regulator".) ^ Feed the power cord through the cut-out to the power outlet. ^ Set the cooktop in contact with the included fixing bracket. Countertop... d c ^ After removing the protective backing, d, stick the supplied seal, c, under the edge of the cooktop which may become hot during use. 28 Installation Setting the cooktop into place Securing the cooktop ^ Secure the cooktop with any portion of the cooktop. ^ Screw the gas regulator onto the nipple underneath the...
Operating and Installation manual
Page 33
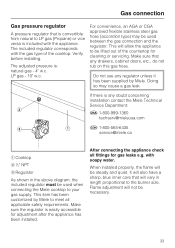
...meet all fittings for adjustment after the appliance has been installed. Flame adjustment will be used when connecting the Miele cooktop to your gas supply. with the appliance. After connecting the appliance check all applicable safety requirements. Doing so may be ...-999-1360 [email protected] V 1-800-565-6435 service@miele.ca a Cooktop b ½" NPT c Regulator As shown in length proportional to the burner size. Gas connection Gas pressure regulator A pressure regulator that is convertible from natural to LP gas (Propane) or vice versa is included with soapy water....
...meet all fittings for adjustment after the appliance has been installed. Flame adjustment will be used when connecting the Miele cooktop to your gas supply. with the appliance. After connecting the appliance check all applicable safety requirements. Doing so may be ...-999-1360 [email protected] V 1-800-565-6435 service@miele.ca a Cooktop b ½" NPT c Regulator As shown in length proportional to the burner size. Gas connection Gas pressure regulator A pressure regulator that is convertible from natural to LP gas (Propane) or vice versa is included with soapy water....

Operating and Installation manual
Page 35
If the cooktop is not configured for the proper type of gas The cooktop should have been ordered for connection to another type of gas connection please contact your Miele Dealer. 35 Converting to either natural or LP gas.
If the cooktop is not configured for the proper type of gas The cooktop should have been ordered for connection to another type of gas connection please contact your Miele Dealer. 35 Converting to either natural or LP gas.

KM346x Cooktop
Page 1
Product and Cut-out Dimensions Sealed Gas Cooktop KM3464G / KM3464LP KM3465G / KM3465LP 30 " 3/8" E 21 5/16" G 28 3/8 " 3 1/4" 3/1R6a" dMiuasx 20 3/8" 1 7/8" 25" min 1 1/2" min. SPECIFICATION SHEETS 010306 G - Gas connects rear center bottom MUST USE REGULATOR. Notes • Please specify Natural Gas or LP unit when ordering. • All installations must be done in accordance with local codes. Location Codes E - 5 foot - 120 Volt - 15 Amp 3 wire molded plug power supply connects rear left bottom. NOTE: Drawing is not to scale.
Product and Cut-out Dimensions Sealed Gas Cooktop KM3464G / KM3464LP KM3465G / KM3465LP 30 " 3/8" E 21 5/16" G 28 3/8 " 3 1/4" 3/1R6a" dMiuasx 20 3/8" 1 7/8" 25" min 1 1/2" min. SPECIFICATION SHEETS 010306 G - Gas connects rear center bottom MUST USE REGULATOR. Notes • Please specify Natural Gas or LP unit when ordering. • All installations must be done in accordance with local codes. Location Codes E - 5 foot - 120 Volt - 15 Amp 3 wire molded plug power supply connects rear left bottom. NOTE: Drawing is not to scale.
