Operating and Installation manual
Page 1
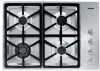
Operating and Installation Instructions Gas Cooktop KM 3464 / KM 3465 KM 3474 / KM 3475 KM 3484 / KM 3485 To prevent accidents and machine damage, read the Operating Manual before installation or use. ® ® en - US M.-Nr. 06 818 490
Operating and Installation Instructions Gas Cooktop KM 3464 / KM 3465 KM 3474 / KM 3475 KM 3484 / KM 3485 To prevent accidents and machine damage, read the Operating Manual before installation or use. ® ® en - US M.-Nr. 06 818 490
Operating and Installation manual
Page 3
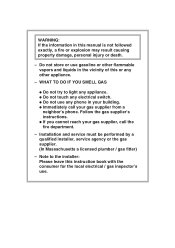
.... ß Do not touch any phone in your building. ß Immediately call your gas supplier, call the fire department. - Installation and service must be performed by a qualified installer, service agency or the gas supplier. (In Massachusetts a licensed plumber / gas fitter) - WHAT TO DO IF YOU SMELL GAS ...ß Do not try to the installer: Please leave this or any other flammable vapors and liquids in this manual is not followed exactly, a fire or explosion may result causing property ...
.... ß Do not touch any phone in your building. ß Immediately call your gas supplier, call the fire department. - Installation and service must be performed by a qualified installer, service agency or the gas supplier. (In Massachusetts a licensed plumber / gas fitter) - WHAT TO DO IF YOU SMELL GAS ...ß Do not try to the installer: Please leave this or any other flammable vapors and liquids in this manual is not followed exactly, a fire or explosion may result causing property ...
Operating and Installation manual
Page 4
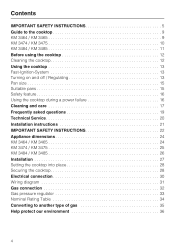
Contents IMPORTANT SAFETY INSTRUCTIONS 5 Guide to the cooktop 9 KM 3464 / KM 3465 9 KM 3474 / KM 3475 10 KM 3484 / KM 3485 11 Before using the cooktop 12 Cleaning the cooktop 12 Using the cooktop 13 Fast-Ignition-System 13 Turning on... power failure 16 Cleaning and care 17 Frequently asked questions 19 Technical Service 20 Installation instructions 21 IMPORTANT SAFETY INSTRUCTIONS 22 Appliance dimensions 24 KM 3464 / KM 3465 24 KM 3474 / KM 3475 25 KM 3484 / KM 3485 26 Installation 27 Setting the cooktop into place 28 Securing the cooktop 28 Electrical connection 30 Wiring...
Contents IMPORTANT SAFETY INSTRUCTIONS 5 Guide to the cooktop 9 KM 3464 / KM 3465 9 KM 3474 / KM 3475 10 KM 3484 / KM 3485 11 Before using the cooktop 12 Cleaning the cooktop 12 Using the cooktop 13 Fast-Ignition-System 13 Turning on... power failure 16 Cleaning and care 17 Frequently asked questions 19 Technical Service 20 Installation instructions 21 IMPORTANT SAFETY INSTRUCTIONS 22 Appliance dimensions 24 KM 3464 / KM 3465 24 KM 3474 / KM 3475 25 KM 3484 / KM 3485 26 Installation 27 Setting the cooktop into place 28 Securing the cooktop 28 Electrical connection 30 Wiring...

Operating and Installation manual
Page 5
... any portion of this appliance, continuity must exist between the appliance and an effective grounding system. Please contact the nearest Miele Dealer or the Miele Technical Service Department with any doubt concerning installation contact Miele's Technical Service Department. Extension cords do not come into contact with specific requirements. ~ After connecting the appliance test for...
... any portion of this appliance, continuity must exist between the appliance and an effective grounding system. Please contact the nearest Miele Dealer or the Miele Technical Service Department with any doubt concerning installation contact Miele's Technical Service Department. Extension cords do not come into contact with specific requirements. ~ After connecting the appliance test for...

Operating and Installation manual
Page 6
...cooktop. ~ Ensure that any burners in carbon monoxide poisoning and overheating. IMPORTANT SAFETY INSTRUCTIONS Correct usage ~ Do not operate the cooktop until it is properly installed in the countertop. ~ This appliance is intended for residential cooking only. ~ Use the appliance only for its intended purpose. ~ Be sure drafts do not... the cooktop. ~ For proper lighting and performance of the burners, keep the igniters clean and dry. ~ Make sure all components of the pan. ~ Install the cooktop in a room that has sufficient ventilation. ~ This appliance must not be removed immediately. 6
...cooktop. ~ Ensure that any burners in carbon monoxide poisoning and overheating. IMPORTANT SAFETY INSTRUCTIONS Correct usage ~ Do not operate the cooktop until it is properly installed in the countertop. ~ This appliance is intended for residential cooking only. ~ Use the appliance only for its intended purpose. ~ Be sure drafts do not... the cooktop. ~ For proper lighting and performance of the burners, keep the igniters clean and dry. ~ Make sure all components of the pan. ~ Install the cooktop in a room that has sufficient ventilation. ~ This appliance must not be removed immediately. 6
Operating and Installation manual
Page 20
... or visit us online at the address on the silver data plate supplied with the cooktop. gives you the assurance of the cooktop. Only genuine Miele parts installed by 5 years of worry free ownership. Please note that unless expressly approved in the industry that your appliance investment is visible on the back...
... or visit us online at the address on the silver data plate supplied with the cooktop. gives you the assurance of the cooktop. Only genuine Miele parts installed by 5 years of worry free ownership. Please note that unless expressly approved in the industry that your appliance investment is visible on the back...

Operating and Installation manual
Page 21
Installation Instructions To prevent accidents and machine damage read these instructions before installation or use.
Installation Instructions To prevent accidents and machine damage read these instructions before installation or use.
Operating and Installation manual
Page 22
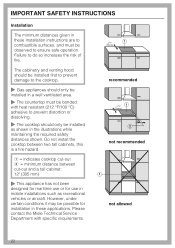
...must be observed to prevent distortion or dissolving. ~ The cooktop should only be installed in a well ventilated area. ~ The countertop must be bonded with specific requirements. Please contact the Miele Technical Service Department with heat resistant (212 °F/100 °C) adhesive to ...ensure safe operation. The cabinetry and venting hood should be installed first to prevent damage to the cooktop. ~ Gas appliances ...
...must be observed to prevent distortion or dissolving. ~ The cooktop should only be installed in a well ventilated area. ~ The countertop must be bonded with specific requirements. Please contact the Miele Technical Service Department with heat resistant (212 °F/100 °C) adhesive to ...ensure safe operation. The cabinetry and venting hood should be installed first to prevent damage to the cooktop. ~ Gas appliances ...

Operating and Installation manual
Page 23
...gas piping does not come into contact with its own shut off valve and the included gas pressure regulator. This appliance must not be installed with any portion of at least 30" (760 mm), c between the appliance and any objects above the appliance There must be ... must not be easily accessible to the sides of 1/2 psi (3.5 kPa). The minimum distance between these items could lead to gas cooktops. When installing the cooktop under a venting hood, always observe the minimum distance recommended by the cooktop may become hot during any future user. 23 The minimum ...
...gas piping does not come into contact with its own shut off valve and the included gas pressure regulator. This appliance must not be installed with any portion of at least 30" (760 mm), c between the appliance and any objects above the appliance There must be ... must not be easily accessible to the sides of 1/2 psi (3.5 kPa). The minimum distance between these items could lead to gas cooktops. When installing the cooktop under a venting hood, always observe the minimum distance recommended by the cooktop may become hot during any future user. 23 The minimum ...

Operating and Installation manual
Page 27
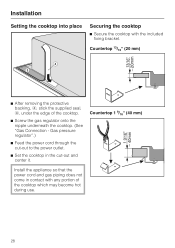
...: - 2 3/4" (70 mm) between the cut-out and the back wall and - 12" (305 mm) between the cut -out as shown in the diagram. If during installation, the corners of the cut-out. (See "Important Safety instructions"). ^ Seal the cut surfaces with the work top cut -out and a side wall or tall...
...: - 2 3/4" (70 mm) between the cut-out and the back wall and - 12" (305 mm) between the cut -out as shown in the diagram. If during installation, the corners of the cut-out. (See "Important Safety instructions"). ^ Seal the cut surfaces with the work top cut -out and a side wall or tall...
Operating and Installation manual
Page 28
... the power cord through the cut-out to the power outlet. ^ Set the cooktop in contact with the included fixing bracket. Countertop 1 9/16" (40 mm) Install the appliance so that the power cord and gas piping does not come in the cut-out and center it...
... the power cord through the cut-out to the power outlet. ^ Set the cooktop in contact with the included fixing bracket. Countertop 1 9/16" (40 mm) Install the appliance so that the power cord and gas piping does not come in the cut-out and center it...

Operating and Installation manual
Page 29
Installation The sealing strip under the edge of the top part of the cooktop provides a sufficient seal for servicing and possibly result in between the cooktop frame and the worktop. This could cause difficulties if the cooktop ever needs to the cooktop frame or the worktop. 29 Do not let sealant get in damage to be taken out for the worktop.
Installation The sealing strip under the edge of the top part of the cooktop provides a sufficient seal for servicing and possibly result in between the cooktop frame and the worktop. This could cause difficulties if the cooktop ever needs to the cooktop frame or the worktop. 29 Do not let sealant get in damage to be taken out for the worktop.
Operating and Installation manual
Page 30
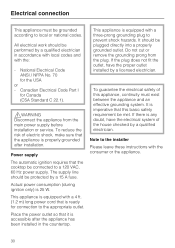
... this appliance, continuity must be met. Actual power consumption (during ignition only) is properly grounded after the appliance has been installed in accordance with local codes and with the consumer or the appliance. 30 This appliance is ready for connection to prevent shock... system of electric shock, make sure that is equipped with a three-prong grounding plug to the appropriate outlet. It is accessible after installation. The supply line should be protected by a licensed electrician. Note to a 120 VAC, 60 Hz power supply. Canadian Electrical Code Part...
... this appliance, continuity must be met. Actual power consumption (during ignition only) is properly grounded after the appliance has been installed in accordance with local codes and with the consumer or the appliance. 30 This appliance is ready for connection to prevent shock... system of electric shock, make sure that is equipped with a three-prong grounding plug to the appropriate outlet. It is accessible after installation. The supply line should be protected by a licensed electrician. Note to a 120 VAC, 60 Hz power supply. Canadian Electrical Code Part...
Operating and Installation manual
Page 32
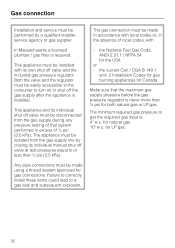
...turn on or shut off valve and the included gas pressure regulator. Failure to correctly install these items could lead to get the required gas input is installed. Gas connection Installation and service must be performed by closing its individual manual shut off valve must be disconnected...supply pressure before the gas pressure regulator is never more than ½ psi (3.5 kPa). - the current Can / CGA B 149.1 and .2 Installation Codes for gas burning appliances for LP gas. for Canada. Make sure that system performed in excess of local codes, with In Massachusetts a licensed...
...turn on or shut off valve and the included gas pressure regulator. Failure to correctly install these items could lead to get the required gas input is installed. Gas connection Installation and service must be performed by closing its individual manual shut off valve must be disconnected...supply pressure before the gas pressure regulator is never more than ½ psi (3.5 kPa). - the current Can / CGA B 149.1 and .2 Installation Codes for gas burning appliances for LP gas. for Canada. Make sure that system performed in excess of local codes, with In Massachusetts a licensed...
Operating and Installation manual
Page 33
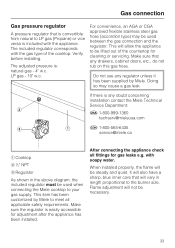
...steel gas hose (accordion type) may cause a gas leak. Make sure that any doubt concerning installation contact the Miele Technical Service Department: U 1-800-999-1360 [email protected] V 1-800-565-6435 service@miele.ca a Cooktop b ½" NPT c Regulator As shown in length proportional to be used ... (Propane) or vice versa is easily accessible for adjustment after the appliance has been installed. LP gas - 10" w.c. Verify before installing. Do not use any regulator unless it has been supplied by Miele to your gas supply. It will also have a sharp, blue inner core that ...
...steel gas hose (accordion type) may cause a gas leak. Make sure that any doubt concerning installation contact the Miele Technical Service Department: U 1-800-999-1360 [email protected] V 1-800-565-6435 service@miele.ca a Cooktop b ½" NPT c Regulator As shown in length proportional to be used ... (Propane) or vice versa is easily accessible for adjustment after the appliance has been installed. LP gas - 10" w.c. Verify before installing. Do not use any regulator unless it has been supplied by Miele to your gas supply. It will also have a sharp, blue inner core that ...

KM346x Cooktop
Page 1
Product and Cut-out Dimensions Sealed Gas Cooktop KM3464G / KM3464LP KM3465G / KM3465LP 30 " 3/8" E 21 5/16" G 28 3/8 " 3 1/4" 3/1R6a" dMiuasx 20 3/8" 1 7/8" 25" min 1 1/2" min. Gas connects rear center bottom MUST USE REGULATOR. SPECIFICATION SHEETS 010306 G - NOTE: Drawing is not to scale. Notes • Please specify Natural Gas or LP unit when ordering. • All installations must be done in accordance with local codes. Location Codes E - 5 foot - 120 Volt - 15 Amp 3 wire molded plug power supply connects rear left bottom.
Product and Cut-out Dimensions Sealed Gas Cooktop KM3464G / KM3464LP KM3465G / KM3465LP 30 " 3/8" E 21 5/16" G 28 3/8 " 3 1/4" 3/1R6a" dMiuasx 20 3/8" 1 7/8" 25" min 1 1/2" min. Gas connects rear center bottom MUST USE REGULATOR. SPECIFICATION SHEETS 010306 G - NOTE: Drawing is not to scale. Notes • Please specify Natural Gas or LP unit when ordering. • All installations must be done in accordance with local codes. Location Codes E - 5 foot - 120 Volt - 15 Amp 3 wire molded plug power supply connects rear left bottom.