Operating and Installation manual
Page 1
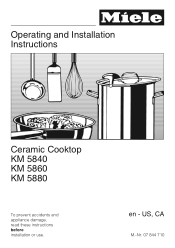
en - Operating and Installation Instructions Ceramic Cooktop KM 5840 KM 5860 KM 5880 To prevent accidents and appliance damage, read these instructions before installation or use. US, CA M.-Nr. 07 844 710
en - Operating and Installation Instructions Ceramic Cooktop KM 5840 KM 5860 KM 5880 To prevent accidents and appliance damage, read these instructions before installation or use. US, CA M.-Nr. 07 844 710
Operating and Installation manual
Page 3
... Setting the timer 22 Turning a burner off automatically 24 Using both timer functions at the same time 25 Safety features 26 Child safety lock / System lock 26 Stop and Go 27 Safety shut-off 28 Overheat protection 29 Cleaning and Care 30 Programming 31 Frequently asked questions 34 Technical Service 37 IMPORTANT INSTALLATION SAFETY INSTRUCTIONS 40 Installation 43 Sealing 44 Tiled surfaces 44 Installation dimensions 45 Installation 48 Electrical connection...
... Setting the timer 22 Turning a burner off automatically 24 Using both timer functions at the same time 25 Safety features 26 Child safety lock / System lock 26 Stop and Go 27 Safety shut-off 28 Overheat protection 29 Cleaning and Care 30 Programming 31 Frequently asked questions 34 Technical Service 37 IMPORTANT INSTALLATION SAFETY INSTRUCTIONS 40 Installation 43 Sealing 44 Tiled surfaces 44 Installation dimensions 45 Installation 48 Electrical connection...

Operating and Installation manual
Page 4
... lock to reach these operating instructions in use the cooktop for residential cooking, and for a future user. Children climbing on the appliance to ensure that any part of children. Keep children away from the appliance. ~ Keep all uniform safety codes and regulations. Other uses are not permitted and can be left unattended in an area where the appliance is hot during use...
... lock to reach these operating instructions in use the cooktop for residential cooking, and for a future user. Children climbing on the appliance to ensure that any part of children. Keep children away from the appliance. ~ Keep all uniform safety codes and regulations. Other uses are not permitted and can be left unattended in an area where the appliance is hot during use...
Operating and Installation manual
Page 5
..., these parts can the manufacturer guarantee the safety of the appliance. ~ Do not cook on a broken cooktop. Consult a qualified electrician if in any damage to the appliance, it has been repaired. 5 Any breakages or cracks in the countertop. ~ Before servicing, disconnect the appliance from the main power supply. Do not use the appliance until repair work should break, cleaning solutions and...
..., these parts can the manufacturer guarantee the safety of the appliance. ~ Do not cook on a broken cooktop. Consult a qualified electrician if in any damage to the appliance, it has been repaired. 5 Any breakages or cracks in the countertop. ~ Before servicing, disconnect the appliance from the main power supply. Do not use the appliance until repair work should break, cleaning solutions and...

Operating and Installation manual
Page 6
... or let clothing or other easily flammable materials underneath or adjacent to touch. ~ Protect your hands with oven mitts or potholders when using the appliance. Use only dry, heat resistant potholders. Items could ignite. Always switch the cooking zone(s) off , the surface may present a fire hazard. ~ Never leave an appliance unattended at high settings or when cooking with a cloth or protective...
... or let clothing or other easily flammable materials underneath or adjacent to touch. ~ Protect your hands with oven mitts or potholders when using the appliance. Use only dry, heat resistant potholders. Items could ignite. Always switch the cooking zone(s) off , the surface may present a fire hazard. ~ Never leave an appliance unattended at high settings or when cooking with a cloth or protective...
Operating and Installation manual
Page 7
...: operating time, high output settings, large cook ware, and number of burners in ignition of any pots and pans are clean, free of clothing or handles becoming hot. Some cleaners may cause damage. ~ Use the proper pan size. cooking grease, accumulate on the appliance. ~ Do not use plastic or aluminum foil cookware. Steam could scratch the cooktop permanently. IMPORTANT SAFETY INSTRUCTIONS ~ Make certain that the power cords of salt...
...: operating time, high output settings, large cook ware, and number of burners in ignition of any pots and pans are clean, free of clothing or handles becoming hot. Some cleaners may cause damage. ~ Use the proper pan size. cooking grease, accumulate on the appliance. ~ Do not use plastic or aluminum foil cookware. Steam could scratch the cooktop permanently. IMPORTANT SAFETY INSTRUCTIONS ~ Make certain that the power cords of salt...

Operating and Installation manual
Page 8
... the cooktop built in the area of the control panel. IMPORTANT SAFETY INSTRUCTIONS ~ Any spills should only be done! These spots can be removed with ceramic glass or stainless steel cleaner (see "Cleaning and Care"). ~ Never heat up an empty pot, unless the manufacturer explicitly allows this can result in a damaged cooktop. ~ NEVER set down hot pots or pans in behind a cabinet door, it should be removed as quickly as...
... the cooktop built in the area of the control panel. IMPORTANT SAFETY INSTRUCTIONS ~ Any spills should only be done! These spots can be removed with ceramic glass or stainless steel cleaner (see "Cleaning and Care"). ~ Never heat up an empty pot, unless the manufacturer explicitly allows this can result in a damaged cooktop. ~ NEVER set down hot pots or pans in behind a cabinet door, it should be removed as quickly as...
Operating and Installation manual
Page 14
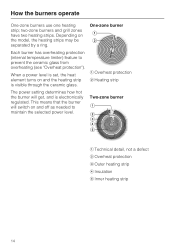
... switch on and off as needed to prevent the ceramic glass from overheating (see "Overheat protection"). When a power level is electronically regulated. One-zone burner Each burner has overheating protection (internal temperature limiter) feature to maintain the selected power level. two-zone burners and grill zones have two heating strips. This means that the burner will get, and is set, the heat element turns on the model, the heating...
... switch on and off as needed to prevent the ceramic glass from overheating (see "Overheat protection"). When a power level is electronically regulated. One-zone burner Each burner has overheating protection (internal temperature limiter) feature to maintain the selected power level. two-zone burners and grill zones have two heating strips. This means that the burner will get, and is set, the heat element turns on the model, the heating...

Operating and Installation manual
Page 20
... they have poor heat transfer and may scratch the cooktop surface. - The residual heat will avoid streaking from friction and scratching. cold hot - Copper bottom and aluminum pans may mar the appearance of the pots/pans should not be removed using a non-abrasive ceramic cooktop cleaner or a shielded scraper blade. Use only pots and pans with convex bottoms will also work adequately. Use a small pot for...
... they have poor heat transfer and may scratch the cooktop surface. - The residual heat will avoid streaking from friction and scratching. cold hot - Copper bottom and aluminum pans may mar the appearance of the pots/pans should not be removed using a non-abrasive ceramic cooktop cleaner or a shielded scraper blade. Use only pots and pans with convex bottoms will also work adequately. Use a small pot for...
Operating and Installation manual
Page 26
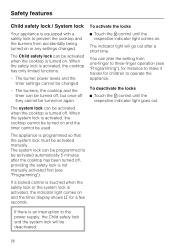
... be used. The burners, the cooktop and the timer can be programmed to be activated when the cooktop is turned off , providing the safety lock is not manually activated first (see "Programming"), for instance to make it harder for a few seconds. If a locked control is touched when the safety lock or the system lock is activated, the indicator light comes on . The burner power levels...
... be used. The burners, the cooktop and the timer can be programmed to be activated when the cooktop is turned off , providing the safety lock is not manually activated first (see "Programming"), for instance to make it harder for a few seconds. If a locked control is touched when the safety lock or the system lock is activated, the indicator light comes on . The burner power levels...

Operating and Installation manual
Page 28
... power level, the cooktop will turn it back on them. Safety features Safety shut-off Safety shut-off for cooking times that boils over or by fingers, food that are too long If a burner is heated for example by an object placed on ^ Clean the control panel or remove the in the timer display. Safety shut-off if the touch controls are covered Your cooktop will turn...
... power level, the cooktop will turn it back on them. Safety features Safety shut-off Safety shut-off for cooking times that boils over or by fingers, food that are too long If a burner is heated for example by an object placed on ^ Clean the control panel or remove the in the timer display. Safety shut-off if the touch controls are covered Your cooktop will turn...
Operating and Installation manual
Page 30
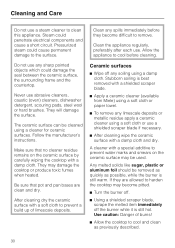
... fumes when heated. Steam could cause permanent damage to remove. If they become pitted. ^ Turn the burner off. ^ Using a shielded scraper blade, scrape the melted item immediately off any spills immediately before cleaning. Pressurized steam could penetrate electrical components and cause a short circuit. Clean any soiling using a cleaner for ceramic surfaces. Ceramic surfaces ^ Wipe off the burner while it is still warm. Follow the manufacturer's instructions. A cleaner...
... fumes when heated. Steam could cause permanent damage to remove. If they become pitted. ^ Turn the burner off. ^ Using a shielded scraper blade, scrape the melted item immediately off any spills immediately before cleaning. Pressurized steam could penetrate electrical components and cause a short circuit. Clean any soiling using a cleaner for ceramic surfaces. Ceramic surfaces ^ Wipe off the burner while it is still warm. Follow the manufacturer's instructions. A cleaner...

Operating and Installation manual
Page 34
... and national safety regulations. The overheat protection automatically turns a burner off "). There may be turned on, contact a qualified electrician or Miele. Reset the circuit breaker or replace the fuse and turn the appliance back on. Deactivate the system lock (see "Programming"). It is in use. Unauthorized repairs could cause injury or appliance damage. The system lock has been activated. "Safety shut-off if the ceramic surface is caused...
... and national safety regulations. The overheat protection automatically turns a burner off "). There may be turned on, contact a qualified electrician or Miele. Reset the circuit breaker or replace the fuse and turn the appliance back on. Deactivate the system lock (see "Programming"). It is in use. Unauthorized repairs could cause injury or appliance damage. The system lock has been activated. "Safety shut-off if the ceramic surface is caused...
Operating and Installation manual
Page 40
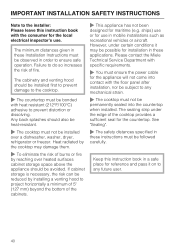
... splashes should also be heat-resistant. ~ The cooktop must not be installed over heated surfaces cabinet storage space above the appliance should be installed first to prevent damage to the cooktop. ~ The countertop must be subject to any future user. 40 See "Sealing". ~ The safety distances specified in these Installation Instructions must be followed carefully. Please contact the Miele Technical Service Department with specific requirements. ~ You must be...
... splashes should also be heat-resistant. ~ The cooktop must not be installed over heated surfaces cabinet storage space above the appliance should be installed first to prevent damage to the cooktop. ~ The countertop must be subject to any future user. 40 See "Sealing". ~ The safety distances specified in these Installation Instructions must be followed carefully. Please contact the Miele Technical Service Department with specific requirements. ~ You must be...

Operating and Installation manual
Page 41
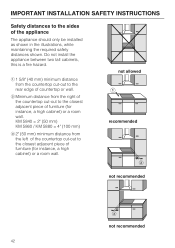
wok burner and electric cooktop), and they have different minimum safety distances, always observe the greater distance. 41 IMPORTANT INSTALLATION SAFETY INSTRUCTIONS Safety distance from divider Installation of the hood for these safety measurements. cabinets, utensil rail, etc.), a minimum safety distance of 30" (760 mm) must be at least 1 3/8"" (35 mm) must be provided between the cooktop and the hood above the appliance The minimum safety...
wok burner and electric cooktop), and they have different minimum safety distances, always observe the greater distance. 41 IMPORTANT INSTALLATION SAFETY INSTRUCTIONS Safety distance from divider Installation of the hood for these safety measurements. cabinets, utensil rail, etc.), a minimum safety distance of 30" (760 mm) must be at least 1 3/8"" (35 mm) must be provided between the cooktop and the hood above the appliance The minimum safety...
Operating and Installation manual
Page 42
... countertop or wall. KM 5840 = 2" (50 mm) KM 5860 / KM 5880 = 4" (100 mm) c 2" (50 mm) minimum distance from the countertop cut -out to the closest adjacent piece of the appliance The appliance should only be installed as shown in the illustrations, while maintaining the required safety distances shown. IMPORTANT INSTALLATION SAFETY INSTRUCTIONS Safety distances to the sides of furniture (for instance, a high cabinet) or a room wall...
... countertop or wall. KM 5840 = 2" (50 mm) KM 5860 / KM 5880 = 4" (100 mm) c 2" (50 mm) minimum distance from the countertop cut -out to the closest adjacent piece of the appliance The appliance should only be installed as shown in the illustrations, while maintaining the required safety distances shown. IMPORTANT INSTALLATION SAFETY INSTRUCTIONS Safety distances to the sides of furniture (for instance, a high cabinet) or a room wall...

Operating and Installation manual
Page 43
... the wall covering c Countertop d Countertop cut-out e Minimum safety distance with flammable materials 2" (50 mm) with the countertop Frame/Facet cooktops a Wall frame b Wall covering x = thickness of wall covering 9/16" (15 mm) 2" (50 mm) - 9/16" (15 mm) = minimum safety distance 1 3/8" (35 mm). Installation Safety distance from the wall covering If a wall covering is made of non-combustible materials (such as wood), the distance between the countertop cut-out and the covering, since high...
... the wall covering c Countertop d Countertop cut-out e Minimum safety distance with flammable materials 2" (50 mm) with the countertop Frame/Facet cooktops a Wall frame b Wall covering x = thickness of wall covering 9/16" (15 mm) 2" (50 mm) - 9/16" (15 mm) = minimum safety distance 1 3/8" (35 mm). Installation Safety distance from the wall covering If a wall covering is made of non-combustible materials (such as wood), the distance between the countertop cut-out and the covering, since high...
Operating and Installation manual
Page 48
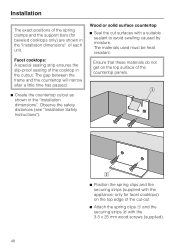
... after a little time has passed. ^ Create the countertop cutout as shown in the cutout. Observe the safety distances (see "Installation Safety Instructions"). Installation The exact positions of the spring clamps and the support bars (for facet cooktops) on the top surface of each unit. The materials used must be heat resistant. Wood or solid surface countertop ^ Seal the cut -out ^ Attach the spring clips a and...
... after a little time has passed. ^ Create the countertop cutout as shown in the cutout. Observe the safety distances (see "Installation Safety Instructions"). Installation The exact positions of the spring clamps and the support bars (for facet cooktops) on the top surface of each unit. The materials used must be heat resistant. Wood or solid surface countertop ^ Seal the cut -out ^ Attach the spring clips a and...

Operating and Installation manual
Page 50
... appliance press down to fit. ^ Connect the appliance to the main power supply (see "Electrical connection"). ^ Turn the appliance on and check the function. The appliance may be carefully filed down evenly on the countertop to ensure an effective seal. This is important to ensure it clicks into the countertop. The appliance can be lifted out using a special tool. When doing...
... appliance press down to fit. ^ Connect the appliance to the main power supply (see "Electrical connection"). ^ Turn the appliance on and check the function. The appliance may be carefully filed down evenly on the countertop to ensure an effective seal. This is important to ensure it clicks into the countertop. The appliance can be lifted out using a special tool. When doing...
Operating and Installation manual
Page 51
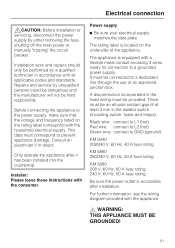
Repairs and service by either removing the fuse, shutting off the main power or manually "tripping" the circuit breaker. This data must be connected to GND (ground) KM 5840 208/240 V, 60 Hz, 40 A fuse rating KM 5860 280/240 V, 60 Hz, 50 A fuse rating KM 5880 208 V, 60 Hz, 60 A fuse rating 240 V, 60 Hz, 50 A fuse rating Be sure the power outlet is located on the rating label correspond with all -pole contact gap...
Repairs and service by either removing the fuse, shutting off the main power or manually "tripping" the circuit breaker. This data must be connected to GND (ground) KM 5840 208/240 V, 60 Hz, 40 A fuse rating KM 5860 280/240 V, 60 Hz, 50 A fuse rating KM 5880 208 V, 60 Hz, 60 A fuse rating 240 V, 60 Hz, 50 A fuse rating Be sure the power outlet is located on the rating label correspond with all -pole contact gap...


