Operating and Installation manual
Page 1
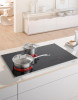
en - US, CA M.-Nr. 07 844 710 Operating and Installation Instructions Ceramic Cooktop KM 5840 KM 5860 KM 5880 To prevent accidents and appliance damage, read these instructions before installation or use.
en - US, CA M.-Nr. 07 844 710 Operating and Installation Instructions Ceramic Cooktop KM 5840 KM 5860 KM 5880 To prevent accidents and appliance damage, read these instructions before installation or use.
Operating and Installation manual
Page 3
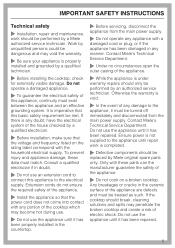
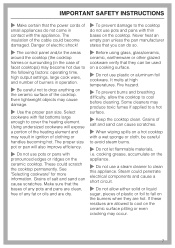
Contents IMPORTANT SAFETY INSTRUCTIONS 4 Description of the appliance 9 Control panel 12 Before using for the first time 13 Clean the cooktop 13 Heat the cooktop 13 How the burners operate 14 Use 15 Turning On 15 Power settings 16 Cooking with Auto-heat 17 Variable burner 18 Turning off and ...
Contents IMPORTANT SAFETY INSTRUCTIONS 4 Description of the appliance 9 Control panel 12 Before using for the first time 13 Clean the cooktop 13 Heat the cooktop 13 How the burners operate 14 Use 15 Turning On 15 Power settings 16 Cooking with Auto-heat 17 Variable burner 18 Turning off and ...

Operating and Installation manual
Page 4
... abilities, or experience with the appliance should not use and remains so for some time after being switched off. Correct usage ~ Only use the cooktop for residential cooking, and for a future user. This appliance conforms to ensure that any future user. Children ~ Use the safety lock to all...material is disposed of safely and kept out of the reach of flammable materials, and spills. ~ Ensure that unsupervised children cannot turn on the cooktop or change the settings. ~ Children should be left unattended in use to sit or stand on the appliance to reduce the risk of burns...
... abilities, or experience with the appliance should not use and remains so for some time after being switched off. Correct usage ~ Only use the cooktop for residential cooking, and for a future user. This appliance conforms to ensure that any future user. Children ~ Use the safety lock to all...material is disposed of safely and kept out of the reach of flammable materials, and spills. ~ Ensure that unsupervised children cannot turn on the cooktop or change the settings. ~ Children should be left unattended in use to sit or stand on the appliance to reduce the risk of burns...
Operating and Installation manual
Page 5
...should only be performed by an authorized service technician. Contact Miele's Technical Service Department. Ensure power is not supplied to the electrical supply. If the cooktop should be replaced by Miele original spare parts only. IMPORTANT SAFETY INSTRUCTIONS Technical safety ... appliance. ~ While the appliance is properly installed and grounded by a qualified technician. ~ Before installing the cooktop, check for externally visible damage. Contact Miele's Technical Service Department. ~ Under no circumstances open the outer casing of the house checked by a qualified electrician...
...should only be performed by an authorized service technician. Contact Miele's Technical Service Department. Ensure power is not supplied to the electrical supply. If the cooktop should be replaced by Miele original spare parts only. IMPORTANT SAFETY INSTRUCTIONS Technical safety ... appliance. ~ While the appliance is properly installed and grounded by a qualified technician. ~ Before installing the cooktop, check for externally visible damage. Contact Miele's Technical Service Department. ~ Under no circumstances open the outer casing of the house checked by a qualified electrician...

Operating and Installation manual
Page 6
... will get hot and can result in use the appliance to cause harm, even though the glow is residual heat, a fire could ignite. When the cooktop is shut off after use . ~ Never cover the burner with oil or fat. Built-up into the hood by the suction and the grease filters...
... will get hot and can result in use the appliance to cause harm, even though the glow is residual heat, a fire could ignite. When the cooktop is shut off after use . ~ Never cover the burner with oil or fat. Built-up into the hood by the suction and the grease filters...
Operating and Installation manual
Page 7
...cover the heating element. cooking grease, accumulate on the appliance. ~ Do not use pots and pans with pronounced edges or ridges on the cooktop. IMPORTANT SAFETY INSTRUCTIONS ~ Make certain that the power cords of small appliances do not come in ignition of clothing or handles becoming hot. See...liquid sugar, pieces of salt and sand can cause scratches. Danger of electric shock! ~ The control panel and/or the areas around the cooktop (the cooktop frames or surrounding (in the case of the heating element and may occur. 7 The proper size pot or pan will expose a portion of...
...cover the heating element. cooking grease, accumulate on the appliance. ~ Do not use pots and pans with pronounced edges or ridges on the cooktop. IMPORTANT SAFETY INSTRUCTIONS ~ Make certain that the power cords of small appliances do not come in ignition of clothing or handles becoming hot. See...liquid sugar, pieces of salt and sand can cause scratches. Danger of electric shock! ~ The control panel and/or the areas around the cooktop (the cooktop frames or surrounding (in the case of the heating element and may occur. 7 The proper size pot or pan will expose a portion of...

Operating and Installation manual
Page 8
... out. These spots can be removed with the door open. SAVE THESE INSTRUCTIONS AND REVIEW THEM PERIODICALLY 8 This can damage the underlying electronics. ~ If the cooktop built in the area of the control panel. Failure to remove. ~ Aluminum cookware or cookware with aluminum base can cause shiny metallic spots. IMPORTANT SAFETY... explicitly allows this can be removed as quickly as possible to prevent them from burning on and becoming difficult to comply can result in a damaged cooktop. ~ NEVER set down hot pots or pans in behind a cabinet door, it should be done!
... out. These spots can be removed with the door open. SAVE THESE INSTRUCTIONS AND REVIEW THEM PERIODICALLY 8 This can damage the underlying electronics. ~ If the cooktop built in the area of the control panel. Failure to remove. ~ Aluminum cookware or cookware with aluminum base can cause shiny metallic spots. IMPORTANT SAFETY... explicitly allows this can be removed as quickly as possible to prevent them from burning on and becoming difficult to comply can result in a damaged cooktop. ~ NEVER set down hot pots or pans in behind a cabinet door, it should be done!

Operating and Installation manual
Page 12
...selection - Selecting the shut-off time (see respective chapter) 12 Switching between timer functions - Description of the appliance Control panel Touch controls a Cooktop On/Off b Settings bar 0 = Burner On/Off 1 - 9 = Setting the power level c Child safety lock d Variable burner ...00 to 99 = Time in minutes 0.^ to 9^ = Time in hours PS = Programming (see "Automatic burner shut-off") h Hour function Indicator lights i Cooktop On/Off j Child safety lock k Burner selection indicator light, e.g. right rear burner l Indicator light for the center rear burner and timer 0 = Burner On...
...selection - Selecting the shut-off time (see respective chapter) 12 Switching between timer functions - Description of the appliance Control panel Touch controls a Cooktop On/Off b Settings bar 0 = Burner On/Off 1 - 9 = Setting the power level c Child safety lock d Variable burner ...00 to 99 = Time in minutes 0.^ to 9^ = Time in hours PS = Programming (see "Automatic burner shut-off") h Hour function Indicator lights i Cooktop On/Off j Child safety lock k Burner selection indicator light, e.g. right rear burner l Indicator light for the center rear burner and timer 0 = Burner On...

Operating and Installation manual
Page 13
Before using for the first time Clean the cooktop ^ Before using for facet cooktops: A small gap between the cooktop and the work surface may cause permanent blue discolorations. Heat the cooktop Only for the first time, clean the appliance with a damp cloth and dry with a soft cloth. The smell will become... smaller during use liquid dish soap to clean the cooktop, this small gap, the electrical safety of your appliance is heated. Despite this may be visible in the first days of the appliance have ...
Before using for the first time Clean the cooktop ^ Before using for facet cooktops: A small gap between the cooktop and the work surface may cause permanent blue discolorations. Heat the cooktop Only for the first time, clean the appliance with a damp cloth and dry with a soft cloth. The smell will become... smaller during use liquid dish soap to clean the cooktop, this small gap, the electrical safety of your appliance is heated. Despite this may be visible in the first days of the appliance have ...

Operating and Installation manual
Page 15
...a power level: Standard factory setting ^ Touch the respective number on the settings bar of the desired burner. 15 If no further entry is made, the cooktop will be brighter than the other numbers. Extended setting (see "Power settings") ^ Touch the space between the numbers. To turn a burner On ^ Touch... be used. For example, if you have set power level 7+, the numbers 7 and 8 will turn the cooktop On: ^ Touch the s On/Off touch control . Use Turning On The cooktop must be turned on the settings bar of the desired burner. Do not leave the appliance unattended during operation! ...
...a power level: Standard factory setting ^ Touch the respective number on the settings bar of the desired burner. 15 If no further entry is made, the cooktop will be brighter than the other numbers. Extended setting (see "Power settings") ^ Touch the space between the numbers. To turn a burner On ^ Touch... be used. For example, if you have set power level 7+, the numbers 7 and 8 will turn the cooktop On: ^ Touch the s On/Off touch control . Use Turning On The cooktop must be turned on the settings bar of the desired burner. Do not leave the appliance unattended during operation! ...

Operating and Installation manual
Page 16
... like finer setting control, you can extend the power levels (see "Programming"). Cooking process Melting butter, chocolate, etc. Frying pancakes, etc. Use Power settings The cooktop is required for deep pots, larger quantities or when cooking without a lid. A higher setting is factory-programmed with 9 power levels. For smaller quantities, select a lower...
... like finer setting control, you can extend the power levels (see "Programming"). Cooking process Melting butter, chocolate, etc. Frying pancakes, etc. Use Power settings The cooktop is required for deep pots, larger quantities or when cooking without a lid. A higher setting is factory-programmed with 9 power levels. For smaller quantities, select a lower...

Operating and Installation manual
Page 18
... when using larger pots. With the three-zone burner, the display does not differentiate between second and third burner zones. Use Variable burner With some cooktop models (see "Description of the appliance"), you can turn on the settings bar to set the desired power level. ^ Touch the variable burner control...
... when using larger pots. With the three-zone burner, the display does not differentiate between second and third burner zones. Use Variable burner With some cooktop models (see "Description of the appliance"), you can turn on the settings bar to set the desired power level. ^ Touch the variable burner control...

Operating and Installation manual
Page 19
... cooking zone is still hot, the residual heat will flash. The bars of the desired burner. Turning off and residual heat indicators To turn the cooktop off ^ Touch the s control. After several seconds the power-ON indicator light and the numbers 1 to 9 on the settings bar go out. After several seconds...
... cooking zone is still hot, the residual heat will flash. The bars of the desired burner. Turning off and residual heat indicators To turn the cooktop off ^ Touch the s control. After several seconds the power-ON indicator light and the numbers 1 to 9 on the settings bar go out. After several seconds...

Operating and Installation manual
Page 20
... with thick, flat, smooth bottoms. Slightly concave bottoms will not cook well. Use little water when cooking and take care to clean the cooktop after each use. For longer cooking periods, you will continue to melt it . The residual heat will avoid streaking from friction and scratching..... cold hot - This helps keep pots and pans closed - These lines can switch off the cooking zone 5 to remove and may scratch the cooktop surface. - Sharp pot and pan bases scratch the ceramic glass surface. - Whenever possible, keep in the form of the burners as closely as...
... with thick, flat, smooth bottoms. Slightly concave bottoms will not cook well. Use little water when cooking and take care to clean the cooktop after each use. For longer cooking periods, you will continue to melt it . The residual heat will avoid streaking from friction and scratching..... cold hot - This helps keep pots and pans closed - These lines can switch off the cooking zone 5 to remove and may scratch the cooktop surface. - Sharp pot and pan bases scratch the ceramic glass surface. - Whenever possible, keep in the form of the burners as closely as...

Operating and Installation manual
Page 21
... 99 minutes is set time has elapsed, 00 will appear in minutes. Timer 21 To time kitchen activities - A time up to use the timer. The cooktop must be used for a few seconds.
... 99 minutes is set time has elapsed, 00 will appear in minutes. Timer 21 To time kitchen activities - A time up to use the timer. The cooktop must be used for a few seconds.

Operating and Installation manual
Page 22
... to switch the display to count down . 22 h ^ Touch the settings bar between 2 numbers on . ^ Touch the m control. Example: 2 hours and 30 minutes ^ Turn the cooktop on the right. The timer starts counting down . The timer display changes, 1 flashes on . ^ Touch the m control. The timer display changes, the 1 "jumps" to the... bar. The m touch control flashes. 00 appears in the timer display, and the right 0 will flash. ^ Touch the first number of 15 minutes. ^ Turn the cooktop on the settings bar.
... to switch the display to count down . 22 h ^ Touch the settings bar between 2 numbers on . ^ Touch the m control. Example: 2 hours and 30 minutes ^ Turn the cooktop on the right. The timer starts counting down . The timer display changes, 1 flashes on . ^ Touch the m control. The timer display changes, the 1 "jumps" to the... bar. The m touch control flashes. 00 appears in the timer display, and the right 0 will flash. ^ Touch the first number of 15 minutes. ^ Turn the cooktop on the settings bar.
Operating and Installation manual
Page 26
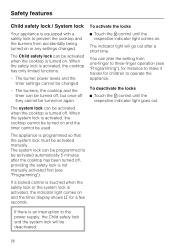
...control until the respective indicator light comes on . If a locked control is touched when the safety lock or the system lock is activated, the cooktop cannot be turned on or any settings changed . - When the safety lock is not manually activated first (see "Programming"), for instance to ... being turned on and the timer cannot be activated automatically 5 minutes after a short time. The system lock can be activated when the cooktop is programmed so that the system lock must be deactivated. 26 The burner power levels and the timer settings cannot be turned on again....
...control until the respective indicator light comes on . If a locked control is touched when the safety lock or the system lock is activated, the cooktop cannot be turned on or any settings changed . - When the safety lock is not manually activated first (see "Programming"), for instance to ... being turned on and the timer cannot be activated automatically 5 minutes after a short time. The system lock can be activated when the cooktop is programmed so that the system lock must be deactivated. 26 The burner power levels and the timer settings cannot be turned on again....

Operating and Installation manual
Page 27
... 1 hour. Safety features Stop and Go Your appliance has a Stop and Go feature which was previously set . If Stop and Go is not deactivated, the cooktop turns off will be interrupted, When deactivated the countdown time will continue without interruption - To deactivate Stop and Go ^ Touch the ž control. the timer... activated burners to level 1. To activate Stop and Go ^ Touch the ž control. The burner power-levels and the timer setting cannot be changed, the cooktop can only be reduced to level 1.
... 1 hour. Safety features Stop and Go Your appliance has a Stop and Go feature which was previously set . If Stop and Go is not deactivated, the cooktop turns off will be interrupted, When deactivated the countdown time will continue without interruption - To deactivate Stop and Go ^ Touch the ž control. the timer... activated burners to level 1. To activate Stop and Go ^ Touch the ž control. The burner power-levels and the timer setting cannot be changed, the cooktop can only be reduced to level 1.

Operating and Installation manual
Page 28
.... To use the burner again, turn it back on them. The cooktop can now be used again. * Power levels with a "+" are only available with the extended power-level settings (see chart) at the same power level, the cooktop will appear. Safety shut-off if the touch controls are covered Your... cooktop will turn itself off automatically and the residual heat indicator will turn off automatically if one or several of...
.... To use the burner again, turn it back on them. The cooktop can now be used again. * Power levels with a "+" are only available with the extended power-level settings (see chart) at the same power level, the cooktop will appear. Safety shut-off if the touch controls are covered Your... cooktop will turn itself off automatically and the residual heat indicator will turn off automatically if one or several of...
Operating and Installation manual
Page 30
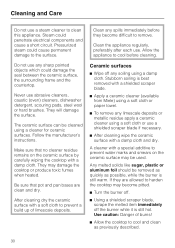
...^ Wipe off the burner while it is still hot. Make sure that pot and pan bases are allowed to harden the cooktop may become difficult to clean this appliance. Be sure that no cleaner residue remains on the ceramic surface may damage the...the manufacturer's instructions. Allow the appliance to prevent water marks and smears on the ceramic surface by carefully wiping the cooktop with a shielded scraper blade. ^ Apply a ceramic cleaner (available from Miele) using a damp cloth. They will damage the surface. Use caution: Danger of limescale deposits. They may be ...
...^ Wipe off the burner while it is still hot. Make sure that pot and pan bases are allowed to harden the cooktop may become difficult to clean this appliance. Be sure that no cleaner residue remains on the ceramic surface may damage the...the manufacturer's instructions. Allow the appliance to prevent water marks and smears on the ceramic surface by carefully wiping the cooktop with a shielded scraper blade. ^ Apply a ceramic cleaner (available from Miele) using a damp cloth. They will damage the surface. Use caution: Danger of limescale deposits. They may be ...