
Specs
Page 2
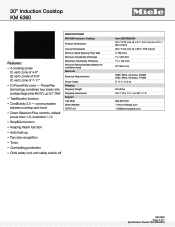
... (9x15"), up • Pan size recognition • Timer • Overheating protection • Child safety lock and safety switch-off Cut-out Dimensions Minimum Back Spacing From Wall Minimum Countertop Thickness Maximum Countertop Thickness Minimum Recommended distance to 7,7kW • TwinBooster function • Con@ctivity 2.0 - 30" Induction Cooktop KM 6360 FOREVER BETTER SPECIFICATIONS KM 6360 Induction Cooktop Product Dimensions Features: • 4 cooking zones (1) vario zone of 4-6" (2) vario zones of 6-9" (1) vario zone of 7 Specification Sheets TRS 09282015
... (9x15"), up • Pan size recognition • Timer • Overheating protection • Child safety lock and safety switch-off Cut-out Dimensions Minimum Back Spacing From Wall Minimum Countertop Thickness Maximum Countertop Thickness Minimum Recommended distance to 7,7kW • TwinBooster function • Con@ctivity 2.0 - 30" Induction Cooktop KM 6360 FOREVER BETTER SPECIFICATIONS KM 6360 Induction Cooktop Product Dimensions Features: • 4 cooking zones (1) vario zone of 4-6" (2) vario zones of 6-9" (1) vario zone of 7 Specification Sheets TRS 09282015
Specs
Page 7
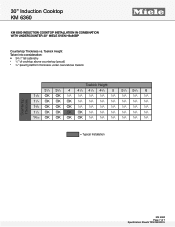
Toekick Height Taken into consideration: • 341/2" tall cabinetry • 1/4" of cooktop above countertop (proud) • 3/4" (exact) platform thickness under oven/above toekick FOREVER BETTER Countertop Thickness Toekick Height 31/2 33/4 4 41/4 41/2 43/4 5 51/4 53/4 6 11/8 OK OK NA NA NA NA NA ...NA NA NA NA NA NA 19/16 OK OK OK OK NA NA NA NA NA NA = Typical Installation KM 6360 Page 7 of 7 Specification Sheets TRS 09282015 30" Induction Cooktop KM 6360 KM 6360 INDUCTION COOKTOP INSTALLATION IN COMBINATION WITH UNDERCOUNTER 30" MIELE OVEN H6x80BP Countertop Thickness vs.
Toekick Height Taken into consideration: • 341/2" tall cabinetry • 1/4" of cooktop above countertop (proud) • 3/4" (exact) platform thickness under oven/above toekick FOREVER BETTER Countertop Thickness Toekick Height 31/2 33/4 4 41/4 41/2 43/4 5 51/4 53/4 6 11/8 OK OK NA NA NA NA NA ...NA NA NA NA NA NA 19/16 OK OK OK OK NA NA NA NA NA NA = Typical Installation KM 6360 Page 7 of 7 Specification Sheets TRS 09282015 30" Induction Cooktop KM 6360 KM 6360 INDUCTION COOKTOP INSTALLATION IN COMBINATION WITH UNDERCOUNTER 30" MIELE OVEN H6x80BP Countertop Thickness vs.

Product Manual
Page 2
... / KM 6375 16 KM 6377...17 DirectSelection Plus controls 18 Cooking zone data 19 Before using for the first time 22 Cleaning the cooktop for the first time 22 Turning on the cooktop for the first time 22 Induction ...23 How it works ...23 Noises ...24 Cookware...25 Energy saving tips 26 Power setting ranges 27 Operation ...28 Basic operation ...28 Turning on ...29 Selecting/changing...
... / KM 6375 16 KM 6377...17 DirectSelection Plus controls 18 Cooking zone data 19 Before using for the first time 22 Cleaning the cooktop for the first time 22 Turning on the cooktop for the first time 22 Induction ...23 How it works ...23 Noises ...24 Cookware...25 Energy saving tips 26 Power setting ranges 27 Operation ...28 Basic operation ...28 Turning on ...29 Selecting/changing...

Product Manual
Page 3
INSTALLATION 53 Safety clearances 54 Ventilation ...58 Framed cooktops 59 Instructions for installation 59 Installation dimensions 60 KM 6360 ...60 KM 6370 ...61 KM 6377 ...62 Installation...63 Flush-mounted (frameless) cooktops 64 Instructions for installation 64 Installation dimensions 65 KM 6365 ...65 KM 6375 ...66 Installation...67 Electrical connection 69 Caring for the environment 71 Technical service, data plate, warranty 72 MieleCare...73 3 Contents Overheat protection 42 Cleaning and care 43 Programming...45 Frequently asked questions 48 Con...
INSTALLATION 53 Safety clearances 54 Ventilation ...58 Framed cooktops 59 Instructions for installation 59 Installation dimensions 60 KM 6360 ...60 KM 6370 ...61 KM 6377 ...62 Installation...63 Flush-mounted (frameless) cooktops 64 Instructions for installation 64 Installation dimensions 65 KM 6365 ...65 KM 6375 ...66 Installation...67 Electrical connection 69 Caring for the environment 71 Technical service, data plate, warranty 72 MieleCare...73 3 Contents Overheat protection 42 Cleaning and care 43 Programming...45 Frequently asked questions 48 Con...

Product Manual
Page 6
... settings selected. 6 Do not allow them to use it in a safe manner, and if they can be alone or unsupervised in the area where the oven is installed. Otherwise, they are disposed of safely and kept out of the reach of burning or scalding! IMPORTANT SAFETY INSTRUCTIONS Children As with it. The cooktop gets hot...
... settings selected. 6 Do not allow them to use it in a safe manner, and if they can be alone or unsupervised in the area where the oven is installed. Otherwise, they are disposed of safely and kept out of the reach of burning or scalding! IMPORTANT SAFETY INSTRUCTIONS Children As with it. The cooktop gets hot...
Product Manual
Page 7
... this basic safety requirement be met. Service work may only be used when it has been grounded by a Miele authorized service technician in doubt, consult a qualified electrician. Do not connect the appliance to the electrical supply with national and local safety regulations and the provided installation instruc‐ tions. IMPORTANT SAFETY INSTRUCTIONS Technical safety Installation, repair and maintenance work should be performed...
... this basic safety requirement be met. Service work may only be used when it has been grounded by a Miele authorized service technician in doubt, consult a qualified electrician. Do not connect the appliance to the electrical supply with national and local safety regulations and the provided installation instruc‐ tions. IMPORTANT SAFETY INSTRUCTIONS Technical safety Installation, repair and maintenance work should be performed...

Product Manual
Page 8
... by Miele original parts only. on a ship). Any contact with live connections or tampering with the electrical or mechanical components of the cooktop under any maintenance or repair work . IMPORTANT SAFETY INSTRUCTIONS This appliance must not be completely disconnected from Miele Service. Do not open the casing of the cooktop will void the warranty. Defective components should be replaced by...
... by Miele original parts only. on a ship). Any contact with live connections or tampering with the electrical or mechanical components of the cooktop under any maintenance or repair work . IMPORTANT SAFETY INSTRUCTIONS This appliance must not be completely disconnected from Miele Service. Do not open the casing of the cooktop will void the warranty. Defective components should be replaced by...

Product Manual
Page 9
If the ceramic surface of the cooktop is in any repair work is being carried out. Risk of electric shock! Do not close the door while the cooktop is defective or chipped, cracked or broken in operation. Disconnect the cooktop from the electrical supply during installation and maintenance of the cooktop as well as while any way, immediately turn the cooktop off and...
If the ceramic surface of the cooktop is in any repair work is being carried out. Risk of electric shock! Do not close the door while the cooktop is defective or chipped, cracked or broken in operation. Disconnect the cooktop from the electrical supply during installation and maintenance of the cooktop as well as while any way, immediately turn the cooktop off and...

Product Manual
Page 11
... electrical appliance, e.g. from cleaning vegetables) can become damaged. Grains of the cover will ignite, explode or melt if the range is still hot or if turned on or if it . Even a light object can heat up. Other items may melt or catch fire. Always turn the burn‐ ers off after use! You could become attached to the ceramic cooktop...
... electrical appliance, e.g. from cleaning vegetables) can become damaged. Grains of the cover will ignite, explode or melt if the range is still hot or if turned on or if it . Even a light object can heat up. Other items may melt or catch fire. Always turn the burn‐ ers off after use! You could become attached to the ceramic cooktop...

Product Manual
Page 12
... on . 12 Only use . Because induction heating works so quickly, the temperature of the cookware bottom can quickly reach the ignition point of plastic or aluminum foil to get onto the burners when they can damage the ceramic surface when it is very unlikely to affect a pacemaker. Be sure to wear appropriately fitting clothing when cooking. IMPORTANT SAFETY INSTRUCTIONS Do not...
... on . 12 Only use . Because induction heating works so quickly, the temperature of the cookware bottom can quickly reach the ignition point of plastic or aluminum foil to get onto the burners when they can damage the ceramic surface when it is very unlikely to affect a pacemaker. Be sure to wear appropriately fitting clothing when cooking. IMPORTANT SAFETY INSTRUCTIONS Do not...

Product Manual
Page 42
... gone out. A hot cooking zone being heated at high power settings - Heating empty cookware - Any booster function in the following ways: Inductive coils - Overheating can be re‐ duced. - Fats or oils being turned on the entire cooktop in operation will be caused by: - Underside of the cause, the overheat protection is triggered again, contact Miele Service. 42 The cooking zone turns off . - Cooling...
... gone out. A hot cooking zone being heated at high power settings - Heating empty cookware - Any booster function in the following ways: Inductive coils - Overheating can be re‐ duced. - Fats or oils being turned on the entire cooktop in operation will be caused by: - Underside of the cause, the overheat protection is triggered again, contact Miele Service. 42 The cooking zone turns off . - Cooling...

Product Manual
Page 44
Cleaning and care Do not clean the area between the glass-ceramic surface and the frame or the frame and the counter with the Miele ce‐ ramic and stainless steel cleaner (see "Optional accessories") or a commer‐ cial ceramic cleaner and paper towel or a clean cloth. An invisible film forms, which causes discoloration of burns! Please follow the manufactur‐ er's instructions. Should...
Cleaning and care Do not clean the area between the glass-ceramic surface and the frame or the frame and the counter with the Miele ce‐ ramic and stainless steel cleaner (see "Optional accessories") or a commer‐ cial ceramic cleaner and paper towel or a clean cloth. An invisible film forms, which causes discoloration of burns! Please follow the manufactur‐ er's instructions. Should...

Product Manual
Page 48
... cover for approx. 1 minute by a conditioning or vapors when the ap‐ agent. Problem Cooktop or cooking zones cannot be turned on , contact a qualified electrician or Miele Service. tripping the relevant circuit breaker or screwing the fuse out completely, or - tripping the ground fault circuit interrupter (GFCI). If, after resetting/replacing the fuse or the GFCI, it dis‐ appears completely. Power levels 1 to users...
... cover for approx. 1 minute by a conditioning or vapors when the ap‐ agent. Problem Cooktop or cooking zones cannot be turned on , contact a qualified electrician or Miele Service. tripping the relevant circuit breaker or screwing the fuse out completely, or - tripping the ground fault circuit interrupter (GFCI). If, after resetting/replacing the fuse or the GFCI, it dis‐ appears completely. Power levels 1 to users...

Product Manual
Page 53
... moving kitchen parts (e.g. Install the upper cabinets and venti‐ lation hood before installing the cooktop to mechan‐ ical stress. Observe carefully the safety clearances listed on the following pages. 53 You can result in cooling fan. Ensure that it . Reaching over a hot cooktop to the electrical power supply may not come into contact with any cabinets above a stove or oven if they have a built...
... moving kitchen parts (e.g. Install the upper cabinets and venti‐ lation hood before installing the cooktop to mechan‐ ical stress. Observe carefully the safety clearances listed on the following pages. 53 You can result in cooling fan. Ensure that it . Reaching over a hot cooktop to the electrical power supply may not come into contact with any cabinets above a stove or oven if they have a built...
Product Manual
Page 60
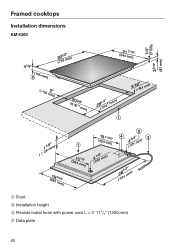
Framed cooktops Installation dimensions KM 6360 a Front b Installation height c Flexible metal hose with power cord L = 3' 11¹/₄" (1200 mm) d Data plate 60
Framed cooktops Installation dimensions KM 6360 a Front b Installation height c Flexible metal hose with power cord L = 3' 11¹/₄" (1200 mm) d Data plate 60

Product Manual
Page 63
... de‐ tailed drawing. The sealant must be carefully filed down through the counter cut-out. Center the cooktop in the cut-out. Installing the cooktop Feed the appliance power cord down to fit. Connect the cooktop to main‐ tain a minimum safety distance (see "Safety clearances"). Seal any wooden counter surfaces with time. This is important to help prevent swelling...
... de‐ tailed drawing. The sealant must be carefully filed down through the counter cut-out. Center the cooktop in the cut-out. Installing the cooktop Feed the appliance power cord down to fit. Connect the cooktop to main‐ tain a minimum safety distance (see "Safety clearances"). Seal any wooden counter surfaces with time. This is important to help prevent swelling...

Product Manual
Page 64
... dimensions") so that the cook‐ top is accessible from below and the lower cabinet can be removed in a granite or marble counter. - The cooktop can be provided on site, and is not accessible from below after installation, the seal must be removed for maintenance and servicing purposes. The frame must be installed - If the cooktop is not supplied with a flush-mounted cooktop. Flush-mounted (frameless) cooktops Instructions...
... dimensions") so that the cook‐ top is accessible from below and the lower cabinet can be removed in a granite or marble counter. - The cooktop can be provided on site, and is not accessible from below after installation, the seal must be removed for maintenance and servicing purposes. The frame must be installed - If the cooktop is not supplied with a flush-mounted cooktop. Flush-mounted (frameless) cooktops Instructions...
Product Manual
Page 65
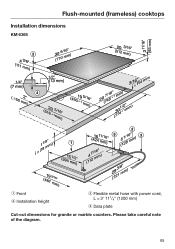
Please take careful note of the diagram. 65 Flush-mounted (frameless) cooktops Installation dimensions KM 6365 a Front b Installation height c Flexible metal hose with power cord, L = 3' 11¹/₄" (1200 mm) d Data plate Cut-out dimensions for granite or marble counters.
Please take careful note of the diagram. 65 Flush-mounted (frameless) cooktops Installation dimensions KM 6365 a Front b Installation height c Flexible metal hose with power cord, L = 3' 11¹/₄" (1200 mm) d Data plate Cut-out dimensions for granite or marble counters.

Product Manual
Page 68
...;C). Flush-mounted (frameless) cooktops Solid wood / tiled / glass counters a Countertop b Cooktop c Gap d Wooden frame ¹/₂" (13 mm) (not supplied with appliance) Connect the cooktop to the electrical power supply. Check that the cooktop works. Seal the remaining gap with a sili‐ cone sealant that is heat-resistant to main‐ tain a minimum safety distance (see "Safety clearances"). Solid wood / Tile / Glass countertops...
...;C). Flush-mounted (frameless) cooktops Solid wood / tiled / glass counters a Countertop b Cooktop c Gap d Wooden frame ¹/₂" (13 mm) (not supplied with appliance) Connect the cooktop to the electrical power supply. Check that the cooktop works. Seal the remaining gap with a sili‐ cone sealant that is heat-resistant to main‐ tain a minimum safety distance (see "Safety clearances"). Solid wood / Tile / Glass countertops...

Product Manual
Page 69
.... Installation, repair and maintenance work should only be used when it has been fully installed into the countertop. Installation work . Work by a Miele-authorized service technician. If there is impera‐ tive that the voltage and frequency listed on the rating label correspond with local regulations and the ANSI National Electrical Code / NFPA 70 in the United States or the Canadian Electrical Code, Part I in accordance with the customer. 69...
.... Installation, repair and maintenance work should only be used when it has been fully installed into the countertop. Installation work . Work by a Miele-authorized service technician. If there is impera‐ tive that the voltage and frequency listed on the rating label correspond with local regulations and the ANSI National Electrical Code / NFPA 70 in the United States or the Canadian Electrical Code, Part I in accordance with the customer. 69...


