
Specs
Page 1
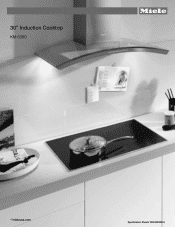
30" Induction Cooktop KM 6360 8mieleusa.com Specification Sheets TRS 09282015
30" Induction Cooktop KM 6360 8mieleusa.com Specification Sheets TRS 09282015
Specs
Page 2
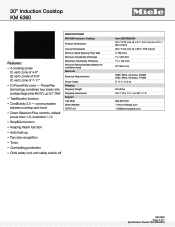
...8226; Keeping Warm function • Auto heat-up to ventilation hood Electrical Electrical Requirements Power Cable Shipping Shipping Weight Shipping Dimensions Support Call Miele Miele Website 20/20 Link Item 26636052USA 301/2" (775 mm) W x 43/4" (121 mm) H x 217/16" (544 mm) ..." W x 79/32" H x 2621/32" D 800.843.7231 8www.mieleusa.com 82020technologies.com KM 6360 Page 2 of 7-11" • (1) PowerFlex zone - 30" Induction Cooktop KM 6360 FOREVER BETTER SPECIFICATIONS KM 6360 Induction Cooktop Product Dimensions Features: • 4 cooking zones (1) vario zone of 4-6" (2) vario zones ...
...8226; Keeping Warm function • Auto heat-up to ventilation hood Electrical Electrical Requirements Power Cable Shipping Shipping Weight Shipping Dimensions Support Call Miele Miele Website 20/20 Link Item 26636052USA 301/2" (775 mm) W x 43/4" (121 mm) H x 217/16" (544 mm) ..." W x 79/32" H x 2621/32" D 800.843.7231 8www.mieleusa.com 82020technologies.com KM 6360 Page 2 of 7-11" • (1) PowerFlex zone - 30" Induction Cooktop KM 6360 FOREVER BETTER SPECIFICATIONS KM 6360 Induction Cooktop Product Dimensions Features: • 4 cooking zones (1) vario zone of 4-6" (2) vario zones ...
Specs
Page 3
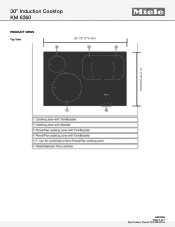
30" Induction Cooktop KM 6360 PRODUCT VIEWS Top View 30 1/2" (775 mm) FOREVER BETTER 21 7/16" (544 mm) KM 6360 Page 3 of 7 Specification Sheets TRS 09282015
30" Induction Cooktop KM 6360 PRODUCT VIEWS Top View 30 1/2" (775 mm) FOREVER BETTER 21 7/16" (544 mm) KM 6360 Page 3 of 7 Specification Sheets TRS 09282015
Specs
Page 4
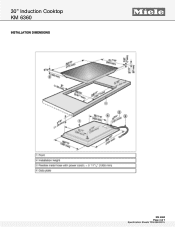
30" Induction Cooktop KM 6360 INSTALLATION DIMENSIONS FOREVER BETTER KM 6360 Page 4 of 7 Specification Sheets TRS 09282015
30" Induction Cooktop KM 6360 INSTALLATION DIMENSIONS FOREVER BETTER KM 6360 Page 4 of 7 Specification Sheets TRS 09282015
Specs
Page 5
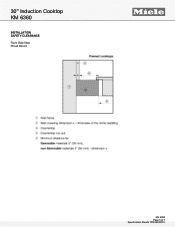
30" Induction Cooktop KM 6360 INSTALLATION SAFETY CLEARANCE Front Side View Proud Mount FOREVER BETTER KM 6360 Page 5 of 7 Specification Sheets TRS 09282015
30" Induction Cooktop KM 6360 INSTALLATION SAFETY CLEARANCE Front Side View Proud Mount FOREVER BETTER KM 6360 Page 5 of 7 Specification Sheets TRS 09282015
Specs
Page 6
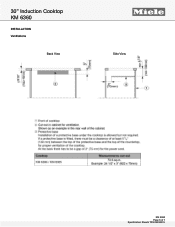
30" Induction Cooktop KM 6360 INSTALLATION Ventilations Back View FOREVER BETTER Side View KM 6360 Page 6 of 7 Specification Sheets TRS 09282015
30" Induction Cooktop KM 6360 INSTALLATION Ventilations Back View FOREVER BETTER Side View KM 6360 Page 6 of 7 Specification Sheets TRS 09282015
Specs
Page 7
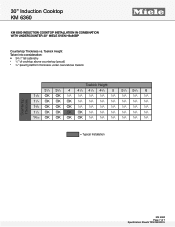
30" Induction Cooktop KM 6360 KM 6360 INDUCTION COOKTOP INSTALLATION IN COMBINATION WITH UNDERCOUNTER 30" MIELE OVEN H6x80BP Countertop Thickness vs. Toekick Height Taken into consideration: • 341/2" tall cabinetry • 1/4" of cooktop above countertop (proud) • 3/4" (exact) platform thickness under ... 11/2 OK OK OK OK NA NA NA NA NA NA 19/16 OK OK OK OK NA NA NA NA NA NA = Typical Installation KM 6360 Page 7 of 7 Specification Sheets TRS 09282015
30" Induction Cooktop KM 6360 KM 6360 INDUCTION COOKTOP INSTALLATION IN COMBINATION WITH UNDERCOUNTER 30" MIELE OVEN H6x80BP Countertop Thickness vs. Toekick Height Taken into consideration: • 341/2" tall cabinetry • 1/4" of cooktop above countertop (proud) • 3/4" (exact) platform thickness under ... 11/2 OK OK OK OK NA NA NA NA NA NA 19/16 OK OK OK OK NA NA NA NA NA NA = Typical Installation KM 6360 Page 7 of 7 Specification Sheets TRS 09282015

Product Manual
Page 2
Contents IMPORTANT SAFETY INSTRUCTIONS 4 Overview ...15 KM 6360 / KM 6365 15 KM 6370 / KM 6375 16 KM 6377...17 DirectSelection Plus controls 18 Cooking zone data 19 Before using for the first time 22 Cleaning the cooktop for the first time 22 ... Power setting ranges 27 Operation ...28 Basic operation ...28 Turning on ...29 Selecting/changing the power level 29 Turning off ...41 2 expanded setting range 30 PowerFlex cooking zone 30 Auto Heat-up...31 TwinBooster / Booster 32 Keep warm function 34 Timer ...35 Timer ...35 Turning a cooking zone off automatically 37 Using both...
Contents IMPORTANT SAFETY INSTRUCTIONS 4 Overview ...15 KM 6360 / KM 6365 15 KM 6370 / KM 6375 16 KM 6377...17 DirectSelection Plus controls 18 Cooking zone data 19 Before using for the first time 22 Cleaning the cooktop for the first time 22 ... Power setting ranges 27 Operation ...28 Basic operation ...28 Turning on ...29 Selecting/changing the power level 29 Turning off ...41 2 expanded setting range 30 PowerFlex cooking zone 30 Auto Heat-up...31 TwinBooster / Booster 32 Keep warm function 34 Timer ...35 Timer ...35 Turning a cooking zone off automatically 37 Using both...

Product Manual
Page 30
Deactivating Tap the sensor button. 30 The sensor buttons in front of the front or left PowerFlex burner. Cooking zone" chapter). The settings for the cooking zone are controlled us‐ ...
Deactivating Tap the sensor button. 30 The sensor buttons in front of the front or left PowerFlex burner. Cooking zone" chapter). The settings for the cooking zone are controlled us‐ ...

Product Manual
Page 35
... the right. Tap the sensor button on the right. Timer The cooktop has to be switched to hours (h). You can be used for example, 2 h 30 min: h Timer Setting the minutes Example: You want to the ones position (5 in this case). For turning off a cooking zone auto‐ matically. In case...
... the right. Tap the sensor button on the right. Timer The cooktop has to be switched to hours (h). You can be used for example, 2 h 30 min: h Timer Setting the minutes Example: You want to the ones position (5 in this case). For turning off a cooking zone auto‐ matically. In case...

Product Manual
Page 36
... After several seconds, the sensor button and timer display light up con‐ stantly. Timer Setting the hours To set a time of 2 hours and 30 minutes. Turn the cooktop on the control scale.
... After several seconds, the sensor button and timer display light up con‐ stantly. Timer Setting the hours To set a time of 2 hours and 30 minutes. Turn the cooktop on the control scale.

Product Manual
Page 41
..., food boiling over or by an object such as an oven glove or tea towel. flashes in the timer display and a buzzer sounds every 30 seconds for 10 minutes. If it is ready for operation again.
..., food boiling over or by an object such as an oven glove or tea towel. flashes in the timer display and a buzzer sounds every 30 seconds for 10 minutes. If it is ready for operation again.

Product Manual
Page 54
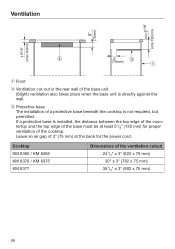
If there are installed above the cook‐ top, always use the clearance specified by the hood manufacturer. a utensil rail) are no specifications from the hood manu‐ facturer or if flammable materials (e.g. If there is more than one appliance installed below the ventilation hood, each with a different safety clear‐ ance, the largest clearance must be used. 54 Safety clearances Safety clearance above the cooktop For a ventilation hood above the cooktop, the clearance must be at least 30" (760 mm).
If there are installed above the cook‐ top, always use the clearance specified by the hood manufacturer. a utensil rail) are no specifications from the hood manu‐ facturer or if flammable materials (e.g. If there is more than one appliance installed below the ventilation hood, each with a different safety clear‐ ance, the largest clearance must be used. 54 Safety clearances Safety clearance above the cooktop For a ventilation hood above the cooktop, the clearance must be at least 30" (760 mm).
Product Manual
Page 58
...of the coun‐ tertop and the top edge of a protective base beneath the cooktop is directly against the wall. Cooktop KM 6360 / KM 6365 KM 6370 / KM 6375 KM 6377 Dimensions of the cooktop. c Protective base The installation of the base must be at the back for proper ventilation of ...the ventilation cutout 24¹/₂" x 3" (622 x 75 mm) 30" x 3" (762 x 75 mm) 35¹/₂" x 3" (902 x 75 mm) 58 Leave an air gap of...
...of the coun‐ tertop and the top edge of a protective base beneath the cooktop is directly against the wall. Cooktop KM 6360 / KM 6365 KM 6370 / KM 6375 KM 6377 Dimensions of the cooktop. c Protective base The installation of the base must be at the back for proper ventilation of ...the ventilation cutout 24¹/₂" x 3" (622 x 75 mm) 30" x 3" (762 x 75 mm) 35¹/₂" x 3" (902 x 75 mm) 58 Leave an air gap of...