Operating and Installation instructions
Page 2
... Installation...14 Installation location 14 Climate class 15 Installation notes 16 Adjoining cabinetry 16 Load-bearing capacity of the niche floor 16 Ventilation ...16 Door hinge...17 Side-by-side 17 Installation dimensions 20 Position of the electrical connections 20 Dimensions when the appliance door is opened (opening angle 90°/115°) .. 22 Dimensions of the cabinet front 23 Installing the wine conditioning unit...
... Installation...14 Installation location 14 Climate class 15 Installation notes 16 Adjoining cabinetry 16 Load-bearing capacity of the niche floor 16 Ventilation ...16 Door hinge...17 Side-by-side 17 Installation dimensions 20 Position of the electrical connections 20 Dimensions when the appliance door is opened (opening angle 90°/115°) .. 22 Dimensions of the cabinet front 23 Installing the wine conditioning unit...

Operating and Installation instructions
Page 3
... or off 74 Switching Ambient Lighting on or off 75 Selecting the Ambient Display 76 The ideal temperature and humidity 77 Temperature ...77 Isolator panels for thermal separation 78 Setting the temperature 78 Humidity ...78 Increasing the humidity 79 Door alarm ...81 Storing wine bottles 82 Wooden shelves 83 Moving the wooden shelves 83 Adjusting the wooden shelves 83 Labeling the...
... or off 74 Switching Ambient Lighting on or off 75 Selecting the Ambient Display 76 The ideal temperature and humidity 77 Temperature ...77 Isolator panels for thermal separation 78 Setting the temperature 78 Humidity ...78 Increasing the humidity 79 Door alarm ...81 Storing wine bottles 82 Wooden shelves 83 Moving the wooden shelves 83 Adjusting the wooden shelves 83 Labeling the...

Operating and Installation instructions
Page 5
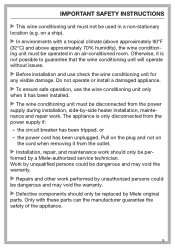
... safety requirements. IMPORTANT SAFETY INSTRUCTIONS This wine conditioning unit complies with the operating and installation instructions. Risk of injury from damaging your wine conditioning unit. They contain important information on safety, installation, use can cause severe injury. 5 Please read and follow the instructions in air pressure. Keep these instructions. Shards of changes in the chapter on to any future owner. Danger of injury...
... safety requirements. IMPORTANT SAFETY INSTRUCTIONS This wine conditioning unit complies with the operating and installation instructions. Risk of injury from damaging your wine conditioning unit. They contain important information on safety, installation, use can cause severe injury. 5 Please read and follow the instructions in air pressure. Keep these instructions. Shards of changes in the chapter on to any future owner. Danger of injury...

Operating and Installation instructions
Page 8
... safe operation of damage to the wine conditioning unit, make sure that the connection data (fuse rating, frequency and voltage) on the data plate corresponds to prevent a hazard for leaks. ditioning unit complies with a power bar or extension cord. IMPORTANT SAFETY INSTRUCTIONS Technical safety The refrigerant circuit has been checked for the user. Miele can be quickly disconnected from the electrical supply in...
... safe operation of damage to the wine conditioning unit, make sure that the connection data (fuse rating, frequency and voltage) on the data plate corresponds to prevent a hazard for leaks. ditioning unit complies with a power bar or extension cord. IMPORTANT SAFETY INSTRUCTIONS Technical safety The refrigerant circuit has been checked for the user. Miele can be quickly disconnected from the electrical supply in...
Operating and Installation instructions
Page 9
IMPORTANT SAFETY INSTRUCTIONS This wine conditioning unit must not be replaced by Miele original parts. Do not operate or install a damaged appliance. To ensure safe operation, use check the wine conditioning unit for any visible damage. the power cord has been unplugged. formed by -side heater installation, maintenance and repair work should only be used in an air-conditioned room. Only with a tropical climate (above approximately 90°...
IMPORTANT SAFETY INSTRUCTIONS This wine conditioning unit must not be replaced by Miele original parts. Do not operate or install a damaged appliance. To ensure safe operation, use check the wine conditioning unit for any visible damage. the power cord has been unplugged. formed by -side heater installation, maintenance and repair work should only be used in an air-conditioned room. Only with a tropical climate (above approximately 90°...
Operating and Installation instructions
Page 16
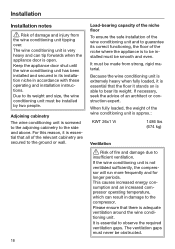
... its weight. This causes increased energy consumption and an increased compressor operating temperature, which can tip forwards when the appliance door is adequate ventilation around the wine conditioning unit. Due to bear its weight and size, the wine conditioning unit must never be installed by two people. Because the wine conditioning unit is extremely heavy when fully loaded, it is essential that...
... its weight. This causes increased energy consumption and an increased compressor operating temperature, which can tip forwards when the appliance door is adequate ventilation around the wine conditioning unit. Due to bear its weight and size, the wine conditioning unit must never be installed by two people. Because the wine conditioning unit is extremely heavy when fully loaded, it is essential that...

Operating and Installation instructions
Page 17
... damage to change the door hinge yourself. Changing the door hinges singlehandedly can be installed side-by -side installation options you need the side-by-side installation kit for installing appliances side-by -side installation (see "Accessories - The wine conditioning unit is supplied with your wine conditioning unit. Optional accessories"). Side-by-side This wine conditioning unit can be found in the sideby-side installation kit installation instructions. 17 If you have with a fixed hinge.
... damage to change the door hinge yourself. Changing the door hinges singlehandedly can be installed side-by -side installation options you need the side-by-side installation kit for installing appliances side-by -side installation (see "Accessories - The wine conditioning unit is supplied with your wine conditioning unit. Optional accessories"). Side-by-side This wine conditioning unit can be found in the sideby-side installation kit installation instructions. 17 If you have with a fixed hinge.

Operating and Installation instructions
Page 27
... appliance door. *INSTALLATION* Installation Before installation Before installation, remove any accessories from the back of the appliance. Check the wine conditioning unit for aligning the appliance in front of the installation area. Risk of damage and injury from the wine conditioning unit tipping over. Do not install the wine conditioning unit if it using the rollers on floors that fix the wine conditioning unit...
... appliance door. *INSTALLATION* Installation Before installation Before installation, remove any accessories from the back of the appliance. Check the wine conditioning unit for aligning the appliance in front of the installation area. Risk of damage and injury from the wine conditioning unit tipping over. Do not install the wine conditioning unit if it using the rollers on floors that fix the wine conditioning unit...

Operating and Installation instructions
Page 49
... relevant regulations. The wine conditioning unit must be installed and connected by a power switch or a fuse, is protected by a suitably qualified electrician in case of the wine conditioning unit. Ensure that the voltage of the power supply corresponds to avoid overloading the electrical circuit. Ground the wine conditioning unit. Do not install a fuse into the power supply. Do not use a frayed or damaged power cord. Risk of electric shock! The...
... relevant regulations. The wine conditioning unit must be installed and connected by a power switch or a fuse, is protected by a suitably qualified electrician in case of the wine conditioning unit. Ensure that the voltage of the power supply corresponds to avoid overloading the electrical circuit. Ground the wine conditioning unit. Do not install a fuse into the power supply. Do not use a frayed or damaged power cord. Risk of electric shock! The...

Operating and Installation instructions
Page 52
... full of dust. Near a heat source (radiator, oven). Saving energy Installation / Maintenance Temperature setting Normal energy consumption In a well-ventilated room. Protected from heat sources (radiator, range/oven). Where the ambient room temperature is approx. 68°F (20°C). Away from direct sunlight. The lower the temperature in the appliance, the higher the energy consumption. 52 Where the...
... full of dust. Near a heat source (radiator, oven). Saving energy Installation / Maintenance Temperature setting Normal energy consumption In a well-ventilated room. Protected from heat sources (radiator, range/oven). Where the ambient room temperature is approx. 68°F (20°C). Away from direct sunlight. The lower the temperature in the appliance, the higher the energy consumption. 52 Where the...

Operating and Installation instructions
Page 53
Store wine bottles in order to allow the air to cool down and the compressor runs for long periods will cause a loss of coldness. Frequent opening of the door for longer periods. circulate. 53 ance was delivered. Saving energy Normal energy consumption Increased energy consumption Use Wooden shelves arranged as possible. The wine conditioning unit works harder to cause a loss of coldness. Do not overfill the appliance Poor air circulation will in an organized way. Only open the door when necessary and for as short a time as they were when the appli-
Store wine bottles in order to allow the air to cool down and the compressor runs for long periods will cause a loss of coldness. Frequent opening of the door for longer periods. circulate. 53 ance was delivered. Saving energy Normal energy consumption Increased energy consumption Use Wooden shelves arranged as possible. The wine conditioning unit works harder to cause a loss of coldness. Do not overfill the appliance Poor air circulation will in an organized way. Only open the door when necessary and for as short a time as they were when the appli-

Operating and Installation instructions
Page 58
... required in a stainless steel look. Optional accessories A range of useful Miele accessories and care products are available from Miele, your Miele dealer or online via the Miele website. 58 The door hinging must be replaced by Miele Technical Service. Accessories Accessories supplied Appliance plug Chalk Use the chalk supplied to write on the magnetic strips on your wine conditioning unit, the upper toe-kick ventilation grille must only be converted. Side...
... required in a stainless steel look. Optional accessories A range of useful Miele accessories and care products are available from Miele, your Miele dealer or online via the Miele website. 58 The door hinging must be replaced by Miele Technical Service. Accessories Accessories supplied Appliance plug Chalk Use the chalk supplied to write on the magnetic strips on your wine conditioning unit, the upper toe-kick ventilation grille must only be converted. Side...

Operating and Installation instructions
Page 61
... wrong Language, return to Settings mode and use the symbol to change the language) - Miele will be asked to make the following settings: - The main screen will appear on for the first time Open the appliance door. Switch the wine conditioning unit on the display. Confirm the first use with OK. Set the Temperature Unit: °C (degrees Celsius...
... wrong Language, return to Settings mode and use the symbol to change the language) - Miele will be asked to make the following settings: - The main screen will appear on for the first time Open the appliance door. Switch the wine conditioning unit on the display. Confirm the first use with OK. Set the Temperature Unit: °C (degrees Celsius...

Operating and Installation instructions
Page 62
... inside the appliance. Please note: the wine conditioning unit is not disconnected from the power supply when it . The cooling and interior lighting are switched off with the On/Off switch. 62 Miele will come on when the appliance door is not going to avoid odors building ...57408; Clean the wine conditioning unit. Leave the door to the wine conditioning unit ajar to enable air to circulate and to be used for longer periods of time If the wine conditioning unit is opened. Switching the wine conditioning unit off Switch the wine conditioning unit off by pressing ...
... inside the appliance. Please note: the wine conditioning unit is not disconnected from the power supply when it . The cooling and interior lighting are switched off with the On/Off switch. 62 Miele will come on when the appliance door is not going to avoid odors building ...57408; Clean the wine conditioning unit. Leave the door to the wine conditioning unit ajar to enable air to circulate and to be used for longer periods of time If the wine conditioning unit is opened. Switching the wine conditioning unit off Switch the wine conditioning unit off by pressing ...

Operating and Installation instructions
Page 67
A Miele user account The user account can be guaranteed. Call up your home WiFi network. This can use the app to carry out the following activities, for example: - The Miele@home service is deactivated at the factory. Networking is not available in every country. Change the settings on your wine conditioning unit Connecting your wine conditioning unit to your wine conditioning unit. 67 Miele@home availability...
A Miele user account The user account can be guaranteed. Call up your home WiFi network. This can use the app to carry out the following activities, for example: - The Miele@home service is deactivated at the factory. Networking is not available in every country. Change the settings on your wine conditioning unit Connecting your wine conditioning unit to your wine conditioning unit. 67 Miele@home availability...

Operating and Installation instructions
Page 70
... buttons to select Miele@home and select OK to confirm your selection. Use the and arrow buttons to select Set up again and touch OK to confirm your selection. Information about the WLAN connection status will reset the network configuration so that a previous owner is a weak connection - disconnected Resetting the network configuration Reset the wine conditioning unit's settings...
... buttons to select Miele@home and select OK to confirm your selection. Use the and arrow buttons to select Set up again and touch OK to confirm your selection. Information about the WLAN connection status will reset the network configuration so that a previous owner is a weak connection - disconnected Resetting the network configuration Reset the wine conditioning unit's settings...

Operating and Installation instructions
Page 72
...; sensor controls to select Reset and select OK to the following values: 72 After a brief delay, Settings reset appears in the display. Confirm the message with OK. This will be reset to confirm your wine conditioning unit, selling it, or putting a used wine conditioning unit into operation. The wine conditioning unit's settings will reset the network configuration so that a previous owner is deleted from the wine conditioning unit.
...; sensor controls to select Reset and select OK to the following values: 72 After a brief delay, Settings reset appears in the display. Confirm the message with OK. This will be reset to confirm your wine conditioning unit, selling it, or putting a used wine conditioning unit into operation. The wine conditioning unit's settings will reset the network configuration so that a previous owner is deleted from the wine conditioning unit.
Operating and Installation instructions
Page 89
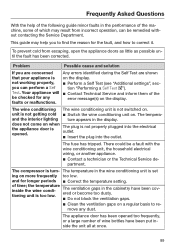
... on when the appliance door is not getting cold Switch the wine conditioning unit on the display. Problem Possible cause and solution If you are shown on the display. Perform a Self Test (see "Additional settings", section "Performing a Self Test "). Contact Technical Service and inform them of the error message(s) on . The plug is not working properly, you can...
... on when the appliance door is not getting cold Switch the wine conditioning unit on the display. Problem Possible cause and solution If you are shown on the display. Perform a Self Test (see "Additional settings", section "Performing a Self Test "). Contact Technical Service and inform them of the error message(s) on . The plug is not working properly, you can...

Operating and Installation instructions
Page 92
... unit is shown in the display. The error message does not disappear from the display until the error has been rectified. is cooling down. The machine does not get cold, but the machine controls are working. bol is dark and the sym- The in the display Message Possible cause and solution The warning sounds and the message Close the door...
... unit is shown in the display. The error message does not disappear from the display until the error has been rectified. is cooling down. The machine does not get cold, but the machine controls are working. bol is dark and the sym- The in the display Message Possible cause and solution The warning sounds and the message Close the door...
Product sheet
Page 1
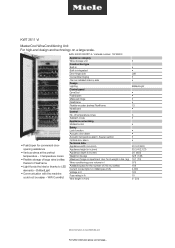
... integrated Door hinge side Convertible hinging Can be easier - EAN: 4002515928714 / material number: 10746000 • Push2open for the number of large wine bottles thanks to FlexiFrame • Light floods the interior thanks to LED elements - BrilliantLight • Communication with the machine could not be installed side-by-side Design Lighting Control panel DynaCool Push2open MaxLoad hinge FlexiFrame Flexible wooden shelves FlexiFrame NoteBoard Control No. KWT 2611 Vi...
... integrated Door hinge side Convertible hinging Can be easier - EAN: 4002515928714 / material number: 10746000 • Push2open for the number of large wine bottles thanks to FlexiFrame • Light floods the interior thanks to LED elements - BrilliantLight • Communication with the machine could not be installed side-by-side Design Lighting Control panel DynaCool Push2open MaxLoad hinge FlexiFrame Flexible wooden shelves FlexiFrame NoteBoard Control No. KWT 2611 Vi...


