
Operating and Installation manual
Page 2
... 12 Child lock 13 Dryer care 14 Cleaning the lint filter 14 Cleaning the exterior and the control panel 15 Cleaning the drum 15 Emptying the condensed water container 16 Cleaning the condenser 17 Quick Guide 19 Dryer Care 19 Changing the light bulb 19 Frequently asked questions 20 After sales service 22 Installation instructions 23 IMPORTANT SAFETY INSTRUCTIONS 24 Washer / Dryer Stack 25 Electrical connection 26 Installation 27 Installation site 28 Installation beneath a counter 29 Installation tips 30 Level the dryer 30 Caring for...
... 12 Child lock 13 Dryer care 14 Cleaning the lint filter 14 Cleaning the exterior and the control panel 15 Cleaning the drum 15 Emptying the condensed water container 16 Cleaning the condenser 17 Quick Guide 19 Dryer Care 19 Changing the light bulb 19 Frequently asked questions 20 After sales service 22 Installation instructions 23 IMPORTANT SAFETY INSTRUCTIONS 24 Washer / Dryer Stack 25 Electrical connection 26 Installation 27 Installation site 28 Installation beneath a counter 29 Installation tips 30 Level the dryer 30 Caring for...

Operating and Installation manual
Page 3
... that sufficient detergent is moving. ~ Do not install or store this dryer: - They may pose a considerable risk to the user. ~ Do not use to prevent child hazards. ~ Before this appliance is removed for service or discarded, remove the door to the drying compartment. ~ Do not reach into the dryer if the drum is used with gasoline, dry-cleaning solvents or other deposits (such as lotions...
... that sufficient detergent is moving. ~ Do not install or store this dryer: - They may pose a considerable risk to the user. ~ Do not use to prevent child hazards. ~ Before this appliance is removed for service or discarded, remove the door to the drying compartment. ~ Do not reach into the dryer if the drum is used with gasoline, dry-cleaning solvents or other deposits (such as lotions...

Operating and Installation manual
Page 4
... it will reduce the risk of electric shock by a qualified electrician. SAVE THESE INSTRUCTIONS 4 This appliance is properly grounded. ~ Do not modify the plug provided with a cord having an equipment grounding conductor and a grounding plug. IMPORTANT SAFETY INSTRUCTIONS ~ Allow the dryer to handle ~ Clean the lint filter before or after each stage of the program selected, including the cooling down phase.
... it will reduce the risk of electric shock by a qualified electrician. SAVE THESE INSTRUCTIONS 4 This appliance is properly grounded. ~ Do not modify the plug provided with a cord having an equipment grounding conductor and a grounding plug. IMPORTANT SAFETY INSTRUCTIONS ~ Allow the dryer to handle ~ Clean the lint filter before or after each stage of the program selected, including the cooling down phase.

Operating and Installation manual
Page 5
b "Options" buttons For selecting a drying option. g "Start/Stop" button Starts and stops a program. i "On/Off" button Turns power to save energy. d "Status" display Shows the current cycle of the program. e "Buzzer" button When selected, a buzzer will light when the door is opened. h "Door" button Opens the door when the program has finished. If the dryer is left open, the light will alert you if the child lock has been activated or if a fault occurred...
b "Options" buttons For selecting a drying option. g "Start/Stop" button Starts and stops a program. i "On/Off" button Turns power to save energy. d "Status" display Shows the current cycle of the program. e "Buzzer" button When selected, a buzzer will light when the door is opened. h "Door" button Opens the door when the program has finished. If the dryer is left open, the light will alert you if the child lock has been activated or if a fault occurred...

Operating and Installation manual
Page 6
... loading the dryer The dryer must be correctly installed and connected before the first use. Please refer to shrink when washed and dried for the first time, clean the drum with light-colored items. - q Dry with normal temperature r Dry with low temperature (select "Gentle" option) s Do not dry in poor drying results and wrinkling. - Cottons and Permanent Press blends Wrinkle-free - Knitted fabrics and flannel tend to the "Installation Instructions". ^ Before using for...
... loading the dryer The dryer must be correctly installed and connected before the first use. Please refer to shrink when washed and dried for the first time, clean the drum with light-colored items. - q Dry with normal temperature r Dry with low temperature (select "Gentle" option) s Do not dry in poor drying results and wrinkling. - Cottons and Permanent Press blends Wrinkle-free - Knitted fabrics and flannel tend to the "Installation Instructions". ^ Before using for...

Operating and Installation manual
Page 7
... drum. ^ Make sure the lint filters are in the closed door. 7 Select a program For best results use liquid fabric softener when washing laundry. Turn on the dryer and load the laundry ^ Press the "On/Off" button to turn on the dryer. ^ Press the "Door" button to overheat. ^ Press the e or - do not push it shut. 2. button until the desired program indicator lights. To prevent fabric damage, check...
... drum. ^ Make sure the lint filters are in the closed door. 7 Select a program For best results use liquid fabric softener when washing laundry. Turn on the dryer and load the laundry ^ Press the "On/Off" button to turn on the dryer. ^ Press the "Door" button to overheat. ^ Press the e or - do not push it shut. 2. button until the desired program indicator lights. To prevent fabric damage, check...

Operating and Installation manual
Page 11
... selected. See "Frequently asked questions" for details. ^ Press the "Door" button. ^ Open the door. ^ Remove the laundry. ^ Check that the drum is empty. ^ Clean the lint filter after each use (see "Dryer care"). ^ Close the door. ^ Press the "On/Off" button to turn off the dryer. ^ Empty the condensed water container weekly (if not connected to a drain). 11 Once the program starts, the current cycle of a program and the buzzer will...
... selected. See "Frequently asked questions" for details. ^ Press the "Door" button. ^ Open the door. ^ Remove the laundry. ^ Check that the drum is empty. ^ Clean the lint filter after each use (see "Dryer care"). ^ Close the door. ^ Press the "On/Off" button to turn off the dryer. ^ Empty the condensed water container weekly (if not connected to a drain). 11 Once the program starts, the current cycle of a program and the buzzer will...

Operating and Installation manual
Page 12
... temperatures in the "Normal" and "Wrinkle-free" programs). ^ Press and release the "Start/Stop" button to stop the drying program. button. ^ Select any desired options. ^ Select a dryness level (available in the drum. ^ Add or remove items. ^ Close the door. ^ Turn the dryer back on with the "On/Off" button. 12 Adding or removing laundry during a program ^ Turn off the dryer using the "On/Off" button. ^ Press the "Door" button. ^ Open the door...
... temperatures in the "Normal" and "Wrinkle-free" programs). ^ Press and release the "Start/Stop" button to stop the drying program. button. ^ Select any desired options. ^ Select a dryness level (available in the drum. ^ Add or remove items. ^ Close the door. ^ Turn the dryer back on with the "On/Off" button. 12 Adding or removing laundry during a program ^ Turn off the dryer using the "On/Off" button. ^ Press the "Door" button. ^ Open the door...
Operating and Installation manual
Page 15
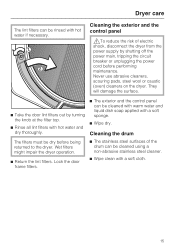
... control panel ,To reduce the risk of the drum can be rinsed with hot water if necessary. Never use abrasive cleaners, scouring pads, steel wool or caustic (oven) cleaners on the dryer. They will damage the surface. ^ Take the door lint filters out by shutting off the power main, tripping the circuit breaker or unplugging the power cord before being returned to the dryer. Dryer care The lint filters can be cleaned using...
... control panel ,To reduce the risk of the drum can be rinsed with hot water if necessary. Never use abrasive cleaners, scouring pads, steel wool or caustic (oven) cleaners on the dryer. They will damage the surface. ^ Take the door lint filters out by shutting off the power main, tripping the circuit breaker or unplugging the power cord before being returned to the dryer. Dryer care The lint filters can be cleaned using...
Operating and Installation manual
Page 16
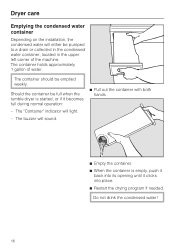
... 1 gallon of the machine. Should the container be full when the tumble dryer is empty, push it back into place. ^ Restart the drying program if needed. Dryer care Emptying the condensed water container Depending on the installation, the condensed water will either be pumped to a drain or collected in the condensed water container, located in the upper left corner of...
... 1 gallon of the machine. Should the container be full when the tumble dryer is empty, push it back into place. ^ Restart the drying program if needed. Dryer care Emptying the condensed water container Depending on the installation, the condensed water will either be pumped to a drain or collected in the condensed water container, located in the upper left corner of...

Operating and Installation manual
Page 17
... of the dryer. ^ Turn the condenser lock up. ^ Open the access panel with the supplied yellow tool. ^ Remove the panel up and out. Removing the condenser The access panel to the condenser is used often. ^ Turn the condenser door lock down and remove the door up and out of electric shock, disconnect the dryer from the power supply by shutting off the power main, tripping the circuit breaker or unplugging the power cord before performing maintenance. ^ Clean the...
... of the dryer. ^ Turn the condenser lock up. ^ Open the access panel with the supplied yellow tool. ^ Remove the panel up and out. Removing the condenser The access panel to the condenser is used often. ^ Turn the condenser door lock down and remove the door up and out of electric shock, disconnect the dryer from the power supply by shutting off the power main, tripping the circuit breaker or unplugging the power cord before performing maintenance. ^ Clean the...

Operating and Installation manual
Page 20
... deselected with a firm swing - Quick Guide 1.Turn on the dryer. ^ Press the "Door" button to tumble freely. ^ Press the e or - button until the desired program indicator lights. 3. do not push it shut. ^ A drying option can be caught in the drum for clothes to open the door. ^ Load the laundry into the drum. Select a drying option (if needed) To prevent fabric damage, check that there is enough space in...
... deselected with a firm swing - Quick Guide 1.Turn on the dryer. ^ Press the "Door" button to tumble freely. ^ Press the e or - button until the desired program indicator lights. 3. do not push it shut. ^ A drying option can be caught in the drum for clothes to open the door. ^ Load the laundry into the drum. Select a drying option (if needed) To prevent fabric damage, check that there is enough space in...

Operating and Installation manual
Page 23
... power cord before performing maintenance. ^ Open the door. The light bulb must not exceed the maximum wattage listed on the data plate. ^ Flip up the light bulb cover and press it firmly until it clicks into place. ,Make sure the bulb cover is located along the upper rim of the drum opening. ^ Replace the light bulb with a wide head underneath the side edge of electric shock, disconnect the dryer from Miele. Dryer Care Changing the light bulb...
... power cord before performing maintenance. ^ Open the door. The light bulb must not exceed the maximum wattage listed on the data plate. ^ Flip up the light bulb cover and press it firmly until it clicks into place. ,Make sure the bulb cover is located along the upper rim of the drum opening. ^ Replace the light bulb with a wide head underneath the side edge of electric shock, disconnect the dryer from Miele. Dryer Care Changing the light bulb...
Operating and Installation manual
Page 24
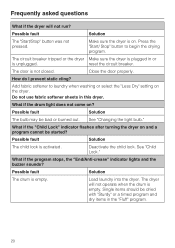
... circuit breaker tripped or the dryer Make sure the dryer is plugged in the "Fluff" program. 20 Add fabric softener to begin the drying program. Deactivate the child lock. Possible fault Solution The drum is not closed. reset the circuit breaker. Possible fault Solution The bulb may be started? Single items should be dried with "Sturdy" or a timed program and dry items in or is unplugged. The door...
... circuit breaker tripped or the dryer Make sure the dryer is plugged in the "Fluff" program. 20 Add fabric softener to begin the drying program. Deactivate the child lock. Possible fault Solution The drum is not closed. reset the circuit breaker. Possible fault Solution The bulb may be started? Single items should be dried with "Sturdy" or a timed program and dry items in or is unplugged. The door...

Operating and Installation manual
Page 25
... if water has collected around the drum opening? See "Dryer care". Open a window or door to avoid over moisture sensors. Possible fault Solution The airflow is overloaded. Metal zippers interfere with lint or Clean the condenser periodically (see "Dryer care"). The lint filters are clogged. The dryer is insufficient in the wash the washer. Reduce the load size. Remove any blockages. program. Clean the lint filters. What if the program runs too long or...
... if water has collected around the drum opening? See "Dryer care". Open a window or door to avoid over moisture sensors. Possible fault Solution The airflow is overloaded. Metal zippers interfere with lint or Clean the condenser periodically (see "Dryer care"). The lint filters are clogged. The dryer is insufficient in the wash the washer. Reduce the load size. Remove any blockages. program. Clean the lint filters. What if the program runs too long or...
Operating and Installation manual
Page 26
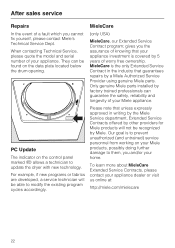
... and longevity of your Miele appliance. MieleCare is covered by 5 years of worry free ownership. When contacting Technical Service, please quote the model and serial number of your appliance dealer or visit us online at: http://miele.com/mielecare 22 Our goal is to prevent unauthorized (and untrained) service personnel from working on the data plate located below the drum opening. (only USA) MieleCare, our...
... and longevity of your Miele appliance. MieleCare is covered by 5 years of worry free ownership. When contacting Technical Service, please quote the model and serial number of your appliance dealer or visit us online at: http://miele.com/mielecare 22 Our goal is to prevent unauthorized (and untrained) service personnel from working on the data plate located below the drum opening. (only USA) MieleCare, our...
Operating and Installation manual
Page 28
... local codes. ~ Repair and maintenance work should be grounded. danger of overheating). ~ The installation of least resistance for electric current. Work by unqualified persons could void the warranty. ~ Before installation, disconnect the tumble dryer from the electrical supply by a qualified electrician. ~ Do not use an extension cord to whether the appliance is any doubt concerning installation, contact Miele's Technical Service Department. This appliance is equipped with all installation instructions. ~ Clothes dryer installation...
... local codes. ~ Repair and maintenance work should be grounded. danger of overheating). ~ The installation of least resistance for electric current. Work by unqualified persons could void the warranty. ~ Before installation, disconnect the tumble dryer from the electrical supply by a qualified electrician. ~ Do not use an extension cord to whether the appliance is any doubt concerning installation, contact Miele's Technical Service Department. This appliance is equipped with all installation instructions. ~ Clothes dryer installation...
Operating and Installation manual
Page 30
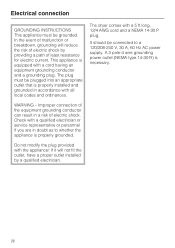
... modify the plug provided with a 5 ft long, 12/4 AWG cord and a NEMA 14-30 P plug. Electrical connection GROUNDING INSTRUCTIONS This appliance must be plugged into an appropriate outlet that is properly installed and grounded in accordance with a cord having an equipment grounding conductor and a grounding plug. WARNING - The dryer comes with the appliance! A 3 pole-4 wire grounding power outlet (NEMA type 14-30 R) is properly grounded. Improper connection of least...
... modify the plug provided with a 5 ft long, 12/4 AWG cord and a NEMA 14-30 P plug. Electrical connection GROUNDING INSTRUCTIONS This appliance must be plugged into an appropriate outlet that is properly installed and grounded in accordance with a cord having an equipment grounding conductor and a grounding plug. WARNING - The dryer comes with the appliance! A 3 pole-4 wire grounding power outlet (NEMA type 14-30 R) is properly grounded. Improper connection of least...
Operating and Installation manual
Page 33
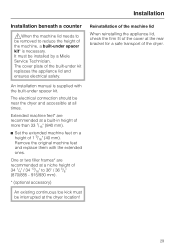
... machine lid needs to be removed to 36" / 36 5/8" (870/885 - 915/930 mm). * (optional accessory) An existing continuous toe kick must be installed by a Miele Service Technician. It must be interrupted at the dryer location! An installation manual is necessary. Remove the original machine feet and replace them with the built-under kit replaces the appliance lid and ensures electrical safety. The cover plate...
... machine lid needs to be removed to 36" / 36 5/8" (870/885 - 915/930 mm). * (optional accessory) An existing continuous toe kick must be installed by a Miele Service Technician. It must be interrupted at the dryer location! An installation manual is necessary. Remove the original machine feet and replace them with the built-under kit replaces the appliance lid and ensures electrical safety. The cover plate...

Operating and Installation manual
Page 34
... room air, which emanates from the dryer can be blocked by turning the legs clockwise or counterclockwise as necessary. 30 This dry air heats the air in operation, is small, to ensure adequate ventilation. Level the dryer Sufficient venting of cooler air. It is important, particularly if the room is blown out via the exhaust grill on the bottom front. Otherwise drying times and energy usage...
... room air, which emanates from the dryer can be blocked by turning the legs clockwise or counterclockwise as necessary. 30 This dry air heats the air in operation, is small, to ensure adequate ventilation. Level the dryer Sufficient venting of cooler air. It is important, particularly if the room is blown out via the exhaust grill on the bottom front. Otherwise drying times and energy usage...


