Operating and Installation manual
Page 1
US, CA M.-Nr. 09 460 400 en - Operating and Installation Instructions Condenser Dryer T 8023 C To prevent accidents and appliance damage read these instructions before installation or use.
US, CA M.-Nr. 09 460 400 en - Operating and Installation Instructions Condenser Dryer T 8023 C To prevent accidents and appliance damage read these instructions before installation or use.

Operating and Installation manual
Page 2
... 14 Cleaning the lint filter 14 Cleaning the exterior and the control panel 15 Cleaning the drum 15 Emptying the condensed water container 16 Cleaning the condenser 17 Quick Guide 19 Dryer Care 19 Changing the light bulb 19 Frequently asked questions 20 After sales service 22 Installation instructions 23 IMPORTANT SAFETY INSTRUCTIONS...
... 14 Cleaning the lint filter 14 Cleaning the exterior and the control panel 15 Cleaning the drum 15 Emptying the condensed water container 16 Cleaning the condenser 17 Quick Guide 19 Dryer Care 19 Changing the light bulb 19 Frequently asked questions 20 After sales service 22 Installation instructions 23 IMPORTANT SAFETY INSTRUCTIONS...

Operating and Installation manual
Page 11
...laundry. ^ Check that the drum is empty. ^ Clean the lint filter after each use (see "Dryer care"). ^ Close the door. ^ Press the "On/Off" button to turn off the dryer. ^ Empty the condensed water container weekly (if not connected to a drain). 11 Start the program ^ Press the "Start/Stop..." button. Using the dryer 6. If a fault occurred, a "FAULT" indicator will be indicated in the "STATUS" ...
...laundry. ^ Check that the drum is empty. ^ Clean the lint filter after each use (see "Dryer care"). ^ Close the door. ^ Press the "On/Off" button to turn off the dryer. ^ Empty the condensed water container weekly (if not connected to a drain). 11 Start the program ^ Press the "Start/Stop..." button. Using the dryer 6. If a fault occurred, a "FAULT" indicator will be indicated in the "STATUS" ...
Operating and Installation manual
Page 16
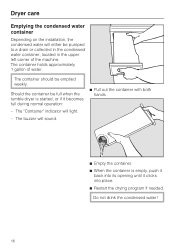
...becomes full during normal operation: - Do not drink the condensed water! 16 Dryer care Emptying the condensed water container Depending on the installation, the condensed water will either be emptied weekly. Should the container be full when the tumble dryer is empty, push it back into place. ^ Restart the... drying program if needed. The container should be pumped to a drain or collected in the condensed water container, located in the upper left corner of water....
...becomes full during normal operation: - Do not drink the condensed water! 16 Dryer care Emptying the condensed water container Depending on the installation, the condensed water will either be emptied weekly. Should the container be full when the tumble dryer is empty, push it back into place. ^ Restart the... drying program if needed. The container should be pumped to a drain or collected in the condensed water container, located in the upper left corner of water....

Operating and Installation manual
Page 17
... performing maintenance. ^ Clean the condenser every 6 months and when the "Filter/Vent" indicator lights. Dryer care Cleaning the condenser ,To reduce the risk of the condenser access area. ^ Pull out the condenser. 17 Clean approximately every 100 uses when the dryer is located on the lower left... corner of the dryer. ^ Turn the condenser lock up. ^ Open the ...
... performing maintenance. ^ Clean the condenser every 6 months and when the "Filter/Vent" indicator lights. Dryer care Cleaning the condenser ,To reduce the risk of the condenser access area. ^ Pull out the condenser. 17 Clean approximately every 100 uses when the dryer is located on the lower left... corner of the dryer. ^ Turn the condenser lock up. ^ Open the ...

Operating and Installation manual
Page 18
Dryer care Rinsing the condenser Returning the Condenser ^ Put the condenser back in place in place. ^ Restore power. ^ Rinse the condenser along the left side with warm water. ^ Rinse the condenser from the front with warm water. ^ Check the condenser for visible soiling. Rinse the condenser until clean. ^ Place the condenser lengthwise on a towel to air dry. 18 Check that the gasket around the front of the condenser is flush and not crimped. ^ To prevent leaks, make certain the condenser is pushed in all the way and locked in the reverse order.
Dryer care Rinsing the condenser Returning the Condenser ^ Put the condenser back in place in place. ^ Restore power. ^ Rinse the condenser along the left side with warm water. ^ Rinse the condenser from the front with warm water. ^ Check the condenser for visible soiling. Rinse the condenser until clean. ^ Place the condenser lengthwise on a towel to air dry. 18 Check that the gasket around the front of the condenser is flush and not crimped. ^ To prevent leaks, make certain the condenser is pushed in all the way and locked in the reverse order.

Operating and Installation manual
Page 25
Possible fault Solution The lint filter is overloaded. airflow. The dryer is clogged. The condenser is clogged with the dryer's Select a timed program to increase the dryer. The laundry was not spun sufficiently in Select a higher spin speed in the room is ... over moisture sensors. Metal zippers interfere with lint or Clean the condenser periodically (see "Dryer care"). Possible fault This is lit? Frequently asked questions What if the "Filter/Vent" fault indicator is condensed moisture from the laundry. 21 Reduce the load size. drying. ...
Possible fault Solution The lint filter is overloaded. airflow. The dryer is clogged. The condenser is clogged with the dryer's Select a timed program to increase the dryer. The laundry was not spun sufficiently in Select a higher spin speed in the room is ... over moisture sensors. Metal zippers interfere with lint or Clean the condenser periodically (see "Dryer care"). Possible fault This is lit? Frequently asked questions What if the "Filter/Vent" fault indicator is condensed moisture from the laundry. 21 Reduce the load size. drying. ...
Operating and Installation manual
Page 32
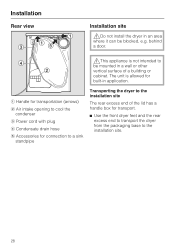
... (arrows) b Air intake opening to cool the condenser c Power cord with plug d Condensate drain hose e Accessories for connection to a sink standpipe Transporting the dryer to the installation site. 28 Installation Rear view Installation site ,Do not install the dryer in an area where it can be mounted in ... handle box for built-in application. behind a door. ,This appliance is allowed for transport. ^ Use the front dryer feet and the rear excess end to transport the dryer from the packaging base to the installation site The rear excess end of a building or cabinet.
... (arrows) b Air intake opening to cool the condenser c Power cord with plug d Condensate drain hose e Accessories for connection to a sink standpipe Transporting the dryer to the installation site. 28 Installation Rear view Installation site ,Do not install the dryer in an area where it can be mounted in ... handle box for built-in application. behind a door. ,This appliance is allowed for transport. ^ Use the front dryer feet and the rear excess end to transport the dryer from the packaging base to the installation site The rear excess end of a building or cabinet.

Operating and Installation manual
Page 35
Installation External water drain When drying is in progress, condensed water is pumped into the condensed water container through the drain hose at hand. ^... m) If the hose is not long enough, an extension hose is installed near a sink or a standpipe so that the condensed water container does not have to prevent the drain hose from the clamps. Installing the drain hose Do not pull or kink... drain hose, it from becoming kinked. 31 The condensed water can also be drained directly if the machine is available as an optional accessory from the Miele. ^ Pull the drain hose off the holder....
Installation External water drain When drying is in progress, condensed water is pumped into the condensed water container through the drain hose at hand. ^... m) If the hose is not long enough, an extension hose is installed near a sink or a standpipe so that the condensed water container does not have to prevent the drain hose from the clamps. Installing the drain hose Do not pull or kink... drain hose, it from becoming kinked. 31 The condensed water can also be drained directly if the machine is available as an optional accessory from the Miele. ^ Pull the drain hose off the holder....
T8023C Condenser Dryer
Page 2
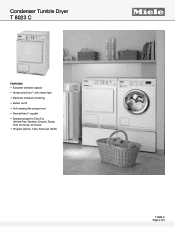
Condenser Tumble Dryer T 8023 C FEATURES European standard capacity Honeycomb Drum™ with interior light Electronic moisture monitoring Buzzer on/off Anti-creasing after program end RemoteVision™ capable Standard programs: Extra Dry, Wrinkle-Free, Woolens, Smooth, Sturdy, Fluff, 20 minute, 30 minute Program options: Turbo, Full Load, Gentle FOREVER BETTER T 8023 C Page 2 of 3
Condenser Tumble Dryer T 8023 C FEATURES European standard capacity Honeycomb Drum™ with interior light Electronic moisture monitoring Buzzer on/off Anti-creasing after program end RemoteVision™ capable Standard programs: Extra Dry, Wrinkle-Free, Woolens, Smooth, Sturdy, Fluff, 20 minute, 30 minute Program options: Turbo, Full Load, Gentle FOREVER BETTER T 8023 C Page 2 of 3


