Operating and Installation manual
Page 1
US, CA M.-Nr. 09 460 400 en - Operating and Installation Instructions Condenser Dryer T 8023 C To prevent accidents and appliance damage read these instructions before installation or use.
US, CA M.-Nr. 09 460 400 en - Operating and Installation Instructions Condenser Dryer T 8023 C To prevent accidents and appliance damage read these instructions before installation or use.

Operating and Installation manual
Page 2
...At the end of a program 11 Canceling or changing a program 12 Adding or removing laundry during a program 12 Child lock 13 Dryer care 14 Cleaning the lint filter 14 Cleaning the exterior and the control panel 15 Cleaning the drum 15 Emptying the condensed water container ...16 Cleaning the condenser 17 Quick Guide 19 Dryer Care 19 Changing the light bulb 19 Frequently asked questions 20 After sales service 22 Installation instructions 23 IMPORTANT SAFETY INSTRUCTIONS 24 Washer...
...At the end of a program 11 Canceling or changing a program 12 Adding or removing laundry during a program 12 Child lock 13 Dryer care 14 Cleaning the lint filter 14 Cleaning the exterior and the control panel 15 Cleaning the drum 15 Emptying the condensed water container ...16 Cleaning the condenser 17 Quick Guide 19 Dryer Care 19 Changing the light bulb 19 Frequently asked questions 20 After sales service 22 Installation instructions 23 IMPORTANT SAFETY INSTRUCTIONS 24 Washer...

Operating and Installation manual
Page 3
...- items with hair spray, nail polish remover, etc. Loose filling could cause the laundry to prevent child hazards. ~ Before this dryer. IMPORTANT SAFETY INSTRUCTIONS ,WARNING - items which have been damaged. They may give off vapors that have been previously cleaned, washed, soaked... detergent is used with flammable cleaning agents or items containing acetone, alcohol, petrol, stain remover, wax or chemicals from the dryer. - Close supervision is necessary when the appliance is used near children. Repairs to electrical appliances should only be dried in ...
...- items with hair spray, nail polish remover, etc. Loose filling could cause the laundry to prevent child hazards. ~ Before this dryer. IMPORTANT SAFETY INSTRUCTIONS ,WARNING - items which have been damaged. They may give off vapors that have been previously cleaned, washed, soaked... detergent is used with flammable cleaning agents or items containing acetone, alcohol, petrol, stain remover, wax or chemicals from the dryer. - Close supervision is necessary when the appliance is used near children. Repairs to electrical appliances should only be dried in ...

Operating and Installation manual
Page 4
... INSTRUCTIONS This appliance must be plugged into an appropriate outlet that the items being removed are in a risk of electric shock. This dryer is properly installed and grounded in accordance with a cord having an equipment grounding conductor and a grounding plug. Contact a qualified electrician if... the lint filter before or after each stage of the program selected, including the cooling down phase. IMPORTANT SAFETY INSTRUCTIONS ~ Allow the dryer to complete each load. ~ Keep the area around the air intake (toe kick) and adjacent surrounding areas free from lint, dust and...
... INSTRUCTIONS This appliance must be plugged into an appropriate outlet that the items being removed are in a risk of electric shock. This dryer is properly installed and grounded in accordance with a cord having an equipment grounding conductor and a grounding plug. Contact a qualified electrician if... the lint filter before or after each stage of the program selected, including the cooling down phase. IMPORTANT SAFETY INSTRUCTIONS ~ Allow the dryer to complete each load. ~ Keep the area around the air intake (toe kick) and adjacent surrounding areas free from lint, dust and...

Operating and Installation manual
Page 5
... pressed. If the door is left open, the light will alert you if the child lock has been activated or if a fault occurred. 5 If the dryer is opened. e "Buzzer" button When selected, a buzzer will light when the door is on and off. i "On/Off" button Turns power to save energy. f "FAULT...
... pressed. If the door is left open, the light will alert you if the child lock has been activated or if a fault occurred. 5 If the dryer is opened. e "Buzzer" button When selected, a buzzer will light when the door is on and off. i "On/Off" button Turns power to save energy. f "FAULT...

Operating and Installation manual
Page 6
...creasing - Permanent Press: select the Hand Iron dryness level and reduce the load size for special drying instructions. Overloading the dryer will result in the dryer, such as polyester: select the Gentle option to the "Installation Instructions". ^ Before using for the first time. Close.../ 45 min - Before drying, check fabric care labels for best drying results - Do not overload the drum! Before loading the dryer The dryer must be correctly installed and connected before the first use. Cottons and Permanent Press blends Wrinkle-free - Do not over dry these fabrics...
...creasing - Permanent Press: select the Hand Iron dryness level and reduce the load size for special drying instructions. Overloading the dryer will result in the dryer, such as polyester: select the Gentle option to the "Installation Instructions". ^ Before using for the first time. Close.../ 45 min - Before drying, check fabric care labels for best drying results - Do not overload the drum! Before loading the dryer The dryer must be correctly installed and connected before the first use. Cottons and Permanent Press blends Wrinkle-free - Do not over dry these fabrics...

Operating and Installation manual
Page 7
... softener sheet may clog the filters and cause the dryer to open the door. ^ Load the laundry loosely into the drum. ^ Make sure the lint filters are in the closed door. 7 button until the desired ... when washing laundry. To prevent fabric damage, check that laundry will not be caught in place. ^ Close the door with a firm swing - Turn on the dryer and load the laundry ^ Press the "On/Off" button to turn on the...
... softener sheet may clog the filters and cause the dryer to open the door. ^ Load the laundry loosely into the drum. ^ Make sure the lint filters are in the closed door. 7 button until the desired ... when washing laundry. To prevent fabric damage, check that laundry will not be caught in place. ^ Close the door with a firm swing - Turn on the dryer and load the laundry ^ Press the "On/Off" button to turn on the...

Operating and Installation manual
Page 8
... items or very small loads, - 45 min e.g. pants and shirts. More Dry Uniform loads of the program while still slightly damp. easily. sheets, - Using the dryer Program Fabric Note Normal Available drying options: Turbo, Gentle, Anti-crease Extra Dry Multi-layer fabrics, mixed loads of - beach towels, swimsuits. 8
... items or very small loads, - 45 min e.g. pants and shirts. More Dry Uniform loads of the program while still slightly damp. easily. sheets, - Using the dryer Program Fabric Note Normal Available drying options: Turbo, Gentle, Anti-crease Extra Dry Multi-layer fabrics, mixed loads of - beach towels, swimsuits. 8

Operating and Installation manual
Page 9
3. Gentle For drying delicate fabrics slowly at a lower temperature. Anti-crease Prevents wrinkles if laundry is not removed immediately after the end of the button. The drum periodically rotates for sturdy fabrics with each press of a program. Using the dryer OPTIONS Turbo Fast drying for about 1 hour. 9 Select a drying option (if needed) ^ A drying option can be selected or deselected with increased temperature and a reduced program length.
3. Gentle For drying delicate fabrics slowly at a lower temperature. Anti-crease Prevents wrinkles if laundry is not removed immediately after the end of the button. The drum periodically rotates for sturdy fabrics with each press of a program. Using the dryer OPTIONS Turbo Fast drying for about 1 hour. 9 Select a drying option (if needed) ^ A drying option can be selected or deselected with increased temperature and a reduced program length.

Operating and Installation manual
Page 10
... be selected in the "Normal" and "Wrinkle-free" programs. (The dryness level of the program. To adjust the buzzer volume: - Indicator light: on - turn the dryer on = buzzer selected off = buzzer not selected ^ Press the selection button until its indicator is lit, press the "Buzzer" button so the indicator light goes... (if desired) ^ Press the "Buzzer" button to have a tone beep at the end of the other programs cannot be selected. close the door - Using the dryer 4. Select the dryness level The dryness level can be adjusted.) 5. select a program -
... be selected in the "Normal" and "Wrinkle-free" programs. (The dryness level of the program. To adjust the buzzer volume: - Indicator light: on - turn the dryer on = buzzer selected off = buzzer not selected ^ Press the selection button until its indicator is lit, press the "Buzzer" button so the indicator light goes... (if desired) ^ Press the "Buzzer" button to have a tone beep at the end of the other programs cannot be selected. close the door - Using the dryer 4. Select the dryness level The dryness level can be adjusted.) 5. select a program -

Operating and Installation manual
Page 11
... the program will be indicated in the "STATUS" display. 7. Once the program starts, the current cycle of a program and the buzzer will light. Using the dryer 6. See "Frequently asked questions" for details. ^ Press the "Door" button. ^ Open the door. ^ Remove the laundry. ^ Check that the drum is... empty. ^ Clean the lint filter after each use (see "Dryer care"). ^ Close the door. ^ Press the "On/Off" button to turn off the dryer. ^ Empty the condensed water container weekly (if not connected to a drain). 11
... the program will be indicated in the "STATUS" display. 7. Once the program starts, the current cycle of a program and the buzzer will light. Using the dryer 6. See "Frequently asked questions" for details. ^ Press the "Door" button. ^ Open the door. ^ Remove the laundry. ^ Check that the drum is... empty. ^ Clean the lint filter after each use (see "Dryer care"). ^ Close the door. ^ Press the "On/Off" button to turn off the dryer. ^ Empty the condensed water container weekly (if not connected to a drain). 11

Operating and Installation manual
Page 12
.... ^ Select any desired options. ^ Select a dryness level (available in the drum. ^ Add or remove items. ^ Close the door. ^ Turn the dryer back on with the "On/Off" button. 12 Do not touch the rear of burns due to high temperatures in the "Normal" and "Wrinkle-free" ... drying: ^ Select the new program by pressing the e or - Adding or removing laundry during a program ^ Turn off the dryer using the "On/Off" button. ^ Press the "Door" button. ^ Open the door. ,CAUTION - Using the dryer Canceling or changing a program ^ Press and release the "Start/Stop" button to start the new program.
.... ^ Select any desired options. ^ Select a dryness level (available in the drum. ^ Add or remove items. ^ Close the door. ^ Turn the dryer back on with the "On/Off" button. 12 Do not touch the rear of burns due to high temperatures in the "Normal" and "Wrinkle-free" ... drying: ^ Select the new program by pressing the e or - Adding or removing laundry during a program ^ Turn off the dryer using the "On/Off" button. ^ Press the "Door" button. ^ Open the door. ,CAUTION - Using the dryer Canceling or changing a program ^ Press and release the "Start/Stop" button to start the new program.

Operating and Installation manual
Page 13
...1. Press the "OPTIONS" button 3 times. 5. Child lock Child lock When activated, the child lock prevents the dryer from being operated by locking the control panel functions. The dryer can be turned on the dryer with the "On/Off" button. 4. The control panel is now locked. 6. Release the "Anti-crease" and...now unlocked. 6. Turn off and the door is closed. 2. Turn on but not started. Make sure the dryer is turned off the dryer using the "On/Off" button. Turn off the dryer using the "On/Off" button. 13 Press and hold the "Anti-crease" and "DRYNESS" buttons at the ...
...1. Press the "OPTIONS" button 3 times. 5. Child lock Child lock When activated, the child lock prevents the dryer from being operated by locking the control panel functions. The dryer can be turned on the dryer with the "On/Off" button. 4. The control panel is now locked. 6. Release the "Anti-crease" and...now unlocked. 6. Turn off and the door is closed. 2. Turn on but not started. Make sure the dryer is turned off the dryer using the "On/Off" button. Turn off the dryer using the "On/Off" button. 13 Press and hold the "Anti-crease" and "DRYNESS" buttons at the ...

Operating and Installation manual
Page 14
Dryer care Cleaning the lint filter The lint filter must be cleaned after every program. ^ Open the door and remove the lint filter, 1, by gently lifting it upwards. ^ Remove the lint from the door frame lint filter with your fingers. ^ Any lint remaining in the hollow casing of the door can be removed through the gap at the bottom with a dust brush or vacuum. ^ Clean the gasket, 2, with a damp cloth. ^ Return the lint filter and close the door. ^ Wipe the lint off the filter with your hand (do not use any sharp objects!) 14
Dryer care Cleaning the lint filter The lint filter must be cleaned after every program. ^ Open the door and remove the lint filter, 1, by gently lifting it upwards. ^ Remove the lint from the door frame lint filter with your fingers. ^ Any lint remaining in the hollow casing of the door can be removed through the gap at the bottom with a dust brush or vacuum. ^ Clean the gasket, 2, with a damp cloth. ^ Return the lint filter and close the door. ^ Wipe the lint off the filter with your hand (do not use any sharp objects!) 14
Operating and Installation manual
Page 15
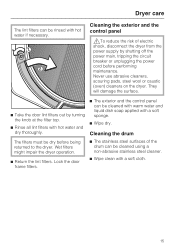
... the door lint filters out by shutting off the power main, tripping the circuit breaker or unplugging the power cord before being returned to the dryer. Cleaning the drum The filters must be rinsed with a soft cloth. 15 Cleaning the exterior and the control panel ,To reduce the risk ...of the drum can be cleaned using a non-abrasive stainless steel cleaner. ^ Return the lint filters. Dryer care The lint filters can be dry before performing maintenance. Never use abrasive cleaners, scouring pads, steel wool or caustic (oven) cleaners on the...
... the door lint filters out by shutting off the power main, tripping the circuit breaker or unplugging the power cord before being returned to the dryer. Cleaning the drum The filters must be rinsed with a soft cloth. 15 Cleaning the exterior and the control panel ,To reduce the risk ...of the drum can be cleaned using a non-abrasive stainless steel cleaner. ^ Return the lint filters. Dryer care The lint filters can be dry before performing maintenance. Never use abrasive cleaners, scouring pads, steel wool or caustic (oven) cleaners on the...
Operating and Installation manual
Page 16
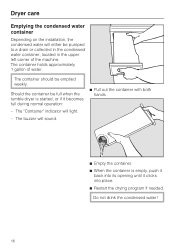
...the container is started, or if it clicks into its opening until it becomes full during normal operation: - Do not drink the condensed water! 16 Dryer care Emptying the condensed water container Depending on the installation, the condensed water will either be pumped to a drain or collected in the condensed water... of water. The container holds approximately 1 gallon of the machine. Should the container be emptied weekly. The container should be full when the tumble dryer is empty, push it back into place. ^ Restart the drying program if needed. The buzzer will light. -
...the container is started, or if it clicks into its opening until it becomes full during normal operation: - Do not drink the condensed water! 16 Dryer care Emptying the condensed water container Depending on the installation, the condensed water will either be pumped to a drain or collected in the condensed water... of water. The container holds approximately 1 gallon of the machine. Should the container be emptied weekly. The container should be full when the tumble dryer is empty, push it back into place. ^ Restart the drying program if needed. The buzzer will light. -

Operating and Installation manual
Page 17
... condenser is used often. ^ Turn the condenser door lock down and remove the door up and out of electric shock, disconnect the dryer from the power supply by shutting off the power main, tripping the circuit breaker or unplugging the power cord before performing maintenance. ^ ...Clean the condenser every 6 months and when the "Filter/Vent" indicator lights. Dryer care Cleaning the condenser ,To reduce the risk of the condenser access area. ^ Pull out the condenser. 17 Clean approximately every 100 uses ...
... condenser is used often. ^ Turn the condenser door lock down and remove the door up and out of electric shock, disconnect the dryer from the power supply by shutting off the power main, tripping the circuit breaker or unplugging the power cord before performing maintenance. ^ ...Clean the condenser every 6 months and when the "Filter/Vent" indicator lights. Dryer care Cleaning the condenser ,To reduce the risk of the condenser access area. ^ Pull out the condenser. 17 Clean approximately every 100 uses ...

Operating and Installation manual
Page 18
Rinse the condenser until clean. ^ Place the condenser lengthwise on a towel to air dry. 18 Check that the gasket around the front of the condenser is flush and not crimped. ^ To prevent leaks, make certain the condenser is pushed in all the way and locked in the reverse order. Dryer care Rinsing the condenser Returning the Condenser ^ Put the condenser back in place in place. ^ Restore power. ^ Rinse the condenser along the left side with warm water. ^ Rinse the condenser from the front with warm water. ^ Check the condenser for visible soiling.
Rinse the condenser until clean. ^ Place the condenser lengthwise on a towel to air dry. 18 Check that the gasket around the front of the condenser is flush and not crimped. ^ To prevent leaks, make certain the condenser is pushed in all the way and locked in the reverse order. Dryer care Rinsing the condenser Returning the Condenser ^ Put the condenser back in place in place. ^ Restore power. ^ Rinse the condenser along the left side with warm water. ^ Rinse the condenser from the front with warm water. ^ Check the condenser for visible soiling.

Operating and Installation manual
Page 19
Quick Guide Remove this guide for easy reference Please read all instructions, especially the "Important Safety Instructions", before using the dryer.
Quick Guide Remove this guide for easy reference Please read all instructions, especially the "Important Safety Instructions", before using the dryer.

Operating and Installation manual
Page 20
Select a program ^ Press the "On/Off" button to turn on the dryer and load the laundry 2. button until the desired program indicator lights. 3. Select a drying option (if needed) To prevent fabric damage, check that there is enough ... door with each press of the button. Make sure that laundry will not be selected or deselected with a firm swing - Quick Guide 1.Turn on the dryer. ^ Press the "Door" button to tumble freely. ^ Press the e or - do not push it shut. ^ A drying option can be caught in the drum for clothes...
Select a program ^ Press the "On/Off" button to turn on the dryer and load the laundry 2. button until the desired program indicator lights. 3. Select a drying option (if needed) To prevent fabric damage, check that there is enough ... door with each press of the button. Make sure that laundry will not be selected or deselected with a firm swing - Quick Guide 1.Turn on the dryer. ^ Press the "Door" button to tumble freely. ^ Press the e or - do not push it shut. ^ A drying option can be caught in the drum for clothes...


