User Guide
Page 2
... Instructions on page 5 before you for purchasing the Dashboard Camera. Got everything? • Dashboard Camera • Windshield Mount • Charging Cable • Car Adapter • User Manual Please keep your original dated sales receipt for warranty coverage. For product related questions, please call: US and Canada 1-888-331-3383 E-mail: support@motorolastore.com On the Web: www.motorolastore.com/support This User's Guide...
... Instructions on page 5 before you for purchasing the Dashboard Camera. Got everything? • Dashboard Camera • Windshield Mount • Charging Cable • Car Adapter • User Manual Please keep your original dated sales receipt for warranty coverage. For product related questions, please call: US and Canada 1-888-331-3383 E-mail: support@motorolastore.com On the Web: www.motorolastore.com/support This User's Guide...

User Guide
Page 3
Menu/Back button 4. Down arrow 8. Mount socket 13. Video/Photo/Replay mode switcher 2. Speaker 5. Status LED 9. OK/Enter button 3. Short press: Mute Long press: SOS mode 7. Short press when OFF: Power ON Short press when ON: LED switch Long press when ON: Power OFF 16. Reset button 12. Lens 11. Power LED 10. Memory card slot 15. Up arrow + 6. USB/Power socket 14. Overview of your Dashboard Camera 1. LED lights
Menu/Back button 4. Down arrow 8. Mount socket 13. Video/Photo/Replay mode switcher 2. Speaker 5. Status LED 9. OK/Enter button 3. Short press: Mute Long press: SOS mode 7. Short press when OFF: Power ON Short press when ON: LED switch Long press when ON: Power OFF 16. Reset button 12. Lens 11. Power LED 10. Memory card slot 15. Up arrow + 6. USB/Power socket 14. Overview of your Dashboard Camera 1. LED lights
User Guide
Page 4
Technical Specifications 33 Table of contents 1. Table of contents 4 Getting Started 6 2.1 Installing your dashboard camera 8 3.1 Switching modes 9 3.2 Video recording mode 10 3.3 Photo shooting mode 10 3.4 Replay mode 11 3.5 Parking mode 11 3.6 SOS mode 12 3.7 Motion detection 12 4. General Information 23 6. Using your device 6 2.2 First use 7 3. Settings 13 4.1 Main Settings 13 4.2 Video Settings 16 4.3 Photo Settings 19 4.4 Playback settings 21 5. Safety Instructions 5 2.
Technical Specifications 33 Table of contents 1. Table of contents 4 Getting Started 6 2.1 Installing your dashboard camera 8 3.1 Switching modes 9 3.2 Video recording mode 10 3.3 Photo shooting mode 10 3.4 Replay mode 11 3.5 Parking mode 11 3.6 SOS mode 12 3.7 Motion detection 12 4. General Information 23 6. Using your device 6 2.2 First use 7 3. Settings 13 4.1 Main Settings 13 4.2 Video Settings 16 4.3 Photo Settings 19 4.4 Playback settings 21 5. Safety Instructions 5 2.
User Guide
Page 5
.... • Never modify modes, settings or program your device while your car's service manual for wrong or unlawful use of dash cams can be regulated by law in motion. • Ensure the device and its power cord are installed as per instructed on the use of dash cams. In some jurisdictions, the use of the dash cam. 5 Safety Instructions Before using the dash cam. It is in some...
.... • Never modify modes, settings or program your device while your car's service manual for wrong or unlawful use of dash cams can be regulated by law in motion. • Ensure the device and its power cord are installed as per instructed on the use of dash cams. In some jurisdictions, the use of the dash cam. 5 Safety Instructions Before using the dash cam. It is in some...

User Guide
Page 6
... within the rear-view mirror area and within the wiper cleaning area to get the clearest possible view. • Your device comes with a 3.6m USB power cable, organize the power cord so that it doesn't interfere with the driver's vision, use cable clips to secure the power cord if necessary. • Place the device on the windshield mount first. Getting Started...
... within the rear-view mirror area and within the wiper cleaning area to get the clearest possible view. • Your device comes with a 3.6m USB power cable, organize the power cord so that it doesn't interfere with the driver's vision, use cable clips to secure the power cord if necessary. • Place the device on the windshield mount first. Getting Started...
User Guide
Page 7
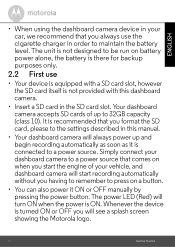
... card slot, however the SD card itself is connected to press on a button. • You can also power it ON or OFF manually by pressing the power button. The unit is not designed to maintain the battery level. Whenever the device is turned ON or OFF you format the SD card, please to the settings described in this dashboard camera. • Insert a SD card...
... card slot, however the SD card itself is connected to press on a button. • You can also power it ON or OFF manually by pressing the power button. The unit is not designed to maintain the battery level. Whenever the device is turned ON or OFF you format the SD card, please to the settings described in this dashboard camera. • Insert a SD card...

User Guide
Page 8
... duration can be changed in the video settings screen, see 4.2 Video Settings. Your dashboard camera will automatically overwrite the oldest footages in first out basis. The sensitivity of up to the SD card the cluster during which no event has been detected. Using your SD card is recording. • Your device records video by clusters of the sensor can be changed in . Each time a shock is equipped...
... duration can be changed in the video settings screen, see 4.2 Video Settings. Your dashboard camera will automatically overwrite the oldest footages in first out basis. The sensitivity of up to the SD card the cluster during which no event has been detected. Using your SD card is recording. • Your device records video by clusters of the sensor can be changed in . Each time a shock is equipped...

User Guide
Page 9
... 3.1 Switching modes Your dash camera has 3 main modes for recording and viewing: Video recording Main function and default mode for video recording. The driver must never switch modes while the car is in video recording mode, press the OK button to stop video recording then press the MODE button to switch to view and manage photos and videos stored inside the SD card. You can also connect the device to your computer using the supplied USB cable to photo mode. Pressing the MODE button...
... 3.1 Switching modes Your dash camera has 3 main modes for recording and viewing: Video recording Main function and default mode for video recording. The driver must never switch modes while the car is in video recording mode, press the OK button to stop video recording then press the MODE button to switch to view and manage photos and videos stored inside the SD card. You can also connect the device to your computer using the supplied USB cable to photo mode. Pressing the MODE button...

User Guide
Page 10
... powered on. IMPORTANT! You can manually turn video recording off , the sensor will stop detecting shocks and no video will be saved to the SD card. 3.3 Photo shooting mode While in video recording mode, press the OK button to stop video recording then press the MODE button to switch to 4.3 Photo Settings for detailed description of the settings menu. Please refer to 4.2 Video Settings for detailed description of the settings menu. Please refer to photo mode. Using...
... powered on. IMPORTANT! You can manually turn video recording off , the sensor will stop detecting shocks and no video will be saved to the SD card. 3.3 Photo shooting mode While in video recording mode, press the OK button to stop video recording then press the MODE button to switch to 4.3 Photo Settings for detailed description of the settings menu. Please refer to 4.2 Video Settings for detailed description of the settings menu. Please refer to photo mode. Using...

User Guide
Page 11
... Using your dashboard camera You can only record and save footage after an event has been detected by mode and will start recording automatically for detailed description of the settings menu. 3.5 Parking mode Your dashboard camera can record footages of your device in video recording mode, press the OK button to stop the video. buttons to rewind or fast forward the video. The parking mode can browse your photos and videos using the...
... Using your dashboard camera You can only record and save footage after an event has been detected by mode and will start recording automatically for detailed description of the settings menu. 3.5 Parking mode Your dashboard camera can record footages of your device in video recording mode, press the OK button to stop the video. buttons to rewind or fast forward the video. The parking mode can browse your photos and videos using the...

User Guide
Page 12
... Parking mode must be involved in the video settings, see 4.2 Video Settings. 3.6 SOS mode In case of an incident or accident you might cause the camera not to record or save memory on the Mute/SOS button . You can enable motion detection. IMPORTANT! This option is disabled by default, enabling it does not detect motion for more than 10 seconds. When enabled, the SOS mode will stop recording when...
... Parking mode must be involved in the video settings, see 4.2 Video Settings. 3.6 SOS mode In case of an incident or accident you might cause the camera not to record or save memory on the Mute/SOS button . You can enable motion detection. IMPORTANT! This option is disabled by default, enabling it does not detect motion for more than 10 seconds. When enabled, the SOS mode will stop recording when...

User Guide
Page 13
Press the OK button to start recording. 4.1 Main Settings To access main settings while in video mode, press the OK button to go back or cancel. Press + or - to the next value. 13 Settings Settings IMPORTANT! ENGLISH 4. Menu Description Date/Time Set the date and time. After exiting the settings screen, video recording will not restart automatically. to navigate, OK to confirm and Menu/Back to stop video recording then press the Menu/Back button twice. For each value, press OK to switch to set each sub-menu, press + or -
Press the OK button to start recording. 4.1 Main Settings To access main settings while in video mode, press the OK button to go back or cancel. Press + or - to the next value. 13 Settings Settings IMPORTANT! ENGLISH 4. Menu Description Date/Time Set the date and time. After exiting the settings screen, video recording will not restart automatically. to navigate, OK to confirm and Menu/Back to stop video recording then press the Menu/Back button twice. For each value, press OK to switch to set each sub-menu, press + or -
User Guide
Page 14
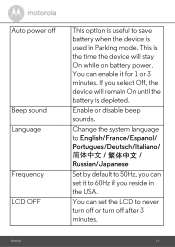
Auto power off Beep sound Language Frequency LCD OFF This option is useful to never turn off or turn off after 3 minutes. Enable or disable beep sounds. Change the system language to English/France/Espanol/ Portugues/Deutsch/Italiano Russian/Japanese Set by default to 50Hz, you can set the LCD to save battery when the device is the time the device will remain On...
Auto power off Beep sound Language Frequency LCD OFF This option is useful to never turn off or turn off after 3 minutes. Enable or disable beep sounds. Change the system language to English/France/Espanol/ Portugues/Deutsch/Italiano Russian/Japanese Set by default to 50Hz, you can set the LCD to save battery when the device is the time the device will remain On...
User Guide
Page 15
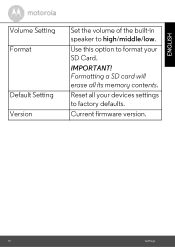
ENGLISH Volume Setting Format Default Setting Version Set the volume of the built-in speaker to format your devices settings to factory defaults. Use this option to high/middle/low. Formatting a SD card will erase all your SD Card. Reset all its memory contents. Current firmware version. 15 Settings IMPORTANT!
ENGLISH Volume Setting Format Default Setting Version Set the volume of the built-in speaker to format your devices settings to factory defaults. Use this option to high/middle/low. Formatting a SD card will erase all your SD Card. Reset all its memory contents. Current firmware version. 15 Settings IMPORTANT!
User Guide
Page 16
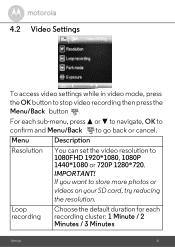
... 1280*720. Menu Description Resolution You can set the video resolution to go back or cancel. 4.2 Video Settings To access video settings while in video mode, press the OK button to store more photos or videos on your SD card, try reducing the resolution. For each recording cluster: 1 Minute / 2 Minutes / 3 Minutes Settings 16 If you want to stop video recording then press the Menu/Back button . Loop recording Choose the default duration for each...
... 1280*720. Menu Description Resolution You can set the video resolution to go back or cancel. 4.2 Video Settings To access video settings while in video mode, press the OK button to store more photos or videos on your SD card, try reducing the resolution. For each recording cluster: 1 Minute / 2 Minutes / 3 Minutes Settings 16 If you want to stop video recording then press the Menu/Back button . Loop recording Choose the default duration for each...
User Guide
Page 17
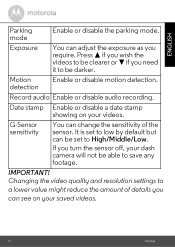
... amount of the sensor. detection Record audio Enable or disable audio recording. It is set to low by default but can be darker. ENGLISH Parking mode Enable or disable the parking mode. Press + if you need it to be set to High/Middle/Low. Date stamp Enable or disable a date stamp showing on your saved videos. 17 Settings Changing the video quality and resolution settings to save any footage. Exposure...
... amount of the sensor. detection Record audio Enable or disable audio recording. It is set to low by default but can be darker. ENGLISH Parking mode Enable or disable the parking mode. Press + if you need it to be set to High/Middle/Low. Date stamp Enable or disable a date stamp showing on your saved videos. 17 Settings Changing the video quality and resolution settings to save any footage. Exposure...

User Guide
Page 20
Date stamp Enable or disable a date only stamp or a date+time stamp showing on your saved photos. Settings 20 We recommend to be darker. Press + if you wish the photos to leave it to a lower value might reduce the amount of details you require. if you need it on Auto. Changing the photo quality and resolution settings to be clearer or - White Balance You can see on your photos. IMPORTANT! Exposure You can adjust the exposure as you can set the white balance to Auto, Daylight, Cloudy, Tungsten or Fluorescent.
Date stamp Enable or disable a date only stamp or a date+time stamp showing on your saved photos. Settings 20 We recommend to be darker. Press + if you wish the photos to leave it to a lower value might reduce the amount of details you require. if you need it on Auto. Changing the photo quality and resolution settings to be clearer or - White Balance You can see on your photos. IMPORTANT! Exposure You can adjust the exposure as you can set the white balance to Auto, Daylight, Cloudy, Tungsten or Fluorescent.
User Guide
Page 28
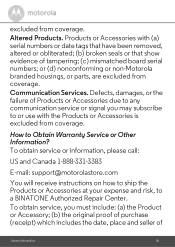
...use with (a) serial numbers or date tags that have been removed, altered or obliterated; (b) broken seals or that show evidence of General Information 28 To obtain service or information, please call: US and Canada 1-888-331-3383 E-mail: support@motorolastore.com You will receive instructions... on how to ship the Products or Accessories at your expense and risk, to Obtain Warranty Service or Other Information? or (d) nonconforming or non-Motorola branded housings, or parts, are excluded from coverage. ...
...use with (a) serial numbers or date tags that have been removed, altered or obliterated; (b) broken seals or that show evidence of General Information 28 To obtain service or information, please call: US and Canada 1-888-331-3383 E-mail: support@motorolastore.com You will receive instructions... on how to ship the Products or Accessories at your expense and risk, to Obtain Warranty Service or Other Information? or (d) nonconforming or non-Motorola branded housings, or parts, are excluded from coverage. ...

User Guide
Page 29
... and, if not installed and used in accordance with the instructions, may have been made in connection with the limits for a Class B digital device, pursuant to provide reasonable protection against harmful interference in a residential installation. These limits are designed to Part 15 of the problem; and, most importantly; (e) your box, a completed warranty card showing the serial number of the Product...
... and, if not installed and used in accordance with the instructions, may have been made in connection with the limits for a Class B digital device, pursuant to provide reasonable protection against harmful interference in a residential installation. These limits are designed to Part 15 of the problem; and, most importantly; (e) your box, a completed warranty card showing the serial number of the Product...

User Guide
Page 30
... separation between the equipment and receiver. • Connect the equipment into an outlet on a circuit different from that to which can be determined by turning the equipment off and on, the user is no guarantee that may cause undesired operation. This device complies with Part 15 of communications General Information 30 Changes or modifications to this equipment...
... separation between the equipment and receiver. • Connect the equipment into an outlet on a circuit different from that to which can be determined by turning the equipment off and on, the user is no guarantee that may cause undesired operation. This device complies with Part 15 of communications General Information 30 Changes or modifications to this equipment...


