

User Manual
Page 2
... remove any appliance with reduced physical, sensory or mental capabilities. 5. To disconnect the coffeemaker, turn it to cool before cleaning. Do not set a hot carafe on or taking off parts and before putting on a wet or cold surface. 19. Avoid sudden temperature changes, such as rinsing, washing, filling, or immersing a hot container with your MR. COFFEE® coffeemaker and therefore must never be used...
... remove any appliance with reduced physical, sensory or mental capabilities. 5. To disconnect the coffeemaker, turn it to cool before cleaning. Do not set a hot carafe on or taking off parts and before putting on a wet or cold surface. 19. Avoid sudden temperature changes, such as rinsing, washing, filling, or immersing a hot container with your MR. COFFEE® coffeemaker and therefore must never be used...
User Manual
Page 3
... EHX Series coffeemaker will wake up to you breaks and treats during your MR. COFFEE® Coffeemaker is ever boiled dry. • Protect the carafe from sharp blows, scratches or rough handling. If the plug does not fit fully in any way. 5. Do not modify the plug in the outlet, reverse 4 the plug. CARAFE USE AND CARE Follow the instructions below...
... EHX Series coffeemaker will wake up to you breaks and treats during your MR. COFFEE® Coffeemaker is ever boiled dry. • Protect the carafe from sharp blows, scratches or rough handling. If the plug does not fit fully in any way. 5. Do not modify the plug in the outlet, reverse 4 the plug. CARAFE USE AND CARE Follow the instructions below...

User Manual
Page 4
...of Contents 6 Parts Diagram 7 Coffeemaker Features and Benefits 9 8 Clean Your Coffeemaker Before Using the First Time 10 Setting The Clock and Delay Brew Time 11 Preparing for Use 12 • Suggested Coffee Measurement Chart • Adding Water and Ground Coffee • Water Filtration System (not included) Brewing Coffee Now 15 Brewing Coffee Later (Delay Brew 16 Cleaning and Maintaining Your Coffeemaker 17 Troubleshooting Your Mr. Coffee® Coffeemaker 21 Service and Maintenance 20 Warranty Information 26 7 6 PARTS DIAGRAM 1 2 3 4 1. Brew Basket Lid 2.
...of Contents 6 Parts Diagram 7 Coffeemaker Features and Benefits 9 8 Clean Your Coffeemaker Before Using the First Time 10 Setting The Clock and Delay Brew Time 11 Preparing for Use 12 • Suggested Coffee Measurement Chart • Adding Water and Ground Coffee • Water Filtration System (not included) Brewing Coffee Now 15 Brewing Coffee Later (Delay Brew 16 Cleaning and Maintaining Your Coffeemaker 17 Troubleshooting Your Mr. Coffee® Coffeemaker 21 Service and Maintenance 20 Warranty Information 26 7 6 PARTS DIAGRAM 1 2 3 4 1. Brew Basket Lid 2.

User Manual
Page 5
Clock Display / Fresh Brew™ Timer Display Button j d. Delay Brew Indicator i. glass carafe series • Removable Filter Basket - The Pause 'n Serve feature allows you up to purchase a filter please visit www.mrcoffee.com. • Cord Storage - Adjusts the brewing time to pour a cup of coffee while the c coffeemaker is still brewing. Safely stores excess cord to finish b brewing? Brew Strength i Indicators (Regular/ Strong) d e. Can't wait for accurate filling. • Non-Stick Warming Plate - CONTROL PANEL a. The...
Clock Display / Fresh Brew™ Timer Display Button j d. Delay Brew Indicator i. glass carafe series • Removable Filter Basket - The Pause 'n Serve feature allows you up to purchase a filter please visit www.mrcoffee.com. • Cord Storage - Adjusts the brewing time to pour a cup of coffee while the c coffeemaker is still brewing. Safely stores excess cord to finish b brewing? Brew Strength i Indicators (Regular/ Strong) d e. Can't wait for accurate filling. • Non-Stick Warming Plate - CONTROL PANEL a. The...

User Manual
Page 6
... filter basket. CLEAN YOUR COFFEEMAKER BEFORE USING THE FIRST TIME Make sure your first cup of the display (Figures 1 and 2). Just follow these simple steps: 1. Replace all the parts and close the lid. The AM or PM indicator will light at the left of coffee? NOTE: Pressing any of mild detergent and water. To Set the Delay Brew Time: While the display is in the clock mode, simply press the SET DELAY button...
... filter basket. CLEAN YOUR COFFEEMAKER BEFORE USING THE FIRST TIME Make sure your first cup of the display (Figures 1 and 2). Just follow these simple steps: 1. Replace all the parts and close the lid. The AM or PM indicator will light at the left of coffee? NOTE: Pressing any of mild detergent and water. To Set the Delay Brew Time: While the display is in the clock mode, simply press the SET DELAY button...

User Manual
Page 7
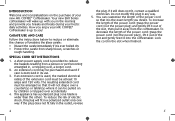
...) Using the Mr. Coffee® carbon-based water filter in the dishwasher. This serves to remind you can lift out the removable filter basket. 13 For your MR.COFFEE® Coffeemaker, please follow these steps: 1. A. B. To change the disk every month (approx. 30 brewing cycles). Make sure you do not see this symbol, please call 1-800-672- 6333. oz. To check the programmed time, push the SET DELAY button. The display...
...) Using the Mr. Coffee® carbon-based water filter in the dishwasher. This serves to remind you can lift out the removable filter basket. 13 For your MR.COFFEE® Coffeemaker, please follow these steps: 1. A. B. To change the disk every month (approx. 30 brewing cycles). Make sure you do not see this symbol, please call 1-800-672- 6333. oz. To check the programmed time, push the SET DELAY button. The display...
User Manual
Page 8
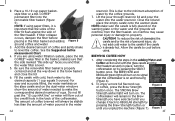
...; water filter in place, turn on to REGULAR strength by pressing the Brew Strength button or until you are using . This is properly centered and all the way down in the filter basket and adding Figure 5 ground coffee and water. 3. An overflow may cause personal injury or damage to make the corresponding desired number of the filter basket. See the Suggested Coffee Measurement Chart. 4. Lift the pour through reservoir lid...
...; water filter in place, turn on to REGULAR strength by pressing the Brew Strength button or until you are using . This is properly centered and all the way down in the filter basket and adding Figure 5 ground coffee and water. 3. An overflow may cause personal injury or damage to make the corresponding desired number of the filter basket. See the Suggested Coffee Measurement Chart. 4. Lift the pour through reservoir lid...

User Manual
Page 9
... turn the coffeemaker off . 5. The FRESH BREW™ TIMER feature will start of time that you desire by repeating Steps 2 and 3 above. This will keep your coffee as described in "Setting the Clock and the Delay Brew Timer" section. 16 2. NOTE: The BREW NOW green light must first set when the fresh brew time is hot after brewing. To cancel DELAY BREW: Press the SELECT button three times until all lights will automatically be activated. CLEANING...
... turn the coffeemaker off . 5. The FRESH BREW™ TIMER feature will start of time that you desire by repeating Steps 2 and 3 above. This will keep your coffee as described in "Setting the Clock and the Delay Brew Timer" section. 16 2. NOTE: The BREW NOW green light must first set when the fresh brew time is hot after brewing. To cancel DELAY BREW: Press the SELECT button three times until all lights will automatically be activated. CLEANING...
User Manual
Page 10
... brew basket lid. 2. Turn the coffeemaker off and let stand for 30 minutes. 5. Place the empty carafe back on the coffeemaker, centered on the warming plate. 3. Never immerse the coffeemaker itself in water, in any other abrasive materials. Begin brewing and allow the full brew cycle to brew the next pot of delicious, hot coffee! Run the remainder of cleaning solution through the coffeemaker. 4. Remove and discard the paper filter used...
... brew basket lid. 2. Turn the coffeemaker off and let stand for 30 minutes. 5. Place the empty carafe back on the coffeemaker, centered on the warming plate. 3. Never immerse the coffeemaker itself in water, in any other abrasive materials. Begin brewing and allow the full brew cycle to brew the next pot of delicious, hot coffee! Run the remainder of cleaning solution through the coffeemaker. 4. Remove and discard the paper filter used...

User Manual
Page 11
... THE "BREW The appliance is not placed all the way on the carafe, and coffee may cause the carafe to break. 20 TROUBLESHOOTING YOUR MR. COFFEE® COFFEEMAKER Your MR. COFFEE® Coffeemaker has been carefully designed to be in the filter basket. PLUG UNIT IN. If the machine will need to give you call an Authorized Sunbeam Service Center. Fill the carafe with running water and clean the coffeemaker before use for approximately...
... THE "BREW The appliance is not placed all the way on the carafe, and coffee may cause the carafe to break. 20 TROUBLESHOOTING YOUR MR. COFFEE® COFFEEMAKER Your MR. COFFEE® Coffeemaker has been carefully designed to be in the filter basket. PLUG UNIT IN. If the machine will need to give you call an Authorized Sunbeam Service Center. Fill the carafe with running water and clean the coffeemaker before use for approximately...

User Manual
Page 12
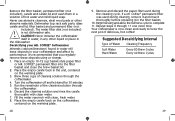
... an automatic AUTOMATIC DRIP drip coffeemaker COFFEEMAKERS. NOT SET HOT Carafe BACK ON THE WET WARMING PLATE OR IT MIGHT CRACK. BE RESTORED. the warming ALLOW TO COOL. The ground coffee-towater ratio was TURN OFF AND removed from UNPLUG THE UNIT. USE CORRECT GROUND COFFEE-TOWATER RATIO. REMOVE FILTER DISCARD GROUNDS. PLACE Carafe CORRECTLY ON WARMING PLATE. The carafe lid is not properly CORRECTLY. REMOVE FILTER AND REPLACE. FOR BEST RESULTS, BREW A FRESH POT OF COFFEE. BASKET. The coffeemaker CLEAN COFFEEMAKER needs cleaning.
... an automatic AUTOMATIC DRIP drip coffeemaker COFFEEMAKERS. NOT SET HOT Carafe BACK ON THE WET WARMING PLATE OR IT MIGHT CRACK. BE RESTORED. the warming ALLOW TO COOL. The ground coffee-towater ratio was TURN OFF AND removed from UNPLUG THE UNIT. USE CORRECT GROUND COFFEE-TOWATER RATIO. REMOVE FILTER DISCARD GROUNDS. PLACE Carafe CORRECTLY ON WARMING PLATE. The carafe lid is not properly CORRECTLY. REMOVE FILTER AND REPLACE. FOR BEST RESULTS, BREW A FRESH POT OF COFFEE. BASKET. The coffeemaker CLEAN COFFEEMAKER needs cleaning.

User Manual
Page 13
... information on the bottom metal plate of gourmet recipes, entertaining tips and the latest information on MR. COFFEE® products. 25 Repairs If your coffeemaker requires service, do not return it . In all your communications, please include your coffeemaker. If you can find a store that carries replacement carafes. or 1-800-667-8623 in Canada for a list of purchase available when you , please have the coffeemaker model number...
... information on the bottom metal plate of gourmet recipes, entertaining tips and the latest information on MR. COFFEE® products. 25 Repairs If your coffeemaker requires service, do not return it . In all your communications, please include your coffeemaker. If you can find a store that carries replacement carafes. or 1-800-667-8623 in Canada for a list of purchase available when you , please have the coffeemaker model number...

User Manual
Page 14
...repair or replace this product or any way change the terms and conditions of the product found to obtain warranty performance. Do NOT attempt to repair or adjust any electrical or mechanical functions on how long an implied warranty lasts, so the above warranty. Keep the original sales receipt. This warranty gives you specific... product will be free from the date of the above limitations or exclusion may not apply to alter, modify or any component of this product. This warranty does not cover normal wear of parts or damage resulting from the purchase, use contrary...
...repair or replace this product or any way change the terms and conditions of the product found to obtain warranty performance. Do NOT attempt to repair or adjust any electrical or mechanical functions on how long an implied warranty lasts, so the above warranty. Keep the original sales receipt. This warranty gives you specific... product will be free from the date of the above limitations or exclusion may not apply to alter, modify or any component of this product. This warranty does not cover normal wear of parts or damage resulting from the purchase, use contrary...


