
User Manual
Page 1
.... es una subsidiaria de Jarden Corporation (NYSE:JAH). A BVMC-KG6_12ESM1 Single Serve Brewer / Cafetera individual BVMC-KG6 www.mrcoffee.com operando bajo el nombre de Jarden Consumer Solutions, Boca Raton, Florida 33431. Keurig, el logo de Taza y Estrella, "Keurig Brewed" y "K-cup" son ... GCDS-MRC27851-ZZ P.N. 159760 Rev. User Manual / Manual del Usuario © 2012 Sunbeam Products, Inc. Sunbeam Products, Inc.is a subsidiary of Keurig, Incorporated used under license. © 2012 Sunbeam Products, Inc. Distribuido por Sunbeam Products, Inc. doing business as Jarden Consumer...
.... es una subsidiaria de Jarden Corporation (NYSE:JAH). A BVMC-KG6_12ESM1 Single Serve Brewer / Cafetera individual BVMC-KG6 www.mrcoffee.com operando bajo el nombre de Jarden Consumer Solutions, Boca Raton, Florida 33431. Keurig, el logo de Taza y Estrella, "Keurig Brewed" y "K-cup" son ... GCDS-MRC27851-ZZ P.N. 159760 Rev. User Manual / Manual del Usuario © 2012 Sunbeam Products, Inc. Sunbeam Products, Inc.is a subsidiary of Keurig, Incorporated used under license. © 2012 Sunbeam Products, Inc. Distribuido por Sunbeam Products, Inc. doing business as Jarden Consumer...
User Manual
Page 2
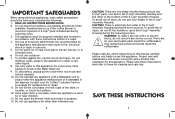
... and a trouble-free operation for cleaning and care tips. SAVE THESE INSTRUCTIONS 3 Only authorized personnel should be properly installed and located in the K-Cup® Assembly Housing during the brewing process. READ ALL INSTRUCTIONS BEFORE USING. 2. Do not operate any appliance with a damaged cord or plug or after the appliance malfunctions or is used by the appliance manufacturer may occur if the coffee Brewer is moved...
... and a trouble-free operation for cleaning and care tips. SAVE THESE INSTRUCTIONS 3 Only authorized personnel should be properly installed and located in the K-Cup® Assembly Housing during the brewing process. READ ALL INSTRUCTIONS BEFORE USING. 2. Do not operate any appliance with a damaged cord or plug or after the appliance malfunctions or is used by the appliance manufacturer may occur if the coffee Brewer is moved...
User Manual
Page 3
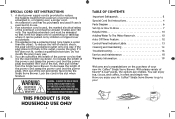
... any way. 5. You can customize the length of the slot, then pull it is exercised in , or tripping over accidentally. 4. Lock the cord in a polarized outlet only one blade is provided to Brew 7 Helpful Hints 10 Adding Water To The Water Reservoir 12 Auto Off Timer Feature 12 Control Panel Indicator Lights 13 Cleaning and Maintaining 14 Troubleshooting 16 Service and Maintenance 18 Warranty Information 19...
... any way. 5. You can customize the length of the slot, then pull it is exercised in , or tripping over accidentally. 4. Lock the cord in a polarized outlet only one blade is provided to Brew 7 Helpful Hints 10 Adding Water To The Water Reservoir 12 Auto Off Timer Feature 12 Control Panel Indicator Lights 13 Cleaning and Maintaining 14 Troubleshooting 16 Service and Maintenance 18 Warranty Information 19...

User Manual
Page 4
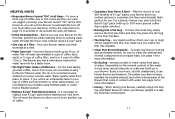
...-Heating Light 3. Serving Size Button 5. Water Reservoir Lid 2 7. Place Brewer upright on a flat surface, remove all product 13 packaging and plug into outlet. 12 11 10 2. Replace Water Reservoir Lid and Water Reservoir to the left side of the K-Cup® pack. 7 Brew•Off Button 2. Drip Tray 3 10.Drip Tray Plate 11.Brew Head 4 12.K-cup® Assembly Housing 13.Brew Head Needle 14.Brew Head Handle 5 15.Water Reservoir Lock Tab Slots 6 SET-UP & HOW TO BREW 14 1. Serving...
...-Heating Light 3. Serving Size Button 5. Water Reservoir Lid 2 7. Place Brewer upright on a flat surface, remove all product 13 packaging and plug into outlet. 12 11 10 2. Replace Water Reservoir Lid and Water Reservoir to the left side of the K-Cup® pack. 7 Brew•Off Button 2. Drip Tray 3 10.Drip Tray Plate 11.Brew Head 4 12.K-cup® Assembly Housing 13.Brew Head Needle 14.Brew Head Handle 5 15.Water Reservoir Lock Tab Slots 6 SET-UP & HOW TO BREW 14 1. Serving...

User Manual
Page 5
... be longer than average because water needs to be removed to accommodate larger mugs. 9. NOTE: After the brewing process is open. ENJOY! 9 NOTE: Drip Tray and Drip Tray Plate can be heated up to indicate that the brewing process has begun. Subsequent brews will indicate your selection. 6 8 10 oz. 8 8. The Brew•Off Button will puncture the K-Cup® pack. 7. CAUTION: Avoid the...
... be longer than average because water needs to be removed to accommodate larger mugs. 9. NOTE: After the brewing process is open. ENJOY! 9 NOTE: Drip Tray and Drip Tray Plate can be heated up to indicate that the brewing process has begun. Subsequent brews will indicate your selection. 6 8 10 oz. 8 8. The Brew•Off Button will puncture the K-Cup® pack. 7. CAUTION: Avoid the...
User Manual
Page 6
... water from place to allow you use your Brewer for more information. • De-Scaling - Your new Brewer makes one fresh beverage at a time. • Water Reservoir - of coffee (6oz. This Brewer also has a internal pre-heated hot water reservoir for more information. • Storing - See page 14 for a faster brew. • The Right Water Makes a Difference - For a strong, intense cup, select an Extra Bold K-Cup® pack (with water. HELPFUL HINTS • Keep your Brewer turned...
... water from place to allow you use your Brewer for more information. • De-Scaling - Your new Brewer makes one fresh beverage at a time. • Water Reservoir - of coffee (6oz. This Brewer also has a internal pre-heated hot water reservoir for more information. • Storing - See page 14 for a faster brew. • The Right Water Makes a Difference - For a strong, intense cup, select an Extra Bold K-Cup® pack (with water. HELPFUL HINTS • Keep your Brewer turned...

User Manual
Page 7
... Water Light Flashing PreHeating Light Flashing Indicates the Water Reservoir is out of water. Indicates water in the internal reservoir in heating to the MAX FILL line. The first brew after 2 hours of non-use. See page 12 for further Brew•Off instructions. NOTE: The Brewer's auto-off timer 6 8 10 Serving oz. times See page 12 for further instructions. 6 8 10 oz. Serving Size Flashing Indicators Indicates Brewer needs to resume or start brewing. ADDING WATER TO THE WATER RESERVOIR...
... Water Light Flashing PreHeating Light Flashing Indicates the Water Reservoir is out of water. Indicates water in the internal reservoir in heating to the MAX FILL line. The first brew after 2 hours of non-use. See page 12 for further Brew•Off instructions. NOTE: The Brewer's auto-off timer 6 8 10 Serving oz. times See page 12 for further instructions. 6 8 10 oz. Serving Size Flashing Indicators Indicates Brewer needs to resume or start brewing. ADDING WATER TO THE WATER RESERVOIR...

User Manual
Page 8
... coffee grinds, it back onto the K-Cup® Assembly Housing. 3. When you prepare to use it out. CLEANING AND MAINTAINING YOUR SINGLE SERVE BREWER Cleaning External Parts CAUTION : Make sure the Brewer is unplugged before storing and take care to ensure that you store your Brewer in a safe and frost free environment. The Drip Tray and Drip Tray Plate should NOT be removed from the K-Cup® Assembly Housing by removing the Water Reservoir Lid and turning...
... coffee grinds, it back onto the K-Cup® Assembly Housing. 3. When you prepare to use it out. CLEANING AND MAINTAINING YOUR SINGLE SERVE BREWER Cleaning External Parts CAUTION : Make sure the Brewer is unplugged before storing and take care to ensure that you store your Brewer in a safe and frost free environment. The Drip Tray and Drip Tray Plate should NOT be removed from the K-Cup® Assembly Housing by removing the Water Reservoir Lid and turning...
User Manual
Page 9
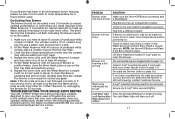
... the Brew●Off Button to reset the Brewer. Lift Brew Head and replace K-Cup® pack to begin brewing. If your Brewer has been in the Water Reservoir and the Brew Head is closed securely. The Brewer is now ready for it to be de-scaled. 1. TROUBLESHOOTING YOUR SINGLE SERVE BREWER Your MR. COFFEE® Single Serve Brewer has been carefully designed to reach room temperature before using. If Brewer is still not brewing, contact Customer Service...
... the Brew●Off Button to reset the Brewer. Lift Brew Head and replace K-Cup® pack to begin brewing. If your Brewer has been in the Water Reservoir and the Brew Head is closed securely. The Brewer is now ready for it to be de-scaled. 1. TROUBLESHOOTING YOUR SINGLE SERVE BREWER Your MR. COFFEE® Single Serve Brewer has been carefully designed to reach room temperature before using. If Brewer is still not brewing, contact Customer Service...
User Manual
Page 10
... cover normal wear of parts or damage resulting from defects in the U.S. All repairs and replacements must be made with a new or remanufactured product or component. The model number is stamped on the bottom metal plate of the coffeemaker) Serial Number Date Code (Located on this product or any way change the terms and conditions of this warranty. In all your communications, please include your coffeemaker requires service...
... cover normal wear of parts or damage resulting from defects in the U.S. All repairs and replacements must be made with a new or remanufactured product or component. The model number is stamped on the bottom metal plate of the coffeemaker) Serial Number Date Code (Located on this product or any way change the terms and conditions of this warranty. In all your communications, please include your coffeemaker requires service...
User Manual
Page 11
... any other party. How to use the product including incidental, special, consequential or similar damages or loss of profits, or for any question regarding this warranty or would like to obtain warranty service, please call 1-877-517-6400 and a convenient service center address will be provided to you have other problem or claim in connection with...
... any other party. How to use the product including incidental, special, consequential or similar damages or loss of profits, or for any question regarding this warranty or would like to obtain warranty service, please call 1-877-517-6400 and a convenient service center address will be provided to you have other problem or claim in connection with...


