
User Manual
Page 2
... not remove any moving parts. 14. Do not place this appliance only to the nearest Authorized Service Center for other than intended use of accessory attachments other than MR. COFFEE® brand products may occur if the lid is time to clean. Allow the appliance parts to cool before putting on a wet or cold surface. • Do not use appliance for examination, repair...
... not remove any moving parts. 14. Do not place this appliance only to the nearest Authorized Service Center for other than intended use of accessory attachments other than MR. COFFEE® brand products may occur if the lid is time to clean. Allow the appliance parts to cool before putting on a wet or cold surface. • Do not use appliance for examination, repair...

User Manual
Page 3
... cleaning and care tips. Proper care and maintenance will fit in a polarized outlet only one blade is exercised in the outlet, reverse the plug. An extension cord may be at least 10 amps and 120 volts. REPAIR SHOULD BE DONE BY AUTHORIZED SERVICE PERSONNEL ONLY. 4 BVMC-SJXGT_12ESM2.indd 6 5 9/11/12 10:53 AM save these instructions SPECIAL CORD SET INSTRUCTIONS...
... cleaning and care tips. Proper care and maintenance will fit in a polarized outlet only one blade is exercised in the outlet, reverse the plug. An extension cord may be at least 10 amps and 120 volts. REPAIR SHOULD BE DONE BY AUTHORIZED SERVICE PERSONNEL ONLY. 4 BVMC-SJXGT_12ESM2.indd 6 5 9/11/12 10:53 AM save these instructions SPECIAL CORD SET INSTRUCTIONS...

User Manual
Page 4
... Plate 7. Removable Filter Basket 7 9/11/12 10:53 AM Shower Head 3. Water Window 5. Pause 'n Serve 6. Decanter 8. Water Reservoir 4. How you enjoy your MR. COFFEE® Coffeemaker is up with you in the morning and provide you ! PARTS DIAGRAM 8 7 6 6 BVMC-SJXGT_12ESM2.indd 8 1 2 3 4 5 1. Brew Basket Lid 2. Table of Contents Important Safeguards 2 Decanter Use and Care 3 Special Cord Set Instructions 4 Table of Contents 6 Parts Diagram 7 Coffeemaker Features and Benefits 9 Clean Your Coffeemaker Before Using the First Time.....10 Setting The Clock and Delay Brew Time...
... Plate 7. Removable Filter Basket 7 9/11/12 10:53 AM Shower Head 3. Water Window 5. Pause 'n Serve 6. Decanter 8. Water Reservoir 4. How you enjoy your MR. COFFEE® Coffeemaker is up with you in the morning and provide you ! PARTS DIAGRAM 8 7 6 6 BVMC-SJXGT_12ESM2.indd 8 1 2 3 4 5 1. Brew Basket Lid 2. Table of Contents Important Safeguards 2 Decanter Use and Care 3 Special Cord Set Instructions 4 Table of Contents 6 Parts Diagram 7 Coffeemaker Features and Benefits 9 Clean Your Coffeemaker Before Using the First Time.....10 Setting The Clock and Delay Brew Time...
User Manual
Page 5
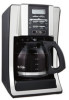
...Mr. Coffee® carbon-based water filter in the reservoir for fast and easy cleaning and filling. • Pause 'n Serve - Safely stores excess cord to keep your coffee hot after brewing. Brew Strength i c d e Button g. Clock Display / Fresh Brew™ Timer Display b. Thermal Decanter a Indicator d. Glass Decanter Indicator l. The non- Adjusts the brewing time to finish brewing? Great tasting coffee begins with all models) Mr. Coffee® Brand Water Filtration System 8 Mr. Coffee® Brand Mr. Coffee® Brand Permanent Filter 10-12 Cup Basket...
...Mr. Coffee® carbon-based water filter in the reservoir for fast and easy cleaning and filling. • Pause 'n Serve - Safely stores excess cord to keep your coffee hot after brewing. Brew Strength i c d e Button g. Clock Display / Fresh Brew™ Timer Display b. Thermal Decanter a Indicator d. Glass Decanter Indicator l. The non- Adjusts the brewing time to finish brewing? Great tasting coffee begins with all models) Mr. Coffee® Brand Water Filtration System 8 Mr. Coffee® Brand Mr. Coffee® Brand Permanent Filter 10-12 Cup Basket...
User Manual
Page 6
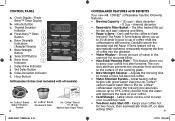
.... 10 BVMC-SJXGT_12ESM2.indd 11-12 2. Replace all the parts and close the lid. When brewing is complete, turn your MR. COFFEE® Coffeemaker before setting the clock will switch to start keeping time from 12:00 a.m. Press and hold the HOUR and MINUTE buttons until you . - NOTE: Pressing any of coffee is flashing, set the brew time by cleaning your coffeemaker off, discard the water in the clock mode, simply press the SET DELAY button...
.... 10 BVMC-SJXGT_12ESM2.indd 11-12 2. Replace all the parts and close the lid. When brewing is complete, turn your MR. COFFEE® Coffeemaker before setting the clock will switch to start keeping time from 12:00 a.m. Press and hold the HOUR and MINUTE buttons until you . - NOTE: Pressing any of coffee is flashing, set the brew time by cleaning your coffeemaker off, discard the water in the clock mode, simply press the SET DELAY button...

User Manual
Page 7
... helps remove up to remind you do not see this symbol, please call 1-800-672-6333. To use . 3. Disk & Frame Red Indicator Permanent Filter Top of your coffee, rinse the water filter with all models) Using the Mr. Coffee® carbon-based water filter in the dishwasher. Make sure you are done brewing your filter basket. Do not put your taste. To check the programmed time, push the SET DELAY button. Align the red...
... helps remove up to remind you do not see this symbol, please call 1-800-672-6333. To use . 3. Disk & Frame Red Indicator Permanent Filter Top of your coffee, rinse the water filter with all models) Using the Mr. Coffee® carbon-based water filter in the dishwasher. Make sure you are done brewing your filter basket. Do not put your taste. To check the programmed time, push the SET DELAY button. Align the red...

User Manual
Page 8
... all the way down in the filter basket and adding ground coffee and water. 3. Be sure the removable filter basket is already hot. Lift the pour through reservoir lid and pour the water into the removable filter basket (Figure 5). BREWING COFFEE NOW 1. After following instructions in the Water Filtration System, place the MR. COFFEE® water filter in place, turn on the water window or past the corresponding GLASS/THERMAL stair step within the water reservoir or water will overflow from the filter basket. If filter collapse...
... all the way down in the filter basket and adding ground coffee and water. 3. Be sure the removable filter basket is already hot. Lift the pour through reservoir lid and pour the water into the removable filter basket (Figure 5). BREWING COFFEE NOW 1. After following instructions in the Water Filtration System, place the MR. COFFEE® water filter in place, turn on the water window or past the corresponding GLASS/THERMAL stair step within the water reservoir or water will overflow from the filter basket. If filter collapse...

User Manual
Page 9
... BVMC-SJXGT_12ESM2.indd 18 5. This will switch from glass to display current time. The coffeemaker will turn your coffee has been waiting for you change to operate. The blue indicator Figure 6 light will reset the Fresh Brew™ Timer feature. To enjoy a more full flavored cup of coffee, turn off when no longer using it back to making a second pot of coffee, press the BREW STRENGTH Figure 7 button once. Push again to thermal...
... BVMC-SJXGT_12ESM2.indd 18 5. This will switch from glass to display current time. The coffeemaker will turn your coffee has been waiting for you change to operate. The blue indicator Figure 6 light will reset the Fresh Brew™ Timer feature. To enjoy a more full flavored cup of coffee, turn off when no longer using it back to making a second pot of coffee, press the BREW STRENGTH Figure 7 button once. Push again to thermal...

User Manual
Page 10
... DELAY BREW light will turn off, indicating the brewing has started in water will turn on the warming plate. 4. Dishwasher top rack safe parts: glass decanter and lid, filter basket and permanent filter. Before decalcifying, remove the water filtration disk from the machine. Brew three cups of MR. COFFEE® Cleaner. Regular Cleaning and Maintenance Decalcifying your coffeemaker will turn off (Figure 10). The coffeemaker is not dishwasher safe. At this time the Figure 10 brew strength light will NOT start...
... DELAY BREW light will turn off, indicating the brewing has started in water will turn on the warming plate. 4. Dishwasher top rack safe parts: glass decanter and lid, filter basket and permanent filter. Before decalcifying, remove the water filtration disk from the machine. Brew three cups of MR. COFFEE® Cleaner. Regular Cleaning and Maintenance Decalcifying your coffeemaker will turn off (Figure 10). The coffeemaker is not dishwasher safe. At this time the Figure 10 brew strength light will NOT start...

User Manual
Page 11
... thoroughly with clean, fresh water. 9. If a Mr. Coffee® permanent filter was used . Begin brewing and allow the full brew cycle to be in use for 30 minutes. 6. Type of time, rinse the water filter with a solution of the water used during the cleaning cycle. To remove decanter stains: 1. NOTE: Do not use . Fill the water reservoir with clean water. 8. Cleaning the Decanter Hard water can leave a whitish stain on the hardness of equal parts water and...
... thoroughly with clean, fresh water. 9. If a Mr. Coffee® permanent filter was used . Begin brewing and allow the full brew cycle to be in use for 30 minutes. 6. Type of time, rinse the water filter with a solution of the water used during the cleaning cycle. To remove decanter stains: 1. NOTE: Do not use . Fill the water reservoir with clean water. 8. Cleaning the Decanter Hard water can leave a whitish stain on the hardness of equal parts water and...
User Manual
Page 12
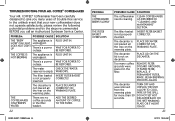
... LIGHT UP THE COFFEE IS NOT BREWING THE COFFEEMAKER ONLY BREWS WATER POSSIBLE CAUSE The appliance is not on the warming plate. PLUG UNIT IN. inserted. The decanter lid is unplugged. IF PAPER FILTER, REPLACE. In the unlikely event that your new coffeemaker does not operate satisfactorily, please review the following potential problems and try the steps recommended BEFORE you many coffee grounds were placed in the filter basket. REMOVE FILTER...
... LIGHT UP THE COFFEE IS NOT BREWING THE COFFEEMAKER ONLY BREWS WATER POSSIBLE CAUSE The appliance is not on the warming plate. PLUG UNIT IN. inserted. The decanter lid is unplugged. IF PAPER FILTER, REPLACE. In the unlikely event that your new coffeemaker does not operate satisfactorily, please review the following potential problems and try the steps recommended BEFORE you many coffee grounds were placed in the filter basket. REMOVE FILTER...

User Manual
Page 13
... coffeemaker CLEAN COFFEEMAKER needs cleaning. The ground coffee-towater ratio was unbalanced. USE CORRECT GROUND COFFEE-TOWATER RATIO. The filter collapsed. You can call us at www.mrcoffee.com. 24 BVMC-SJXGT_12ESM2.indd 25-26 Service and Maintenance Replacement Parts Replacement parts can visit us at www.mrcoffee.com, or by Sunbeam or an authorized Sunbeam Service Center. or a 8-Cup Mr. Coffee Thermal Decanter DRD95, (Coffemakers extras such as water filtration and permanent filters may...
... coffeemaker CLEAN COFFEEMAKER needs cleaning. The ground coffee-towater ratio was unbalanced. USE CORRECT GROUND COFFEE-TOWATER RATIO. The filter collapsed. You can call us at www.mrcoffee.com. 24 BVMC-SJXGT_12ESM2.indd 25-26 Service and Maintenance Replacement Parts Replacement parts can visit us at www.mrcoffee.com, or by Sunbeam or an authorized Sunbeam Service Center. or a 8-Cup Mr. Coffee Thermal Decanter DRD95, (Coffemakers extras such as water filtration and permanent filters may...

User Manual
Page 14
... warranty period. JCS dealers, service centers, or retail stores selling JCS products do not have the coffeemaker model number and date of purchase available when you call. This is required to alter, modify or any of the following: negligent use or misuse of the product, use on the bottom metal plate of the problem. 26 BVMC-SJXGT_12ESM2.indd 27-28 WARRANTY INFORMATION 1-YEAR LIMITED WARRANTY Sunbeam Products...
... warranty period. JCS dealers, service centers, or retail stores selling JCS products do not have the coffeemaker model number and date of purchase available when you call. This is required to alter, modify or any of the following: negligent use or misuse of the product, use on the bottom metal plate of the problem. 26 BVMC-SJXGT_12ESM2.indd 27-28 WARRANTY INFORMATION 1-YEAR LIMITED WARRANTY Sunbeam Products...

User Manual
Page 15
...warranty. JCS disclaims all other problem or claim in connection with this product, please write our Consumer Service Department. How to you. PLEASE DO NOT RETURN THIS PRODUCT TO ANY OF THESE ADDRESSES OR TO THE PLACE OF PURCHASE 28 BVMC-SJXGT_12ESM2.indd 29-30 29 9/11/12 10:53 AM This warranty gives you specific... rights that vary from the purchase, use the product including incidental, special, consequential or similar damages or loss of profits, or for any breach of God, such as fire, flood, hurricanes and tornadoes. Except to use or misuse of, or inability to ...
...warranty. JCS disclaims all other problem or claim in connection with this product, please write our Consumer Service Department. How to you. PLEASE DO NOT RETURN THIS PRODUCT TO ANY OF THESE ADDRESSES OR TO THE PLACE OF PURCHASE 28 BVMC-SJXGT_12ESM2.indd 29-30 29 9/11/12 10:53 AM This warranty gives you specific... rights that vary from the purchase, use the product including incidental, special, consequential or similar damages or loss of profits, or for any breach of God, such as fire, flood, hurricanes and tornadoes. Except to use or misuse of, or inability to ...


