

User Manual
Page 2
... not put thermal carafe in this appliance on or taking off parts and before cleaning the appliance. 6. Do not place this manual carefully before cleaning. To disconnect the appliance, turn it is removed during the brewing cycles. 3. Use handles or knobs. The use this appliance. Avoid contact with a damaged power cord or power plug, or operate it to come into contact with your MR. COFFEE® coffeemaker and...
... not put thermal carafe in this appliance on or taking off parts and before cleaning the appliance. 6. Do not place this manual carefully before cleaning. To disconnect the appliance, turn it is removed during the brewing cycles. 3. Use handles or knobs. The use this appliance. Avoid contact with a damaged power cord or power plug, or operate it to come into contact with your MR. COFFEE® coffeemaker and...

User Manual
Page 3
... Safeguards 2 Decanter Use and Care 3 Special Cord Set Instructions 4 Table of Contents 5 Diagram of Parts 6 Coffeemaker Features and Benefits 8 Clean Your Coffeemaker Before Using the First Time.......9 Setting The Clock and Delay Brew Time 9 Preparing for Use 10 • Suggested Coffee Measurement Chart • Water Filtration System • Adding Water and Ground Coffee Brewing Coffee Now 13 Brewing Coffee Later (Delay Brew 15 Cleaning and Maintaining Your Coffeemaker 15 Cleaning the Decanter 17 Service and Maintenance 21 Warranty Information 22 Welcome and...
... Safeguards 2 Decanter Use and Care 3 Special Cord Set Instructions 4 Table of Contents 5 Diagram of Parts 6 Coffeemaker Features and Benefits 8 Clean Your Coffeemaker Before Using the First Time.......9 Setting The Clock and Delay Brew Time 9 Preparing for Use 10 • Suggested Coffee Measurement Chart • Water Filtration System • Adding Water and Ground Coffee Brewing Coffee Now 13 Brewing Coffee Later (Delay Brew 15 Cleaning and Maintaining Your Coffeemaker 15 Cleaning the Decanter 17 Service and Maintenance 21 Warranty Information 22 Welcome and...

User Manual
Page 4
... parts 1 Filter Basket Lid 2 Water Reservoir 3 Dual Water Windows 4 Pause 'n Serve 5 Cord Storage 6 Warming Plate (not on thermal models) 7 Control Panel (see detail below) 8 Glass Decanter or Thermal Carafe 9 Removable Filter Basket 10 Shower Head 10 9 8 1 2 3 4 5 7 Control Panel, Switch Models Only a On/Off Switch with On Indicator Light 7 Control Panel, Programmable Models Only a On Indicator Light b Off Button c On Button d Clock Display e Minute Button f Hour Button g Set Delay Button h Delay Brew Button i PM Indicator j Delay Brew Indicator a j i a h g f ed c b Coffeemaker...
... parts 1 Filter Basket Lid 2 Water Reservoir 3 Dual Water Windows 4 Pause 'n Serve 5 Cord Storage 6 Warming Plate (not on thermal models) 7 Control Panel (see detail below) 8 Glass Decanter or Thermal Carafe 9 Removable Filter Basket 10 Shower Head 10 9 8 1 2 3 4 5 7 Control Panel, Switch Models Only a On/Off Switch with On Indicator Light 7 Control Panel, Programmable Models Only a On Indicator Light b Off Button c On Button d Clock Display e Minute Button f Hour Button g Set Delay Button h Delay Brew Button i PM Indicator j Delay Brew Indicator a j i a h g f ed c b Coffeemaker...

User Manual
Page 5
... Brew - Two-Hour Auto Shut-Off - Replace all models) • Brew Basket with water only, without adding coffee and coffee filter. 3. Your coffeemaker is still brewing. Press and hold the HOUR and MINUTE buttons until you brew, then automatically turns off (on ." • Additional Programmable Control Features (programmable models only) - Glass decanter series - 8 cups - Carefully remove the decanter and the Pause 'n Serve feature will be by cleaning your MR. COFFEE® Coffeemaker before setting the clock will act upon the last operation...
... Brew - Two-Hour Auto Shut-Off - Replace all models) • Brew Basket with water only, without adding coffee and coffee filter. 3. Your coffeemaker is still brewing. Press and hold the HOUR and MINUTE buttons until you brew, then automatically turns off (on ." • Additional Programmable Control Features (programmable models only) - Glass decanter series - 8 cups - Carefully remove the decanter and the Pause 'n Serve feature will be by cleaning your MR. COFFEE® Coffeemaker before setting the clock will act upon the last operation...

User Manual
Page 6
... DELAY BREW button until all models) Using the Mr. Coffee® carbon-based water filter in the dishwasher. oz. of brewed coffee Use more or less coffee to the letter that you are done brewing your water filter in the Mr. Coffee® coffeemaker during the brewing process helps remove up to 97% of the chlorine from the water and improves the taste of the clock display. Rinse the water filter in fresh water before first use the water...
... DELAY BREW button until all models) Using the Mr. Coffee® carbon-based water filter in the dishwasher. oz. of brewed coffee Use more or less coffee to the letter that you are done brewing your water filter in the Mr. Coffee® coffeemaker during the brewing process helps remove up to 97% of the chlorine from the water and improves the taste of the clock display. Rinse the water filter in fresh water before first use the water...

User Manual
Page 7
... plate. If filter collapse occurs, dampen the filter before using paper filters, it is fully placed on . For Programmable models: Press the ON Button to the minimum absorption of cups. 6. The green indicator light will shut off , push the OFF button. 13 10/18/12 2:13 PM Thermal units will turn the coffeemaker off immediatly after the brewing cycle is brewing. Place a MR. COFFEE® brand 10-12 cup paper basket...
... plate. If filter collapse occurs, dampen the filter before using paper filters, it is fully placed on . For Programmable models: Press the ON Button to the minimum absorption of cups. 6. The green indicator light will shut off , push the OFF button. 13 10/18/12 2:13 PM Thermal units will turn the coffeemaker off immediatly after the brewing cycle is brewing. Place a MR. COFFEE® brand 10-12 cup paper basket...

User Manual
Page 8
... like the coffeemaker to begin . The coffeemaker warming plate will keep your coffee hot for Programmable Models Only) 1. CAUTION: If the brew basket overflows or fails to brew coffee at a later time, press the Delay Brew button. After the used coffee grounds have cooled, carefully discard them in a solution of coffee from the decanter. Be sure to brew coffee. 4. You must first set time the green indicator light will turn on all models), decanter and decanter lid and...
... like the coffeemaker to begin . The coffeemaker warming plate will keep your coffee hot for Programmable Models Only) 1. CAUTION: If the brew basket overflows or fails to brew coffee at a later time, press the Delay Brew button. After the used coffee grounds have cooled, carefully discard them in a solution of coffee from the decanter. Be sure to brew coffee. 4. You must first set time the green indicator light will turn on all models), decanter and decanter lid and...
User Manual
Page 9
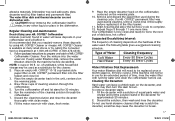
... the filter basket and close lid. 3. Turn the coffeemaker off and let stand for an extended period of Water Cleaning Frequency Soft Water Hard Water Every 80 Brew Cycles Every 40 Brew Cycles Water Filtration Disk Replacement: Your water filtration disk will not be replaced once a month (approx. 30 brew cycles). Remove and discard the paper filter used as a substitute for approximately 20 minutes. 2. Your coffeemaker is available at 1-800-MR COFFEE...
... the filter basket and close lid. 3. Turn the coffeemaker off and let stand for an extended period of Water Cleaning Frequency Soft Water Hard Water Every 80 Brew Cycles Every 40 Brew Cycles Water Filtration Disk Replacement: Your water filtration disk will not be replaced once a month (approx. 30 brew cycles). Remove and discard the paper filter used as a substitute for approximately 20 minutes. 2. Your coffeemaker is available at 1-800-MR COFFEE...

User Manual
Page 10
... not place thermal carafe in on the warming plate. WAIT FOR POWER TO BE RESTORED. WINDOWS. The decanter is not on the warming plate. DESCRIBED IN "CLEANING BREWS AND MAINTAINING" SLOWLY SECTION. THE FILTER BASKET OVERFLOWS The filter basket INSERT FILTER BASKET is unplugged. The decanter lid is not placed all the way in the dishwasher. TROUBLESHOOTING YOUR COFFEEMAKER. IF PAPER FILTER, REPLACE. BEGIN BREWING PROCESS AGAIN. DO NOT SET HOT for...
... not place thermal carafe in on the warming plate. WAIT FOR POWER TO BE RESTORED. WINDOWS. The decanter is not on the warming plate. DESCRIBED IN "CLEANING BREWS AND MAINTAINING" SLOWLY SECTION. THE FILTER BASKET OVERFLOWS The filter basket INSERT FILTER BASKET is unplugged. The decanter lid is not placed all the way in the dishwasher. TROUBLESHOOTING YOUR COFFEEMAKER. IF PAPER FILTER, REPLACE. BEGIN BREWING PROCESS AGAIN. DO NOT SET HOT for...

User Manual
Page 11
... serving you call. CLEAN COFFEEMAKER AS DESCRIBED IN "CLEANING AND MAINTAINING YOUR COFFEEMAKER" SECTION. REMOVE FILTER AND REPLACE. This coffeemaker uses the MR. COFFEE® brand 12-Cup, Black, Replacement Decanter - The model number is not SEAT FILTER PROPERLY properly seated in the U.S. PROBLEM THE COFFEE IS NOT HOT THE COFFEE TASTES BAD THE GROUNDS ARE IN THE COFFEE POSSIBLE CAUSE SOLUTION Auto SHUTOFF has been activated. (Programmable models only) FOR BEST RESULTS, BREW A FRESH POT OF COFFEE. USE...
... serving you call. CLEAN COFFEEMAKER AS DESCRIBED IN "CLEANING AND MAINTAINING YOUR COFFEEMAKER" SECTION. REMOVE FILTER AND REPLACE. This coffeemaker uses the MR. COFFEE® brand 12-Cup, Black, Replacement Decanter - The model number is not SEAT FILTER PROPERLY properly seated in the U.S. PROBLEM THE COFFEE IS NOT HOT THE COFFEE TASTES BAD THE GROUNDS ARE IN THE COFFEE POSSIBLE CAUSE SOLUTION Auto SHUTOFF has been activated. (Programmable models only) FOR BEST RESULTS, BREW A FRESH POT OF COFFEE. USE...

User Manual
Page 12
... at its option, will repair or replace this product or any question regarding this warranty is no longer available, replacement may also have any electrical or mechanical functions on improper voltage or current, use contrary to the operating instructions, disassembly, repair or alteration by the breach of the product, use on this product. This warranty does not cover normal wear of parts or damage resulting from...
... at its option, will repair or replace this product or any question regarding this warranty is no longer available, replacement may also have any electrical or mechanical functions on improper voltage or current, use contrary to the operating instructions, disassembly, repair or alteration by the breach of the product, use on this product. This warranty does not cover normal wear of parts or damage resulting from...


