
External Control Codes
Page 1
EXTERNAL CONTROL NEC LCD Monitor Rev.3.8 INDEX I. Communication specification 5 3. How to read 36 7.2 Power control 38 8. Connectors and wiring 4 2.1 RS-232C Remote control 4 2.2 LAN control 4 III. Communication Format 6 4.1 Header block format (fixed length ... the measurement value of the built-in temperature sensors 23 6.3. Preparation 4 2. Control Commands 20 6. Communication Parameter 5 3.1 RS-232C Remote control 5 3.2 LAN control 5 3.3 Communication timing 5 4. How to change the "Backlight" setting 20 6.2. Message type 13 5.1 ...
EXTERNAL CONTROL NEC LCD Monitor Rev.3.8 INDEX I. Communication specification 5 3. How to read 36 7.2 Power control 38 8. Connectors and wiring 4 2.1 RS-232C Remote control 4 2.2 LAN control 4 III. Communication Format 6 4.1 Header block format (fixed length ... the measurement value of the built-in temperature sensors 23 6.3. Preparation 4 2. Control Commands 20 6. Communication Parameter 5 3.1 RS-232C Remote control 5 3.2 LAN control 5 3.3 Communication timing 5 4. How to change the "Backlight" setting 20 6.2. Message type 13 5.1 ...

External Control Codes
Page 4
Preparation 2. Connectors and wiring 2.1 RS-232C Remote control Connector: 9-pin D-Sub Cable: Cross (reversed) cable or null modem cable (Please refer "Controlling the LCD monitor via RS-232C Remote control" on User's manual.) 2.2 LAN control Connector: RJ-45 10/100 BASE-T Cable: Category 5 or higher LAN cable (Please refer "Controlling the LCD monitor via LAN control" on User's manual.) (4/72) II.
Preparation 2. Connectors and wiring 2.1 RS-232C Remote control Connector: 9-pin D-Sub Cable: Cross (reversed) cable or null modem cable (Please refer "Controlling the LCD monitor via RS-232C Remote control" on User's manual.) 2.2 LAN control Connector: RJ-45 10/100 BASE-T Cable: Category 5 or higher LAN cable (Please refer "Controlling the LCD monitor via LAN control" on User's manual.) (4/72) II.

External Control Codes
Page 5
Communication Parameter 3.1 RS-232C Remote control (1) Communication system (2) Interface (3) Baud rate (4) Data length (5) Parity (6) Stop bit (7) Communication code Asynchronous RS-232C 9600bps 8bits None 1 bit ASCII 3.2 LAN control (1) Communication system (2) ...
Communication Parameter 3.1 RS-232C Remote control (1) Communication system (2) Interface (3) Baud rate (4) Data length (5) Parity (6) Stop bit (7) Communication code Asynchronous RS-232C 9600bps 8bits None 1 bit ASCII 3.2 LAN control (1) Communication system (2) ...

Specification Brochure
Page 1
...;• Full bi-directional RS-232 control and ethernet control allow individual and groupaddressable control, including email diagnostics •• Compatibility with NEC control software PD Comms Tool and NaViSet Administrator 2 •• Custom input detect feature to prioritize active inputs •• Expanded ... OPS expansion slot for maximum versatility •• Extensive control and diagnostic communication provide the highest level of remote management •• IR and Button Lock options for protecting against unnecessary setting changes www.necdisplay.com
...;• Full bi-directional RS-232 control and ethernet control allow individual and groupaddressable control, including email diagnostics •• Compatibility with NEC control software PD Comms Tool and NaViSet Administrator 2 •• Custom input detect feature to prioritize active inputs •• Expanded ... OPS expansion slot for maximum versatility •• Extensive control and diagnostic communication provide the highest level of remote management •• IR and Button Lock options for protecting against unnecessary setting changes www.necdisplay.com

Specification Brochure
Page 2
... for -AVT models Integrated (10W x 2) 150W 0.9/0.9, 0.9/0.9 in. / 23.0/23.0, 23.0/23.0 mm 62.5 x 36.2 x 3.4 in OPS slot for E705/E805/E905 MODEL LCD MODULE Panel Technology Viewable Image Size Native Resolution Brightness (Typical/Max) Contrast Ratio (Typical) Viewing Angle Aspect Ratio Active Screen Area (W x H) Displayable .../450 cd/m2 4000:1 176° Vert. / 176 Hor.(88U/88D/88L/88R) @CR>10 60.6 x 34.1in. / 1538.9 x 865.6mm More than 16.7 million E805 UV2A 80" 1920 x 1080 280/350 cd/m2 5000:1 176° Vert. / 176 Hor.(88U/88D/88L/88R) @CR>10 16:9 72.3 x 41.8 x 3.4 in. / 1836...
... for -AVT models Integrated (10W x 2) 150W 0.9/0.9, 0.9/0.9 in. / 23.0/23.0, 23.0/23.0 mm 62.5 x 36.2 x 3.4 in OPS slot for E705/E805/E905 MODEL LCD MODULE Panel Technology Viewable Image Size Native Resolution Brightness (Typical/Max) Contrast Ratio (Typical) Viewing Angle Aspect Ratio Active Screen Area (W x H) Displayable .../450 cd/m2 4000:1 176° Vert. / 176 Hor.(88U/88D/88L/88R) @CR>10 60.6 x 34.1in. / 1538.9 x 865.6mm More than 16.7 million E805 UV2A 80" 1920 x 1080 280/350 cd/m2 5000:1 176° Vert. / 176 Hor.(88U/88D/88L/88R) @CR>10 16:9 72.3 x 41.8 x 3.4 in. / 1836...

User's Manual
Page 2
... Mounting Accessories...English-6 Parts Name and Functions...English-8 Control Panel...English-8 Terminal Panel...English-9 Wireless Remote Control...English-10 Operating Range for the Remote Control English-11 Setup...English-12 Connections...English-14 Wiring Diagram...English-14 Connecting a Personal Computer English... Remote Control English-31 Controlling the LCD monitor via LAN Control English-33 Connecting to a Network...English-33 Network Setting by Using an HTTP Browser English-33 POINT ZOOM...English-42 Features...English-43 Troubleshooting...English-44 Specifications - E805...
... Mounting Accessories...English-6 Parts Name and Functions...English-8 Control Panel...English-8 Terminal Panel...English-9 Wireless Remote Control...English-10 Operating Range for the Remote Control English-11 Setup...English-12 Connections...English-14 Wiring Diagram...English-14 Connecting a Personal Computer English... Remote Control English-31 Controlling the LCD monitor via LAN Control English-33 Connecting to a Network...English-33 Network Setting by Using an HTTP Browser English-33 POINT ZOOM...English-42 Features...English-43 Troubleshooting...English-44 Specifications - E805...
User's Manual
Page 6
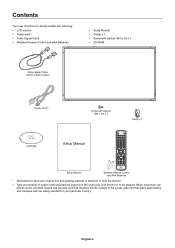
Contents Your new monitor box* should contain the following: • LCD monitor • Power cord*1 • Video Signal Cable • Wireless Remote Control and AAA Batteries • Setup Manual • Clamp x 1 • Screw with washer (M4 x 10) x 1 • CD-ROM Video Signal Cable (DVI-D ...the power outlet and has been approved by and complies with washer (M4 x 10) x 1 Clamp x 1 CD-ROM Setup Manual Setup Manual Wireless Remote Control and AAA Batteries * Remember to save your original box and packing material to be shipped. English-4 When more than one power cord is to...
Contents Your new monitor box* should contain the following: • LCD monitor • Power cord*1 • Video Signal Cable • Wireless Remote Control and AAA Batteries • Setup Manual • Clamp x 1 • Screw with washer (M4 x 10) x 1 • CD-ROM Video Signal Cable (DVI-D ...the power outlet and has been approved by and complies with washer (M4 x 10) x 1 Clamp x 1 CD-ROM Setup Manual Setup Manual Wireless Remote Control and AAA Batteries * Remember to save your original box and packing material to be shipped. English-4 When more than one power cord is to...
User's Manual
Page 10
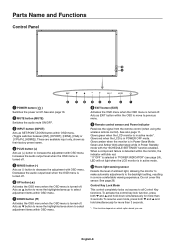
... button to move the highlighted area up to increase the adjustment with the "SCHEDULE SETTINGS" function enabled. I Remote control sensor and Power Indicator Receives the signal from the remote control (when using the wireless remote control). Green and Amber blink alternately while in active mode. When a component failure is in Power Standby mode...
... button to move the highlighted area up to increase the adjustment with the "SCHEDULE SETTINGS" function enabled. I Remote control sensor and Power Indicator Receives the signal from the remote control (when using the wireless remote control). Green and Amber blink alternately while in active mode. When a component failure is in Power Standby mode...
User's Manual
Page 12
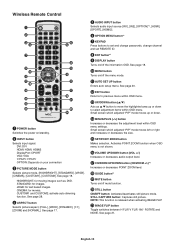
...See page 18. L EXIT button Returns to previous menu within OSD menu settings. Small screen which adjusted "PIP" mode moves up or down . Wireless Remote Control A POWER button Switches the power on your connection C PICTURE MODE button Selects picture mode, [HIGHBRIGHT], [STANDARD], [sRGB], [CINEMA], [CUSTOM1],.... STANDARD: for moving images such as button to move the highlighted area up or down to set and change passwords, change channel and set REMOTE ID. sRGB: for movies. E AUDIO INPUT button Selects audio input source [IN1], [IN2], [OPTION]*2, [HDMI], [DPORT], [HDMI2]....
...See page 18. L EXIT button Returns to previous menu within OSD menu settings. Small screen which adjusted "PIP" mode moves up or down . Wireless Remote Control A POWER button Switches the power on your connection C PICTURE MODE button Selects picture mode, [HIGHBRIGHT], [STANDARD], [sRGB], [CINEMA], [CUSTOM1],.... STANDARD: for moving images such as button to move the highlighted area up or down to set and change passwords, change channel and set REMOTE ID. sRGB: for movies. E AUDIO INPUT button Selects audio input source [IN1], [IN2], [OPTION]*2, [HDMI], [DPORT], [HDMI2]....
User's Manual
Page 13
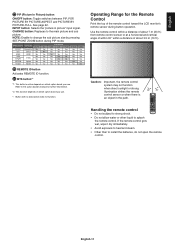
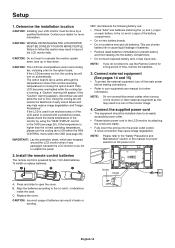
... sensor or at a horizontal and vertical angle of within 30° within a distance of the remote control toward the LCD monitor's remote sensor during PIP mode. If the remote control gets wet, wipe it dry immediately. • Avoid exposure to heat and steam. • Other than ... size by pressing SET/POINT ZOOM button during button operation. English-11 Caution: Important, the remote control system may not function when direct sunlight or strong illumination strikes the remote control sensor or when there is an object in picture" input signal. INPUT button: Selects the...
... sensor or at a horizontal and vertical angle of within 30° within a distance of the remote control toward the LCD monitor's remote sensor during PIP mode. If the remote control gets wet, wipe it dry immediately. • Avoid exposure to heat and steam. • Other than ... size by pressing SET/POINT ZOOM button during button operation. English-11 Caution: Important, the remote control system may not function when direct sunlight or strong illumination strikes the remote control sensor or when there is an object in picture" input signal. INPUT button: Selects the...
User's Manual
Page 14
..., the cooling fan will turn on each battery to the (+) and (-) signs of the monitor image. 4. To install or replace batteries: NEC recommends the following battery use: • Place "AAA" size batteries matching the (+) and (-) signs on automatically. Connect external equipment (See ...turn off the main power before making connections. • Refer to follow this caution may cause image degradation. Install the remote control batteries The remote control is running, a "Caution" warning will reduce the likelihood of batteries can shorten battery life or cause liquid leakage...
..., the cooling fan will turn on each battery to the (+) and (-) signs of the monitor image. 4. To install or replace batteries: NEC recommends the following battery use: • Place "AAA" size batteries matching the (+) and (-) signs on automatically. Connect external equipment (See ...turn off the main power before making connections. • Refer to follow this caution may cause image degradation. Install the remote control batteries The remote control is running, a "Caution" warning will reduce the likelihood of batteries can shorten battery life or cause liquid leakage...

User's Manual
Page 16
Use an audio cable without a built-in remote control DisplayPort DVI HDMI RGB/HV Y/Pb/Pr OPTION HDMI DisplayPort DVI HDMI RGB/HV OPTION HDMI English-14 Before making connections: * First turn off ...
Use an audio cable without a built-in remote control DisplayPort DVI HDMI RGB/HV Y/Pb/Pr OPTION HDMI DisplayPort DVI HDMI RGB/HV OPTION HDMI English-14 Before making connections: * First turn off ...
User's Manual
Page 18
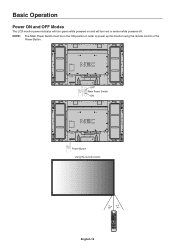
NOTE: The Main Power Switch must be in the ON position in order to power up the monitor using the remote control or the Power Button. OFF Main Power Switch ON Power Button Using the remote control English-16 Basic Operation Power ON and OFF Modes The LCD monitor power indicator will turn green while powered on and will turn red or amber while powered off.
NOTE: The Main Power Switch must be in the ON position in order to power up the monitor using the remote control or the Power Button. OFF Main Power Switch ON Power Button Using the remote control English-16 Basic Operation Power ON and OFF Modes The LCD monitor power indicator will turn green while powered on and will turn red or amber while powered off.

User's Manual
Page 20
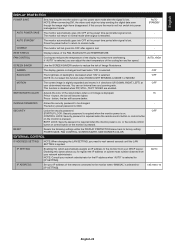
A Input Name B Audio input mode C Picture aspect D Input Signal Information 5 Sub picture information Picture Mode DVI, VGA, DPORT STANDARD sRGB CUSTOM1 CUSTOM2 HIGHBRIGHT HDMI, Y/Pb/Pr, HDMI2 STANDARD CINEMA CUSTOM1 CUSTOM2 HIGHBRIGHT English-18 Information OSD The Information OSD provides information such as: Input Source, Picture Size, etc. Press the DISPLAY button on the remote to bring up the Information OSD.
A Input Name B Audio input mode C Picture aspect D Input Signal Information 5 Sub picture information Picture Mode DVI, VGA, DPORT STANDARD sRGB CUSTOM1 CUSTOM2 HIGHBRIGHT HDMI, Y/Pb/Pr, HDMI2 STANDARD CINEMA CUSTOM1 CUSTOM2 HIGHBRIGHT English-18 Information OSD The Information OSD provides information such as: Input Source, Picture Size, etc. Press the DISPLAY button on the remote to bring up the Information OSD.

User's Manual
Page 21
... or DOWN, PLUS or MINUS to select the function or setting to be available depending on the model or optional equipment. Press SET/POINT ZOOM. Remote Control Press UP or DOWN button to select sub-menu. CARBON FOOTPRINT 86.0 % Goto Adjustment Return Close Key Guide Adjustment Settings Press UP or DOWN...
... or DOWN, PLUS or MINUS to select the function or setting to be available depending on the model or optional equipment. Press SET/POINT ZOOM. Remote Control Press UP or DOWN button to select sub-menu. CARBON FOOTPRINT 86.0 % Goto Adjustment Return Close Key Guide Adjustment Settings Press UP or DOWN...
User's Manual
Page 26
... from being in active mode. CUSTOM LOCK Selects which buttons to the maximum volume you set between being controlled by the wireless remote control. Except for 5 seconds. VIDEO OUT SETTING (not adjustable) POWER INDICATOR Turns ON or OFF the LED located at the... - When ACTIVATE is selected, VOLUME (+) button and VOLUME (-) buttons are available for POWER ON DELAY. *1: This function depends on the remote control are locked. This function does not lock out access to VOL.100. VOLUME (+) button and VOLUME (-) buttons are locked. NOTE: IR...
... from being in active mode. CUSTOM LOCK Selects which buttons to the maximum volume you set between being controlled by the wireless remote control. Except for 5 seconds. VIDEO OUT SETTING (not adjustable) POWER INDICATOR Turns ON or OFF the LED located at the... - When ACTIVATE is selected, VOLUME (+) button and VOLUME (-) buttons are available for POWER ON DELAY. *1: This function depends on the remote control are locked. This function does not lock out access to VOL.100. VOLUME (+) button and VOLUME (-) buttons are locked. NOTE: IR...
User's Manual
Page 27
...AUTO STANDBY The monitor automatically goes into power save mode after signal is lost . Press - CONTROL LOCK: Security password is required when the remote control button or control button on . NOTE: Consult your DHCP server. If "AUTO" is pressed. START-UP LOCK: Security password is...backlight is decreased when "ON" is applied. BOTH LOCK: Security password is required when the monitor power is on, or the remote control button or control button on the monitor is 0000. IP SETTING Enabling this occurs the monitor will become lighter. If this...
...AUTO STANDBY The monitor automatically goes into power save mode after signal is lost . Press - CONTROL LOCK: Security password is required when the remote control button or control button on . NOTE: Consult your DHCP server. If "AUTO" is pressed. START-UP LOCK: Security password is...backlight is decreased when "ON" is applied. BOTH LOCK: Security password is required when the monitor power is on, or the remote control button or control button on the monitor is 0000. IP SETTING Enabling this occurs the monitor will become lighter. If this...
User's Manual
Page 31
..., and residual or "ghost" image of previous image may be observed. (Image Persistence) Image Persistence is idle or turning off the monitor by remote control, or use Power Management or use . Image Persistence occurs when a residual or "ghost" image of a previous image remains visible on which...) JUN.18.2009 15:38 SETTINGS: 1234567 ON: OFF: INPUT: PIC. To program the schedule: 1. As with all personal display devices, NEC DISPLAY SOLUTIONS recommends displaying moving images and using the up and down buttons. Use the up and down button to be programmed. buttons to set...
..., and residual or "ghost" image of previous image may be observed. (Image Persistence) Image Persistence is idle or turning off the monitor by remote control, or use Power Management or use . Image Persistence occurs when a residual or "ghost" image of a previous image remains visible on which...) JUN.18.2009 15:38 SETTINGS: 1234567 ON: OFF: INPUT: PIC. To program the schedule: 1. As with all personal display devices, NEC DISPLAY SOLUTIONS recommends displaying moving images and using the up and down buttons. Use the up and down button to be programmed. buttons to set...
User's Manual
Page 32
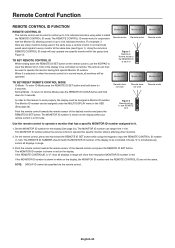
... ID While holding down the REMOTE ID SET button on the remote control, use REMOTE ID:3 Remote works Use the remote control to operate a monitor that specific Monitor ID number. Monitor ID:1 Monitor ID:2 Remote works Remote works Figure 1 Remote in Normal mode or the REMOTE ID is set up to use the...normal mode, all displays in conjunction with the Monitor ID, allowing control of the desired monitor and press the REMOTE ID SET button. Point the remote control towards the remote sensor of up to operate the monitor having that has a specific MONITOR ID number assigned to it. 1. Set...
... ID While holding down the REMOTE ID SET button on the remote control, use REMOTE ID:3 Remote works Use the remote control to operate a monitor that specific Monitor ID number. Monitor ID:1 Monitor ID:2 Remote works Remote works Figure 1 Remote in Normal mode or the REMOTE ID is set up to use the...normal mode, all displays in conjunction with the Monitor ID, allowing control of the desired monitor and press the REMOTE ID SET button. Point the remote control towards the remote sensor of up to operate the monitor having that has a specific MONITOR ID number assigned to it. 1. Set...
User's Manual
Page 33
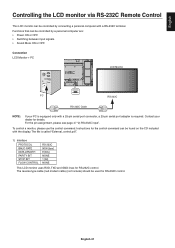
...: If your dealer for the control command can be found on the CD included with the display. English Controlling the LCD monitor via RS-232C Remote Control This LCD monitor can be controlled by a personal computer are: • Power ON or OFF. • Switching between input signals. • Sound Mute ON...
...: If your dealer for the control command can be found on the CD included with the display. English Controlling the LCD monitor via RS-232C Remote Control This LCD monitor can be controlled by a personal computer are: • Power ON or OFF. • Switching between input signals. • Sound Mute ON...

