

External Control Codes
Page 4
Preparation 2. II. Connectors and wiring 2.1 RS-232C Remote control Connector: 9-pin D-Sub Cable: Cross (reversed) cable or null modem cable (Please refer "Controlling the LCD monitor via RS-232C Remote control" on User's manual.) 2.2 LAN control Connector: RJ-45 10/100 BASE-T Cable: Category 5 or higher LAN cable (Please refer "Controlling the LCD monitor via LAN control" on User's manual.) (4/72)
Preparation 2. II. Connectors and wiring 2.1 RS-232C Remote control Connector: 9-pin D-Sub Cable: Cross (reversed) cable or null modem cable (Please refer "Controlling the LCD monitor via RS-232C Remote control" on User's manual.) 2.2 LAN control Connector: RJ-45 10/100 BASE-T Cable: Category 5 or higher LAN cable (Please refer "Controlling the LCD monitor via LAN control" on User's manual.) (4/72)

External Control Codes
Page 5
... interval before next command is received for the LCD monitor. (5/72) Communication specification 3. The packet interval needs to change, Please refer "Network settings" on User's manual. 7142 (Fixed) (Note) The monitor will disconnect the connection if no packet data is sent. III. TCP/IP (Internet protocol suite) Ethernet (CSMA/CD) Transport...
... interval before next command is received for the LCD monitor. (5/72) Communication specification 3. The packet interval needs to change, Please refer "Network settings" on User's manual. 7142 (Fixed) (Note) The monitor will disconnect the connection if no packet data is sent. III. TCP/IP (Internet protocol suite) Ethernet (CSMA/CD) Transport...

External Control Codes
Page 30
Momentary OSD Language 5sec/step Please refer to the monitor instruction manual. OS D Item PIP H Position PIP V Position Aspect Text Ticker Mode Position Size Blend Detect Fade In PIP Input(Sub input) Menu tree reset (PIP) Language ...
Momentary OSD Language 5sec/step Please refer to the monitor instruction manual. OS D Item PIP H Position PIP V Position Aspect Text Ticker Mode Position Size Blend Detect Fade In PIP Input(Sub input) Menu tree reset (PIP) Language ...

External Control Codes
Page 35
Refer to the monitor instruction manual. Momentary Momentary This operation requires supported option TV tuner. 2's Read only Read only Read only Read only Read only Temperature sensor Carbon footprint (35/72) ...
Refer to the monitor instruction manual. Momentary Momentary This operation requires supported option TV tuner. 2's Read only Read only Read only Read only Read only Temperature sensor Carbon footprint (35/72) ...

Specification Brochure
Page 2
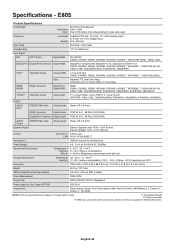
... for -AVT models Integrated (10W x 2) 150W 0.9/0.9, 0.9/0.9 in. / 23.0/23.0, 23.0/23.0 mm 62.5 x 36.2 x 3.4 in OPS slot for E705/E805/E905 MODEL LCD MODULE Panel Technology Viewable Image Size Native Resolution Brightness (Typical/Max) Contrast Ratio (Typical) Viewing Angle Aspect Ratio Active Screen Area (W x H) Displayable .../450 cd/m2 4000:1 176° Vert. / 176 Hor.(88U/88D/88L/88R) @CR>10 60.6 x 34.1in. / 1538.9 x 865.6mm More than 16.7 million E805 UV2A 80" 1920 x 1080 280/350 cd/m2 5000:1 176° Vert. / 176 Hor.(88U/88D/88L/88R) @CR>10 16:9 72.3 x 41.8 x 3.4 in. / 1836...
... for -AVT models Integrated (10W x 2) 150W 0.9/0.9, 0.9/0.9 in. / 23.0/23.0, 23.0/23.0 mm 62.5 x 36.2 x 3.4 in OPS slot for E705/E805/E905 MODEL LCD MODULE Panel Technology Viewable Image Size Native Resolution Brightness (Typical/Max) Contrast Ratio (Typical) Viewing Angle Aspect Ratio Active Screen Area (W x H) Displayable .../450 cd/m2 4000:1 176° Vert. / 176 Hor.(88U/88D/88L/88R) @CR>10 60.6 x 34.1in. / 1538.9 x 865.6mm More than 16.7 million E805 UV2A 80" 1920 x 1080 280/350 cd/m2 5000:1 176° Vert. / 176 Hor.(88U/88D/88L/88R) @CR>10 16:9 72.3 x 41.8 x 3.4 in. / 1836...
User's Manual
Page 3
...GmbH in the United States and other countries. English Declaration of this display so as not to interfere with the instruction manual, may cause harmful interference to radio communications. These limits are trademarks or registered trademarks of Microsoft Corporation. This equipment generates,... Electronics, Inc. English-1 All other cables and adapters may find the following booklet, prepared by the Video Electronics Standards Association. NEC is likely to cause harmful interference in which case the user will be required to comply with radio and television reception. 2. ...
...GmbH in the United States and other countries. English Declaration of this display so as not to interfere with the instruction manual, may cause harmful interference to radio communications. These limits are trademarks or registered trademarks of Microsoft Corporation. This equipment generates,... Electronics, Inc. English-1 All other cables and adapters may find the following booklet, prepared by the Video Electronics Standards Association. NEC is likely to cause harmful interference in which case the user will be required to comply with radio and television reception. 2. ...
User's Manual
Page 6
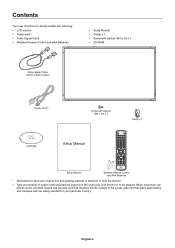
...box* should contain the following: • LCD monitor • Power cord*1 • Video Signal Cable • Wireless Remote Control and AAA Batteries • Setup Manual • Clamp x 1 • Screw with washer (M4 x 10) x 1 • CD-ROM Video Signal Cable (DVI-D to DVI-D cable) Power Cord...and number of the power outlet and has been approved by and complies with washer (M4 x 10) x 1 Clamp x 1 CD-ROM Setup Manual Setup Manual Wireless Remote Control and AAA Batteries * Remember to save your particular country. English-4 When more than one power cord is included, please use a...
...box* should contain the following: • LCD monitor • Power cord*1 • Video Signal Cable • Wireless Remote Control and AAA Batteries • Setup Manual • Clamp x 1 • Screw with washer (M4 x 10) x 1 • CD-ROM Video Signal Cable (DVI-D to DVI-D cable) Power Cord...and number of the power outlet and has been approved by and complies with washer (M4 x 10) x 1 Clamp x 1 CD-ROM Setup Manual Setup Manual Wireless Remote Control and AAA Batteries * Remember to save your particular country. English-4 When more than one power cord is included, please use a...
User's Manual
Page 13
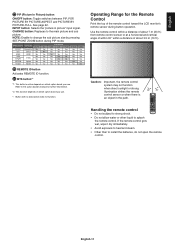
... In Picture) button ON/OFF button: Toggle switches between PIP, POP, PICTURE BY PICTURE-ASPECT and PICTURE BY PICTURE-FULL. Refer to the option board's manual for the Remote Control Point the top of about 7 m (23 ft.) from remote control sensor or at a horizontal and vertical angle of within 30°...
... In Picture) button ON/OFF button: Toggle switches between PIP, POP, PICTURE BY PICTURE-ASPECT and PICTURE BY PICTURE-FULL. Refer to the option board's manual for the Remote Control Point the top of about 7 m (23 ft.) from remote control sensor or at a horizontal and vertical angle of within 30°...
User's Manual
Page 14
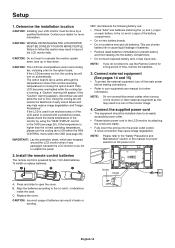
...turn the cooling fan to open the cover. NOTE: If you do not intend to the "Safety Precautions and Maintenance" section of this manual for further information. NOTE: Please refer to use the Remote Control for more information. Screw Clamp A. Determine the installation location CAUTION: Installing ...the case. CAUTION: MOVING OR INSTALLING THE LCD MONITOR MUST BE DONE BY FOUR OR MORE PEOPLE. B. To install or replace batteries: NEC recommends the following battery use and allow the unit to the (+) and (-) indications inside temperature of batteries can shorten battery life or ...
...turn the cooling fan to open the cover. NOTE: If you do not intend to the "Safety Precautions and Maintenance" section of this manual for further information. NOTE: Please refer to use the Remote Control for more information. Screw Clamp A. Determine the installation location CAUTION: Installing ...the case. CAUTION: MOVING OR INSTALLING THE LCD MONITOR MUST BE DONE BY FOUR OR MORE PEOPLE. B. To install or replace batteries: NEC recommends the following battery use and allow the unit to the (+) and (-) indications inside temperature of batteries can shorten battery life or ...

User's Manual
Page 16
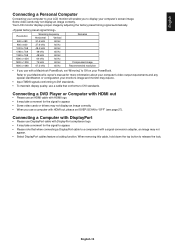
Before making connections: * First turn off the power of all the attached equipment and make connections. * Refer to the user manual included with a built-in remote control DisplayPort DVI HDMI RGB/HV Y/Pb/Pr OPTION HDMI DisplayPort DVI HDMI RGB/HV OPTION HDMI English-14 Using ...
Before making connections: * First turn off the power of all the attached equipment and make connections. * Refer to the user manual included with a built-in remote control DisplayPort DVI HDMI RGB/HV Y/Pb/Pr OPTION HDMI DisplayPort DVI HDMI RGB/HV OPTION HDMI English-14 Using ...
User's Manual
Page 17
... the top button to DVI standards. Your LCD monitor displays proper image by adjusting the factory preset timing signal automatically. Refer to your Macintosh's owner's manual for more information about your computer's video output requirements and any special identification or configuration your monitor's image and monitor may require. • Input TMDS...
... the top button to DVI standards. Your LCD monitor displays proper image by adjusting the factory preset timing signal automatically. Refer to your Macintosh's owner's manual for more information about your computer's video output requirements and any special identification or configuration your monitor's image and monitor may require. • Input TMDS...
User's Manual
Page 27
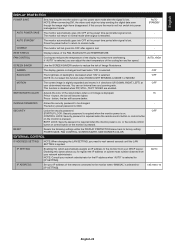
... network connected to wait several seconds until the LAN SETTING is applied. Press - IP SETTING Enabling this option allows you need to the monitor when "MANUAL" is selected for [IP SETTING]. START-UP LOCK: Security password is required when the monitor power is disabled when PIP, STILL, TEXT TICKER are enabled...
... network connected to wait several seconds until the LAN SETTING is applied. Press - IP SETTING Enabling this option allows you need to the monitor when "MANUAL" is selected for [IP SETTING]. START-UP LOCK: Security password is required when the monitor power is disabled when PIP, STILL, TEXT TICKER are enabled...

User's Manual
Page 28
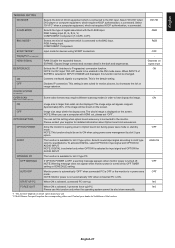
...When selected "SUPER", allows to factory settings: - NOTE: Set as [0.0.0.0] to delete the setting. 0.0.0.0 MAC ADDRESS Displays the MAC ADDRESS. - MANUAL: Set your primary DNS settings of the network connected to the monitor. NOTE: Set as [0.0.0.0] to delete the setting. 0.0.0.0 DNS Set for IP...: Set as [0.0.0.0] to delete the setting. 0.0.0.0 DNS SECONDARY: Set your default gateway of the network connected to the monitor when "MANUAL" is selected for [IP SETTING]. When CUSTOM DETECT is selected, monitor searches listed inputs only. FIRST DETECT*2 When the current video input...
...When selected "SUPER", allows to factory settings: - NOTE: Set as [0.0.0.0] to delete the setting. 0.0.0.0 MAC ADDRESS Displays the MAC ADDRESS. - MANUAL: Set your primary DNS settings of the network connected to the monitor. NOTE: Set as [0.0.0.0] to delete the setting. 0.0.0.0 DNS Set for IP...: Set as [0.0.0.0] to delete the setting. 0.0.0.0 DNS SECONDARY: Set your default gateway of the network connected to the monitor when "MANUAL" is selected for [IP SETTING]. When CUSTOM DETECT is selected, monitor searches listed inputs only. FIRST DETECT*2 When the current video input...
User's Manual
Page 29
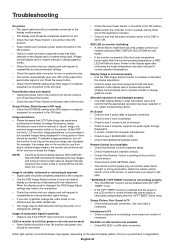
... power save mode. DisplayPort (not adjustable) HDMI SIGNAL RAW: Disable the expanded feature. This is ON. Approximately 95% of this function cannot be shut down manually. *1: This function depends on signal input ON ON OFF ANALOG OFF OFF NO NO English-27 NOTE: Warning message does not appear when monitor power...
... power save mode. DisplayPort (not adjustable) HDMI SIGNAL RAW: Disable the expanded feature. This is ON. Approximately 95% of this function cannot be shut down manually. *1: This function depends on signal input ON ON OFF ANALOG OFF OFF NO NO English-27 NOTE: Warning message does not appear when monitor power...

User's Manual
Page 37
...MASK Set your secondary DNS settings of DNS server. SECONDARY DNS Set your subnet mask number of the network connected to the monitor when [MANUAL] is selected for IP ADDRESS setting. DNS Set for [IP SETTING]. NOTE: Consult your IP address of HOME. English Network Setting Click... "NETWORK" on the left side of DNS server connected to the monitor when [MANUAL] is selected for [IP SETTING]. AUTO: Automatically assign an IP address. MANUAL: Set your network administrator for the IP address when [AUTO] is selected for IP ADDRESS setting of...
...MASK Set your secondary DNS settings of DNS server. SECONDARY DNS Set your subnet mask number of the network connected to the monitor when [MANUAL] is selected for IP ADDRESS setting. DNS Set for [IP SETTING]. NOTE: Consult your IP address of HOME. English Network Setting Click... "NETWORK" on the left side of DNS server connected to the monitor when [MANUAL] is selected for [IP SETTING]. AUTO: Automatically assign an IP address. MANUAL: Set your network administrator for the IP address when [AUTO] is selected for IP ADDRESS setting of...
User's Manual
Page 46
...make sure that a supported mode has been selected on the display card or system being used . (Please consult display card or system manual to change the video mode to normal operation temperature. If unsure, contact the computer manufacturer. • Check to see if computer supports ... is unstable, unfocused or swimming is connected to the DVI input. Power on the screen. NOTE: As with all personal display devices, NEC DISPLAY SOLUTIONS recommends displaying moving images and using a moving screen saver at the monitor's remote sensor. • Check the IR LOCK SETTING...
...make sure that a supported mode has been selected on the display card or system being used . (Please consult display card or system manual to change the video mode to normal operation temperature. If unsure, contact the computer manufacturer. • Check to see if computer supports ... is unstable, unfocused or swimming is connected to the DVI input. Power on the screen. NOTE: As with all personal display devices, NEC DISPLAY SOLUTIONS recommends displaying moving images and using a moving screen saver at the monitor's remote sensor. • Check the IR LOCK SETTING...
User's Manual
Page 47
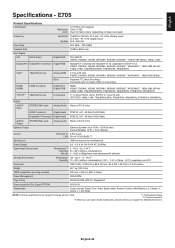
... mm x 400 mm (M8, 4 Holes) Power Management VESA DPM Plug & Play Power supply for Slot 2 type OPTION VESA DDC2B, DDC/CI, DisplayPort 16V/3.6 A Accessories Setup manual, Power Cord, Video Signal cable, Remote Control, AAA Battery x 2, Clamp x 1, Screw x 1, CD-ROM NOTE: Technical specifications are subject to HDCP V1.3 VGA60, SVGA60, XGA60, WXGA60...
... mm x 400 mm (M8, 4 Holes) Power Management VESA DPM Plug & Play Power supply for Slot 2 type OPTION VESA DDC2B, DDC/CI, DisplayPort 16V/3.6 A Accessories Setup manual, Power Cord, Video Signal cable, Remote Control, AAA Battery x 2, Clamp x 1, Screw x 1, CD-ROM NOTE: Technical specifications are subject to HDCP V1.3 VGA60, SVGA60, XGA60, WXGA60...
User's Manual
Page 48
...M8, 4 Holes) Power Management VESA DPM Plug & Play Power supply for Slot 2 type OPTION VESA DDC2B, DDC/CI, DisplayPort 16V/3.6 A Accessories Setup manual, Power Cord, Video Signal cable, Remote Control, AAA Battery x 2, Clamp x 1, Screw x 1, CD-ROM NOTE: Technical specifications are subject to change.... *2: Common terminal. *3: When you use option board accessories, please contact your supplier for detailed information. Specifications - E805 Product Specifications LCD Module 80"/2032.2 mm diagonal Resolution: 1920 x 1080 Color: Over 1073 million colors (depending on Green Video: 0.3 ...
...M8, 4 Holes) Power Management VESA DPM Plug & Play Power supply for Slot 2 type OPTION VESA DDC2B, DDC/CI, DisplayPort 16V/3.6 A Accessories Setup manual, Power Cord, Video Signal cable, Remote Control, AAA Battery x 2, Clamp x 1, Screw x 1, CD-ROM NOTE: Technical specifications are subject to change.... *2: Common terminal. *3: When you use option board accessories, please contact your supplier for detailed information. Specifications - E805 Product Specifications LCD Module 80"/2032.2 mm diagonal Resolution: 1920 x 1080 Color: Over 1073 million colors (depending on Green Video: 0.3 ...

Installation Guide
Page 1
E805 Installation Guide 80" LCD Display Contents: Product Description and Notes Tilt Angle and Rotation Ventilation Recommendations Display Dimensions Display Dimensions with stand Optional Table Top Stand Dimensions Optional Speaker Dimensions Dimensions of Optional Wall Mount (WMK-3257) Input Terminals Control Codes Browser Control NEC... bars on the left or right, or stretched horizontally to fill the screen using the menus (see "Aspect Modes" in menus and user manual). Distances are in inches, for a design or installation. Note that the monitor can be a step-by 25.4. ...
E805 Installation Guide 80" LCD Display Contents: Product Description and Notes Tilt Angle and Rotation Ventilation Recommendations Display Dimensions Display Dimensions with stand Optional Table Top Stand Dimensions Optional Speaker Dimensions Dimensions of Optional Wall Mount (WMK-3257) Input Terminals Control Codes Browser Control NEC... bars on the left or right, or stretched horizontally to fill the screen using the menus (see "Aspect Modes" in menus and user manual). Distances are in inches, for a design or installation. Note that the monitor can be a step-by 25.4. ...
