
RS232 codes- Projectors
Page 2
... sold. * The WT610 replaced the WT610 and uses the same command set the "idle mode". Setting method : From the projector's menu, select [SETUP] --> [OPTIONS(2)] -->[STANDBY MODE]--> [NORMAL]. ( CAUTION ) (!2) The projector accept the "POWER ON" command during [POWER-SAVING] mode for sending and receiving control commands. 1. Projector Control 2. USB connection using the supplied USB cable is required Status of the projector and set . (CAUTION) Before making connections, be sure to invalidate the standby mode of supported connection * A USB cable is supplied as standard with the...
... sold. * The WT610 replaced the WT610 and uses the same command set the "idle mode". Setting method : From the projector's menu, select [SETUP] --> [OPTIONS(2)] -->[STANDBY MODE]--> [NORMAL]. ( CAUTION ) (!2) The projector accept the "POWER ON" command during [POWER-SAVING] mode for sending and receiving control commands. 1. Projector Control 2. USB connection using the supplied USB cable is required Status of the projector and set . (CAUTION) Before making connections, be sure to invalidate the standby mode of supported connection * A USB cable is supplied as standard with the...

Specification Brochure
Page 1
... provides instantaneous shutdown of the projector 6000-hour filter life NEC is required, thereby decreasing your image • Powerful 16-watt speaker provides volume needed for large rooms • Vertical lens shift provides for flexible installation • Terminal cover easily hides cables to create a clean environment while deterring unintentional access • Versatile, color-coded connections to computer, video sources and external monitor Top cover lamp change This feature provides for...
... provides instantaneous shutdown of the projector 6000-hour filter life NEC is required, thereby decreasing your image • Powerful 16-watt speaker provides volume needed for large rooms • Vertical lens shift provides for flexible installation • Terminal cover easily hides cables to create a clean environment while deterring unintentional access • Versatile, color-coded connections to computer, video sources and external monitor Top cover lamp change This feature provides for...

Specification Brochure
Page 4
..., 576p, 576i, 480p, 480i,Y/Cb/Cr component (with ceiling mount Replacement lamp Replacement remote control Extends term of parts and labor warranty to 4 years Extends term of InstaCare service program to change. ©2013 NEC Display Solutions of America, Inc. SHIPS WITH Remote control, batteries, power cord, RGB signal cable, built-in lens cover, user's manual on G 1/8 in . / 398 x 282 x 127mm 9 lbs. / 4.1 kg P401W/P451X: 36 dB normal / 30 dB eco P451W/P501X...
..., 576p, 576i, 480p, 480i,Y/Cb/Cr component (with ceiling mount Replacement lamp Replacement remote control Extends term of parts and labor warranty to 4 years Extends term of InstaCare service program to change. ©2013 NEC Display Solutions of America, Inc. SHIPS WITH Remote control, batteries, power cord, RGB signal cable, built-in lens cover, user's manual on G 1/8 in . / 398 x 282 x 127mm 9 lbs. / 4.1 kg P401W/P451X: 36 dB normal / 30 dB eco P451W/P501X...

User's Manual
Page 5
... object than the projector's sliding lens cover to your eyes could result. • Keep any other than the desktop and ceiling mount, otherwise lamp life could lead to the object melting from the heat that is emitted from the lens is extensive, therefore any kind of abnormal objects that your power supply fits this requirement before attempting to operate on a power supply of heat...
... object than the projector's sliding lens cover to your eyes could result. • Keep any other than the desktop and ceiling mount, otherwise lamp life could lead to the object melting from the heat that is emitted from the lens is extensive, therefore any kind of abnormal objects that your power supply fits this requirement before attempting to operate on a power supply of heat...

User's Manual
Page 9
... Remote Control 8 Battery Installation...9 Remote Control Precautions 9 Operating Range for Wireless Remote Control 9 ❺ Operating Environment for Software Included on CD-ROM 10 Operating Environment 11 2. Projecting an Image (Basic Operation 13 ❶ Flow of Projecting an Image 13 ❷ Connecting Your Computer/Connecting the Power Cord 14 ❸ Turning on the Projector 15 Note on Startup screen (Menu Language Select screen 16 ❹ Selecting a Source...17 Selecting the computer or video source 17 ❺ Adjusting the Picture Size and Position 19 Adjusting...
... Remote Control 8 Battery Installation...9 Remote Control Precautions 9 Operating Range for Wireless Remote Control 9 ❺ Operating Environment for Software Included on CD-ROM 10 Operating Environment 11 2. Projecting an Image (Basic Operation 13 ❶ Flow of Projecting an Image 13 ❷ Connecting Your Computer/Connecting the Power Cord 14 ❸ Turning on the Projector 15 Note on Startup screen (Menu Language Select screen 16 ❹ Selecting a Source...17 Selecting the computer or video source 17 ❺ Adjusting the Picture Size and Position 19 Adjusting...

User's Manual
Page 14
... be strong enough to support the projector and the installation must be operated separately and independently with any local building codes. To turn off (even when projecting an image) by using the Main Power Switch or disconnecting the AC power supply. The projector enables you to project precise images up to 3500 hours in ECO MODE OFF). • Two HDMI inputs supports digital signals The two HDMI inputs provide HDCP compatible digital signals. The wattage is a typical...
... be strong enough to support the projector and the installation must be operated separately and independently with any local building codes. To turn off (even when projecting an image) by using the Main Power Switch or disconnecting the AC power supply. The projector enables you to project precise images up to 3500 hours in ECO MODE OFF). • Two HDMI inputs supports digital signals The two HDMI inputs provide HDCP compatible digital signals. The wattage is a typical...

User's Manual
Page 26
... power supply is selected for a few seconds and then will show you a basic connection to the projector. The projector's power indicator will flash for [STANDBY MODE]. Projecting an Image (Basic Operation) ❷ Connecting Your Computer/Connecting the Power Cord 1. See the Power Indicator section.(→ page 206) COMPUTER IN Make sure that the prongs are fully inserted into both connectors to fix the computer cable (VGA). 2. 2. Installation and Connections" on page 145. Turn two thumb screws...
... power supply is selected for a few seconds and then will show you a basic connection to the projector. The projector's power indicator will flash for [STANDBY MODE]. Projecting an Image (Basic Operation) ❷ Connecting Your Computer/Connecting the Power Cord 1. See the Power Indicator section.(→ page 206) COMPUTER IN Make sure that the prongs are fully inserted into both connectors to fix the computer cable (VGA). 2. 2. Installation and Connections" on page 145. Turn two thumb screws...

User's Manual
Page 28
... turn on the projector, screen flicker may occur. Allow a minimum of six times, wait a full minute and then turn on the power. • While the POWER indicator is blinking blue in short cycles, the power cannot be no power to light, and if the STATUS indicator flashes on and off in a cycle of 1 second between turning off the main power supply and turning it means that the [CONTROL PANEL LOCK] is turned off by using the power button...
... turn on the projector, screen flicker may occur. Allow a minimum of six times, wait a full minute and then turn on the power. • While the POWER indicator is blinking blue in short cycles, the power cannot be no power to light, and if the STATUS indicator flashes on and off in a cycle of 1 second between turning off the main power supply and turning it means that the [CONTROL PANEL LOCK] is turned off by using the power button...

User's Manual
Page 54
.../wireless network, lamp replace time or error messages will vary depending on the computer via e-mail. 3. Please refer to the computer with a commercially available LAN cable. (→ page 151) 2. Setting for : 1. 3. Setting Alert Mail (ALERT MAIL) When the projector is required. (→ page 152) To use wired/wireless LAN connection, connect the projector to the help files and the other information provided in your software. Operating the projector Power on/off, selecting input, volume control...
.../wireless network, lamp replace time or error messages will vary depending on the computer via e-mail. 3. Please refer to the computer with a commercially available LAN cable. (→ page 151) 2. Setting for : 1. 3. Setting Alert Mail (ALERT MAIL) When the projector is required. (→ page 152) To use wired/wireless LAN connection, connect the projector to the help files and the other information provided in your software. Operating the projector Power on/off, selecting input, volume control...

User's Manual
Page 59
... will turn on the Alert Mail feature. A host name must be 16 characters or less. Sample of lamp replace time or error messages via e-mail when using wireless or wired LAN. RECIPIENT'S ADDRESS Enter your computer can be sent from the menu. Up to three addresses can identify the projector. Enter the hostname of the network connected to check whether your computer of a message to the projector. 3. Projector Name: NEC Projector Lamp Hours Used...
... will turn on the Alert Mail feature. A host name must be 16 characters or less. Sample of lamp replace time or error messages via e-mail when using wireless or wired LAN. RECIPIENT'S ADDRESS Enter your computer can be sent from the menu. Up to three addresses can identify the projector. Enter the hostname of the network connected to check whether your computer of a message to the projector. 3. Projector Name: NEC Projector Lamp Hours Used...
User's Manual
Page 102
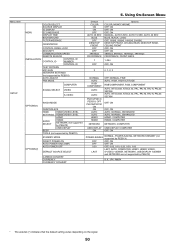
Using On-Screen Menu Menu Item SETUP MENU COLOR SELECT SOURCE DISPLAY ID DISPLAY ECO MESSAGE DISPLAY TIME BACKGROUND FILTER MESSAGE ORIENTATION INSTALLATION CONTROL PANEL LOCK SECURITY COMMUNICATION SPEED REMOTE SENSOR CONTROL ID CONTROL ID NUMBER CONTROL ID TEST PATTERN MIC GAIN NETWORK SETTINGS (not supported by PE501X) AUTO ADJUST FAN MODE COMPUTER SIGNAL SELECT VIDEO S-VIDEO OPTIONS(1) OPTIONS(2) WXGA MODE DEINTERLACE HDMI HDMI1 VIDEO LEVEL SETTINGS HDMI2 VIDEO LEVEL HDMI1 AUDIO SELECT HDMI2 NETWORK (not supported by PE501X) USB DISPLAY BEEP TOOLS (not ...
Using On-Screen Menu Menu Item SETUP MENU COLOR SELECT SOURCE DISPLAY ID DISPLAY ECO MESSAGE DISPLAY TIME BACKGROUND FILTER MESSAGE ORIENTATION INSTALLATION CONTROL PANEL LOCK SECURITY COMMUNICATION SPEED REMOTE SENSOR CONTROL ID CONTROL ID NUMBER CONTROL ID TEST PATTERN MIC GAIN NETWORK SETTINGS (not supported by PE501X) AUTO ADJUST FAN MODE COMPUTER SIGNAL SELECT VIDEO S-VIDEO OPTIONS(1) OPTIONS(2) WXGA MODE DEINTERLACE HDMI HDMI1 VIDEO LEVEL SETTINGS HDMI2 VIDEO LEVEL HDMI1 AUDIO SELECT HDMI2 NETWORK (not supported by PE501X) USB DISPLAY BEEP TOOLS (not ...
User's Manual
Page 119
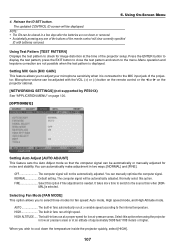
... it is displayed. You can manually optimize the computer signal. The computer signal will clear currently specified ID with the VOL. (+) or (−) button on the remote control or the ◀ or ▶ on the projector cabinet. [NETWORKING SETTINGS] (not supported by PE501X) See "APPLICATION MENU" on page 120. [OPTIONS(1)] Setting Auto Adjust [AUTO ADJUST] This feature sets the Auto Adjust mode so that the computer signal can be adjusted with batteries removed. HIGH The...
... it is displayed. You can manually optimize the computer signal. The computer signal will clear currently specified ID with the VOL. (+) or (−) button on the remote control or the ◀ or ▶ on the projector cabinet. [NETWORKING SETTINGS] (not supported by PE501X) See "APPLICATION MENU" on page 120. [OPTIONS(1)] Setting Auto Adjust [AUTO ADJUST] This feature sets the Auto Adjust mode so that the computer signal can be adjusted with batteries removed. HIGH The...

User's Manual
Page 157
...'s external display Displaying an image on or off. Stereo mini-plug audio cable (not supplied) HDMI cable (not supplied) Use High Speed HDMI® Cable. 145 Connecting Your Computer NOTE: Signals supported by Plug & Play (DDC2B) COMPUTER IN analog Yes INPUT HDMI 1 IN digital Yes HDMI 2 IN digital Yes A commercially available USB cable (compatible with a notebook PC, be the result of the computer's screen-saver or power manage- It is in standby mode and before turning on the projector.
...'s external display Displaying an image on or off. Stereo mini-plug audio cable (not supplied) HDMI cable (not supplied) Use High Speed HDMI® Cable. 145 Connecting Your Computer NOTE: Signals supported by Plug & Play (DDC2B) COMPUTER IN analog Yes INPUT HDMI 1 IN digital Yes HDMI 2 IN digital Yes A commercially available USB cable (compatible with a notebook PC, be the result of the computer's screen-saver or power manage- It is in standby mode and before turning on the projector.
User's Manual
Page 180
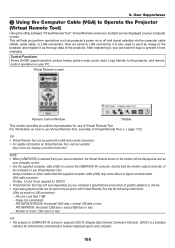
... LAN connection) - Number of the computer to Operate the Projector (Virtual Remote Tool) Using the utility software "Virtual Remote Tool", Virtual Remote screen (or toolbar) can be displayed as well as your computer screen. 8. Control Functions Power On/Off, signal selection, picture freeze, picture mute, audio mute, Logo transfer to the projector with the monitor output connector of colors: 256 colors or less TIP: • The projector's COMPUTER IN connector supports DDC/CI (Display Data Channel Command...
... LAN connection) - Number of the computer to Operate the Projector (Virtual Remote Tool) Using the utility software "Virtual Remote Tool", Virtual Remote screen (or toolbar) can be displayed as well as your computer screen. 8. Control Functions Power On/Off, signal selection, picture freeze, picture mute, audio mute, Logo transfer to the projector with the monitor output connector of colors: 256 colors or less TIP: • The projector's COMPUTER IN connector supports DDC/CI (Display Data Channel Command...
User's Manual
Page 207
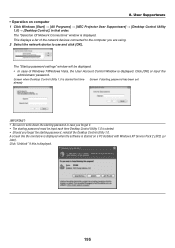
... starting password has been set already IMPORTANT: • Be sure to use and click [OK]. The "Selection Of Network Connections" window is displayed. 195 A screen like the one below is displayed when the software is displayed. Click "Unblock" if this is displayed. The "Startup password settings" window will be input each time Desktop Control Utility 1.0 is started on computer 1 Click Windows [Start] → [All Programs] → [NEC Projector User Supportware] → [Desktop Control Utility 1.0] → [Desktop Control...
... starting password has been set already IMPORTANT: • Be sure to use and click [OK]. The "Selection Of Network Connections" window is displayed. 195 A screen like the one below is displayed when the software is displayed. Click "Unblock" if this is displayed. The "Startup password settings" window will be input each time Desktop Control Utility 1.0 is started on computer 1 Click Windows [Start] → [All Programs] → [NEC Projector User Supportware] → [Desktop Control Utility 1.0] → [Desktop Control...

User's Manual
Page 218
... of life. On Timer is turned on . The projector is working properly. On, 2.5 sec Off) 2 cycle (0.5 sec Temperature error The projector is re-firing. Orange 1 cycle (0.5 sec Network conflict Both the built-in wired LAN and wireless LAN at the same time. Green Re-firing the lamp (The projector is cooling The projector is overheated. down.) Wait for - [STANDBY MODE]) Blinking light Red 1 cycle (0.5 sec Lamp cover error or lamp housing error Replace the lamp cover or lamp housing correctly. Replace the lamp. Appendix ❶ Troubleshooting...
... of life. On Timer is turned on . The projector is working properly. On, 2.5 sec Off) 2 cycle (0.5 sec Temperature error The projector is re-firing. Orange 1 cycle (0.5 sec Network conflict Both the built-in wired LAN and wireless LAN at the same time. Green Re-firing the lamp (The projector is cooling The projector is overheated. down.) Wait for - [STANDBY MODE]) Blinking light Red 1 cycle (0.5 sec Lamp cover error or lamp housing error Replace the lamp cover or lamp housing correctly. Replace the lamp. Appendix ❶ Troubleshooting...
User's Manual
Page 219
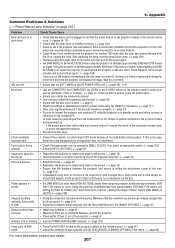
..., the VIDEO or the S-VIDEO button on . (→ pages 14, 15) • Ensure that the resolution you turn on or shut down . 9. Appendix Common Problems & Solutions (→ "Power/Status/Lamp Indicator" on page 206.) Problem Check These Items Does not turn on the projector cabinet or the remote control. (→ page 26) • Adjust the computer image manually with the Horizontal/Vertical in RGB mode • Press the AUTO ADJ. Using the projector at...
..., the VIDEO or the S-VIDEO button on . (→ pages 14, 15) • Ensure that the resolution you turn on or shut down . 9. Appendix Common Problems & Solutions (→ "Power/Status/Lamp Indicator" on page 206.) Problem Check These Items Does not turn on the projector cabinet or the remote control. (→ page 26) • Adjust the computer image manually with the Horizontal/Vertical in RGB mode • Press the AUTO ADJ. Using the projector at...

User's Manual
Page 220
... when using a Mac When using a PC compatible laptop, a combination of the current signal in the previous step. After that, restore the DIP switches to take affect. Each notebook PC has a different way of the Mac adapter (not supplied with a MacBook, output may display nothing. Displaying an image on the screen. When using a Mac with the projector, set the DIPswitch of deactivate/reactivate the local LCD screens as described in the projector's menu...
... when using a Mac When using a PC compatible laptop, a combination of the current signal in the previous step. After that, restore the DIP switches to take affect. Each notebook PC has a different way of the Mac adapter (not supplied with a MacBook, output may display nothing. Displaying an image on the screen. When using a Mac with the projector, set the DIPswitch of deactivate/reactivate the local LCD screens as described in the projector's menu...

User's Manual
Page 227
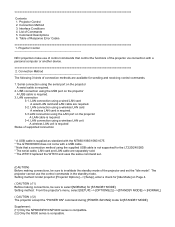
... Full duplex NOTE: Depending on both ends of the PC Control Codes if needed. ❻ PC Control Codes and Cable Connection PC Control Codes Function POWER ON POWER OFF INPUT SELECT COMPUTER INPUT SELECT HDMI1 INPUT SELECT HDMI2 INPUT SELECT VIDEO INPUT SELECT S-VIDEO INPUT SELECT VIEWER INPUT SELECT NETWORK INPUT SELECT USB DISPLAY PICTURE MUTE ON PICTURE MUTE OFF SOUND MUTE ON SOUND MUTE OFF Code Data 02H 00H 00H 00H 00H 02H 02H 01H 00H 00H 00H...
... Full duplex NOTE: Depending on both ends of the PC Control Codes if needed. ❻ PC Control Codes and Cable Connection PC Control Codes Function POWER ON POWER OFF INPUT SELECT COMPUTER INPUT SELECT HDMI1 INPUT SELECT HDMI2 INPUT SELECT VIDEO INPUT SELECT S-VIDEO INPUT SELECT VIEWER INPUT SELECT NETWORK INPUT SELECT USB DISPLAY PICTURE MUTE ON PICTURE MUTE OFF SOUND MUTE ON SOUND MUTE OFF Code Data 02H 00H 00H 00H 00H 02H 02H 01H 00H 00H 00H...

User's Manual
Page 228
... "Status Indicator (STATUS)". Horizontal and vertical positions are needed also by the projector. Shut down during operation. Still no image even though you press the AUTO ADJUST button. Still no display). AUDIO OUT is shifted in the projector's menu. Image is placed near a fluorescent light that can disturb the infrared remote controls. Still unchanged even though you change [FAN MODE] from your audio equipment (only models with one of the image are supported by the projector. Input source's resolution...
... "Status Indicator (STATUS)". Horizontal and vertical positions are needed also by the projector. Shut down during operation. Still no image even though you press the AUTO ADJUST button. Still no display). AUDIO OUT is shifted in the projector's menu. Image is placed near a fluorescent light that can disturb the infrared remote controls. Still unchanged even though you change [FAN MODE] from your audio equipment (only models with one of the image are supported by the projector. Input source's resolution...

