

External Controls
Page 1
... sensors 25 6.3. Asset Data read ...50 7.2 Power control ...52 8. Preparation ...4 2. How to change the "Backlight" setting 22 6.2. Operation Code (OP code) Table ...28 7. External Control NEC LCD Monitor INDEX Rev.1.7 (G4) I.
... sensors 25 6.3. Asset Data read ...50 7.2 Power control ...52 8. Preparation ...4 2. How to change the "Backlight" setting 22 6.2. Operation Code (OP code) Table ...28 7. External Control NEC LCD Monitor INDEX Rev.1.7 (G4) I.

External Controls
Page 4
Connectors and wiring 2.1 RS-232C Remote control Connector: 9-pin D-Sub Cable: Cross (reversed) cable or null modem cable (Please refer "Controlling the LCD monitor via RS-232C Remote control" on User's manual.) (4/145) Preparation 2. Application This document defines the communications method for control of the NEC LCD monitor, MultiSync P404 /P484 /P554 /V404 /V484 /V554/ V404-T/ V484-T/ V554-T/ P654Q/ P754Q/ V554Q/ V654Q/ V754Q/ V864Q/ V984Q/ C651Q/ C751Q/ C861Q/ C981Q/ UN462A/ UN462VA/ UN492S/ UN492VS/ UN552/ UN552V/ UN552S/ UN552VS when using an external controller. I. II.
Connectors and wiring 2.1 RS-232C Remote control Connector: 9-pin D-Sub Cable: Cross (reversed) cable or null modem cable (Please refer "Controlling the LCD monitor via RS-232C Remote control" on User's manual.) (4/145) Preparation 2. Application This document defines the communications method for control of the NEC LCD monitor, MultiSync P404 /P484 /P554 /V404 /V484 /V554/ V404-T/ V484-T/ V554-T/ P654Q/ P754Q/ V554Q/ V654Q/ V754Q/ V864Q/ V984Q/ C651Q/ C751Q/ C861Q/ C981Q/ UN462A/ UN462VA/ UN492S/ UN492VS/ UN552/ UN552V/ UN552S/ UN552VS when using an external controller. I. II.
External Controls
Page 5
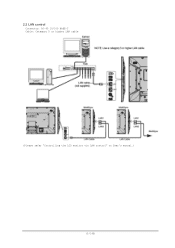
2.2 LAN control Connector: RJ-45 10/100 BASE-T Cable: Category 5 or higher LAN cable (Please refer "Controlling the LCD monitor via LAN control" on User's manual.) (5/145)
2.2 LAN control Connector: RJ-45 10/100 BASE-T Cable: Category 5 or higher LAN cable (Please refer "Controlling the LCD monitor via LAN control" on User's manual.) (5/145)
Installation Guide
Page 1
V984Q/C981Q Installation Guide NEC Display Solutions of 12 www.necdisplay.com V984Q/C981Q Page 1 of America, Inc. [Ver.1.1] Contents: Product Description and Notes Rotation Ventilation Recommendations Carrying Handle Positioning Display Dimensions Front, Top, ... Page 2 Page 2 Page 3 Page 4 Page 5 Page 6 Page 7 Page 8 Page 9 Page 10 Page 10 Page 11 Page 11 Page 12 Product Description: Type: LCD Display Resolution: 3840 x 2160 Dimensions without stand: Aspect Ratio: 16:9 Dimensions with stand: EMI: Class B Weight without stand: Power Consumption: 525W (Max C981Q), 650W (Max...
V984Q/C981Q Installation Guide NEC Display Solutions of 12 www.necdisplay.com V984Q/C981Q Page 1 of America, Inc. [Ver.1.1] Contents: Product Description and Notes Rotation Ventilation Recommendations Carrying Handle Positioning Display Dimensions Front, Top, ... Page 2 Page 2 Page 3 Page 4 Page 5 Page 6 Page 7 Page 8 Page 9 Page 10 Page 10 Page 11 Page 11 Page 12 Product Description: Type: LCD Display Resolution: 3840 x 2160 Dimensions without stand: Aspect Ratio: 16:9 Dimensions with stand: EMI: Class B Weight without stand: Power Consumption: 525W (Max C981Q), 650W (Max...
Users Manual - English
Page 2
V864Q...English-74 Specifications - V984Q...English-75 Manufacturer's Recycling and Energy Information...English-76 [Notice] About the MPEG-4 AVC, MPEG‑4 Visual license included ...WARNING...English-2 CAUTION...English-2 Safety Precautions, Maintenance & Recommended Use English-3 Safety Precautions and Maintenance...English-3 Recommended Use...English-3 Ergonomics...English-3 Cleaning the LCD Panel...English-4 Cleaning the Cabinet...English-4 Installation...English-5 Attaching Mounting Accessories...English-7 Parts Name and Functions...English-10 Control Panel...English-10 Terminal Panel...
V864Q...English-74 Specifications - V984Q...English-75 Manufacturer's Recycling and Energy Information...English-76 [Notice] About the MPEG-4 AVC, MPEG‑4 Visual license included ...WARNING...English-2 CAUTION...English-2 Safety Precautions, Maintenance & Recommended Use English-3 Safety Precautions and Maintenance...English-3 Recommended Use...English-3 Ergonomics...English-3 Cleaning the LCD Panel...English-4 Cleaning the Cabinet...English-4 Installation...English-5 Attaching Mounting Accessories...English-7 Parts Name and Functions...English-10 Control Panel...English-10 Terminal Panel...
Users Manual - English
Page 6
Avoid using any cleaning solution or glass cleaner! • Please do not use OA cleaner as it will cause deterioration or discoloration on the LCD panel surface. These types of time. Rubber or vinyl should not be in contact with a hard or abrasive material. • Please do not apply pressure ...to the LCD panel surface. • Please do not rub the LCD panel with the cabinet for an extended period of fluids and materials can cause the paint to deteriorate, crack or peel...
Avoid using any cleaning solution or glass cleaner! • Please do not use OA cleaner as it will cause deterioration or discoloration on the LCD panel surface. These types of time. Rubber or vinyl should not be in contact with a hard or abrasive material. • Please do not apply pressure ...to the LCD panel surface. • Please do not rub the LCD panel with the cabinet for an extended period of fluids and materials can cause the paint to deteriorate, crack or peel...

Users Manual - English
Page 7
... Periodically check for a long time, slight expansion of the wall or ceiling strong enough to follow NEC standard mounting procedures could result in accordance with the mounting equipment. • Make sure that the ...for signs of the unit. CAUTION: • When installing, do not apply pressure to the LCD panel or excessive force to any part of bracket and washers Bracket hole should be under ... (see "V654Q" on page 72, "V754Q" on page 73, "V864Q" on page 74 and "V984Q" on page 75). Please note the following when mounting on a wall or ceiling and hiring a technician ...
... Periodically check for a long time, slight expansion of the wall or ceiling strong enough to follow NEC standard mounting procedures could result in accordance with the mounting equipment. • Make sure that the ...for signs of the unit. CAUTION: • When installing, do not apply pressure to the LCD panel or excessive force to any part of bracket and washers Bracket hole should be under ... (see "V654Q" on page 72, "V754Q" on page 73, "V864Q" on page 74 and "V984Q" on page 75). Please note the following when mounting on a wall or ceiling and hiring a technician ...

Users Manual - English
Page 9
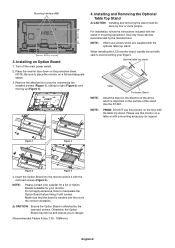
... to move the monitor into eyebolt holes in eyebolt brackets as a blanket that is designed for tentative use with the VESA mounting system. 1. V984Q 2. Attaching the logo ornament: make sure the holes for the screws on the logo ornament and the holes for mounting. 400 mm CAUTION: Do.... : Alternate position. CAUTION: DO NOT mount the monitor using the monitor in the portrait position, the NEC logo ornament position can easily support the weight of the monitor. To avoid scratching the LCD panel, always place a soft cloth, such as shown in the face down . Use a sturdy table ...
... to move the monitor into eyebolt holes in eyebolt brackets as a blanket that is designed for tentative use with the VESA mounting system. 1. V984Q 2. Attaching the logo ornament: make sure the holes for the screws on the logo ornament and the holes for mounting. 400 mm CAUTION: Do.... : Alternate position. CAUTION: DO NOT mount the monitor using the monitor in the portrait position, the NEC logo ornament position can easily support the weight of the monitor. To avoid scratching the LCD panel, always place a soft cloth, such as shown in the face down . Use a sturdy table ...
Users Manual - English
Page 10
.... Place the monitor face down on a flat and adequate space. 3. NOTE: ONLY use screws which is attached by four or more people. V984Q: DO NOT use this monitor on a table or with care to avoid pinching your monitor. NOTE: Please contact your supplier for a list of... the arrow which are supplied with the removed screws (Figure 4). English-8 When installing the LCD monitor stand, handle the unit with a mounting accessory for your fingers. Please use this monitor on the floor with the table top stand. ...
.... Place the monitor face down on a flat and adequate space. 3. NOTE: ONLY use screws which is attached by four or more people. V984Q: DO NOT use this monitor on a table or with care to avoid pinching your monitor. NOTE: Please contact your supplier for a list of... the arrow which are supplied with the removed screws (Figure 4). English-8 When installing the LCD monitor stand, handle the unit with a mounting accessory for your fingers. Please use this monitor on the floor with the table top stand. ...

Users Manual - English
Page 11
Without eyebolt brackets Cord or chain Clamp Screw (M4) Screw Holes With eyebolt brackets Before attaching the LCD monitor to the wall, make sure that heat can support the weight of the room. Be sure to disperse, as shown below. 100 mm 30 ... speakers will be under 40 Degree Celsius. Prevent Tipping When using a cord or chain that are included with the optional table top stand, fasten the LCD to prevent the monitor from the wall before moving the LCD. Ventilation Requirements When mounting in a multiple screen configuration.
Without eyebolt brackets Cord or chain Clamp Screw (M4) Screw Holes With eyebolt brackets Before attaching the LCD monitor to the wall, make sure that heat can support the weight of the room. Be sure to disperse, as shown below. 100 mm 30 ... speakers will be under 40 Degree Celsius. Prevent Tipping When using a cord or chain that are included with the optional table top stand, fasten the LCD to prevent the monitor from the wall before moving the LCD. Ventilation Requirements When mounting in a multiple screen configuration.

Users Manual - English
Page 12
... or blink a combination of red and blue. * If "OFF" is selected in the "POWER INDICATOR" (see page 43), the LED will not glow when the LCD monitor is in active mode. *1 If "OFF" is turned off. [DisplayPort1], [DisplayPort2], [HDMI1], [HDMI2], [HDMI3], [MP], [OPTION*], [C MODULE]*1. Acts as (+) to ... "SCHEDULE INDICATOR" (see page 43). Acts to move to the left when navigating through the OSD menu options. Glows blue when the LCD monitor is available when the optional Raspberry Pi Compute Module Interface Board and Raspberry Pi Compute Module are available inputs only, shown as an ...
... or blink a combination of red and blue. * If "OFF" is selected in the "POWER INDICATOR" (see page 43), the LED will not glow when the LCD monitor is in active mode. *1 If "OFF" is turned off. [DisplayPort1], [DisplayPort2], [HDMI1], [HDMI2], [HDMI3], [MP], [OPTION*], [C MODULE]*1. Acts as (+) to ... "SCHEDULE INDICATOR" (see page 43). Acts to move to the left when navigating through the OSD menu options. Glows blue when the LCD monitor is available when the optional Raspberry Pi Compute Module Interface Board and Raspberry Pi Compute Module are available inputs only, shown as an ...

Users Manual - English
Page 17
... indications inside temperature of the monitor image. 4. If the "Caution" warning appears, stop using the "HEAT STATUS" control in injury if the LCD monitor falls. • Do not mount or operate the monitor upside down . 2. English Setup 1. NOTE: If you do not intend to ON...signs of early unit failure and may injure your supplier for cooling the Option Board. Replace the cover. To install or replace batteries: NEC recommends the following battery use the Remote Control for further information. Connect external equipment (See page 17, page 18 and page 19) ...
... indications inside temperature of the monitor image. 4. If the "Caution" warning appears, stop using the "HEAT STATUS" control in injury if the LCD monitor falls. • Do not mount or operate the monitor upside down . 2. English Setup 1. NOTE: If you do not intend to ON...signs of early unit failure and may injure your supplier for cooling the Option Board. Replace the cover. To install or replace batteries: NEC recommends the following battery use the Remote Control for further information. Connect external equipment (See page 17, page 18 and page 19) ...

Users Manual - English
Page 31
...in high-end graphics applications such as professional digital still cameras and imaging. Provides a standard color space used for digital cinema. Native LCD panel color gamut. Adjusts the white color by ECI (The European Color Initiative). PRESET Types PRESET sRGB Adobe®RGB SIM. Highest... setting of content that conforms to SVE-5 SETTING at PRESET. REC-Bt709 HIGH BRIGHT FULL DICOM SIM. For the Hardware Calibration by NEC Display Solutions GammaCompMD QA software (some OSD settings are selectable (sRGB, Adobe®RGB SIM., eciRGB_v2 SIM., DCI SIM., REC-Bt709...
...in high-end graphics applications such as professional digital still cameras and imaging. Provides a standard color space used for digital cinema. Native LCD panel color gamut. Adjusts the white color by ECI (The European Color Initiative). PRESET Types PRESET sRGB Adobe®RGB SIM. Highest... setting of content that conforms to SVE-5 SETTING at PRESET. REC-Bt709 HIGH BRIGHT FULL DICOM SIM. For the Hardware Calibration by NEC Display Solutions GammaCompMD QA software (some OSD settings are selectable (sRGB, Adobe®RGB SIM., eciRGB_v2 SIM., DCI SIM., REC-Bt709...
Users Manual - English
Page 32
...used for the CIELAB color space Lab. CUSTOM VALUE: The gamma value is highly recommended to show grayscale image data on the NEC Display Solutions website. Adjusts the color gamut. This preview is available in four modes: Types P (Protanopia), D (Deuteranopia) ... from the range from your computer's ICC color profile, you to those with a strong color vision mode of the monitor. SAMPLE OF RGB GAMUT SETTING 0.9 LCD NATIVE GAMUT 0.8 GREEN GREEN MODIFIED SETTING 0.7 RANGE 0.6 0.5 0.4 WHITE RED y 0.3 0.2 0.1 0 BLUE 0 0.1 0.2 0.3 0.4 0.5 0.6 0.7 0.8 x COLOR VISION ...
...used for the CIELAB color space Lab. CUSTOM VALUE: The gamma value is highly recommended to show grayscale image data on the NEC Display Solutions website. Adjusts the color gamut. This preview is available in four modes: Types P (Protanopia), D (Deuteranopia) ... from the range from your computer's ICC color profile, you to those with a strong color vision mode of the monitor. SAMPLE OF RGB GAMUT SETTING 0.9 LCD NATIVE GAMUT 0.8 GREEN GREEN MODIFIED SETTING 0.7 RANGE 0.6 0.5 0.4 WHITE RED y 0.3 0.2 0.1 0 BLUE 0 0.1 0.2 0.3 0.4 0.5 0.6 0.7 0.8 x COLOR VISION ...

Users Manual - English
Page 35
... Adjusts the image brightness in relationship to the background. Press + or - HDR-ST2084 (PQ) Gamma setting for HDR, typically for LCD type. System gamma can be adjusted. AUTO HDR SELECT HDMI input only GAMMA correction of movies. When PROGRAMMABLE1, PROGRAMMABLE2 or PROGRAMMABLE3 is selected... color temperature will result in microSD memory card or USB storage device. Selection depends on which Option Board you are using optional NEC software. HDR-HYBRID LOG Gamma setting for HDR, typically for best picture quality. OPTION*3 Select input signal. To be able to...
... Adjusts the image brightness in relationship to the background. Press + or - HDR-ST2084 (PQ) Gamma setting for HDR, typically for LCD type. System gamma can be adjusted. AUTO HDR SELECT HDMI input only GAMMA correction of movies. When PROGRAMMABLE1, PROGRAMMABLE2 or PROGRAMMABLE3 is selected... color temperature will result in microSD memory card or USB storage device. Selection depends on which Option Board you are using optional NEC software. HDR-HYBRID LOG Gamma setting for HDR, typically for best picture quality. OPTION*3 Select input signal. To be able to...
Users Manual - English
Page 45
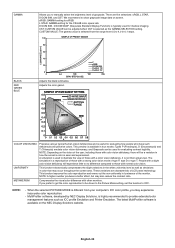
... ROOM LIGHT SENSING in HUMAN SENSING. IN DARK: This is the level of backlight that the monitor will not glow when the LCD monitor is low. DISABLE No human sensing. NETWORK FUNCTIONS Individually enable or disable the networking component for the monitor to use when ambient...DISPLAY: Enables or disables the network function for the monitor to use MODE1 or MODE2. English AUTO DIMMING*1 Adjusts the backlight of the LCD automatically depending on a schedule activity which is active. AUTO BRIGHTNESS Adjusts the brightness level according to the lighting conditions of the room (...
... ROOM LIGHT SENSING in HUMAN SENSING. IN DARK: This is the level of backlight that the monitor will not glow when the LCD monitor is low. DISABLE No human sensing. NETWORK FUNCTIONS Individually enable or disable the networking component for the monitor to use when ambient...DISPLAY: Enables or disables the network function for the monitor to use MODE1 or MODE2. English AUTO DIMMING*1 Adjusts the backlight of the LCD automatically depending on a schedule activity which is active. AUTO BRIGHTNESS Adjusts the brightness level according to the lighting conditions of the room (...
Users Manual - English
Page 48
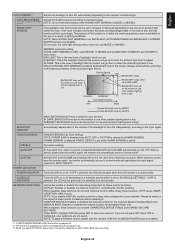
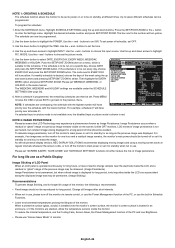
...: If schedules are overlapping, the schedule with the highest number will have Choose priority over the schedule with all personal display devices, NEC DISPLAY SOLUTIONS recommends displaying moving images and using a moving screen saver at different times. As with the lowest number. Please set "... usage of the monitor, the following is not permanent, but when a fixed image is shown in the same manner. Unlike CRT monitors, LCD monitors' image persistence is recommended. • Fixed image should be programmed. 2. For example, if an image was displayed. When a protective...
...: If schedules are overlapping, the schedule with the highest number will have Choose priority over the schedule with all personal display devices, NEC DISPLAY SOLUTIONS recommends displaying moving images and using a moving screen saver at different times. As with the lowest number. Please set "... usage of the monitor, the following is not permanent, but when a fixed image is shown in the same manner. Unlike CRT monitors, LCD monitors' image persistence is recommended. • Fixed image should be programmed. 2. For example, if an image was displayed. When a protective...

Users Manual - English
Page 51
English Controlling the LCD monitor via RS-232C Remote Control This monitor can be controlled by a personal computer are: • Power ON or standby. • Switching between input signals. &#...
English Controlling the LCD monitor via RS-232C Remote Control This monitor can be controlled by a personal computer are: • Power ON or standby. • Switching between input signals. &#...
Users Manual - English
Page 52
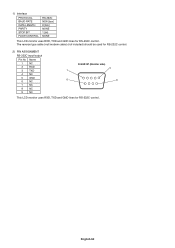
English-50 The reverse type cable (null modem cable) (not included) should be used for RS-232C control. 2) PIN ASSIGNMENT RS-232C input/output Pin No Name 1 NC 2 RXD 3 TXD 4 NC 5 GND 6 NC 7 NC 8 NC 9 NC D-SUB 9P (Monitor side) 5 1 6 9 This LCD monitor uses RXD, TXD and GND lines for RS-232C control. 1) Interface PROTOCOL BAUD RATE DATA LENGTH PARITY STOP BIT FLOW CONTROL RS-232C 9600 [bps] 8 [bits] NONE 1 [bit] NONE This LCD monitor uses RXD, TXD and GND lines for RS-232C control.
English-50 The reverse type cable (null modem cable) (not included) should be used for RS-232C control. 2) PIN ASSIGNMENT RS-232C input/output Pin No Name 1 NC 2 RXD 3 TXD 4 NC 5 GND 6 NC 7 NC 8 NC 9 NC D-SUB 9P (Monitor side) 5 1 6 9 This LCD monitor uses RXD, TXD and GND lines for RS-232C control. 1) Interface PROTOCOL BAUD RATE DATA LENGTH PARITY STOP BIT FLOW CONTROL RS-232C 9600 [bps] 8 [bits] NONE 1 [bit] NONE This LCD monitor uses RXD, TXD and GND lines for RS-232C control.
Users Manual - English
Page 53
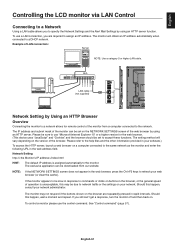
... use "Microsoft Internet Explorer 10" or a higher version for remote control of LAN connection: Server NOTE: Use a category 5 or higher LAN cable. English Controlling the LCD monitor via LAN Control Connecting to a Network Using a LAN cable allows you are required to assign an IP address.
... use "Microsoft Internet Explorer 10" or a higher version for remote control of LAN connection: Server NOTE: Use a category 5 or higher LAN cable. English Controlling the LCD monitor via LAN Control Connecting to a Network Using a LAN cable allows you are required to assign an IP address.

