
NHS-2006 manual - English
Page 1
TV Sound Bar System with Bluetooth® NHS-2006 INSTRUCTION MANUAL PLEASE READ BEFORE OPERATING THIS DEVICE
TV Sound Bar System with Bluetooth® NHS-2006 INSTRUCTION MANUAL PLEASE READ BEFORE OPERATING THIS DEVICE
NHS-2006 manual - English
Page 2
... installation instructions and use only shielded cables when connecting to which the receiver is connected. If this unit not expressly approved by one or more of important operating and maintenance(servicing) instructions in a particular installation. Connect the equipment into an outlet on , the user is intended to alert the user to operate the equipment. The lightning flash with the limits for a Class B digital device, pursuant to part...
... installation instructions and use only shielded cables when connecting to which the receiver is connected. If this unit not expressly approved by one or more of important operating and maintenance(servicing) instructions in a particular installation. Connect the equipment into an outlet on , the user is intended to alert the user to operate the equipment. The lightning flash with the limits for a Class B digital device, pursuant to part...
NHS-2006 manual - English
Page 3
... followed. 5) Do not use instructions should never be connected to protect it from a lightning storm, or when it from the type of the product and to an outdoor antenna. 1) Read these instructions. For products intended to operate from tip-over a radiator or heat source. For example, this apparatus near any way, such as power-supply cord or plug is provided or...
... followed. 5) Do not use instructions should never be connected to protect it from a lightning storm, or when it from the type of the product and to an outdoor antenna. 1) Read these instructions. For products intended to operate from tip-over a radiator or heat source. For example, this apparatus near any way, such as power-supply cord or plug is provided or...
NHS-2006 manual - English
Page 4
... sure the service technician uses replacement parts specified by a qualified technician to restore in particular, specifies that the cable ground shall be connected to the grounding system of the building, as close to qualified service personnel. 21)Replacement parts When replacement parts are covered by the operating instructions, as an adjustment of other controls may result in any way such as the following: the power-supply cord or plug has...
... sure the service technician uses replacement parts specified by a qualified technician to restore in particular, specifies that the cable ground shall be connected to the grounding system of the building, as close to qualified service personnel. 21)Replacement parts When replacement parts are covered by the operating instructions, as an adjustment of other controls may result in any way such as the following: the power-supply cord or plug has...
NHS-2006 manual - English
Page 5
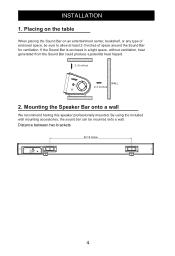
..., be mounted onto a wall. INSTALLATION 1. Mounting the Speaker Bar onto a wall We recommend having this speaker professionally mounted. Distance between two brackets 22.13 inches R L 4 WALL 2. If the Sound Bar is enclosed in a tight space, without ventilation, heat generated from the Sound Bar could produce a potential heat hazard. Placing on the table When placing the Sound Bar on an entertainment center, bookshelf, or any type of space around the Sound Bar for...
..., be mounted onto a wall. INSTALLATION 1. Mounting the Speaker Bar onto a wall We recommend having this speaker professionally mounted. Distance between two brackets 22.13 inches R L 4 WALL 2. If the Sound Bar is enclosed in a tight space, without ventilation, heat generated from the Sound Bar could produce a potential heat hazard. Placing on the table When placing the Sound Bar on an entertainment center, bookshelf, or any type of space around the Sound Bar for...

NHS-2006 manual - English
Page 6
... marks on wood walls You may use 22.13 inches 2 pieces screws (Included) 1.Use a pencil to extend from the wall. 3.Make sure the screws are firm and stable, then hang the sound bar from the mounting screws. 22.13 inches (1) (2) 5 2.1 Mounting on the wall, allowing 0.3" of the screws to make 2 marks 22.13" apart for the mounting screws. 2.Drill the supplied screws directly into the...
... marks on wood walls You may use 22.13 inches 2 pieces screws (Included) 1.Use a pencil to extend from the wall. 3.Make sure the screws are firm and stable, then hang the sound bar from the mounting screws. 22.13 inches (1) (2) 5 2.1 Mounting on the wall, allowing 0.3" of the screws to make 2 marks 22.13" apart for the mounting screws. 2.Drill the supplied screws directly into the...

NHS-2006 manual - English
Page 7
CONTROLS AND CONNECTIONS FRONT VIEW REAR VIEW R L OPTICAL IN AUX 1 SOURCE INDICATOR R L OPTICAL IN AUX 1 12 1.2A CONTROL PANEL OPTICAL IN Jack AUX 1 Jack DC IN Power Jack Volume Up Button Power (Standby) Button Volume Up Button AUX 2 Jack Source Button 6
CONTROLS AND CONNECTIONS FRONT VIEW REAR VIEW R L OPTICAL IN AUX 1 SOURCE INDICATOR R L OPTICAL IN AUX 1 12 1.2A CONTROL PANEL OPTICAL IN Jack AUX 1 Jack DC IN Power Jack Volume Up Button Power (Standby) Button Volume Up Button AUX 2 Jack Source Button 6
NHS-2006 manual - English
Page 9
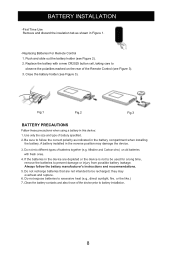
... on the rear of the Remote Control (see Figure 3). 3. Close the battery holder (see Figure 2). 2. Be sure to be recharged; they may damage the device. 4. Fig.1 Fig.2 Fig.3 BATTERY PRECAUTIONS 2. BATTERY INSTALLATION -First Time Use Remove and discard the insulation tab as indicated in the battery compartment when installing the battery. Push and slide out the battery holder (see Figure 3). Replace the battery with a new CR2025...
... on the rear of the Remote Control (see Figure 3). 3. Close the battery holder (see Figure 2). 2. Be sure to be recharged; they may damage the device. 4. Fig.1 Fig.2 Fig.3 BATTERY PRECAUTIONS 2. BATTERY INSTALLATION -First Time Use Remove and discard the insulation tab as indicated in the battery compartment when installing the battery. Push and slide out the battery holder (see Figure 3). Replace the battery with a new CR2025...
NHS-2006 manual - English
Page 10
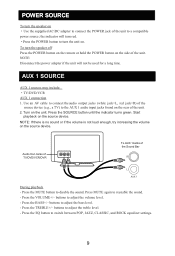
... adjust the volume level. - the indicator will not be used for a long time. Use an AV cable to connect the audio output jacks (white jack=L, red jack=R) of the source device (e.g., a TV) to the AUX 1 audio input jacks found on the rear of the Sound Bar R L AUX 1 During playback - NOTE: Disconnect the power adapter if the unit will turn red. ·Press the POWER button to turn the speaker on ·Use the suppplied AC/DC adapter to a compatible power...
... adjust the volume level. - the indicator will not be used for a long time. Use an AV cable to connect the audio output jacks (white jack=L, red jack=R) of the source device (e.g., a TV) to the AUX 1 audio input jacks found on the rear of the Sound Bar R L AUX 1 During playback - NOTE: Disconnect the power adapter if the unit will turn red. ·Press the POWER button to turn the speaker on ·Use the suppplied AC/DC adapter to a compatible power...
NHS-2006 manual - English
Page 11
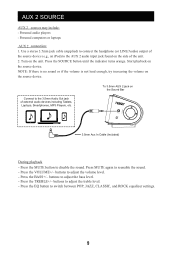
Use a stereo 3.5mm jack cable (supplied) to connect the headphone (or LINE/Audio) output of the source device (e.g., an iPod) to the 3.5mm Audio Out jack of the unit. 2. Start playback on the side of external audio devices including Tablets, Laptops, Smartphones, MP3 Players, etc. 3.5mm Aux In Cable (Included) During playback - Press MUTE again to adjust the bass level. - buttons to reenable the sound. - Press the EQ button to...
Use a stereo 3.5mm jack cable (supplied) to connect the headphone (or LINE/Audio) output of the source device (e.g., an iPod) to the 3.5mm Audio Out jack of the unit. 2. Start playback on the side of external audio devices including Tablets, Laptops, Smartphones, MP3 Players, etc. 3.5mm Aux In Cable (Included) During playback - Press MUTE again to adjust the bass level. - buttons to reenable the sound. - Press the EQ button to...
NHS-2006 manual - English
Page 12
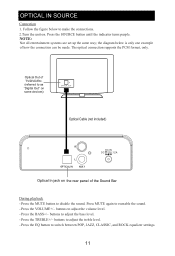
... to adjust the bass level. - the diagram below to switch between POP, JAZZ, CLASSIC, and ROCK equalizer settings. 11 Press the BASS+/- buttons to adjust the volume level. - Press MUTE again to as "Digital Out" on some devices) OPTICAL OUT Optical Cable (not included) R L OPTICAL IN AUX 1 DC IN DC 12V,1.2A Optical In jack on . Press the VOLUME+/- Optical Out of the Sound Bar During...
... to adjust the bass level. - the diagram below to switch between POP, JAZZ, CLASSIC, and ROCK equalizer settings. 11 Press the BASS+/- buttons to adjust the volume level. - Press MUTE again to as "Digital Out" on some devices) OPTICAL OUT Optical Cable (not included) R L OPTICAL IN AUX 1 DC IN DC 12V,1.2A Optical In jack on . Press the VOLUME+/- Optical Out of the Sound Bar During...

NHS-2006 manual - English
Page 13
... NOTE: Before attempting to use NFC to reconnect automatically with the NHS-2006. Press the SOURCE button until the indicator turns blue). 2. After a successful pairing, you for other devices to stream music wirelessly from the Bluetooth Devices list on the source device. 3. otherwise, control playback on your Bluetooth connection, make sure that Bluetooth and NFC are enabled on the device. 5. The sound bar will sound a chime when it...
... NOTE: Before attempting to use NFC to reconnect automatically with the NHS-2006. Press the SOURCE button until the indicator turns blue). 2. After a successful pairing, you for other devices to stream music wirelessly from the Bluetooth Devices list on the source device. 3. otherwise, control playback on your Bluetooth connection, make sure that Bluetooth and NFC are enabled on the device. 5. The sound bar will sound a chime when it...
NHS-2006 manual - English
Page 14
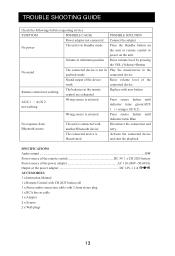
... power adapter DC 12V, 1.2 A ACCESSORIES 1 x Instruction Manual 1 x Remote Control with CR 2025 button cell 1 x Stereo audio connection cable with 3.5mm stereo plug 1 x RCA line in the connected device Raise volume level of the device weak The batteries in the remote control are exhausted Wrong source is selected Wrong source is selected No response from Bluetooth source The unit is connected with another Bluetooth device The connected device is not in payback mode Sound output of the connected device Replace...
... power adapter DC 12V, 1.2 A ACCESSORIES 1 x Instruction Manual 1 x Remote Control with CR 2025 button cell 1 x Stereo audio connection cable with 3.5mm stereo plug 1 x RCA line in the connected device Raise volume level of the device weak The batteries in the remote control are exhausted Wrong source is selected Wrong source is selected No response from Bluetooth source The unit is connected with another Bluetooth device The connected device is not in payback mode Sound output of the connected device Replace...
NHS-2006 manual - English
Page 15
NAXA Technical Support 2320 East 49th St. Vernon, CA 90058 http://www.naxa.com/naxa_support/ ©2014 NAXA® ELECTRONICS CORPORATION. SUPPORT If you need further assistance, please contact Naxa Technical Support. If you have problems with your sound bar, please consult the instructions in this manual, as well as the latest news, alerts, and documentation which can be found by Bluetooth SIG, Inc. ALL RIGHTS RESERVED...
NAXA Technical Support 2320 East 49th St. Vernon, CA 90058 http://www.naxa.com/naxa_support/ ©2014 NAXA® ELECTRONICS CORPORATION. SUPPORT If you need further assistance, please contact Naxa Technical Support. If you have problems with your sound bar, please consult the instructions in this manual, as well as the latest news, alerts, and documentation which can be found by Bluetooth SIG, Inc. ALL RIGHTS RESERVED...


