

English manual
Page 1
37" Bluetooth® Soundbar & Wireless Subwoofer Home Theater System MODEL: NHS-2050 Please read this instruction manual carefully and keep it for future reference.
37" Bluetooth® Soundbar & Wireless Subwoofer Home Theater System MODEL: NHS-2050 Please read this instruction manual carefully and keep it for future reference.
English manual
Page 2
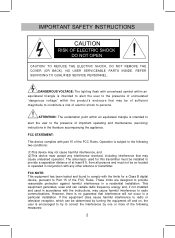
...radio or television reception, which can radiate radio frequency energy and, if not installed and used for a Class B digital device, pursuant to persons. However, there is intended to alert the user to provide reasonable protection against harmful interference in a particular installation. DANGEROUS VOLTAGE: The lighting flash with any interference received...REFER SERVICING TO QUALIFIED SERVICE PERSONNEL. IMPORTANT SAFETY INSTRUCTIONS CAUTION RISK OF ELECTRIC SHOCK DO NOT OPEN CAUTION: TO REDUCE THE ELECTRIC SHOCK, DO NOT REMOVE THE COVER (OR BACK). NO USER SERVICEABLE PARTS ...
...radio or television reception, which can radiate radio frequency energy and, if not installed and used for a Class B digital device, pursuant to persons. However, there is intended to alert the user to provide reasonable protection against harmful interference in a particular installation. DANGEROUS VOLTAGE: The lighting flash with any interference received...REFER SERVICING TO QUALIFIED SERVICE PERSONNEL. IMPORTANT SAFETY INSTRUCTIONS CAUTION RISK OF ELECTRIC SHOCK DO NOT OPEN CAUTION: TO REDUCE THE ELECTRIC SHOCK, DO NOT REMOVE THE COVER (OR BACK). NO USER SERVICEABLE PARTS ...
English manual
Page 3
... attached installation instructions and use only shielded cables when connecting to read before the appliance is connected. -- All the safety and operating instructions should be sure to other apparatus (including amplifiers) that its location or position does not interfere with its proper ventilation. Heed all warnings - Do not use instructions should be kept for replacement of the polarized or grounding-type plug. Install in the operating instructions...
... attached installation instructions and use only shielded cables when connecting to read before the appliance is connected. -- All the safety and operating instructions should be sure to other apparatus (including amplifiers) that its location or position does not interfere with its proper ventilation. Heed all warnings - Do not use instructions should be kept for replacement of the polarized or grounding-type plug. Install in the operating instructions...
English manual
Page 4
... been damaged in the operating instructions or as power-supply cord or plug is used, use attachments / accessories specified by the manufacturer, or sold with a cart, stand, tripod, bracket, or table specified by the manufacturer. 12. Do not attempt to rain or moisture, does not operate normally, or has been dropped. 15. The appliance should be connected to a power supply only of time. 14...
... been damaged in the operating instructions or as power-supply cord or plug is used, use attachments / accessories specified by the manufacturer, or sold with a cart, stand, tripod, bracket, or table specified by the manufacturer. 12. Do not attempt to rain or moisture, does not operate normally, or has been dropped. 15. The appliance should be connected to a power supply only of time. 14...

English manual
Page 5
If the Sound Bar is enclosed in a tight space, without ventilation, heat generated from the Sound Bar could produce a potential heat hazard. 2-3 inches 2-3inches 2-3 inches 2-3inches 2. Ventilation When placing the Soundbar and Subwoofer on a Table - Placing the Device on an entertainment center, bookshelf, or any type of enclosed space, be sure to allow at least 2-3 inches of space around the Sound Bar for ventilation. PLACEMENT AND MOUNTING 1. The Installation Distance 634mm (24.9 inches) 5
If the Sound Bar is enclosed in a tight space, without ventilation, heat generated from the Sound Bar could produce a potential heat hazard. 2-3 inches 2-3inches 2-3 inches 2-3inches 2. Ventilation When placing the Soundbar and Subwoofer on a Table - Placing the Device on an entertainment center, bookshelf, or any type of enclosed space, be sure to allow at least 2-3 inches of space around the Sound Bar for ventilation. PLACEMENT AND MOUNTING 1. The Installation Distance 634mm (24.9 inches) 5

English manual
Page 6
.... Mark the position of the mounting screws on the wall using a pencil (not supplied). Mounting to a Wall 2.1 Mounting to hook the Sound Bar. Make sure they are firm and stable. 6 C. Put the Sound Bar onto the mounting screws. Drill 2 holes directly into the marks that you made on the wall using an electric drill (not supplied). Insert the fixing plugs and hammer them into the fixing plugs and leave approximately 0.3 inch length...
.... Mark the position of the mounting screws on the wall using a pencil (not supplied). Mounting to a Wall 2.1 Mounting to hook the Sound Bar. Make sure they are firm and stable. 6 C. Put the Sound Bar onto the mounting screws. Drill 2 holes directly into the marks that you made on the wall using an electric drill (not supplied). Insert the fixing plugs and hammer them into the fixing plugs and leave approximately 0.3 inch length...

English manual
Page 7
OPTICAL Jack 6. Indicator 3. Speaker AUX IN LINE IN L R DC 16V,1.5A OPTICAL 4. SB Pair Button (subwoofer pairing button) 7 10. Remote Sensor 3. DC IN Jack Top View 8. Vol+ 9. Front View PRODUCT OVERVIEW 1. LINE IN Jacks 7. Volume Up Button Standby /Source SB Pair Vol- Standby/Source Button 11. Volume Down Button Speaker Rear View 2. AUX IN Jack 5.
OPTICAL Jack 6. Indicator 3. Speaker AUX IN LINE IN L R DC 16V,1.5A OPTICAL 4. SB Pair Button (subwoofer pairing button) 7 10. Remote Sensor 3. DC IN Jack Top View 8. Vol+ 9. Front View PRODUCT OVERVIEW 1. LINE IN Jacks 7. Volume Up Button Standby /Source SB Pair Vol- Standby/Source Button 11. Volume Down Button Speaker Rear View 2. AUX IN Jack 5.

English manual
Page 9
... 11. BT Button (Bluetooth mode) 11 8. REMOTE CONTROL 1 2 AUX OPTICAL BT 3 LINE IN 4 MUSIC TALK MOVIE 5 Sound Mode STANDARD VOL 1. (Power On/Off) Button 2. Sound Mode (MUSIC, 9 TALK, MOVIE, STANDARD) 6. (Mute) Button 10 7. Play/Pause Button 12 12. (Volume Up/Down) Button BATTERY INSTALLATION OF REMOTE CONTROL FIRST TIME USING: Remove and discard the insulation film, as shown in Fig.1. AUX Button 6 3. Replace the old button cell with a new CR2025 button cell...
... 11. BT Button (Bluetooth mode) 11 8. REMOTE CONTROL 1 2 AUX OPTICAL BT 3 LINE IN 4 MUSIC TALK MOVIE 5 Sound Mode STANDARD VOL 1. (Power On/Off) Button 2. Sound Mode (MUSIC, 9 TALK, MOVIE, STANDARD) 6. (Mute) Button 10 7. Play/Pause Button 12 12. (Volume Up/Down) Button BATTERY INSTALLATION OF REMOTE CONTROL FIRST TIME USING: Remove and discard the insulation film, as shown in Fig.1. AUX Button 6 3. Replace the old button cell with a new CR2025 button cell...

English manual
Page 10
... OPTICAL BT LINE IN MUSIC STANDARD TALK Sound Mode MOVIE VOL 10 Replace only with a coin/button cell battery. OPERATION RANGE: When there is not to the device. 3. Be sure to prevent damage or injury from possible leakage. 5. If the batteries in this device: 1. The batteries shall not be recharged; The remote control is incorrectly replaced. If you think batteries might have been...
... OPTICAL BT LINE IN MUSIC STANDARD TALK Sound Mode MOVIE VOL 10 Replace only with a coin/button cell battery. OPERATION RANGE: When there is not to the device. 3. Be sure to prevent damage or injury from possible leakage. 5. If the batteries in this device: 1. The batteries shall not be recharged; The remote control is incorrectly replaced. If you think batteries might have been...

English manual
Page 11
... solid BLUE. Connect the DC16V, 1.5A adapter to the DC IN jack on the Subwoofer. Press the button on remote control or press the Standby/Source button on the Sound Bar will be solid BLUE. 5. The mode Indicator on the Sound Bar repeatedly to switch to power off , it means the Sound Bar is off , then press the STANDBY button on the Subwoofer to power on the Subwoofer will turn to : Blue...Bluetooth Mode Green...LINE IN Mode...
... solid BLUE. Connect the DC16V, 1.5A adapter to the DC IN jack on the Subwoofer. Press the button on remote control or press the Standby/Source button on the Sound Bar will be solid BLUE. 5. The mode Indicator on the Sound Bar repeatedly to switch to power off , it means the Sound Bar is off , then press the STANDBY button on the Subwoofer to power on the Subwoofer will turn to : Blue...Bluetooth Mode Green...LINE IN Mode...

English manual
Page 12
... will begin flashing when the volume is at maximum. ~ Press the button on remote control to turn off sound, the mode indicator on the Sound Bar will be automatically connected with the last connected Bluetooth device if their Bluetooth function are activated and they are in working range. 12 NOTE: The Sound Bar will stop blinking. 6. BLUETOOTH OPERATION 1. When " NAXA NHS-2050" appears, select it again to adjust volume. Begin a search for the...
... will begin flashing when the volume is at maximum. ~ Press the button on remote control to turn off sound, the mode indicator on the Sound Bar will be automatically connected with the last connected Bluetooth device if their Bluetooth function are activated and they are in working range. 12 NOTE: The Sound Bar will stop blinking. 6. BLUETOOTH OPERATION 1. When " NAXA NHS-2050" appears, select it again to adjust volume. Begin a search for the...

English manual
Page 13
... or AUX Out Jack of the external devices (Such as MP3 Player; Power on the Sound Bar will turn Indigo (Blue +Green). 5. Press the button on remote control or press the Standby/Source button on Sound Bar repeatedly, or press the AUX button on remote control directly to switch to AUX IN mode, the mode Indicator on the Sound Bar and Subwoofer, and pair together as previous stated. 4. iPod/iPad...etc.) MP3 Player Mobile Phone ...3.
... or AUX Out Jack of the external devices (Such as MP3 Player; Power on the Sound Bar will turn Indigo (Blue +Green). 5. Press the button on remote control or press the Standby/Source button on Sound Bar repeatedly, or press the AUX button on remote control directly to switch to AUX IN mode, the mode Indicator on the Sound Bar and Subwoofer, and pair together as previous stated. 4. iPod/iPad...etc.) MP3 Player Mobile Phone ...3.

English manual
Page 14
... on remote control or press the Standby/Source button on Sound Bar repeatedly, or press the LINE IN button on remote control directly to switch to the Sound Bar and played through the Sound Bar's speakers. 1. Power on the rear of the LINE IN cable into the LINE IN jacks [L&R] on the Sound Bar and Subwoofer, and pair together as usual. 14 LINE IN OPERATION An external Audio/Video player (such as TV, DVD player, etc.) can be connected to LINE IN mode, the mode...
... on remote control or press the Standby/Source button on Sound Bar repeatedly, or press the LINE IN button on remote control directly to switch to the Sound Bar and played through the Sound Bar's speakers. 1. Power on the rear of the LINE IN cable into the LINE IN jacks [L&R] on the Sound Bar and Subwoofer, and pair together as usual. 14 LINE IN OPERATION An external Audio/Video player (such as TV, DVD player, etc.) can be connected to LINE IN mode, the mode...
English manual
Page 15
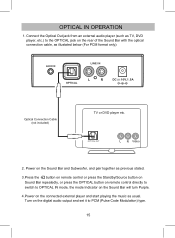
.... Power on the Sound Bar and Subwoofer, and pair together as previous stated. 3.Press the button on remote control or press the Standby/Source button on Sound Bar repeatedly, or press the OPTICAL button on remote control directly to switch to OPTICAL IN mode, the mode Indicator on the Sound Bar will turn Purple. 4.Power on the digital audio output and set it to the OPTICAL jack on the rear of the Sound Bar with the optical connection cable, as...
.... Power on the Sound Bar and Subwoofer, and pair together as previous stated. 3.Press the button on remote control or press the Standby/Source button on Sound Bar repeatedly, or press the OPTICAL button on remote control directly to switch to OPTICAL IN mode, the mode Indicator on the Sound Bar will turn Purple. 4.Power on the digital audio output and set it to the OPTICAL jack on the rear of the Sound Bar with the optical connection cable, as...

English manual
Page 16
... on remote control The paired/connected device is not in playback mode Input source incorrect Sound distortion/rattle Volume level too high Remote Control not functioning Bluetooth reception failure Out of working range The battery in the remote control is drained The external device is in high level Press the button on remote control or press the Standby/Source on the unit within 16 feet, +/-30 degress Replace with new battery Put the...
... on remote control The paired/connected device is not in playback mode Input source incorrect Sound distortion/rattle Volume level too high Remote Control not functioning Bluetooth reception failure Out of working range The battery in the remote control is drained The external device is in high level Press the button on remote control or press the Standby/Source on the unit within 16 feet, +/-30 degress Replace with new battery Put the...

English manual
Page 17
SPECIFICATIONS Speakers 40W RMS: 10W x 2 Sound Bar; 20W x 1 Subwoofer PMPO Output...400W Wireless Source Bluetooth Inputs Optical Digital, RCA Stereo, 3.5mm AUX Installation Option Built-In Wall Bracket Power Input AC100-240V~, 50/60Hz Power Output DC 16V 1.5A Bluetooth Working Range Up to 33 Feet Remote Working Range Up to 16 Feet In the Box 1x Sound Bar 1x Subwoofer 1x User Manual 1x Remote Control 1x AUX IN Cable (1M) 1x LINE IN Cable (1.2M) 1x UL Approved Power Adapter for the Sound Bar 1x UL...
SPECIFICATIONS Speakers 40W RMS: 10W x 2 Sound Bar; 20W x 1 Subwoofer PMPO Output...400W Wireless Source Bluetooth Inputs Optical Digital, RCA Stereo, 3.5mm AUX Installation Option Built-In Wall Bracket Power Input AC100-240V~, 50/60Hz Power Output DC 16V 1.5A Bluetooth Working Range Up to 33 Feet Remote Working Range Up to 16 Feet In the Box 1x Sound Bar 1x Subwoofer 1x User Manual 1x Remote Control 1x AUX IN Cable (1M) 1x LINE IN Cable (1.2M) 1x UL Approved Power Adapter for the Sound Bar 1x UL...


