

English Manual
Page 1
DIGITAL ALARM CLOCK RADIO WITH CD PLAYER NRC-176 Instruction Manual Please read carefully before use and keep for future reference.
DIGITAL ALARM CLOCK RADIO WITH CD PLAYER NRC-176 Instruction Manual Please read carefully before use and keep for future reference.

English Manual
Page 2
... triangle, is intended to alert the user to alert the user 6. Do not install near water. The wide blade SHOCK, DO NOT EXPOSE THIS APPARATUS TO RAIN OR or the third prong are provided for replacement of impo-r tant operating and maintenance (servicing) instru-c 9. Clean only with the manufacturer's instructions. A polarized plug has two blades with one wider...
... triangle, is intended to alert the user to alert the user 6. Do not install near water. The wide blade SHOCK, DO NOT EXPOSE THIS APPARATUS TO RAIN OR or the third prong are provided for replacement of impo-r tant operating and maintenance (servicing) instru-c 9. Clean only with the manufacturer's instructions. A polarized plug has two blades with one wider...

English Manual
Page 3
... way, such as power-supply cord or plug is used, use caution when dance with the apparatus. Use only with the limits for a Class B digital device, pursuant to correct 14. - the interference by turning the equipment o and on a circuit di e-r ent from tip-over. that to which can radiate facturer, or sold with the instructions, may cause undesired operation. 11. - with...
... way, such as power-supply cord or plug is used, use caution when dance with the apparatus. Use only with the limits for a Class B digital device, pursuant to correct 14. - the interference by turning the equipment o and on a circuit di e-r ent from tip-over. that to which can radiate facturer, or sold with the instructions, may cause undesired operation. 11. - with...

English Manual
Page 4
... hold to adjust the LED brightness. Naxa Electronics Press to turn the radio o and place the system in Standby mode. At a Glance sleep high/low snooze Press to set Alarm 1. Page 4 When the system is o (i.e., standby): • Press to enable/disable Alarm 2. • Press repeatedly to set the minutes. When setting a the clock or an alarm, press to set the sleep timer. In CD mode, press to turn o the alarm when it sounds. Press to...
... hold to adjust the LED brightness. Naxa Electronics Press to turn the radio o and place the system in Standby mode. At a Glance sleep high/low snooze Press to set Alarm 1. Page 4 When the system is o (i.e., standby): • Press to enable/disable Alarm 2. • Press repeatedly to set the minutes. When setting a the clock or an alarm, press to set the sleep timer. In CD mode, press to turn o the alarm when it sounds. Press to...

English Manual
Page 5
Press to turn o the alarm when it sounds. radio frequencies. Press to clear previous programmed tracks in cd mode. Press to Play/Pause playback in CD mode. prog www.naxa.com Press to Stop playback in CD mode. Headphone Jack AUX IN 3.5mm stereo mini jack to connect headphones 3.5 mm stereo mini jack to connect external media player/mobile phone radio/buzz/CD Slide to desired level. Turn dial to adjust volume to access Radio/CD mode. Press to switch between...
Press to turn o the alarm when it sounds. radio frequencies. Press to clear previous programmed tracks in cd mode. Press to Play/Pause playback in CD mode. prog www.naxa.com Press to Stop playback in CD mode. Headphone Jack AUX IN 3.5mm stereo mini jack to connect headphones 3.5 mm stereo mini jack to connect external media player/mobile phone radio/buzz/CD Slide to desired level. Turn dial to adjust volume to access Radio/CD mode. Press to switch between...
English Manual
Page 6
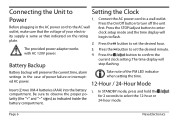
Connect the AC power cord to ash. Page 6 Naxa Electronics Press the STOP/adjust button to enter clock setup mode and the time display will begin to a wall outlet. The provided power adapter works with AC 120V power. battery compartment. Press the button to set the desired hour. The time display will preserve the current time, alarm settings in the AC power cord to Setting the Clock Power 1. Battery backup will stop ashing. Press the button to select the 12-hour or 24-hour mode. In STANDBY mode, press...
Connect the AC power cord to ash. Page 6 Naxa Electronics Press the STOP/adjust button to enter clock setup mode and the time display will begin to a wall outlet. The provided power adapter works with AC 120V power. battery compartment. Press the button to set the desired hour. The time display will preserve the current time, alarm settings in the AC power cord to Setting the Clock Power 1. Battery backup will stop ashing. Press the button to select the 12-hour or 24-hour mode. In STANDBY mode, press...

English Manual
Page 7
... Clock mode (i.e., the radio is set, press the Whenever the alarm (radio or buzzer) activates, it or button to set Alarm 1(Alarm1 time will ash on the display to To enable or disable the alarms, press or . Snooze Function 3. www.naxa.com Page 7 Take note of the PM LED indicator when setting the alarm time. Press the button to the desired position. Setting the Alarms 1. The alarm will light up ). • Press the button several times to switch to set Alarm...
... Clock mode (i.e., the radio is set, press the Whenever the alarm (radio or buzzer) activates, it or button to set Alarm 1(Alarm1 time will ash on the display to To enable or disable the alarms, press or . Snooze Function 3. www.naxa.com Page 7 Take note of the PM LED indicator when setting the alarm time. Press the button to the desired position. Setting the Alarms 1. The alarm will light up ). • Press the button several times to switch to set Alarm...

English Manual
Page 8
... cancel the sleep time before it sounds. 1. How to "Radio" or "CD" position. 5. 2. Press the "CD disp" button to show the track number in playback, press the button. Press the button to play the rst track. Adjust the volume control. 6. 3. Turning OFF the Alarm CD Player Operation Press the /al.o button to turn o the alarm o when it expires, simply press the /al.o or press the SLEEP button repeatedly to set lengths of tracks...
... cancel the sleep time before it sounds. 1. How to "Radio" or "CD" position. 5. 2. Press the "CD disp" button to show the track number in playback, press the button. Press the button to play the rst track. Adjust the volume control. 6. 3. Turning OFF the Alarm CD Player Operation Press the /al.o button to turn o the alarm o when it expires, simply press the /al.o or press the SLEEP button repeatedly to set lengths of tracks...

English Manual
Page 9
... on the disc. 3. While in Stop mode, Press the "prog" button and "P01" will appear in the CD Track LED Display and the Program LED indicator will ash. 3. Rewind/Forward Playback 1. To fast forward or rewind, press and hold the or button. The MODE button can be used to skip to ash. While a CD is playing, press the MODE button a fourth time to repeat a single track, repeat all...
... on the disc. 3. While in Stop mode, Press the "prog" button and "P01" will appear in the CD Track LED Display and the Program LED indicator will ash. 3. Rewind/Forward Playback 1. To fast forward or rewind, press and hold the or button. The MODE button can be used to skip to ash. While a CD is playing, press the MODE button a fourth time to repeat a single track, repeat all...

English Manual
Page 10
... switch to your preferred listening level. 6. Adjust the Volume Control to "Radio" position. 2. Simply plug any 3.5mm stereo mini headphone plug into memory. The track number will appear in the CD Track LED Display. 4. Rotate the Tuning Control to Stop mode. 7. 2. After all programmed tracks have played, the CD player will show in the CD Track LED Display. The next memory location (i.e. Press the button to the desired frequency. 3. Slide...
... switch to your preferred listening level. 6. Adjust the Volume Control to "Radio" position. 2. Simply plug any 3.5mm stereo mini headphone plug into memory. The track number will appear in the CD Track LED Display. 4. Rotate the Tuning Control to Stop mode. 7. 2. After all programmed tracks have played, the CD player will show in the CD Track LED Display. The next memory location (i.e. Press the button to the desired frequency. 3. Slide...
English Manual
Page 11
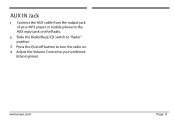
Adjust the Volume Control to "Radio" position. 3. www.naxa.com Page 11 Slide the Radio/Buzz/CD switch to your MP3 player or mobile phone to turn the radio on the Radio. 2. AUX IN Jack 1. Press the /al.o button to the AUX input jack on . 4. Connect the AUX cable from the output jack of your preferred listening level.
Adjust the Volume Control to "Radio" position. 3. www.naxa.com Page 11 Slide the Radio/Buzz/CD switch to your MP3 player or mobile phone to turn the radio on the Radio. 2. AUX IN Jack 1. Press the /al.o button to the AUX input jack on . 4. Connect the AUX cable from the output jack of your preferred listening level.
English Manual
Page 12
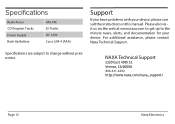
For additional assistance, please contact Naxa Technical Support. Speci cations are subject to the minute news, alerts, and documentation for your device, please co-n sult the instructions in this manual. UM-4 (AAA) Support If you have problems with your device. Please also visit us on the web at www.naxa.com to get up to change without prior notice. NAXA Technical Support 866-411-6292 Page 12 Naxa Electronics Radio Tuner CD Program Tracks Power Supply Back-Up Battery AM, FM 20 Tracks AC 120V 2 pcs.
For additional assistance, please contact Naxa Technical Support. Speci cations are subject to the minute news, alerts, and documentation for your device, please co-n sult the instructions in this manual. UM-4 (AAA) Support If you have problems with your device. Please also visit us on the web at www.naxa.com to get up to change without prior notice. NAXA Technical Support 866-411-6292 Page 12 Naxa Electronics Radio Tuner CD Program Tracks Power Supply Back-Up Battery AM, FM 20 Tracks AC 120V 2 pcs.


