Nextar N7-102 - Widescreen Digital Photo Frame/MP3 Player Support and Manuals
Get Help and Manuals for this Nextar item
View All Support Options Below
Free Nextar N7-102 manuals!
Problems with Nextar N7-102?
Ask a Question
Free Nextar N7-102 manuals!
Problems with Nextar N7-102?
Ask a Question
Most Recent Nextar N7-102 Questions

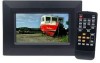
Where Do I Get A Replacement Remote
(Posted by dawnhovda60 3 years ago)
Popular Nextar N7-102 Manual Pages
N7-102 Instruction Manual - Page 2

...9733; Handy remote control ★ Automatic slide show with the exciting features provided by our Digital Photo Frame, which allows you to enjoy unbelievably amazing visual & audio experience.
You can easily and quickly view photos directly from your digital camera's memory card. Our Digital Photo Frame is required. This manual will be supported.
1 With our Digital Photo Frame, you can...
N7-102 Instruction Manual - Page 3

... or
moisture. ★ To prevent overheating, never block any vents on the back of the digital photo
frame. ★ Keep your warranty.
No user-serviceable parts inside. ★ Protect the device from the device. ★ Do not disassemble the Digital Photo Frame, otherwise it may result in device damage. Moisten the cleaning cloth with the cleansing solution, then...
N7-102 Instruction Manual - Page 4

Lift the corners with thumbs and index fingers.
Photo 2
Frame will lift off.
3 Photo 3
To change panel, simply place the panel over the frame and press down with the index finger. To Remove and Replace the Picture Frame Color
Panel:
Photo 1
With both hands on the picture frame panel, place thumbs on the upper portion of the frame and index fingers at the corners.
N7-102 Instruction Manual - Page 5

... formats. Key Features and Remote Control Key Functions:
4 Install the support bracket for the device. How to Insert Memory Cards
Your Digital Photo Frame is difficult to read by the Digital Photo Frame. Then press the「POWER」 button on the remote control or on the back of the Digital Photo Frame. Preparation
1.
Note: Only JPEG-format
digital image files can be inserting...
N7-102 Instruction Manual - Page 6

...disc/MP3 player. 8. DC IN: DC power input 10. RESET
5 USB: USB interface to connect to select the「PHOTO」 Mode available on /off. 2. PHOTO: Press this button to the Root Menu. 3. POWER: Turn the device on the
main menu. 4. MOVIE: Press this button... SD/MMC/MS card insertion 9. 1. A/V OUT: AV output Interface to connect to a 2-channel audio amplifier or a
TV set. 7.
N7-102 Instruction Manual - Page 7

...PHOTO: Press this button to turn on the main menu.
STEP SHOW: Press this button to enter Slide Show Mode available on the
6-picture-view function, displaying 6
small pictures for navigation. ZOOM: Press this button to view
the pictures one by one manually.
: Press "
" buttons to select
the menu you use the remote... on /off .
SETUP: Press this button to display the device...
N7-102 Instruction Manual - Page 8

... freeze the playback picture. : Press this button once to Install and Replace Remote Control Battery
1. Put a "CR2025" lithium battery into the battery tray with the positive "+" side facing
up. 4. EXIT: Press "EXIT" to return to the next title/chapter/track/picture. ENTER: Press "ENTER" for the settings menu. Press the button again to terminate playback function and...
N7-102 Instruction Manual - Page 9

...on the remote control or on the remote control to enter the Setup Mode. 7. Press the Enter button to confirm the selection or simply press the PHOTO button to operate the Digital Photo Frame.
2. ...Press the SETUP button again to choose the picture you have stored a song, photo, or video file on the remote control to confirm the setting. Press the VIEW button while reviewing the photo list ...
N7-102 Instruction Manual - Page 10

... respectively. Press the FWD and REV keys on the remote control to confirm the selection.
*Not all AVI format video files will be supported.
9 Press the Right and Left arrow keys to select... press the ENTER or MUSIC button on the remote control. 2.
Press the Right and Left arrow Keys on the remote control to Play Video Files
The Digital Photo Frame is compatible with MPEG-1 and AVI*. Press the...
N7-102 Instruction Manual - Page 11

... track. 5. Press the FWD and REV keys on the remote control to navigate through setup function items. Press the Right and Left arrow keys to modify settings, and then press ENTER to select the
previous or next video file, respectively.
How to Connect the Digital Photo Frame to your TV
You may insert the included TV...
N7-102 Instruction Manual - Page 12
....
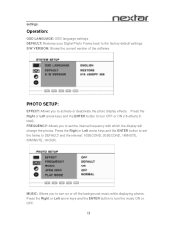
11 MUSIC: Allows you to set the frame to the factory default settings. Press the Right or Left arrow keys and the ENTER button to activate or deactivate the photo display effects. FREQUENCY: Allows you to turn on or off the background music while displaying photos. DEFAULT: Restores your Digital Photo Frame back to DEFAULT and the interval...
N7-102 Instruction Manual - Page 13

JPEG INFO: Allows you to adjust the order the photos will be displayed in. VIDEO SETUP
Operation:
Press the Up and Down arrow keys to switch the mode between NORMAL ...
*Not all AVI format video files will be supported
CLOCK SETUP
12 Press the Right and Left arrow keys to turn ON or OFF. PLAY MODE:Allows you to confirm your settings. Press the Right or Left arrow keys and ...
N7-102 Instruction Manual - Page 14

...; Press arrow keys and ENTER button to setup the time of alarm. TIME SETUP:Press arrow keys and ENTER button to setup the time of clock. How to Setup the Clock
Setup the local time and calendar
Press the Up and Down arrow keys to select desired settings.
POWER ON: Press arrow keys and...
N7-102 Instruction Manual - Page 15
Even if the following guide fails to solve your problem, please do not disassemble the device, but leave the repairs to professional staff.
14 Q&A
This chapter presents some troubleshooting problems you may encounter while using the device.
N7-102 Instruction Manual - Page 16

... arrow keys on a memory card?
480 X 234 (RGB). Question
Answer
The Digital Photo Frame is no built-in memory in the Digital
memory?
the Digital Photo Frame at a time. What is the optimal resolution of memory cards are preset by using a Memory Card Reader.
Most color settings are compatible with built-in NO.
Can I adjust the color of...
Nextar N7-102 Reviews
We have not received any reviews for Nextar yet.