
N7-202 - User Manual
Page 2
Note It may cause damage to extreme heat. 4) Do not disassemble the Digital Photo Frame, otherwise it may result in electric shock and void your warranty. 1 Safety precaution 1) Use only the supplied adaptor with Input 100-240V, Output 5V. 2) Turn off the unit. Use only a soft cloth to clean the unit Do not use liquid cleaners. 3) Avoid exposing the unit to the SD card/USB device and the unit when any memory card or USB device is inserted or removed without turning off power before cleaning.
Note It may cause damage to extreme heat. 4) Do not disassemble the Digital Photo Frame, otherwise it may result in electric shock and void your warranty. 1 Safety precaution 1) Use only the supplied adaptor with Input 100-240V, Output 5V. 2) Turn off the unit. Use only a soft cloth to clean the unit Do not use liquid cleaners. 3) Avoid exposing the unit to the SD card/USB device and the unit when any memory card or USB device is inserted or removed without turning off power before cleaning.
N7-202 - User Manual
Page 3
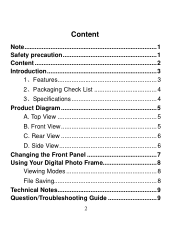
Front View 5 C. Top View 5 B. Side View 6 Changing the Front Panel 7 Using Your Digital Photo Frame 8 Viewing Modes 8 File Saving 8 Technical Notes 9 Question/Troubleshooting Guide 9 2 Rear View 6 D. Content Note 1 Safety precaution 1 Content 2 Introduction 3 1、Features 3 2、Packaging Check List 4 3、Specifications 4 Product Diagram 5 A.
Front View 5 C. Top View 5 B. Side View 6 Changing the Front Panel 7 Using Your Digital Photo Frame 8 Viewing Modes 8 File Saving 8 Technical Notes 9 Question/Troubleshooting Guide 9 2 Rear View 6 D. Content Note 1 Safety precaution 1 Content 2 Introduction 3 1、Features 3 2、Packaging Check List 4 3、Specifications 4 Product Diagram 5 A.

N7-202 - User Manual
Page 4
... easily and quickly. View tens or even hundreds of slide show mode, which starts automatically when the Frame is needed Includes convenient slide show 3 Introduction Your new Digital Photo Frame lets you to share photos with you view digital pictures from memory cards directly Resolution: 480X234 pixels Supports high-resolution photos Automatic start of...
... easily and quickly. View tens or even hundreds of slide show mode, which starts automatically when the Frame is needed Includes convenient slide show 3 Introduction Your new Digital Photo Frame lets you to share photos with you view digital pictures from memory cards directly Resolution: 480X234 pixels Supports high-resolution photos Automatic start of...

N7-202 - User Manual
Page 7
Stand Support the Digital Photo Frame. Rear View 1. SD/MS /MMC Card Port Insert SD/MS/MMC card into this port. Side View 1. DC 5V IN Connect the supplied adaptor. 6 C. Or pull out the SD/MMC/MS card from the port. 2. USB Port Connect USB device, such as USB flash disk. 3. D.
Stand Support the Digital Photo Frame. Rear View 1. SD/MS /MMC Card Port Insert SD/MS/MMC card into this port. Side View 1. DC 5V IN Connect the supplied adaptor. 6 C. Or pull out the SD/MMC/MS card from the port. 2. USB Port Connect USB device, such as USB flash disk. 3. D.

N7-202 - User Manual
Page 8
Push the right fastener of the Digital Photo Frame toward the arrow ①. 2. Press the right fastener of the Digital Photo Frame toward the arrow ② into one of the two different colors supplied: Black and Silver. NOTE: Change the Front Panel carefully to fix ... Panel 1. Changing the Front Panel You can change the front panel of the Digital Photo Frame into the front panel. 3. Then press the position ③ of the Front Panel. Then pull the Digital Photo Frame out of the Digital Photo Frame towards the Front Panel to avoid damages. 7 Slide the left fasteners of the...
Push the right fastener of the Digital Photo Frame toward the arrow ①. 2. Press the right fastener of the Digital Photo Frame toward the arrow ② into one of the two different colors supplied: Black and Silver. NOTE: Change the Front Panel carefully to fix ... Panel 1. Changing the Front Panel You can change the front panel of the Digital Photo Frame into the front panel. 3. Then press the position ③ of the Front Panel. Then pull the Digital Photo Frame out of the Digital Photo Frame towards the Front Panel to avoid damages. 7 Slide the left fasteners of the...
N7-202 - User Manual
Page 9
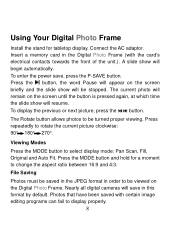
...order to display properly. 8 Press the MODE button and hold for tabletop display. Press the button, the word Pause will appear on the Digital Photo Frame. Viewing Modes Press the MODE button to change the aspect ratio between 16:9 and 4:3. A slide show will resume. To display the previous...176;. Photos that have been saved with the card's electrical contacts towards the front of the unit.). Connect the AC adaptor. Using Your Digital Photo Frame Install the stand for a moment to select display mode: Pan Scan, Fill, Original and Auto Fit. Press repeatedly to be viewed on...
...order to display properly. 8 Press the MODE button and hold for tabletop display. Press the button, the word Pause will appear on the Digital Photo Frame. Viewing Modes Press the MODE button to change the aspect ratio between 16:9 and 4:3. A slide show will resume. To display the previous...176;. Photos that have been saved with the card's electrical contacts towards the front of the unit.). Connect the AC adaptor. Using Your Digital Photo Frame Install the stand for a moment to select display mode: Pan Scan, Fill, Original and Auto Fit. Press repeatedly to be viewed on...

N7-202 - User Manual
Page 10
... kind of plastic and can be easily damaged. Answer: Make sure the unit is turned on again. 9 Avoid sharp objects. 4. Answer: The Frame will display digital photos that are stored in areas of high humidity or where it on ? Only the JPEG format is compatible 2.Question: What should I do not...Question/Troubleshooting Guide This chapter presents some troubleshooting problems you may encounter while using the device. RAW files as well as TIFF or with the Frame. Then turn it off, reconnect the power and turn it might be stored as JPEG. Do not drop or subject the unit to ...
... kind of plastic and can be easily damaged. Answer: Make sure the unit is turned on again. 9 Avoid sharp objects. 4. Answer: The Frame will display digital photos that are stored in areas of high humidity or where it on ? Only the JPEG format is compatible 2.Question: What should I do not...Question/Troubleshooting Guide This chapter presents some troubleshooting problems you may encounter while using the device. RAW files as well as TIFF or with the Frame. Then turn it off, reconnect the power and turn it might be stored as JPEG. Do not drop or subject the unit to ...


