Quick Start Guide for customers in Europe
Page 29
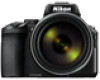
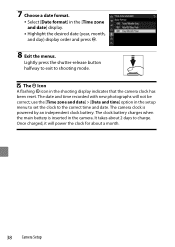
Set up Time zone and date Slot empty release lock Monitor settings EVF auto toggle Date stamp Self-timer: after release 6 Press HI or rotate the multi selector to select a setting, and press the k button to confirm the selection. Date stamp Date Date and time O ff • When you can ...or rotate the multi selector to the menu category selection area. Other functions 19 Time zone and date Slot empty release lock Monitor settings EVF auto toggle Date stamp Self-timer: after release 4 Press the k button to confirm the menu category. • Menu items corresponding to the...
Set up Time zone and date Slot empty release lock Monitor settings EVF auto toggle Date stamp Self-timer: after release 6 Press HI or rotate the multi selector to select a setting, and press the k button to confirm the selection. Date stamp Date Date and time O ff • When you can ...or rotate the multi selector to the menu category selection area. Other functions 19 Time zone and date Slot empty release lock Monitor settings EVF auto toggle Date stamp Self-timer: after release 4 Press the k button to confirm the menu category. • Menu items corresponding to the...
Reference Manual
Page 6
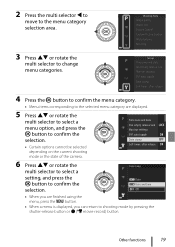
... display ...221 Key picture selection ...222 The network menu ...223 The setup menu ...227 Time zone and date ...227 Slot empty release lock ...229 Monitor settings ...229 EVF auto toggle ...232 Date stamp ...232 Self-timer: after release ...233 Vibration reduction ...234 AF assist ...235 Digital zoom ...235 Assign side zoom control ...236 Snap...
... display ...221 Key picture selection ...222 The network menu ...223 The setup menu ...227 Time zone and date ...227 Slot empty release lock ...229 Monitor settings ...229 EVF auto toggle ...232 Date stamp ...232 Self-timer: after release ...233 Vibration reduction ...234 AF assist ...235 Digital zoom ...235 Assign side zoom control ...236 Snap...
Reference Manual
Page 26
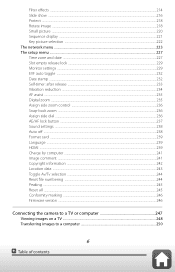
...value 117 20 Remaining movie recording time 145, 147 21 Flash-ready indicator 100 22 Number of exposures remaining (still images 48, 175 23 Enable release (when no memory card is inserted 229 24 F-number 63 25 Shutter speed 63 26 Auto exposure (AE)/Autofocus (AF) lock (still image)... .........111, 237 27 ISO sensitivity 189 28 Charging AC Adapter connection 29 Battery level 48 30 Travel destination 227 31 "Date not set 227, 269 32 Date stamp 232 Auto exposure (AE)/Autofocus 33 (AF) lock (during movie recording 146, 237 26 Parts of the camera The monitor...
...value 117 20 Remaining movie recording time 145, 147 21 Flash-ready indicator 100 22 Number of exposures remaining (still images 48, 175 23 Enable release (when no memory card is inserted 229 24 F-number 63 25 Shutter speed 63 26 Auto exposure (AE)/Autofocus (AF) lock (still image)... .........111, 237 27 ISO sensitivity 189 28 Charging AC Adapter connection 29 Battery level 48 30 Travel destination 227 31 "Date not set 227, 269 32 Date stamp 232 Auto exposure (AE)/Autofocus 33 (AF) lock (during movie recording 146, 237 26 Parts of the camera The monitor...
Reference Manual
Page 30
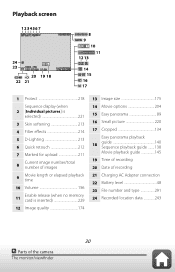
...retouch 212 7 Marked for upload 211 8 Current image number/total number of images 9 Movie length or elapsed playback time 10 Volume 156 11 Enable release (when no memory card is inserted 229 12 Image quality 174 13 Image size 175 14 Movie options 204 15 Easy panorama 89 16 Small... 220 17 Cropped 134 Easy panorama playback 18 guide 140 Sequence playback guide ........138 Movie playback guide 145 19 Time of recording 20 Date of recording 21 Charging AC Adapter connection 22 Battery level 48 23 File number and type 291 24 Recorded location data 243 30 Parts...
...retouch 212 7 Marked for upload 211 8 Current image number/total number of images 9 Movie length or elapsed playback time 10 Volume 156 11 Enable release (when no memory card is inserted 229 12 Image quality 174 13 Image size 175 14 Movie options 204 15 Easy panorama 89 16 Small... 220 17 Cropped 134 Easy panorama playback 18 guide 140 Sequence playback guide ........138 Movie playback guide 145 19 Time of recording 20 Date of recording 21 Charging AC Adapter connection 22 Battery level 48 23 File number and type 291 24 Recorded location data 243 30 Parts...

Reference Manual
Page 172
The setup menu button (setup) button Option Time zone and date (page 227) Slot empty release lock (page 229) Monitor settings (page 229)* EVF auto toggle (page 232) Date stamp (page 232) Self-timer: after release (page 233) Vibration reduction (page 234)* AF assist (page 235) Digital zoom (page 235)* Assign side zoom control (page...
The setup menu button (setup) button Option Time zone and date (page 227) Slot empty release lock (page 229) Monitor settings (page 229)* EVF auto toggle (page 232) Date stamp (page 232) Self-timer: after release (page 233) Vibration reduction (page 234)* AF assist (page 235) Digital zoom (page 235)* Assign side zoom control (page...
Reference Manual
Page 229
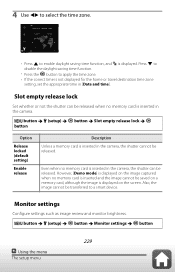
button button (setup) button Slot empty release lock Option Release locked (default setting) Enable release Description Unless a memory card is inserted in [Date and time]. Also, the image cannot be saved on the screen. Monitor settings Configure settings such as image review and monitor brightness. Press to ..., [Demo mode] is displayed on the image captured when no memory card is inserted in the camera, the shutter can be released when no memory card is inserted and the image cannot be transferred to a smart device. 4 Use to select the time zone. • Press to...
button button (setup) button Slot empty release lock Option Release locked (default setting) Enable release Description Unless a memory card is inserted in [Date and time]. Also, the image cannot be saved on the screen. Monitor settings Configure settings such as image review and monitor brightness. Press to ..., [Demo mode] is displayed on the image captured when no memory card is inserted in the camera, the shutter can be released when no memory card is inserted and the image cannot be transferred to a smart device. 4 Use to select the time zone. • Press to...

Reference Manual
Page 233
...When recording movies - Self-timer: after release Select whether or not to cancel the self-timer setting after release 233 Using the menu The setup menu button (setup) button Date stamp button Option Date Date and time Off (default setting) Description Date is stamped on images after they have been... captured. • The date and time cannot be stamped in ...
...When recording movies - Self-timer: after release Select whether or not to cancel the self-timer setting after release 233 Using the menu The setup menu button (setup) button Date stamp button Option Date Date and time Off (default setting) Description Date is stamped on images after they have been... captured. • The date and time cannot be stamped in ...
Reference Manual
Page 304
... tracking 193, 194 Selective color 78, 93 Sunset 78, 84 Self-timer 98, 102 Self-timer lamp 17, 102, 105 T Self-timer: after release 233 Target finding AF 108, 194 Send while shooting 224 Telephoto 124 Sequence 138 Thumbnail playback 55, 136 Sequence display 221 Time difference 227 Setup... menu 172, 227 Time setting (long time-exposure)..... 69 Shooting 48, 61, 145 Time zone 44, 228 Shooting information 25 Time zone and date 44, 227 Shooting menu 166, 174, 177 Time-lapse movie 78, 153 Shooting mode 61 Toggle Av/Tv selection 121, 244 304 Technical notes...
... tracking 193, 194 Selective color 78, 93 Sunset 78, 84 Self-timer 98, 102 Self-timer lamp 17, 102, 105 T Self-timer: after release 233 Target finding AF 108, 194 Send while shooting 224 Telephoto 124 Sequence 138 Thumbnail playback 55, 136 Sequence display 221 Time difference 227 Setup... menu 172, 227 Time setting (long time-exposure)..... 69 Shooting 48, 61, 145 Time zone 44, 228 Shooting information 25 Time zone and date 44, 227 Shooting menu 166, 174, 177 Time-lapse movie 78, 153 Shooting mode 61 Toggle Av/Tv selection 121, 244 304 Technical notes...
Reference Manual
Page 33
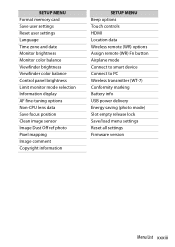
SETUP MENU Format memory card Save user settings Reset user settings Language Time zone and date Monitor brightness Monitor color balance Viewfinder brightness Viewfinder color balance Control panel brightness Limit monitor mode selection Information display AF fine-tuning options Non-CPU ... Airplane mode Connect to smart device Connect to PC Wireless transmitter (WT-7) Conformity marking Battery info USB power delivery Energy saving (photo mode) Slot empty release lock Save/load menu settings Reset all settings Firmware version Menu List xxxiii
SETUP MENU Format memory card Save user settings Reset user settings Language Time zone and date Monitor brightness Monitor color balance Viewfinder brightness Viewfinder color balance Control panel brightness Limit monitor mode selection Information display AF fine-tuning options Non-CPU ... Airplane mode Connect to smart device Connect to PC Wireless transmitter (WT-7) Conformity marking Battery info USB power delivery Energy saving (photo mode) Slot empty release lock Save/load menu settings Reset all settings Firmware version Menu List xxxiii
Reference Manual
Page 97
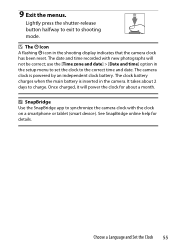
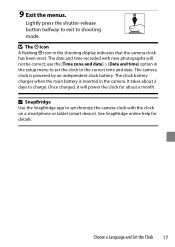
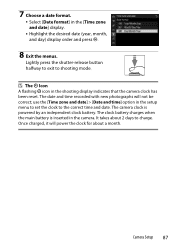
... battery is powered by an independent clock battery. Choose a Language and Set the Clock 55 9 Exit the menus. Lightly press the shutter-release button halfway to exit to the correct time and date. D The t Icon A flashing t icon in the camera. A SnapBridge Use the SnapBridge app to charge. use the [Time zone ...and date] > [Date and time] option in the setup menu to set the clock to shooting mode. See SnapBridge online help for about 2 days to synchronize the ...
... battery is powered by an independent clock battery. Choose a Language and Set the Clock 55 9 Exit the menus. Lightly press the shutter-release button halfway to exit to the correct time and date. D The t Icon A flashing t icon in the camera. A SnapBridge Use the SnapBridge app to charge. use the [Time zone ...and date] > [Date and time] option in the setup menu to set the clock to shooting mode. See SnapBridge online help for about 2 days to synchronize the ...
Reference Manual
Page 368
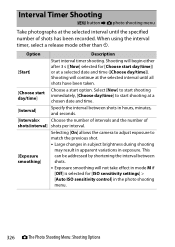
When using the interval timer, select a release mode other than E. Interval Timer Shooting G button U C photo shooting menu Take photographs at a selected date and time ([Choose day/time]). Shooting will begin either after 3 s ([Now] selected for [ISO sensitivity settings] > [Auto ISO sensitivity ... Shooting will continue at the selected interval until all shots have been taken. [Choose start day/time] Choose a start shooting at a chosen date and time. [Interval] Specify the interval between shots. • Exposure smoothing will not take effect in mode M if [Off] is selected...
When using the interval timer, select a release mode other than E. Interval Timer Shooting G button U C photo shooting menu Take photographs at a selected date and time ([Choose day/time]). Shooting will begin either after 3 s ([Now] selected for [ISO sensitivity settings] > [Auto ISO sensitivity ... Shooting will continue at the selected interval until all shots have been taken. [Choose start day/time] Choose a start shooting at a chosen date and time. [Interval] Specify the interval between shots. • Exposure smoothing will not take effect in mode M if [Off] is selected...
Reference Manual
Page 541
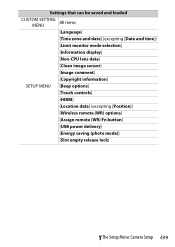
Settings that can be saved and loaded CUSTOM SETTING MENU All items [Language] [Time zone and date] (excepting [Date and time]) [Limit monitor mode selection] [Information display] [Non-CPU lens data] [Clean image sensor] [Image comment] [Copyright information] SETUP MENU [Beep options] [Touch controls] [HDMI] [Location data] (excepting [Position]) [Wireless remote (WR) options] [Assign remote (WR) Fn button] [USB power delivery] [Energy saving (photo mode)] [Slot empty release lock] B The Setup Menu: Camera Setup 499
Settings that can be saved and loaded CUSTOM SETTING MENU All items [Language] [Time zone and date] (excepting [Date and time]) [Limit monitor mode selection] [Information display] [Non-CPU lens data] [Clean image sensor] [Image comment] [Copyright information] SETUP MENU [Beep options] [Touch controls] [HDMI] [Location data] (excepting [Position]) [Wireless remote (WR) options] [Assign remote (WR) Fn button] [USB power delivery] [Energy saving (photo mode)] [Slot empty release lock] B The Setup Menu: Camera Setup 499
Reference Manual
Page 848
continuous release 396 Memory buffer 129 Memory card 45, 770 Memory card capacity 773 Metering 157 MF (Manual focus 75 Microphone sensitivity........... 174, 372 Mid-range sharpening (... comment 473 Image Dust Off ref photo 468 Image overlay 523 Image quality 260 Image review 235 Image size 154, 261 Images shot on selected dates... 210 Incandescent (White balance) ........96 Information display 461 Infrastructure mode 543, 550 Interval timer shooting 326 IP address 554 ISO sensitivity 118 ISO sensitivity settings...
continuous release 396 Memory buffer 129 Memory card 45, 770 Memory card capacity 773 Metering 157 MF (Manual focus 75 Microphone sensitivity........... 174, 372 Mid-range sharpening (... comment 473 Image Dust Off ref photo 468 Image overlay 523 Image quality 260 Image review 235 Image size 154, 261 Images shot on selected dates... 210 Incandescent (White balance) ........96 Information display 461 Infrastructure mode 543, 550 Interval timer shooting 326 IP address 554 ISO sensitivity 118 ISO sensitivity settings...
Reference Manual
Page 850
release mode options .......... 397 T Thumbnail 181 Time 112 Time zone and date 52, 456 Timecode 375 Time-lapse movie 340 Toning (Set Picture Control...Shooting data 188 Shutter spd & aperture lock........... 429 Shutter speed 108, 109 Shutter type 398 Shutter-release button AE-L.......... 394 Silent photography 100, 362 Single AF 75 Single frame 126, 130 Single-point AF 78 ...Slide show 245 Slot empty release lock 495 Slow sync 156, 620 Slow-motion movie 172 SnapBridge 565 Spot metering 157 SSID 544, ...
release mode options .......... 397 T Thumbnail 181 Time 112 Time zone and date 52, 456 Timecode 375 Time-lapse movie 340 Toning (Set Picture Control...Shooting data 188 Shutter spd & aperture lock........... 429 Shutter speed 108, 109 Shutter type 398 Shutter-release button AE-L.......... 394 Silent photography 100, 362 Single AF 75 Single frame 126, 130 Single-point AF 78 ...Slide show 245 Slot empty release lock 495 Slow sync 156, 620 Slow-motion movie 172 SnapBridge 565 Spot metering 157 SSID 544, ...
Users Manual for customers in Europe
Page 35
...battery charges when the main battery is powered by an independent clock battery. Lightly press the shutter-release button halfway to exit to the correct time and date. use the [Time zone and date] > [Date and time] option in the setup menu to set the clock to shooting mode. A SnapBridge ... the shooting display indicates that the camera clock has been reset. It takes about a month. Choose a Language and Set the Clock 17 The date and time recorded with the clock on a smartphone or tablet (smart device). See SnapBridge online help for about 2 days to synchronize the camera...
...battery charges when the main battery is powered by an independent clock battery. Lightly press the shutter-release button halfway to exit to the correct time and date. use the [Time zone and date] > [Date and time] option in the setup menu to set the clock to shooting mode. A SnapBridge ... the shooting display indicates that the camera clock has been reset. It takes about a month. Choose a Language and Set the Clock 17 The date and time recorded with the clock on a smartphone or tablet (smart device). See SnapBridge online help for about 2 days to synchronize the camera...
Users Manual for customers in Europe
Page 38
...The clock battery charges when the main battery is powered by an independent clock battery. It takes about a month. 38 Camera Setup The date and time recorded with new photographs will power the clock for about 2 days to shooting mode. Once charged, it will not be correct...; Lightly press the shutter-release button halfway to exit to charge. D The t Icon A flashing t icon in the [Time zone and date] display. • Highlight the desired date (year, month, and day) display order and press J. 8 Exit the menus. use...
...The clock battery charges when the main battery is powered by an independent clock battery. It takes about a month. 38 Camera Setup The date and time recorded with new photographs will power the clock for about 2 days to shooting mode. Once charged, it will not be correct...; Lightly press the shutter-release button halfway to exit to charge. D The t Icon A flashing t icon in the [Time zone and date] display. • Highlight the desired date (year, month, and day) display order and press J. 8 Exit the menus. use...
Supplementary Firmware Update Manual
Page 34
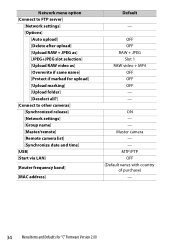
... - - ON - - OFF OFF RAW + JPEG Slot 1 RAW video + MP4 OFF OFF OFF - - Network menu option [Connect to other cameras] [Synchronized release] [Network settings] [Group name] [Master/remote] [Remote camera list] [Synchronize date and time] [USB] [Start via LAN] [Router frequency band] [MAC address] Default - MTP/PTP OFF (Default varies with country of...
... - - ON - - OFF OFF RAW + JPEG Slot 1 RAW video + MP4 OFF OFF OFF - - Network menu option [Connect to other cameras] [Synchronized release] [Network settings] [Group name] [Master/remote] [Remote camera list] [Synchronize date and time] [USB] [Start via LAN] [Router frequency band] [MAC address] Default - MTP/PTP OFF (Default varies with country of...
Reference Guide PDF Edition
Page 12
... Connecting to Other Cameras 401 What Inter-camera Connections Can Do for You 401 Camera-Based Remote Photography (Synchronized Release 401 Clock Synchronization (Synchronize Date and Time 401 Synchronized Release 402 Configuring and Using Synchronized Release 402 Synchronizing Camera Clocks 421 Flash Photography 422 "On-Camera" Versus "Remote 422 Camera-Mounted Flash Units 422...
... Connecting to Other Cameras 401 What Inter-camera Connections Can Do for You 401 Camera-Based Remote Photography (Synchronized Release 401 Clock Synchronization (Synchronize Date and Time 401 Synchronized Release 402 Configuring and Using Synchronized Release 402 Synchronizing Camera Clocks 421 Flash Photography 422 "On-Camera" Versus "Remote 422 Camera-Mounted Flash Units 422...
Reference Guide PDF Edition
Page 22
... Options 763 Connect to FTP Server 765 Network Settings 765 Options 768 Connect to Other Cameras 770 Synchronized Release 770 Network Settings 770 Group Name 772 Master/Remote 772 Remote Camera List 772 Synchronize Date and Time 772 USB ...773 Start via LAN 773 Router Frequency Band 774 MAC Address 774 22...
... Options 763 Connect to FTP Server 765 Network Settings 765 Options 768 Connect to Other Cameras 770 Synchronized Release 770 Network Settings 770 Group Name 772 Master/Remote 772 Remote Camera List 772 Synchronize Date and Time 772 USB ...773 Start via LAN 773 Router Frequency Band 774 MAC Address 774 22...
Reference Guide PDF Edition
Page 87
..., month, and day) display order and press J. 8 Exit the menus. Lightly press the shutter-release button halfway to exit to the correct time and date. It takes about a month. use the [Time zone and date] > [Date and time] option in the shooting display indicates that the camera clock has been reset. D The t Icon A flashing...
..., month, and day) display order and press J. 8 Exit the menus. Lightly press the shutter-release button halfway to exit to the correct time and date. It takes about a month. use the [Time zone and date] > [Date and time] option in the shooting display indicates that the camera clock has been reset. D The t Icon A flashing...


