Reference Manual
Page 4
... (mode S)? How do I set the flash to take pictures with the self-timer or a remote control? Can I preserve details in shadows and highlights? Can I make long ("time") exposures (mode M)? i Exposure Can I choose an aperture (mode A)? i Using the Flash Can I view more pictures on the memory card? How ...I shoot movies? Can I view photographs on a TV? i Release Modes Can I take photos one at large sizes? How do I quickly adjust settings for using this "question and answer" index. i Deletion How do I delete unwanted photos? 0 26-29 30-34 115-121 63 64 66 ...
... (mode S)? How do I set the flash to take pictures with the self-timer or a remote control? Can I preserve details in shadows and highlights? Can I make long ("time") exposures (mode M)? i Exposure Can I choose an aperture (mode A)? i Using the Flash Can I view more pictures on the memory card? How ...I shoot movies? Can I view photographs on a TV? i Release Modes Can I take photos one at large sizes? How do I quickly adjust settings for using this "question and answer" index. i Deletion How do I delete unwanted photos? 0 26-29 30-34 115-121 63 64 66 ...
Reference Manual
Page 9
...Camera 137 Connecting the Camera ...138 Printing Photographs...139 Connecting the Printer ...139 Printing Pictures One at a Time 140 Printing Multiple Pictures 142 Creating a DPOF Print Order: Print Set 144 Viewing Photographs on TV 146 Standard Definition Devices 146 High-Definition Devices ...147... Reset shooting menu...152 Storage Folder ...152 Auto Distortion Control 153 Color Space...153 Long Exposure NR...154 High ISO NR ...154 ISO Sensitivity Settings 155 A Custom Settings: Fine-Tuning Camera Settings 156 Reset Custom Settings 157 a: Autofocus ...158 a1: AF-C Priority Selection...
...Camera 137 Connecting the Camera ...138 Printing Photographs...139 Connecting the Printer ...139 Printing Pictures One at a Time 140 Printing Multiple Pictures 142 Creating a DPOF Print Order: Print Set 144 Viewing Photographs on TV 146 Standard Definition Devices 146 High-Definition Devices ...147... Reset shooting menu...152 Storage Folder ...152 Auto Distortion Control 153 Color Space...153 Long Exposure NR...154 High ISO NR ...154 ISO Sensitivity Settings 155 A Custom Settings: Fine-Tuning Camera Settings 156 Reset Custom Settings 157 a: Autofocus ...158 a1: AF-C Priority Selection...
Reference Manual
Page 20
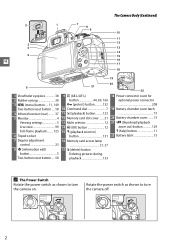
... G (menu) button .... 11, 149 Two-button reset button .... 58 4 Infrared receiver (rear) ......... 37 5 Monitor 4 Viewing settings 5 Live view 99 Full-frame playback......... 123 6 Tripod socket 7 Diopter adjustment control 23 8 P (information edit) button 5 Two-button reset button .... 58 9 A (AE-L/AF-L) button 44, 69, 166 L... 12 15 X (playback zoom in) button 131 16 Memory card access lamp 21, 27 17 O (delete) button Deleting pictures during playback 133 18 Power connector cover for optional power connector 208 19 Battery-chamber cover latch 15 20 Battery-chamber cover........ 15...
... G (menu) button .... 11, 149 Two-button reset button .... 58 4 Infrared receiver (rear) ......... 37 5 Monitor 4 Viewing settings 5 Live view 99 Full-frame playback......... 123 6 Tripod socket 7 Diopter adjustment control 23 8 P (information edit) button 5 Two-button reset button .... 58 9 A (AE-L/AF-L) button 44, 69, 166 L... 12 15 X (playback zoom in) button 131 16 Memory card access lamp 21, 27 17 O (delete) button Deleting pictures during playback 133 18 Power connector cover for optional power connector 208 19 Battery-chamber cover latch 15 20 Battery-chamber cover........ 15...
Reference Manual
Page 23
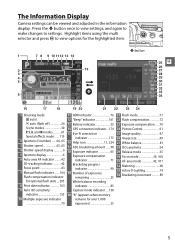
Press the P button once to view settings, and again to make changes to view options for the highlighted item. 1 7 8 9 10 11 12 13 14 P button 2... remains for over 1,000 exposures 25 21 Flash mode 51 22 Flash compensation 72 23 Exposure compensation ......70 24 Picture Control 91 25 Image quality 47 26 Image size 49 27 White balance 81 28 ISO sensitivity 54 29 Release mode ...74 34 Bracketing increment ...........89 5 Highlight items using the multi selector and press J to settings. The Information Display Camera settings can be viewed and adjusted in the information display.
Press the P button once to view settings, and again to make changes to view options for the highlighted item. 1 7 8 9 10 11 12 13 14 P button 2... remains for over 1,000 exposures 25 21 Flash mode 51 22 Flash compensation 72 23 Exposure compensation ......70 24 Picture Control 91 25 Image quality 47 26 Image size 49 27 White balance 81 28 ISO sensitivity 54 29 Release mode ...74 34 Bracketing increment ...........89 5 Highlight items using the multi selector and press J to settings. The Information Display Camera settings can be viewed and adjusted in the information display.

Reference Manual
Page 76
... P, S, A, M Auto bracketing P, S, A, M 100 P, S, A, M k, l, p, m, n, o, r, s, t, u, v, w, x, y, z, 0, g, (, 3, 1, 2, 3 Release mode m, w Other shooting modes Focus mode Viewfinder Shooting modes other than % Live view/movie Auto Continuous Single frame AF-A AF-S 54 Picture Control settings P, S, A, M Exposure compensation %, P, S, A, M 35 Flash compensation P, S, A, M Flash mode i, k, p, n, w, g 39 o 100 s AF-area mode Viewfinder P, S, A, M n, x, 0, 1, 2, 3 Single-point AF m, w Dynamic-area AF i, j, k, l, p, o, r, s, 42 t, u, v, y, z, g, 3, P, S, A, Auto-area AF M Live view...
... P, S, A, M Auto bracketing P, S, A, M 100 P, S, A, M k, l, p, m, n, o, r, s, t, u, v, w, x, y, z, 0, g, (, 3, 1, 2, 3 Release mode m, w Other shooting modes Focus mode Viewfinder Shooting modes other than % Live view/movie Auto Continuous Single frame AF-A AF-S 54 Picture Control settings P, S, A, M Exposure compensation %, P, S, A, M 35 Flash compensation P, S, A, M Flash mode i, k, p, n, w, g 39 o 100 s AF-area mode Viewfinder P, S, A, M n, x, 0, 1, 2, 3 Single-point AF m, w Dynamic-area AF i, j, k, l, p, o, r, s, 42 t, u, v, y, z, g, 3, P, S, A, Auto-area AF M Live view...

Reference Manual
Page 109
Picture Controls Nikon's unique Picture Control system makes it possible to the information display, press the shutter-release button halfway. 91 Selecting a Picture Control The camera offers six Picture Controls. Choose for photographs that will later be extensively processed or retouched. If shooting information is not displayed in the information display. Information display P button 2 Display Picture Control options. Highlight the current Picture Control and...
Picture Controls Nikon's unique Picture Control system makes it possible to the information display, press the shutter-release button halfway. 91 Selecting a Picture Control The camera offers six Picture Controls. Choose for photographs that will later be extensively processed or retouched. If shooting information is not displayed in the information display. Information display P button 2 Display Picture Control options. Highlight the current Picture Control and...

Reference Manual
Page 110
... Quick adjust, or make manual adjustments to individual settings. 1 Display the Picture Control menu. G button 3 Adjust settings. Highlight Set Picture Control in the shooting menu and press 2. 2 t Select a Picture Control. To display the menus, press the G button. Default settings can be restored by an asterisk ("*"). 92 Modifying Picture Controls Existing preset or custom Picture Controls (0 95) can be modified to suit the scene or...
... Quick adjust, or make manual adjustments to individual settings. 1 Display the Picture Control menu. G button 3 Adjust settings. Highlight Set Picture Control in the shooting menu and press 2. 2 t Select a Picture Control. To display the menus, press the G button. Default settings can be restored by an asterisk ("*"). 92 Modifying Picture Controls Existing preset or custom Picture Controls (0 95) can be modified to suit the scene or...
Reference Manual
Page 111
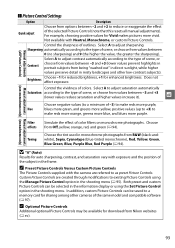
... Does not affect exposure. D "A" (Auto) Results for download from Nikon websites (0 xv). 93 In addition, custom Picture Controls can be selected in the information display or using the Manage Picture Control option in the shooting menu (0 95). Manual adjustments Manual adjustments (non...in the shooting menu. Choose from Off, yellow, orange, red, and green (0 94). ❚❚ Picture Control Settings Manual adjustments (all Picture Controls) Option Description Choose from options between -3 and +3 (lower values prevent highlights in portrait subjects from being ...
... Does not affect exposure. D "A" (Auto) Results for download from Nikon websites (0 xv). 93 In addition, custom Picture Controls can be selected in the information display or using the Manage Picture Control option in the shooting menu (0 95). Manual adjustments Manual adjustments (non...in the shooting menu. Choose from Off, yellow, orange, red, and green (0 94). ❚❚ Picture Control Settings Manual adjustments (all Picture Controls) Option Description Choose from options between -3 and +3 (lower values prevent highlights in portrait subjects from being ...

Reference Manual
Page 112
... to adjust saturation. Use this menu simulate the effect of the sky in the Picture Control setting menu indicates the previous value for Picture Controls that the effects achieved with custom picture controls are more contrast than those on monochrome photographs. Can be used to tone down ...the brightness of color filters on which the custom picture control was based. A Previous Settings The line under the value display in O Orange landscape photographs. The following filter effects are displayed in green...
... to adjust saturation. Use this menu simulate the effect of the sky in the Picture Control setting menu indicates the previous value for Picture Controls that the effects achieved with custom picture controls are more contrast than those on monochrome photographs. Can be used to tone down ...the brightness of color filters on which the custom picture control was based. A Previous Settings The line under the value display in O Orange landscape photographs. The following filter effects are displayed in green...

Reference Manual
Page 113
... Save/edit and press 2. Highlight a destination for more information. To abandon any changes and start over from default settings, press the O button. See page 93 for the custom Picture Control (C-1 through C-9) and press 2. 95 Highlight Manage Picture Control in the shooting menu and press 2. 2 Select Save/edit. To display the menus, press the G button. Creating...
... Save/edit and press 2. Highlight a destination for more information. To abandon any changes and start over from default settings, press the O button. See page 93 for the custom Picture Control (C-1 through C-9) and press 2. 95 Highlight Manage Picture Control in the shooting menu and press 2. 2 Select Save/edit. To display the menus, press the G button. Creating...

Reference Manual
Page 169
... balance Large 49 ISO P, S, A, M Auto 81 sensitivity Other modes Fluorescent Set Picture Control Cool-white fluorescent Standard 82 Auto ISO sensitivity control Release mode 91 Multiple exposure Manage Picture Control Auto distortion control Color space - 95 Movie settings Off 153 Movie quality 3 sRGB 153 Microphone Active D-Lighting HDR (high dynamic range... to 2 and gain to 1. Reset shooting menu can not be grayed out and unavailable. i 151 For information on camera settings, some items may be selected while shooting is in each shooting mode, see page 216.
... balance Large 49 ISO P, S, A, M Auto 81 sensitivity Other modes Fluorescent Set Picture Control Cool-white fluorescent Standard 82 Auto ISO sensitivity control Release mode 91 Multiple exposure Manage Picture Control Auto distortion control Color space - 95 Movie settings Off 153 Movie quality 3 sRGB 153 Microphone Active D-Lighting HDR (high dynamic range... to 2 and gain to 1. Reset shooting menu can not be grayed out and unavailable. i 151 For information on camera settings, some items may be selected while shooting is in each shooting mode, see page 216.

Reference Manual
Page 180
...a photograph numbered 9999, a new folder will be created automatically and file numbering will be disabled and no further photographs can blur pictures, select On to 0001 and creates a new folder with the next photograph taken. If a photograph is numbered 999 and contains ...created automatically if a photograph is raised. d4: Exposure Delay Mode G button ➜ A Custom Settings menu In situations where the slightest camera movement can be taken. This option controls whether file numbering continues from the largest file number in the current folder, whichever is inserted in...
...a photograph numbered 9999, a new folder will be created automatically and file numbering will be disabled and no further photographs can blur pictures, select On to 0001 and creates a new folder with the next photograph taken. If a photograph is numbered 999 and contains ...created automatically if a photograph is raised. d4: Exposure Delay Mode G button ➜ A Custom Settings menu In situations where the slightest camera movement can be taken. This option controls whether file numbering continues from the largest file number in the current folder, whichever is inserted in...

Reference Manual
Page 183
...("*") is pressed. w ISO sensitivity * Press the Fn (E) button and rotate the command dial to select the release mode (0 35). HDR ends when a picture is taken or the Fn (E) button is set to select white balance (P, S, A, and M modes only; 0 81). ! m White balance * Press the Fn (E) button and rotate the command dial...to JPEG fine, JPEG normal, or JPEG basic, "RAW" will appear in effect (P, S, A, and M modes only; 0 88). If image quality is pressed again. f: Controls f1: Assign E/Fn Button G button ➜ A Custom Settings menu Choose the role played by the Fn (E) button.
...("*") is pressed. w ISO sensitivity * Press the Fn (E) button and rotate the command dial to select the release mode (0 35). HDR ends when a picture is taken or the Fn (E) button is set to select white balance (P, S, A, and M modes only; 0 81). ! m White balance * Press the Fn (E) button and rotate the command dial...to JPEG fine, JPEG normal, or JPEG basic, "RAW" will appear in effect (P, S, A, and M modes only; 0 88). If image quality is pressed again. f: Controls f1: Assign E/Fn Button G button ➜ A Custom Settings menu Choose the role played by the Fn (E) button.
Reference Manual
Page 194
...only available when a memory card containing photographs is displayed. A Image Quality Except in the case of existing pictures, and are grayed out and unavailable. u 176 Option 0 Option 0 Option 0 i D-Lighting 178 ... 188 l Monochrome 179 e Straighten 185 3 Selective color 189 m Filter effects 180 ( Distortion control 185 f Edit movie 111 n Color balance o Image overlay 1 181 ) Fisheye 181 q Color...are used . A Retouching Copies With the exceptions of detail). Time stamps added with Custom Setting d5 (Print Date; 0 163) may result in loss of Image overlay and Edit ...
...only available when a memory card containing photographs is displayed. A Image Quality Except in the case of existing pictures, and are grayed out and unavailable. u 176 Option 0 Option 0 Option 0 i D-Lighting 178 ... 188 l Monochrome 179 e Straighten 185 3 Selective color 189 m Filter effects 180 ( Distortion control 185 f Edit movie 111 n Color balance o Image overlay 1 181 ) Fisheye 181 q Color...are used . A Retouching Copies With the exceptions of detail). Time stamps added with Custom Setting d5 (Print Date; 0 163) may result in loss of Image overlay and Edit ...
Reference Manual
Page 201
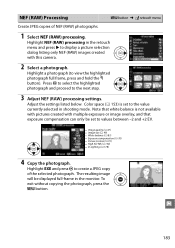
... the retouch menu and press 2 to display a picture selection dialog listing only NEF (RAW) images created with multiple exposure or image overlay, and that white balance is set to values between -2 and +2 EV. Adjust the settings listed below. To exit without copying the photograph, ...Image size (0 49) White balance (0 81) Exposure compensation (0 70) Picture Control (0 91) High ISO NR (0 154) D-Lighting (0 178) 4 Copy the photograph. Highlight a photograph (to the next step. 3 Adjust NEF (RAW) processing settings. u 183 Highlight EXE and press J to the value currently selected in ...
... the retouch menu and press 2 to display a picture selection dialog listing only NEF (RAW) images created with multiple exposure or image overlay, and that white balance is set to values between -2 and +2 EV. Adjust the settings listed below. To exit without copying the photograph, ...Image size (0 49) White balance (0 81) Exposure compensation (0 70) Picture Control (0 91) High ISO NR (0 154) D-Lighting (0 178) 4 Copy the photograph. Highlight a photograph (to the next step. 3 Adjust NEF (RAW) processing settings. u 183 Highlight EXE and press J to the value currently selected in ...

Reference Manual
Page 234
... White balance 2 Set Picture Control 2 Auto distortion control Color space Active D-Lighting 2 HDR (high dynamic range) 2 Long exposure NR High ISO NR ISO sensitivity settings 2 Release mode 2 Multiple exposure 2 Movie settings Interval timer shooting ...10004;3 ✔3 - ✔3 3 ✔3 ✔3 ✔3 ✔3 ✔3 ✔3 ✔3 3 - ✔3 - ✔3 - - Available Settings The following table lists the settings that can be adjusted in AF-assist illuminator a3: Rangefinder b1: EV steps for exposure cntrl.
... White balance 2 Set Picture Control 2 Auto distortion control Color space Active D-Lighting 2 HDR (high dynamic range) 2 Long exposure NR High ISO NR ISO sensitivity settings 2 Release mode 2 Multiple exposure 2 Movie settings Interval timer shooting ...10004;3 ✔3 - ✔3 3 ✔3 ✔3 ✔3 ✔3 ✔3 ✔3 ✔3 3 - ✔3 - ✔3 - - Available Settings The following table lists the settings that can be adjusted in AF-assist illuminator a3: Rangefinder b1: EV steps for exposure cntrl.

Reference Manual
Page 239
... when live view or movie recording: Choose an option for image quality (0 48). Image size can not be changed: NEF (RAW) option selected for Custom Setting d1 (Beep; 0 161). • Camera is in all modes. Date is not imprinted on photos: An NEF (RAW) option is selected for Flicker reduction that...; MF or AF-C is selected as the focus mode or subject moves when AF-A is selected (0 39). Subject-tracking AF not available: Select a non-monochrome Picture Control (0 91). If problem persists, perform image sensor cleaning (0 210).
... when live view or movie recording: Choose an option for image quality (0 48). Image size can not be changed: NEF (RAW) option selected for Custom Setting d1 (Beep; 0 161). • Camera is in all modes. Date is not imprinted on photos: An NEF (RAW) option is selected for Flicker reduction that...; MF or AF-C is selected as the focus mode or subject moves when AF-A is selected (0 39). Subject-tracking AF not available: Select a non-monochrome Picture Control (0 91). If problem persists, perform image sensor cleaning (0 210).

Reference Manual
Page 240
... with D5100 (0 87). Shooting (P, S, A, M) Shutter-release disabled: • Non-CPU lens is attached: rotate camera mode dial to M (0 65, 199). • Mode dial rotated to match light source (0 81). • Adjust Set Picture Control settings (0 91). For consistent results over a series of Picture Control differ ... of shutter speeds not available: Flash in long time-exposures: Enable long-exposure noise reduction (0 154). Effects of photos, choose another setting (0 93). Image can not be used: Choose mode P, S, or A (0 61, 70). n 222 Exposure compensation can not be...
... with D5100 (0 87). Shooting (P, S, A, M) Shutter-release disabled: • Non-CPU lens is attached: rotate camera mode dial to M (0 65, 199). • Mode dial rotated to match light source (0 81). • Adjust Set Picture Control settings (0 91). For consistent results over a series of Picture Control differ ... of shutter speeds not available: Flash in long time-exposures: Enable long-exposure noise reduction (0 154). Effects of photos, choose another setting (0 93). Image can not be used: Choose mode P, S, or A (0 61, 70). n 222 Exposure compensation can not be...
Reference Manual
Page 256
...balanced fill-flash for digital SLR 164 J JPEG 47 JPEG basic 47 JPEG fine 47 JPEG normal 47 L Landscape (Set Picture Control) 91 Language 19, 171 Large (Image size 49 Lens 17, 18, 197 Lens cap 17 Lens focus ring 17 ...Lock mirror up for cleaning ......212 Long exposure NR 154 Low-angle shots 4 M Magenta 83, 181 Manage Picture Control 95 Manual 45, 65 Manual focus 45, 100, 106 Matrix metering 68 Maximum aperture 46 Maximum sensitivity 155 Medium... Mode dial 3 Monitor 4, 5, 99, 123 Monitor brightness 167 Monochrome 179 Monochrome (Set Picture Control) 91 Mounting mark 17 238
...balanced fill-flash for digital SLR 164 J JPEG 47 JPEG basic 47 JPEG fine 47 JPEG normal 47 L Landscape (Set Picture Control) 91 Language 19, 171 Large (Image size 49 Lens 17, 18, 197 Lens cap 17 Lens focus ring 17 ...Lock mirror up for cleaning ......212 Long exposure NR 154 Low-angle shots 4 M Magenta 83, 181 Manage Picture Control 95 Manual 45, 65 Manual focus 45, 100, 106 Matrix metering 68 Maximum aperture 46 Maximum sensitivity 155 Medium... Mode dial 3 Monitor 4, 5, 99, 123 Monitor brightness 167 Monochrome 179 Monochrome (Set Picture Control) 91 Mounting mark 17 238

Reference Manual
Page 257
MOV 218 Movie quality 109 Movie settings 109 Movie-record button 107 Movies 107 Multiple exposure 78 N NEF 47 NEF (RAW 47, 183 NEF (RAW) processing 183 Neutral (Set Picture Control).......91 Nikon Transfer 2 137, 138 Non-CPU lens 199 Number of shots 236 O Optional ...flash 164, 202 Output resolution (HDMI)......... 148 Overview 128 P Page size (PictBridge 140 Perspective control 187 Photo information 124, 150 PictBridge 139, 235 Picture Controls 91 Playback ...
MOV 218 Movie quality 109 Movie settings 109 Movie-record button 107 Movies 107 Multiple exposure 78 N NEF 47 NEF (RAW 47, 183 NEF (RAW) processing 183 Neutral (Set Picture Control).......91 Nikon Transfer 2 137, 138 Non-CPU lens 199 Number of shots 236 O Optional ...flash 164, 202 Output resolution (HDMI)......... 148 Overview 128 P Page size (PictBridge 140 Perspective control 187 Photo information 124, 150 PictBridge 139, 235 Picture Controls 91 Playback ...


