
Reference Manual
Page 2
... other pages in this manual assume that should be read by all who use to prevent damage to the camera. Camera Settings The explanations in this manual. Digitutor "Digitutor", a series of a Nikon single-lens reflex (SLR) digital camera. A This icon marks notes; See page 11 for help feature for details. information that...
... other pages in this manual assume that should be read by all who use to prevent damage to the camera. Camera Settings The explanations in this manual. Digitutor "Digitutor", a series of a Nikon single-lens reflex (SLR) digital camera. A This icon marks notes; See page 11 for help feature for details. information that...

Reference Manual
Page 3
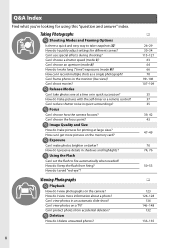
Where to Find It Find what you're looking for from: i The Table of Contents 0 iv i The Q&A Index 0 ii i The Index 0 237 i Error Messages 0 224 i Troubleshooting 0 220 X Introduction s Basic Photography z More on Photography (All Modes) t P, S, A, and M Modes x Live View y Recording and Viewing Movies % Special Effects I More on Playback Q Connections o The Playback Menu i The Shooting Menu L Custom Settings g The Setup Menu u The Retouch Menu w v Recent Settings / My Menu n Technical Notes 01 0 25 0 35 0 61 0 99 0 107 0 115 0 123 0 137 0 149 0 151 0 156 0 167 0 176 0 192 0 197 i
Where to Find It Find what you're looking for from: i The Table of Contents 0 iv i The Q&A Index 0 ii i The Index 0 237 i Error Messages 0 224 i Troubleshooting 0 220 X Introduction s Basic Photography z More on Photography (All Modes) t P, S, A, and M Modes x Live View y Recording and Viewing Movies % Special Effects I More on Playback Q Connections o The Playback Menu i The Shooting Menu L Custom Settings g The Setup Menu u The Retouch Menu w v Recent Settings / My Menu n Technical Notes 01 0 25 0 35 0 61 0 99 0 107 0 115 0 123 0 137 0 149 0 151 0 156 0 167 0 176 0 192 0 197 i
Reference Manual
Page 4
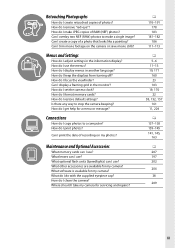
Can I shoot movies? How do I quickly adjust settings for printing at a time or in quick succession? Can I choose a shutter speed (mode S)? How can I avoid "red-eye"? i Using the Flash Can I delete unwanted photos? 0 ... 132 133-135 ii Viewing Photographs i Playback How do I get more information about a photo? i Deletion How do I view photographs on the memory card? How do I set the flash to take pictures with the self-timer or a remote control? Can I keep the flash from accidental deletion? How do I take pictures for different...
Can I shoot movies? How do I quickly adjust settings for printing at a time or in quick succession? Can I choose a shutter speed (mode S)? How can I avoid "red-eye"? i Using the Flash Can I delete unwanted photos? 0 ... 132 133-135 ii Viewing Photographs i Playback How do I get more information about a photo? i Deletion How do I view photographs on the memory card? How do I set the flash to take pictures with the self-timer or a remote control? Can I keep the flash from accidental deletion? How do I take pictures for different...
Reference Manual
Page 5
... message? Maintenance and Optional Accessories What memory cards can I use ? How do I use the menus? How do I adjust settings in the monitor? How do I make a single image? Can I focus the viewfinder? Menus and Settings How do I restore default settings? How do I set the camera clock? How do I display a framing grid in the information display?
... message? Maintenance and Optional Accessories What memory cards can I use ? How do I use the menus? How do I adjust settings in the monitor? How do I make a single image? Can I focus the viewfinder? Menus and Settings How do I restore default settings? How do I set the camera clock? How do I display a framing grid in the information display?

Reference Manual
Page 7
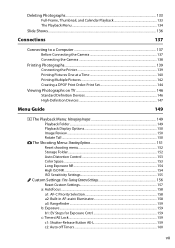
... ...47 Image Quality ...47 Image Size...49 Using the Built-in Flash...50 Flash Mode ...51 ISO Sensitivity...54 Interval Timer Photography 56 Restoring Default Settings 58 P, S, A, and M Modes 61 Shutter Speed and Aperture 61 Mode P (Programmed Auto 62 Mode S (Shutter-Priority Auto 63 Mode A (Aperture-Priority Auto 64 Mode M (Manual...
... ...47 Image Quality ...47 Image Size...49 Using the Built-in Flash...50 Flash Mode ...51 ISO Sensitivity...54 Interval Timer Photography 56 Restoring Default Settings 58 P, S, A, and M Modes 61 Shutter Speed and Aperture 61 Mode P (Programmed Auto 62 Mode S (Shutter-Priority Auto 63 Mode A (Aperture-Priority Auto 64 Mode M (Manual...
Reference Manual
Page 9
...139 Connecting the Printer ...139 Printing Pictures One at a Time 140 Printing Multiple Pictures 142 Creating a DPOF Print Order: Print Set 144 Viewing Photographs on TV 146 Standard Definition Devices 146 High-Definition Devices ...147 Menu Guide 149 D The Playback Menu: Managing ...Folder ...152 Auto Distortion Control 153 Color Space...153 Long Exposure NR...154 High ISO NR ...154 ISO Sensitivity Settings 155 A Custom Settings: Fine-Tuning Camera Settings 156 Reset Custom Settings 157 a: Autofocus ...158 a1: AF-C Priority Selection 158 a2: Built-in AF-assist Illuminator 158 a3:...
...139 Connecting the Printer ...139 Printing Pictures One at a Time 140 Printing Multiple Pictures 142 Creating a DPOF Print Order: Print Set 144 Viewing Photographs on TV 146 Standard Definition Devices 146 High-Definition Devices ...147 Menu Guide 149 D The Playback Menu: Managing ...Folder ...152 Auto Distortion Control 153 Color Space...153 Long Exposure NR...154 High ISO NR ...154 ISO Sensitivity Settings 155 A Custom Settings: Fine-Tuning Camera Settings 156 Reset Custom Settings 157 a: Autofocus ...158 a1: AF-C Priority Selection 158 a2: Built-in AF-assist Illuminator 158 a3:...
Reference Manual
Page 10
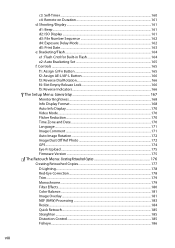
... Sequence 162 d4: Exposure Delay Mode 162 d5: Print Date...163 e: Bracketing/Flash...164 e1: Flash Cntrl for Built-in Flash 164 e2: Auto Bracketing Set 165 f: Controls ...165 f1: Assign E/Fn Button 165 f2: Assign AE-L/AF-L Button 166 f3: Reverse Dial Rotation 166 f4: Slot Empty Release Lock 166...
... Sequence 162 d4: Exposure Delay Mode 162 d5: Print Date...163 e: Bracketing/Flash...164 e1: Flash Cntrl for Built-in Flash 164 e2: Auto Bracketing Set 165 f: Controls ...165 f1: Assign E/Fn Button 165 f2: Assign AE-L/AF-L Button 166 f3: Reverse Dial Rotation 166 f4: Slot Empty Release Lock 166...
Reference Manual
Page 11
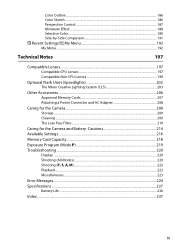
... Miniature Effect...188 Selective Color...189 Side-by-Side Comparison 191 m Recent Settings/O My Menu 192 My Menu ...192 Technical Notes 197 Compatible Lenses...197 Compatible CPU Lenses ...197 Compatible Non-CPU Lenses 199 Optional Flash Units (Speedlights 202 The Nikon Creative Lighting System (CLS 203 Other Accessories ...206 Approved Memory Cards...
... Miniature Effect...188 Selective Color...189 Side-by-Side Comparison 191 m Recent Settings/O My Menu 192 My Menu ...192 Technical Notes 197 Compatible Lenses...197 Compatible CPU Lenses ...197 Compatible Non-CPU Lenses 199 Optional Flash Units (Speedlights 202 The Nikon Creative Lighting System (CLS 203 Other Accessories ...206 Approved Memory Cards...
Reference Manual
Page 20
... 19 20 6 21 22 1 Viewfinder eyepiece 38 2 Rubber eyecup 38 3 G (menu) button .... 11, 149 Two-button reset button .... 58 4 Infrared receiver (rear) ......... 37 5 Monitor 4 Viewing settings 5 Live view 99 Full-frame playback......... 123 6 Tripod socket 7 Diopter adjustment control 23 8 P (information edit) button 5 Two-button reset button .... 58 9 A (AE-L/AF-L) button 44...
... 19 20 6 21 22 1 Viewfinder eyepiece 38 2 Rubber eyecup 38 3 G (menu) button .... 11, 149 Two-button reset button .... 58 4 Infrared receiver (rear) ......... 37 5 Monitor 4 Viewing settings 5 Live view 99 Full-frame playback......... 123 6 Tripod socket 7 Diopter adjustment control 23 8 P (information edit) button 5 Two-button reset button .... 58 9 A (AE-L/AF-L) button 44...

Reference Manual
Page 21
..., 120) (0 116, 118) • 1 Silhouette (0 117) • ( Miniature effect • 2 High key (0 117) (0 116, 119) • 3 Low key (0 117) Scene Modes The camera automatically optimizes settings to the scene being photographed. • k Portrait (0 30) • m Sports (0 31) • l Landscape (0 30) • n Close up (0 31) • p Child (0 31) • h: Other scenes (0 32... dial. The Mode Dial The camera offers a choice of the following shooting modes: P, S, A, and M Modes Select these modes for full control over Auto Modes camera settings.
..., 120) (0 116, 118) • 1 Silhouette (0 117) • ( Miniature effect • 2 High key (0 117) (0 116, 119) • 3 Low key (0 117) Scene Modes The camera automatically optimizes settings to the scene being photographed. • k Portrait (0 30) • m Sports (0 31) • l Landscape (0 30) • n Close up (0 31) • p Child (0 31) • h: Other scenes (0 32... dial. The Mode Dial The camera offers a choice of the following shooting modes: P, S, A, and M Modes Select these modes for full control over Auto Modes camera settings.
Reference Manual
Page 23
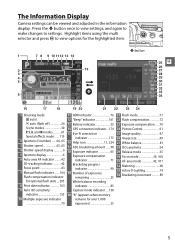
Press the P button once to view settings, and again to make changes to view options for the highlighted item. 1 7 8 9 10 11 12 13 14 P button 2 15 3 4 5 6 25 X 26 27 28 29 30 ... AF-area mode 42, 101 32 Metering 68 33 Active D-Lighting 74 34 Bracketing increment ...........89 5 Highlight items using the multi selector and press J to settings. The Information Display Camera settings can be viewed and adjusted in the information display.
Press the P button once to view settings, and again to make changes to view options for the highlighted item. 1 7 8 9 10 11 12 13 14 P button 2 15 3 4 5 6 25 X 26 27 28 29 30 ... AF-area mode 42, 101 32 Metering 68 33 Active D-Lighting 74 34 Bracketing increment ...........89 5 Highlight items using the multi selector and press J to settings. The Information Display Camera settings can be viewed and adjusted in the information display.

Reference Manual
Page 24
... choosing how long the monitor stays on choosing a design for the information display, see Info display format, (0 168). A See Also For information on , see Custom Setting c2 (Auto off automatically while the shutter-release button is replaced by pressing the R button again. For information on choosing whether information is rotated 90...
... choosing how long the monitor stays on choosing a design for the information display, see Info display format, (0 168). A See Also For information on , see Custom Setting c2 (Auto off automatically while the shutter-release button is replaced by pressing the R button again. For information on choosing whether information is rotated 90...

Reference Manual
Page 25
Choose a shutter speed (mode S or M; 0 63, 65). Command dial Mode dial Choose a special effect (q mode; 0 115). The Command Dial The command dial can be used with other controls to adjust a variety of aperture and shutter speed (mode P; 0 62). q mode Command dial Information display Mode P Command dial Information display Mode S or M Command dial Information display 7 M button Fn button E button X Choose a scene (h mode; 0 32). h mode Command dial Information display Choose a combination of settings when shooting information is displayed in the monitor.
Choose a shutter speed (mode S or M; 0 63, 65). Command dial Mode dial Choose a special effect (q mode; 0 115). The Command Dial The command dial can be used with other controls to adjust a variety of aperture and shutter speed (mode P; 0 62). q mode Command dial Information display Mode P Command dial Information display Mode S or M Command dial Information display 7 M button Fn button E button X Choose a scene (h mode; 0 32). h mode Command dial Information display Choose a combination of settings when shooting information is displayed in the monitor.

Reference Manual
Page 26
Set exposure compensation (mode P, S, or A; 0 70). Information display + + P, S, A, or M M button E button Command dial Information display 8 Mode A Command dial Information display + E button Command dial Information display + E button Command dial Information display + M button Command dial Adjust flash compensation (mode P, S, A, or M; 0 72). Choose an aperture X (mode M; 0 65). Mode M Mode P, S, or A Choose a flash mode (0 51). Choose an aperture (mode A; 0 64).
Set exposure compensation (mode P, S, or A; 0 70). Information display + + P, S, A, or M M button E button Command dial Information display 8 Mode A Command dial Information display + E button Command dial Information display + E button Command dial Information display + M button Command dial Adjust flash compensation (mode P, S, A, or M; 0 72). Choose an aperture X (mode M; 0 65). Mode M Mode P, S, or A Choose a flash mode (0 51). Choose an aperture (mode A; 0 64).

Reference Manual
Page 27
The role of the Fn button can be selected using Custom Setting f1 (Assign E/Fn button; 0 165), allowing the following settings to be adjusted by pressing the Fn + (E) button and rotating the command dial: Release mode (0 35) Fn (E) button Command dial Image quality/size (0 47) X ISO sensitivity (0 54) White balance (0 81) Active D-Lighting (0 74) Auto bracketing (0 88) 9
The role of the Fn button can be selected using Custom Setting f1 (Assign E/Fn button; 0 165), allowing the following settings to be adjusted by pressing the Fn + (E) button and rotating the command dial: Release mode (0 35) Fn (E) button Command dial Image quality/size (0 47) X ISO sensitivity (0 54) White balance (0 81) Active D-Lighting (0 74) Auto bracketing (0 88) 9

Reference Manual
Page 29
... setup options can be accessed from the following menus: • D: Playback (0 149) • C: Shooting (0 151) • A: Custom Settings (0 156) • B: Setup (0 167) G button X • N: Retouch (0 176) • m/O: Recent settings or My Menu (defaults to Recent settings; 0 192) Slider shows position in current menu. To view the menus, press the G button. Q (W) button 11 Current...
... setup options can be accessed from the following menus: • D: Playback (0 149) • C: Shooting (0 151) • A: Custom Settings (0 156) • B: Setup (0 167) G button X • N: Retouch (0 176) • m/O: Recent settings or My Menu (defaults to Recent settings; 0 192) Slider shows position in current menu. To view the menus, press the G button. Q (W) button 11 Current...

Reference Manual
Page 36
...both autofocus and manual focus modes. When the camera is panned, vibration reduction applies only to motion that is not part of 55 mm (Nikon measurements; This is not a malfunction, and can be turned off when the camera is securely mounted on if the tripod head is not ... which reduces blur caused by camera shake even when the camera is panned, allowing shutter speeds to be slowed by approximately 3 EV at the minimum setting (highest f-number). To remove the lens, press and hold the lens release button (q) while turning the lens clockwise (w). Vibration reduction is disabled while...
...both autofocus and manual focus modes. When the camera is panned, vibration reduction applies only to motion that is not part of 55 mm (Nikon measurements; This is not a malfunction, and can be turned off when the camera is securely mounted on if the tripod head is not ... which reduces blur caused by camera shake even when the camera is panned, allowing shutter speeds to be slowed by approximately 3 EV at the minimum setting (highest f-number). To remove the lens, press and hold the lens release button (q) while turning the lens clockwise (w). Vibration reduction is disabled while...

Reference Manual
Page 37
... or 2 to select an item, 1 or 3 to choose the order in hours) and press J. 4 Choose a date format. Press J to highlight On and press J. 6 Set the date and time. A time-zone selection dialog will be displayed. 2 Select a language. Daylight saving time options will be displayed. Daylight saving time is in.... Press 4 or 2 to shooting mode. 19 Press 1 or 3 to change. Basic Setup A language-selection dialog will be taken until you have set the time and date. 1 Turn the camera on. Photographs can not be displayed the first time the camera is turned on. The dialog shown at...
... or 2 to select an item, 1 or 3 to choose the order in hours) and press J. 4 Choose a date format. Press J to highlight On and press J. 6 Set the date and time. A time-zone selection dialog will be displayed. 2 Select a language. Daylight saving time options will be displayed. Daylight saving time is in.... Press 4 or 2 to shooting mode. 19 Press 1 or 3 to change. Basic Setup A language-selection dialog will be taken until you have set the time and date. 1 Turn the camera on. Photographs can not be displayed the first time the camera is turned on. The dialog shown at...

Reference Manual
Page 38
... displayed when the camera is turned on, the clock battery is less accurate than most watches and household clocks. X Set the clock to the correct time and date. Check the clock regularly against more accurate time pieces and reset as necessary when the main battery ... clock for about a month. A The Camera Clock The camera clock is exhausted and the clock has been reset. A The Setup Menu Language and date/time settings can be changed at any time using the Language (0 171) and Time zone and date (0 170) options in the setup menu.
... displayed when the camera is turned on, the clock battery is less accurate than most watches and household clocks. X Set the clock to the correct time and date. Check the clock regularly against more accurate time pieces and reset as necessary when the main battery ... clock for about a month. A The Camera Clock The camera clock is exhausted and the clock has been reset. A The Setup Menu Language and date/time settings can be changed at any time using the Language (0 171) and Time zone and date (0 170) options in the setup menu.

Reference Manual
Page 44
...-and-Shoot" Photography (i and j Modes) This section describes how to take photographs in i and j modes, automatic "point-and-shoot" modes in which the majority of settings are controlled by rotating the mode dial to i (auto). 3 Ready the camera. Remove the lens cap and turn the camera on . use of a flash is...
...-and-Shoot" Photography (i and j Modes) This section describes how to take photographs in i and j modes, automatic "point-and-shoot" modes in which the majority of settings are controlled by rotating the mode dial to i (auto). 3 Ready the camera. Remove the lens cap and turn the camera on . use of a flash is...


