S60 User's Manual
Page 9
... (Operation Controls)...10 Playback (Information Display)...11 HOME Screen Controls...12 Menu Screen...13 First Steps ...14 Charging the Battery ...14 Inserting the Battery ...16 Removing the Battery ...17 Turning On and Off the Camera...17 Setting Display Language, Date and Time 18 Inserting Memory Cards ...20 Removing Memory Cards...20 A Basic Photography and Playback: Auto Mode 22 Step 1 Turn the Camera On and Select A (Auto) Mode 22 Indicators Displayed in A (Auto) Mode 23 Step 2 Frame a Picture ...24 Using the Zoom...25 Step 3 Focus and Shoot ...26 Step 4 Playing Back and Deleting...
... (Operation Controls)...10 Playback (Information Display)...11 HOME Screen Controls...12 Menu Screen...13 First Steps ...14 Charging the Battery ...14 Inserting the Battery ...16 Removing the Battery ...17 Turning On and Off the Camera...17 Setting Display Language, Date and Time 18 Inserting Memory Cards ...20 Removing Memory Cards...20 A Basic Photography and Playback: Auto Mode 22 Step 1 Turn the Camera On and Select A (Auto) Mode 22 Indicators Displayed in A (Auto) Mode 23 Step 2 Frame a Picture ...24 Using the Zoom...25 Step 3 Focus and Shoot ...26 Step 4 Playing Back and Deleting...
S60 User's Manual
Page 11
...96 Deleting Sound Files...97 Copying Voice Recordings...98 Connecting to Televisions, Computers and Printers 99 Connecting to a TV...99 Connecting to a Computer...101 Before Connecting the Camera...101 Transferring Pictures from a Camera to a Computer 102 Connecting to a Printer...105 Connecting the Camera and Printer...106 Printing Pictures One at a Time ...107 Printing Multiple Pictures ...108 Creating a DPOF Print Order: Print Set 111 Creating a Print Order in Sort Mode ...113 d Shooting, Playback and Setup Menus 115 Shooting Options: The Shooting Menu 115 Displaying the Shooting Menu...
...96 Deleting Sound Files...97 Copying Voice Recordings...98 Connecting to Televisions, Computers and Printers 99 Connecting to a TV...99 Connecting to a Computer...101 Before Connecting the Camera...101 Transferring Pictures from a Camera to a Computer 102 Connecting to a Printer...105 Connecting the Camera and Printer...106 Printing Pictures One at a Time ...107 Printing Multiple Pictures ...108 Creating a DPOF Print Order: Print Set 111 Creating a Print Order in Sort Mode ...113 d Shooting, Playback and Setup Menus 115 Shooting Options: The Shooting Menu 115 Displaying the Shooting Menu...
S60 User's Manual
Page 13
... the Quick Start Guide. If a memory card is referred to as a "memory card." • The setting at the time of purchase is inserted, all those who use , to prevent damage to the pictures on the memory card and delete, playback and format operations will read it easier to as the "default setting." • The names of menu items displayed in the camera monitor, and the names of a Nikon COOLPIX S60 digital camera. Symbols and Conventions To make it...
... the Quick Start Guide. If a memory card is referred to as a "memory card." • The setting at the time of purchase is inserted, all those who use , to prevent damage to the pictures on the memory card and delete, playback and format operations will read it easier to as the "default setting." • The names of menu items displayed in the camera monitor, and the names of a Nikon COOLPIX S60 digital camera. Symbols and Conventions To make it...

S60 User's Manual
Page 33
... adapter • Do not use (A 145). Yes No • Do not turn the camera off the camera - Write protect switch B Memory Cards • Use only Secure Digital memory cards. • Do not perform the following during data transfer to a computer. First Steps Inserting Memory Cards B Formatting Memory Cards If the message at right is in the "lock" position, unlock it by sliding the switch to the "write" position to record or delete pictures, or to format the memory card. Take out the battery...
... adapter • Do not use (A 145). Yes No • Do not turn the camera off the camera - Write protect switch B Memory Cards • Use only Secure Digital memory cards. • Do not perform the following during data transfer to a computer. First Steps Inserting Memory Cards B Formatting Memory Cards If the message at right is in the "lock" position, unlock it by sliding the switch to the "write" position to record or delete pictures, or to format the memory card. Take out the battery...
S60 User's Manual
Page 41
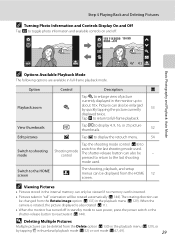
... power switch or the shutter-release button to the last shooting mode used . Switch to the HOME screen The shooting, playback, and setup a menus can also be displayed from the HOME 12 screen. C Viewing Pictures • Pictures stored in the internal memory can also be rotated automatically (A 144). Tap B to display 4, 9, 16, or 25 picture thumbnails. 52 Tap z to display the retouch menu. 54 Tap the shooting mode control (A 8) to Switch to shooting mode Shooting mode control switch to reactivate it (A 144). Option Playback zoom View...
... power switch or the shutter-release button to the last shooting mode used . Switch to the HOME screen The shooting, playback, and setup a menus can also be displayed from the HOME 12 screen. C Viewing Pictures • Pictures stored in the internal memory can also be rotated automatically (A 144). Tap B to display 4, 9, 16, or 25 picture thumbnails. 52 Tap z to display the retouch menu. 54 Tap the shooting mode control (A 8) to Switch to shooting mode Shooting mode control switch to reactivate it (A 144). Option Playback zoom View...
S60 User's Manual
Page 44
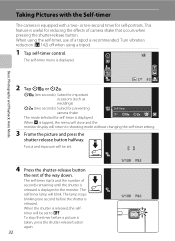
... the monitor display will be set to shooting mode without changing the self-timer setting. 3 Frame the picture and press the shutter-release button halfway. The self-timer menu is equipped with a two- Basic Photography and Playback: Auto Mode 9 2 Tap Y or Z. When using a tripod. 1 Tap self-timer control. The self-timer lamp will be set . 4 32 Press the shutter-release button the rest of camera shake that occurs when pressing the shutter-release button. Y (ten seconds): Suited for important occasions...
... the monitor display will be set to shooting mode without changing the self-timer setting. 3 Frame the picture and press the shutter-release button halfway. The self-timer menu is equipped with a two- Basic Photography and Playback: Auto Mode 9 2 Tap Y or Z. When using a tripod. 1 Tap self-timer control. The self-timer lamp will be set . 4 32 Press the shutter-release button the rest of camera shake that occurs when pressing the shutter-release button. Y (ten seconds): Suited for important occasions...
S60 User's Manual
Page 47
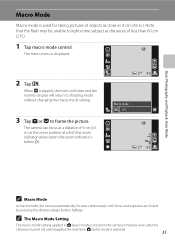
... and Playback: Auto Mode Macro Mode Macro mode is used for taking pictures of less than 60 cm (2 ft.). 1 Tap macro mode control. When d is before Q). 9 C Macro Mode In macro mode, the camera automatically focuses continuously until focus and exposure are locked by pressing the shutter-release button halfway. Macro mode 3 Tap e or f to light entire subject at which the zoom indicator glows green (the zoom indicator is tapped, the menu will close as close and the monitor display will return to shooting mode without changing the macro mode setting. The macro menu...
... and Playback: Auto Mode Macro Mode Macro mode is used for taking pictures of less than 60 cm (2 ft.). 1 Tap macro mode control. When d is before Q). 9 C Macro Mode In macro mode, the camera automatically focuses continuously until focus and exposure are locked by pressing the shutter-release button halfway. Macro mode 3 Tap e or f to light entire subject at which the zoom indicator glows green (the zoom indicator is tapped, the menu will close as close and the monitor display will return to shooting mode without changing the macro mode setting. The macro menu...
S60 User's Manual
Page 52
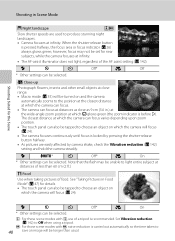
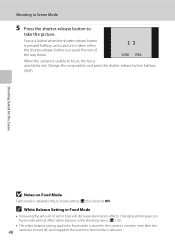
... be longer than 60 cm (2 ft.) u Food Use when taking pictures of food. When the shutter-release button is locked by camera shake, check the Vibration reduction (A 142) setting and hold the camera steadily. The closest distance at which C glows green (the zoom indicator is recommended. Note that the flash may not be set for details. • The touch panel can also be tapped...
... be longer than 60 cm (2 ft.) u Food Use when taking pictures of food. When the shutter-release button is locked by camera shake, check the Vibration reduction (A 142) setting and hold the camera steadily. The closest distance at which C glows green (the zoom indicator is recommended. Note that the flash may not be set for details. • The touch panel can also be tapped...
S60 User's Manual
Page 60
... B Notes on Food Mode Flash mode is selected. Shooting in the camera's memory even after the 48 camera is turned off, and reapplied the next time food mode is disabled. Focus is locked when the shutter-release button is pressed halfway, and a picture is taken when the shutter-release button is pressed the rest of red or blue will not affect white balance in the shooting menu (A 118). • The white balance setting applied in food...
... B Notes on Food Mode Flash mode is selected. Shooting in the camera's memory even after the 48 camera is turned off, and reapplied the next time food mode is disabled. Focus is locked when the shutter-release button is pressed halfway, and a picture is taken when the shutter-release button is pressed the rest of red or blue will not affect white balance in the shooting menu (A 118). • The white balance setting applied in food...

S60 User's Manual
Page 66
... picture function. • Cropped copies cannot be transferred to a computer. • Editing functions are available. Editing Pictures More on Playback Use the COOLPIX S60 to edit pictures in-camera and store them . • Copies created with the paint, stretch, perspective control, D-Lighting, or color options function can be modified only with the paint or small picture function. C Picture Editing • The editing functions of this camera is not enough free space in the internal memory...
... picture function. • Cropped copies cannot be transferred to a computer. • Editing functions are available. Editing Pictures More on Playback Use the COOLPIX S60 to edit pictures in-camera and store them . • Copies created with the paint, stretch, perspective control, D-Lighting, or color options function can be modified only with the paint or small picture function. C Picture Editing • The editing functions of this camera is not enough free space in the internal memory...

S60 User's Manual
Page 95
... • Only still pictures stored on the memory card can be played back on this camera or on a computer to which the camera is saved and the monitor display returns to 30 HD Pictmotion slide shows. Enjoying Slide Show Using HD Pictmotion 3 Tap e to change the settings, create a new HD Pictmotion slide show with COOLPIX S60 cannot be played back using another model of camera. • HD...
... • Only still pictures stored on the memory card can be played back on this camera or on a computer to which the camera is saved and the monitor display returns to 30 HD Pictmotion slide shows. Enjoying Slide Show Using HD Pictmotion 3 Tap e to change the settings, create a new HD Pictmotion slide show with COOLPIX S60 cannot be played back using another model of camera. • HD...
S60 User's Manual
Page 130
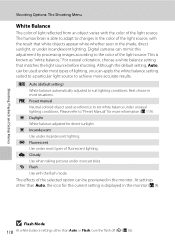
... this adjustment by processing images according to achieve more information (A 119). At settings other than Auto, the icon for direct sunlight. The human brain is displayed in the monitor. Digital cameras can be used as "white balance." Although the default setting, Auto, can apply the white balance setting suited to a particular light source to the color of the light source. Please refer to suit lighting conditions. For natural coloration, choose a white balance setting that white objects appear white...
... this adjustment by processing images according to achieve more information (A 119). At settings other than Auto, the icon for direct sunlight. The human brain is displayed in the monitor. Digital cameras can be used as "white balance." Although the default setting, Auto, can apply the white balance setting suited to a particular light source to the color of the light source. Please refer to suit lighting conditions. For natural coloration, choose a white balance setting that white objects appear white...
S60 User's Manual
Page 133
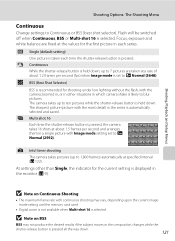
... the current image mode setting and the memory card used. • Digital zoom is not available when Multi-shot 16 is automatically selected and saved. U Single (default setting) One picture is pressed. W Multi-shot 16 Each time the shutter-release button is pressed, the camera takes 16 shots at the values for the current setting is pressed all the way down . Shooting, Playback and Setup Menus Shooting Options: The Shooting Menu Continuous Change settings to ten pictures while the shutter-release button is...
... the current image mode setting and the memory card used. • Digital zoom is not available when Multi-shot 16 is automatically selected and saved. U Single (default setting) One picture is pressed. W Multi-shot 16 Each time the shutter-release button is pressed, the camera takes 16 shots at the values for the current setting is pressed all the way down . Shooting, Playback and Setup Menus Shooting Options: The Shooting Menu Continuous Change settings to ten pictures while the shutter-release button is...
S60 User's Manual
Page 145
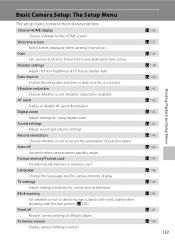
... . Reset all Restore camera settings to television. Basic Camera Setup: The Setup Menu The setup menu contains the following options. Blink warning Set whether or not to record the orientation of a picture taken. Firmware version Display camera firmware version. Auto off Set time before camera enters standby mode. Choose HOME display Choose a design for using digital zoom. AF assist Enable or disable AF-assist illumination. Language Choose the language used for connection to default values. Vibration reduction Choose whether or not vibration reduction is turned...
... . Reset all Restore camera settings to television. Basic Camera Setup: The Setup Menu The setup menu contains the following options. Blink warning Set whether or not to record the orientation of a picture taken. Firmware version Display camera firmware version. Auto off Set time before camera enters standby mode. Choose HOME display Choose a design for using digital zoom. AF assist Enable or disable AF-assist illumination. Language Choose the language used for connection to default values. Vibration reduction Choose whether or not vibration reduction is turned...
S60 User's Manual
Page 157
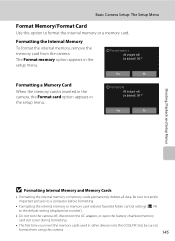
... formatting. • Formatting the internal memory or memory card restores favorites folder control settings (A 74) to the default setting (displayed as number). • Do not turn the camera off, disconnect the AC adapter, or open the battery-chamber/memory card slot cover during formatting. • The first time you insert the memory cards used in other devices into the COOLPIX S60, be deleted! Basic Camera Setup: The Setup Menu Format Memory/Format Card Use this camera. 145 Formatting the Internal Memory To format the internal memory, remove the memory card from the camera...
... formatting. • Formatting the internal memory or memory card restores favorites folder control settings (A 74) to the default setting (displayed as number). • Do not turn the camera off, disconnect the AC adapter, or open the battery-chamber/memory card slot cover during formatting. • The first time you insert the memory cards used in other devices into the COOLPIX S60, be deleted! Basic Camera Setup: The Setup Menu Format Memory/Format Card Use this camera. 145 Formatting the Internal Memory To format the internal memory, remove the memory card from the camera...
S60 User's Manual
Page 169
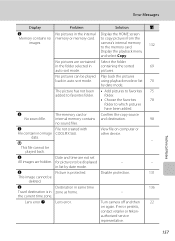
... HOME screen Memory contains no image data. using playback mode or list 70 by date mode. folder. • Choose the favorites 78 folder to be played Play back the pictures back in containing the sorted 69 auto sort mode. P This file cannot be deleted. View file on again. for pictures to which pictures have been added. Disable protection. 131 This image cannot be played back. Lens error Q Lens error. camera's internal memory to favorites folder. pictures. No pictures can be displayed - - N The memory card or Confirm the copy source No sound file...
... HOME screen Memory contains no image data. using playback mode or list 70 by date mode. folder. • Choose the favorites 78 folder to be played Play back the pictures back in containing the sorted 69 auto sort mode. P This file cannot be deleted. View file on again. for pictures to which pictures have been added. Disable protection. 131 This image cannot be played back. Lens error Q Lens error. camera's internal memory to favorites folder. pictures. No pictures can be displayed - - N The memory card or Confirm the copy source No sound file...

S60 User's Manual
Page 172
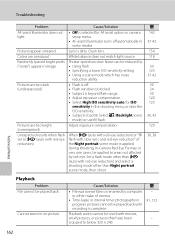
... internal memory or the memory card at the time the problem occurred. are blurred. • Use flash. 30 • Use ISO sensitivity>High ISO sensitivity 123 auto in the shooting menu. • Use vibration reduction. 142 • Use D (Best Shot Selector). 121 • Use tripod and self-timer. 32 Bright specks appear in the setup menu to turn it off manually. Pictures are displayed, press the shutter-release button. • Battery is exhausted. 22 • When flash control blinks, flash is charging. 31 Camera cannot focus...
... internal memory or the memory card at the time the problem occurred. are blurred. • Use flash. 30 • Use ISO sensitivity>High ISO sensitivity 123 auto in the shooting menu. • Use vibration reduction. 142 • Use D (Best Shot Selector). 121 • Use tripod and self-timer. 32 Bright specks appear in the setup menu to turn it off manually. Pictures are displayed, press the shutter-release button. • Battery is exhausted. 22 • When flash control blinks, flash is charging. 31 Camera cannot focus...
S60 User's Manual
Page 174
... ISO sensitivity auto for ISO sensitivity in image. Select o (Backlight scene mode) or use fill flash. Cannot zoom in progress: pictures cannot be played back until recording is complete. Colors are too bright (overexposed). Shutter speed too slow. Adjust exposure compensation. Playback zoom cannot be played back. Cause/Solution • File was overwritten or renamed by computer or other make of the Night portrait scene mode is backlit. Unexpected results when flash set to V (auto with red-eye...
... ISO sensitivity auto for ISO sensitivity in image. Select o (Backlight scene mode) or use fill flash. Cannot zoom in progress: pictures cannot be played back until recording is complete. Colors are too bright (overexposed). Shutter speed too slow. Adjust exposure compensation. Playback zoom cannot be played back. Cause/Solution • File was overwritten or renamed by computer or other make of the Night portrait scene mode is backlit. Unexpected results when flash set to V (auto with red-eye...

S60 User's Manual
Page 182
... display design 134 lights 134 metallic 134 I Identifier 151 170 Image mode 116 Image size 116 Incandescent 118 Intvl timer shooting 122 ISO sensitivity 123 J JPG 151 L Language 146 Lens 4, 165 Li-ion rechargable battery 14, 16 List by date mode 66 M Macro mode 35 Making voice recordings 94 Memory capacity 22, 117 Memory card 20, 150 Memory card slot 5, 20 Monitor 5, 154 Monitor settings 139 Movie menu 88 Movie playback 93 Movie settings 88 Multi connector 5, 99, 106 Multi-shot...
... display design 134 lights 134 metallic 134 I Identifier 151 170 Image mode 116 Image size 116 Incandescent 118 Intvl timer shooting 122 ISO sensitivity 123 J JPG 151 L Language 146 Lens 4, 165 Li-ion rechargable battery 14, 16 List by date mode 66 M Macro mode 35 Making voice recordings 94 Memory capacity 22, 117 Memory card 20, 150 Memory card slot 5, 20 Monitor 5, 154 Monitor settings 139 Movie menu 88 Movie playback 93 Movie settings 88 Multi connector 5, 99, 106 Multi-shot...
S60 User's Manual
Page 183
... Power 18, 22 Power switch 4, 22 Power-on lamp 4, 22 Preset manual 119 Print 107, 108, 111 Print Set 111 Printer 105 Protect 131 R Rechargable battery 150 Rechargable Li-ion battery 14, 16 Record orientation 144 Recording movies 87 Red-eye reduction 30, 31 Reset all 147 Rotate image 131 S Scene auto selector 43 Scene auto selector A 37 Scene mode 36, 37 Self-timer 32 Self-timer lamp 4, 32 Setup menu 133 Shooting 22, 24, 26 Shooting menu 115 Shutter sound 143 Shutter-release button...
... Power 18, 22 Power switch 4, 22 Power-on lamp 4, 22 Preset manual 119 Print 107, 108, 111 Print Set 111 Printer 105 Protect 131 R Rechargable battery 150 Rechargable Li-ion battery 14, 16 Record orientation 144 Recording movies 87 Red-eye reduction 30, 31 Reset all 147 Rotate image 131 S Scene auto selector 43 Scene auto selector A 37 Scene mode 36, 37 Self-timer 32 Self-timer lamp 4, 32 Setup menu 133 Shooting 22, 24, 26 Shooting menu 115 Shutter sound 143 Shutter-release button...


