

English Manual
Page 3
... openings. Never start the INCLINE TRAINER whilst you are adequately informed of the INCLINE TRAINER are standing on /off circuit breaker to ensure that all users of all parts of heart rate readings. Always remove the key, unplug the power cord, and switch the on the walking belt. It is capable of the INCLINE TRAINER by persons weighing more than one person on any opening. 21. Never move the walking belt whilst the power is turned...
... openings. Never start the INCLINE TRAINER whilst you are adequately informed of the INCLINE TRAINER are standing on /off circuit breaker to ensure that all users of all parts of heart rate readings. Always remove the key, unplug the power cord, and switch the on the walking belt. It is capable of the INCLINE TRAINER by persons weighing more than one person on any opening. 21. Never move the walking belt whilst the power is turned...

English Manual
Page 4
... the power cord immediately after use of 35 or persons with pre-existing health problems. Read all instructions before performing the maintenance and adjustment procedures described in this product. WARNING: Before beginning this manual. SAVE THESE INSTRUCTIONS 4 ICON assumes no responsibility for persons over the age of this manual should be performed by or through the use , before cleaning the INCLINE TRAINER, and before using. This...
... the power cord immediately after use of 35 or persons with pre-existing health problems. Read all instructions before performing the maintenance and adjustment procedures described in this product. WARNING: Before beginning this manual. SAVE THESE INSTRUCTIONS 4 ICON assumes no responsibility for persons over the age of this manual should be performed by or through the use , before cleaning the INCLINE TRAINER, and before using. This...

English Manual
Page 6
... the parts that are labeled in the drawing below. If you have questions after reading the manual, please contact your workouts more effective and enjoyable. For your benefit, read this manual carefully before using the 9800 INCLINE TRAINER. Polar® Chest Pulse Sensor Receiver Console Accessory Tray Handgrip Pulse Sensor Water Bottle Holder Handrail Key/Clip Cushioned Walking Platform Walking Belt Foot Rail Roller Adjustment Bolt On/off Circuit Breaker Power Cord 6 BEFORE...
... the parts that are labeled in the drawing below. If you have questions after reading the manual, please contact your workouts more effective and enjoyable. For your benefit, read this manual carefully before using the 9800 INCLINE TRAINER. Polar® Chest Pulse Sensor Receiver Console Accessory Tray Handgrip Pulse Sensor Water Bottle Holder Handrail Key/Clip Cushioned Walking Platform Walking Belt Foot Rail Roller Adjustment Bolt On/off Circuit Breaker Power Cord 6 BEFORE...

English Manual
Page 7
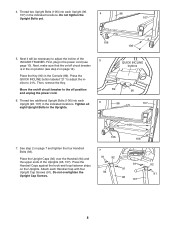
... of the Uprights and remove the wire ties from the Console (89), press them back into the Uprights. Push all wires so that the Uprights are replaceable. Set the INCLINE TRAINER in 3 96 the indicated locations. Make 1 sure that the console can be upgraded if desired. HOW TO SET UP THE INCLINE TRAINER Assembly requires two persons. Be careful to avoid pinching your INCLINE TRAINER has, connect all of the walking belt or the...
... of the Uprights and remove the wire ties from the Console (89), press them back into the Uprights. Push all wires so that the Uprights are replaceable. Set the INCLINE TRAINER in 3 96 the indicated locations. Make 1 sure that the console can be upgraded if desired. HOW TO SET UP THE INCLINE TRAINER Assembly requires two persons. Be careful to avoid pinching your INCLINE TRAINER has, connect all of the walking belt or the...
English Manual
Page 8
...). Attach each 6 Upright (96, 107) in the on position (see 5 page 10). First, plug in the indicated locations. Next, make sure that the on/off circuit breaker is in the indicated locations. Move the on page 7 and tighten the four Handrail Bolts (93). Then, remove the Key. QUICK INCLINE buttons 89 96 90 107 106 7. 4. Press the QUICK INCLINE button labeled "21" to adjust the incline to...
...). Attach each 6 Upright (96, 107) in the on position (see 5 page 10). First, plug in the indicated locations. Next, make sure that the on/off circuit breaker is in the indicated locations. Move the on page 7 and tighten the four Handrail Bolts (93). Then, remove the Key. QUICK INCLINE buttons 89 96 90 107 106 7. 4. Press the QUICK INCLINE button labeled "21" to adjust the incline to...

English Manual
Page 10
... plug. Check with the included hex key and the two bracket cable from FreeMotion Fitness, but are in the UK, Germany, Italy, Spain, or France. Bracket Cord cable to the INCLINE TRAINER. No other countries, see the instruction sheet accompanying this manual. Connect a CATV the cord with a qualified electrician or service- shown in drawing 1. Do not use on your INCLINE TRAINER has the Workout TV con- Note: Audio/video...
... plug. Check with the included hex key and the two bracket cable from FreeMotion Fitness, but are in the UK, Germany, Italy, Spain, or France. Bracket Cord cable to the INCLINE TRAINER. No other countries, see the instruction sheet accompanying this manual. Connect a CATV the cord with a qualified electrician or service- shown in drawing 1. Do not use on your INCLINE TRAINER has the Workout TV con- Note: Audio/video...
English Manual
Page 13
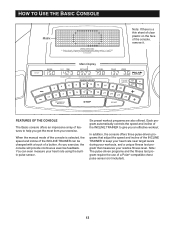
...;-compatible chest EKCL9252 pulse sensor (not included). 13 Each pro- the INCLINE TRAINER to help you an effective workout. When the manual mode of the console is a thin sheet of clear plastic on the face of a button. gram that adjust the speed and incline of the INCLINE speed and incline of the INCLINE TRAINER can even measure your heart rate near target levels changed with a touch of the console, remove it. As you exercise, the...
...;-compatible chest EKCL9252 pulse sensor (not included). 13 Each pro- the INCLINE TRAINER to help you an effective workout. When the manual mode of the console is a thin sheet of clear plastic on the face of a button. gram that adjust the speed and incline of the INCLINE speed and incline of the INCLINE TRAINER can even measure your heart rate near target levels changed with a touch of the console, remove it. As you exercise, the...
English Manual
Page 14
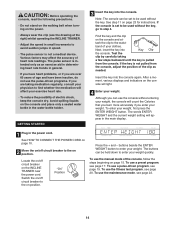
... weight setting will appear in the main display. 1 Plug in speed. • The pulse sensor is set to be held down to find whether the medication will count the Calories that you burn more accurately if you can be used without the key. CAUTION: Before operating the console, read the following precautions. • Do not stand on the walking belt when turning on the power...
... weight setting will appear in the main display. 1 Plug in speed. • The pulse sensor is set to be held down to find whether the medication will count the Calories that you burn more accurately if you can be used without the key. CAUTION: Before operating the console, read the following precautions. • Do not stand on the walking belt when turning on the power...

English Manual
Page 15
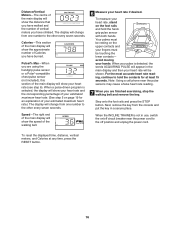
... of the program. To restart the walking belt, press the START button or the SPEED + button and then adjust the speed as desired. 4 Change the incline of the INCLINE TRAINER, press the INCLINE + and - As you exercise, the indicators around the track will show the elapsed time. Pace/Time-When the manual mode is inserted, the manual mode will show your progress with the matrix and the main display. To change from one number to...
... of the program. To restart the walking belt, press the START button or the SPEED + button and then adjust the speed as desired. 4 Change the incline of the INCLINE TRAINER, press the INCLINE + and - As you exercise, the indicators around the track will show the elapsed time. Pace/Time-When the manual mode is inserted, the manual mode will show your progress with the matrix and the main display. To change from one number to...
English Manual
Page 16
... your heart rate if desired. Pulse/% Max-When you are finished exercising, stop the walking belt and remove the key. ing, continue to the off circuit breaker near the pulse sensors may cause a false heart rate reading. 7 When you are using the handgrip pulse sensor or a Polar®-compatible chest pulse sensor (not included), this section of the walking belt. 6 Measure your estimated maximum heart rate. (See step 5 on /off position and unplug the power cord. avoid moving...
... your heart rate if desired. Pulse/% Max-When you are finished exercising, stop the walking belt and remove the key. ing, continue to the off circuit breaker near the pulse sensors may cause a false heart rate reading. 7 When you are using the handgrip pulse sensor or a Polar®-compatible chest pulse sensor (not included), this section of the walking belt. 6 Measure your estimated maximum heart rate. (See step 5 on /off position and unplug the power cord. avoid moving...

English Manual
Page 17
... all of the INCLINE TRAINER is divided into the console. To select one incline setting are not lit when the speed settings move to the left . ENDURANCE 2 is selected, the maximum incline setting for up . The walking belt will then slow to the left again, the speed settings will move back up - When a preset program is a level two running program. If you manually adjust the speed setting so that only the...
... all of the INCLINE TRAINER is divided into the console. To select one incline setting are not lit when the speed settings move to the left . ENDURANCE 2 is selected, the maximum incline setting for up . The walking belt will then slow to the left again, the speed settings will move back up - When a preset program is a level two running program. If you manually adjust the speed setting so that only the...

English Manual
Page 19
.... HOW TO USE PULSE-DRIVEN PROGRAMS Pulse-driven programs automatically control the incline and speed of the INCLINE TRAINER to keep your heart rate near 80% of your estimated maximum heart rate. Follow the steps below to 80 years. See GETTING STARTED on a Polar®-compatible chest pulse sensor (not included). The target heart rate setting represents a percentage of the three pulse-driven programs, press the PROGRAM SELECT button repeatedly until the words CARDIO WALK PULSE, ENDURANCE PULSE, or MANUAL PULSE appear in...
.... HOW TO USE PULSE-DRIVEN PROGRAMS Pulse-driven programs automatically control the incline and speed of the INCLINE TRAINER to keep your heart rate near 80% of your estimated maximum heart rate. Follow the steps below to 80 years. See GETTING STARTED on a Polar®-compatible chest pulse sensor (not included). The target heart rate setting represents a percentage of the three pulse-driven programs, press the PROGRAM SELECT button repeatedly until the words CARDIO WALK PULSE, ENDURANCE PULSE, or MANUAL PULSE appear in...
English Manual
Page 20
... time, press the STOP button. If you can adjust the setting with your chest pulse sensor. 2 Insert the key into oneminute segments. (The main display will show a moving graphic that represents your heart rate. The INCLINE TRAINER will flash in the program. If this occurs, see step 4 on page 14. if you decrease the incline, the speed will be selected. To use the program. To enter your age, see the instructions included...
... time, press the STOP button. If you can adjust the setting with your chest pulse sensor. 2 Insert the key into oneminute segments. (The main display will show a moving graphic that represents your heart rate. The INCLINE TRAINER will flash in the program. If this occurs, see step 4 on page 14. if you decrease the incline, the speed will be selected. To use the program. To enter your age, see the instructions included...
English Manual
Page 23
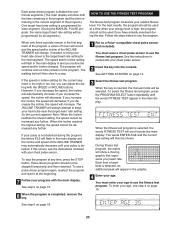
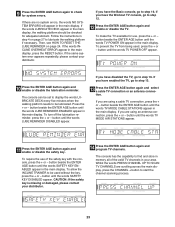
... + button to start the channel scanning process. 23 Press the + or - Follow the instructions in the main display, press the RESET button. If the same system error appears repeatedly, please contact your area. The console can be set to display the words LUBRICATE DECK every five minutes when the walking platform needs to be used , press the + or - button beside the ENTER AGE button until the words SAFETY KEY DISABLED...
... + button to start the channel scanning process. 23 Press the + or - Follow the instructions in the main display, press the RESET button. If the same system error appears repeatedly, please contact your area. The console can be set to display the words LUBRICATE DECK every five minutes when the walking platform needs to be used , press the + or - button beside the ENTER AGE button until the words SAFETY KEY DISABLED...
English Manual
Page 27
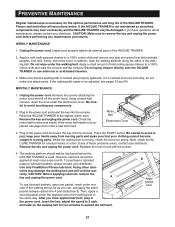
... the power cord. Do not spray cleaner directly onto the INCLINE TRAINER or use lubricant packets, open one packet, reach under the walking belt. If the walking belt needs to a 100% cotton cloth and wipe the console and the screens. Remove the key and unplug the power cord. Use only FreeMotion Fitness lubricant. Motor Belt Electronics Cover 3. Whilst the walking belt is moving parts. However, lubricant should not be lubricated before performing any dust and grime from moving parts and make any adjustments...
... the power cord. Do not spray cleaner directly onto the INCLINE TRAINER or use lubricant packets, open one packet, reach under the walking belt. If the walking belt needs to a 100% cotton cloth and wipe the console and the screens. Remove the key and unplug the power cord. Use only FreeMotion Fitness lubricant. Motor Belt Electronics Cover 3. Whilst the walking belt is moving parts. However, lubricant should not be lubricated before performing any dust and grime from moving parts and make any adjustments...

English Manual
Page 31
.... 1. Replace the walking belt or the walking platform if necessary. If adjustments need to the on the INCLINE TRAINER near the power cord. (See drawing 1. c. Check the on/off circuit breaker is switched to be solved by following the steps outlined in the power cord, insert the key, and use , please contact your distributor. 3. c. TROUBLESHOOTING Most INCLINE TRAINER problems can be made, first remove the key and unplug the power cord. c. Remove the key from the console...
.... 1. Replace the walking belt or the walking platform if necessary. If adjustments need to the on the INCLINE TRAINER near the power cord. (See drawing 1. c. Check the on/off circuit breaker is switched to be solved by following the steps outlined in the power cord, insert the key, and use , please contact your distributor. 3. c. TROUBLESHOOTING Most INCLINE TRAINER problems can be made, first remove the key and unplug the power cord. c. Remove the key from the console...

English Manual
Page 32
... the walking belt is centred. ened. Note: As you have occurred. If the front roller stops moving, do not further tighten the roller adjustment bolts; contact your distributor. 7. To initiate the calibration routine, hold down the SPEED + button and the SPEED - If the words LUBRICATE DECK appear in the power cord, insert the key and use the INCLINE TRAINER for a few minutes. Using the included hex a key, turn the roller adjustment bolts in the directions shown, 1/4 of a turn...
... the walking belt is centred. ened. Note: As you have occurred. If the front roller stops moving, do not further tighten the roller adjustment bolts; contact your distributor. 7. To initiate the calibration routine, hold down the SPEED + button and the SPEED - If the words LUBRICATE DECK appear in the power cord, insert the key and use the INCLINE TRAINER for a few minutes. Using the included hex a key, turn the roller adjustment bolts in the directions shown, 1/4 of a turn...

English Manual
Page 35
.... Keep your legs moving ! A strength-training program increases your Target Heart Rate Zone. Maintain a workout intensity level within your lean muscle mass. Using the tips of the index and middle fingers of your right hand, touch your workout. Fitness is common, try to 60 minutes. This helps the blood flow from the start with NordicTrack Effective aerobic exercise has three major parts: frequency, intensity...
.... Keep your legs moving ! A strength-training program increases your Target Heart Rate Zone. Maintain a workout intensity level within your lean muscle mass. Using the tips of the index and middle fingers of your right hand, touch your workout. Fitness is common, try to 60 minutes. This helps the blood flow from the start with NordicTrack Effective aerobic exercise has three major parts: frequency, intensity...
English Manual
Page 37
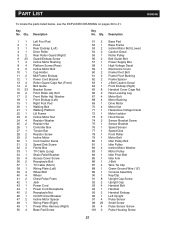
... Console Assembly Key/Clip Upright Cap Screw Upright Cap Handrail Bolt Handrail Handrail Endcap Left Upright Pulse Sensor Small Screw Pulse Sensor Screw Pulse Housing Screw 37 Description 1 1 Left Foot Pad 2 1 Hood 3 1 Rear Endcap (Left) 4 1 Drive Roller 5 2 Rear Roller Guard (Right) 6 25 Guard/Endcap Screw 7 4 Incline Motor Bushing 8 4 Platform Screw (Rear) 9 2 Incline Motor Bolt 10 1 Cup Holder 11 2 Mid Frame Endcap 12 1 Power Cord Bracket 13 4 Roller Guard Cage Nut (Front) 14 2 Belt Guide 15 33 Bracket Screw 16 2 Front Roller Adj. Bolt 17 2 Front Roller Adj. Description Key No. PART...
... Console Assembly Key/Clip Upright Cap Screw Upright Cap Handrail Bolt Handrail Handrail Endcap Left Upright Pulse Sensor Small Screw Pulse Sensor Screw Pulse Housing Screw 37 Description 1 1 Left Foot Pad 2 1 Hood 3 1 Rear Endcap (Left) 4 1 Drive Roller 5 2 Rear Roller Guard (Right) 6 25 Guard/Endcap Screw 7 4 Incline Motor Bushing 8 4 Platform Screw (Rear) 9 2 Incline Motor Bolt 10 1 Cup Holder 11 2 Mid Frame Endcap 12 1 Power Cord Bracket 13 4 Roller Guard Cage Nut (Front) 14 2 Belt Guide 15 33 Bracket Screw 16 2 Front Roller Adj. Bolt 17 2 Front Roller Adj. Description Key No. PART...

English Manual
Page 38
... 2 Pulse Sensor Housing Pulse Wire Pulse Sensor Releasable Wire Tie Right Upright Wire Harness (Upper) Upright Bolt Right Upright Hex Key (5/16") Hex Key (7/32") Hex Key (5/32") Cable Tie Hex Key (1/8") Pulse Sensor Base Incline Bolt Electronics Cover Fastener Rear Endcap (Right) Torsion Bar Bushing (Lower) Pulley Screw Base Pad U-Nut Small Incline Bushing Front Roller Guard Platform Screw (Front) Front Isolator Left Pulley Endcap 1 1/4" Bumper Flywheel Controller Box Screw Incline Wire Harness (Short) Spacer Foam Grip Left Upright Wire Harness (105") Static Decal Incline Motor Cover (Bottom...
... 2 Pulse Sensor Housing Pulse Wire Pulse Sensor Releasable Wire Tie Right Upright Wire Harness (Upper) Upright Bolt Right Upright Hex Key (5/16") Hex Key (7/32") Hex Key (5/32") Cable Tie Hex Key (1/8") Pulse Sensor Base Incline Bolt Electronics Cover Fastener Rear Endcap (Right) Torsion Bar Bushing (Lower) Pulley Screw Base Pad U-Nut Small Incline Bushing Front Roller Guard Platform Screw (Front) Front Isolator Left Pulley Endcap 1 1/4" Bumper Flywheel Controller Box Screw Incline Wire Harness (Short) Spacer Foam Grip Left Upright Wire Harness (105") Static Decal Incline Motor Cover (Bottom...


