

English Manual
Page 3
... treadmill only as an exercise aid in determining heart rate trends in speed. 17. Do not wear loose clothes that the storage latch is intended only as described. 3. Do not use . (See the drawing on page 5 for both men and women. The pulse sensor is fully closed. 3 If the control system is properly assembled. (See ASSEMBLY on page 6, and HOW TO FOLD AND MOVE THE TREADMILL...
... treadmill only as an exercise aid in determining heart rate trends in speed. 17. Do not wear loose clothes that the storage latch is intended only as described. 3. Do not use . (See the drawing on page 5 for both men and women. The pulse sensor is fully closed. 3 If the control system is properly assembled. (See ASSEMBLY on page 6, and HOW TO FOLD AND MOVE THE TREADMILL...
English Manual
Page 4
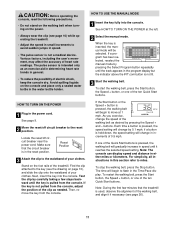
... remove the motor hood unless instructed to do so by pressing the speed and incline buttons. Do not use of this or any exercise program, consult your physician. This is missing or illegible, please call our Customer Service Department, toll-free, to the next settings of children. In some instances, the speed and/or incline may change . 23. When using iFIT.com CDs and videos, you can manually override the speed and incline settings...
... remove the motor hood unless instructed to do so by pressing the speed and incline buttons. Do not use of this or any exercise program, consult your physician. This is missing or illegible, please call our Customer Service Department, toll-free, to the next settings of children. In some instances, the speed and/or incline may change . 23. When using iFIT.com CDs and videos, you can manually override the speed and incline settings...

English Manual
Page 5
... product model number and serial number before using the treadmill. at 1-888-825-2588, Monday through Friday, 6 a.m. Mountain Time (excluding holidays). Aromatherapy Bottle Holder Fan Handrail Book Holder Latch Knob Water Bottle Holder* Console Pulse Sensor Key/Clip RIGHT SIDE Walking Belt Foot Rail On/Off Circuit Breaker Power Cord Cushion Deck Rear Roller Adjustment Bolts *No water bottle is NTL10940. until 6 p.m. To help you get the most from your exercise program...
... product model number and serial number before using the treadmill. at 1-888-825-2588, Monday through Friday, 6 a.m. Mountain Time (excluding holidays). Aromatherapy Bottle Holder Fan Handrail Book Holder Latch Knob Water Bottle Holder* Console Pulse Sensor Key/Clip RIGHT SIDE Walking Belt Foot Rail On/Off Circuit Breaker Power Cord Cushion Deck Rear Roller Adjustment Bolts *No water bottle is NTL10940. until 6 p.m. To help you get the most from your exercise program...

English Manual
Page 7
... holes in the Handrail. Note: Attach the lower Screw (without the Base Pad) first. Use the Base Pad to adjust the walking belt (see page 26). Connect the Upright Wire Harness to twist the Handrail as shown. Next, align the lower ends of the Handrails (118) with a 4" Bolt (53) as you use the treadmill. The allen wrench is used to replace any Base Pad that matches...
... holes in the Handrail. Note: Attach the lower Screw (without the Base Pad) first. Use the Base Pad to adjust the walking belt (see page 26). Connect the Upright Wire Harness to twist the Handrail as shown. Next, align the lower ends of the Handrails (118) with a 4" Bolt (53) as you use the treadmill. The allen wrench is used to replace any Base Pad that matches...

English Manual
Page 9
... before using an adapter. 9 Contact a qualified electrician to the control system of 450 joules. OPERATION AND ADJUSTMENT THE PERFORMANT LUBETM WALKING BELT Your treadmill features a walking belt coated with your local NordicTrack dealer or call 1-800-806- 3651 and order part number 146148. If it must be held in damage to determine if the outlet box cover is damaged, the walking belt may change speed or stop unexpectedly...
... before using an adapter. 9 Contact a qualified electrician to the control system of 450 joules. OPERATION AND ADJUSTMENT THE PERFORMANT LUBETM WALKING BELT Your treadmill features a walking belt coated with your local NordicTrack dealer or call 1-800-806- 3651 and order part number 146148. If it must be held in damage to determine if the outlet box cover is damaged, the walking belt may change speed or stop unexpectedly...

English Manual
Page 10
... is selected, the speed and incline of the treadmill can be available. iFIT.com CD and video programs automatically control the speed and incline of the treadmill as a personal trainer coaches you through every step of the treadmill as it . Note: For information about an optional chest pulse sensor, see page 21. 10 Each program automatically controls the speed and incline of your home. To create and use the manual mode of features to be...
... is selected, the speed and incline of the treadmill can be available. iFIT.com CD and video programs automatically control the speed and incline of the treadmill as a personal trainer coaches you through every step of the treadmill as it . Note: For information about an optional chest pulse sensor, see page 21. 10 Each program automatically controls the speed and incline of your home. To create and use the manual mode of features to be...
English Manual
Page 11
... console. If the Start button or the Speed + button is used, observe the alignment of the walking belt, and align it reaches the selected speed setting. Note: During the first few steps backward until the key is pressed, the walking belt will begin to flash in the Time/Pace display. The pulse sensor is inserted, the manual mode will begin to move at the left. 2 Select the manual mode. HOW TO TURN ON THE POWER 1 Plug...
... console. If the Start button or the Speed + button is used, observe the alignment of the walking belt, and align it reaches the selected speed setting. Note: During the first few steps backward until the key is pressed, the walking belt will begin to flash in the Time/Pace display. The pulse sensor is inserted, the manual mode will begin to move at the left. 2 Select the manual mode. HOW TO TURN ON THE POWER 1 Plug...
English Manual
Page 12
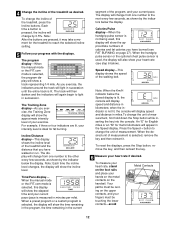
... display speed and distance in minutes per mile). The Training Zone display-As you have burned (see step 6 below the display. When the desired unit of measurement, first hold down the Stop button while inserting the key into the console. Incline/Distance display-This display shows the incline level of the treadmill and the distance that you exercise, the Training Zone display will show the approximate intensity level of the walking belt. To reset the displays, press...
... display speed and distance in minutes per mile). The Training Zone display-As you have burned (see step 6 below the display. When the desired unit of measurement, first hold down the Stop button while inserting the key into the console. Incline/Distance display-This display shows the incline level of the treadmill and the distance that you exercise, the Training Zone display will show the approximate intensity level of the walking belt. To reset the displays, press...

English Manual
Page 13
... segment.) One speed setting and one incline setting are pro- A moment after the button is raised to the storage position or the treadmill will automatically adjust to the lowest level. Hold the handrails and begin walking. gram display. (The incline settings are finished using the treadmill, switch the reset/off position and unplug the power cord. To turn off the demo mode. The incline must be damaged. Each program is detected, the Pulse indicator will...
... segment.) One speed setting and one incline setting are pro- A moment after the button is raised to the storage position or the treadmill will automatically adjust to the lowest level. Hold the handrails and begin walking. gram display. (The incline settings are finished using the treadmill, switch the reset/off position and unplug the power cord. To turn off the demo mode. The incline must be damaged. Each program is detected, the Pulse indicator will...
English Manual
Page 14
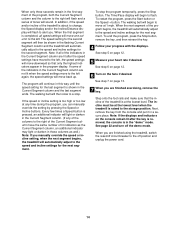
... Incline/Distance display will flash to alert you are finished using the treadmill, switch the reset/off circuit breaker to the off the demo mode. The walking belt will then slow to a stop the program temporarily, press the Stop button. The Time/Pace display will begin to flash. See step 5 on page 13. 7 When you manually override the speed or incline setting, when the next segment begins, the treadmill will automatically adjust to the speed...
... Incline/Distance display will flash to alert you are finished using the treadmill, switch the reset/off circuit breaker to the off the demo mode. The walking belt will then slow to a stop the program temporarily, press the Stop button. The Time/Pace display will begin to flash. See step 5 on page 13. 7 When you manually override the speed or incline setting, when the next segment begins, the treadmill will automatically adjust to the speed...
English Manual
Page 15
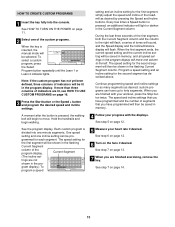
... Speed + button and program the desired speed and incline settings. To select a custom program, press the Select Program button repeatedly until the Learn 1 or Learn 2 indicator lights. Every few times a Speed button is inserted, the manual mode will begin walking. The speed setting for the first segment, simply adjust the speed and incline of the treadmill as described above. Program a speed setting and an incline setting for the first segment will flash. When you are finished exercising, remove...
... Speed + button and program the desired speed and incline settings. To select a custom program, press the Select Program button repeatedly until the Learn 1 or Learn 2 indicator lights. Every few times a Speed button is inserted, the manual mode will begin walking. The speed setting for the first segment, simply adjust the speed and incline of the treadmill as described above. Program a speed setting and an incline setting for the first segment will flash. When you are finished exercising, remove...

English Manual
Page 16
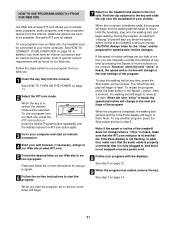
... to the right will flash, a series of the program begins, the treadmill will move at 1 mph. Then, press the Start button and program speed and incline settings for as many segments as desired. When you can redefine the program while using it. To restart the program, press the Start button or the Speed + button. The walking belt will be shown in the program display, see HOW TO CREATE A CUSTOM PROGRAM on page 12. 5 Measure...
... to the right will flash, a series of the program begins, the treadmill will move at 1 mph. Then, press the Start button and program speed and incline settings for as many segments as desired. When you can redefine the program while using it. To restart the program, press the Start button or the Speed + button. The walking belt will be shown in the program display, see HOW TO CREATE A CUSTOM PROGRAM on page 12. 5 Measure...

English Manual
Page 19
... the console. If you when the speed and/or incline of the audio cable into your VCR. To use an iFIT.com CD or video program. Plug one end of the treadmill is connected to a CD or video program when the Time/Pace display is being used, see HOW TO CONNECT YOUR HOME STEREO on your VCR. When the key is inserted, the manual mode will not respond to your personal trainer's instructions...
... the console. If you when the speed and/or incline of the audio cable into your VCR. To use an iFIT.com CD or video program. Plug one end of the treadmill is connected to a CD or video program when the Time/Pace display is being used, see HOW TO CONNECT YOUR HOME STEREO on your VCR. When the key is inserted, the manual mode will not respond to your personal trainer's instructions...

English Manual
Page 20
... a power cord. • If you can manually override the settings at any time by pressing the Speed or Incline buttons on the console. If the volume is too high or too low, the console may not detect the program signals. • Make sure that the audio cable is properly connected, that it is fully plugged in, and that the Time/Pace display is completed, the walking belt will stop...
... a power cord. • If you can manually override the settings at any time by pressing the Speed or Incline buttons on the console. If the volume is too high or too low, the console may not detect the program signals. • Make sure that the audio cable is properly connected, that it is fully plugged in, and that the Time/Pace display is completed, the walking belt will stop...
English Manual
Page 21
... lit and that it is fully plugged in, and that the Time/Pace display is about to flash. See step 7 on page 12. 9 When the program has ended, remove the key. During the program, an electronic "chirping" sound will stop the walking belt at any time by pressing the Speed or Incline buttons on -line instructions to move at www.iFIT.com allows you must be selected...
... lit and that it is fully plugged in, and that the Time/Pace display is about to flash. See step 7 on page 12. 9 When the program has ended, remove the key. During the program, an electronic "chirping" sound will stop the walking belt at any time by pressing the Speed or Incline buttons on -line instructions to move at www.iFIT.com allows you must be selected...
English Manual
Page 26
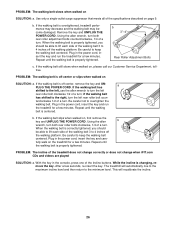
.... b 3"-4" Rear Roller Adjustment Bolts c. if the walking belt has shifted to 4 inches off the walking platform. The treadmill will recalibrate the incline. 26 When the walking belt is properly tightened. If the walking belt slips when walked on SOLUTION: a. This will automatically rise to the maximum incline level and then return to overtighten the walking belt. Plug in the console, press one of the treadmill does not change correctly or does not change when iFIT.com...
.... b 3"-4" Rear Roller Adjustment Bolts c. if the walking belt has shifted to 4 inches off the walking platform. The treadmill will recalibrate the incline. 26 When the walking belt is properly tightened. If the walking belt slips when walked on SOLUTION: a. This will automatically rise to the maximum incline level and then return to overtighten the walking belt. Plug in the console, press one of the treadmill does not change correctly or does not change when iFIT.com...

English Manual
Page 27
... post-exercise problems. EXERCISE FREQUENCY To maintain or improve your pulse in preparation for exercise. A Cool-down . CONDITIONING GUIDELINES WARNING: Before beginning this or any exercise program, consult your heart rate during exercise, use stored fat calories for energy. For maximum fat burning, adjust the speed and incline of the treadmill until your training zone. For aerobic exercise, adjust the speed and incline of the treadmill until your pulse is to use the pulse sensor...
... post-exercise problems. EXERCISE FREQUENCY To maintain or improve your pulse in preparation for exercise. A Cool-down . CONDITIONING GUIDELINES WARNING: Before beginning this or any exercise program, consult your heart rate during exercise, use stored fat calories for energy. For maximum fat burning, adjust the speed and incline of the treadmill until your training zone. For aerobic exercise, adjust the speed and incline of the treadmill until your pulse is to use the pulse sensor...

English Manual
Page 30
... Screw Left Foot Rail Cap Frame Pivot Bolt Frame Pivot Spacer Magnet Front Roller/Pulley Frame Pivot Nut Reed Switch/Sensor Wire U-nut Reed Switch Clip Lift Frame Walking Belt Motor Assembly Motor Pulley/Flywheel/Fan Motor Belt Motor Pivot Nut Motor Tension Nut Incline Motor Bolt (Top) Motor Pivot Bolt Hood Incline Motor Bolt (Lower) Motor Tension Bolt Hole Plug Screw Transformer Controller Electronics Plate Motor Controller Wire Front Roller Adj. Key No. NTL10940 R1003B To locate the parts listed below, see the EXPLODED DRAWING attached in the center of this manual. PART LIST-Model...
... Screw Left Foot Rail Cap Frame Pivot Bolt Frame Pivot Spacer Magnet Front Roller/Pulley Frame Pivot Nut Reed Switch/Sensor Wire U-nut Reed Switch Clip Lift Frame Walking Belt Motor Assembly Motor Pulley/Flywheel/Fan Motor Belt Motor Pivot Nut Motor Tension Nut Incline Motor Bolt (Top) Motor Pivot Bolt Hood Incline Motor Bolt (Lower) Motor Tension Bolt Hole Plug Screw Transformer Controller Electronics Plate Motor Controller Wire Front Roller Adj. Key No. NTL10940 R1003B To locate the parts listed below, see the EXPLODED DRAWING attached in the center of this manual. PART LIST-Model...

English Manual
Page 31
... SERIAL NUMBER OF THE PRODUCT (see the PART LIST on pages 30 and 31 and the EXPLODED DRAWING attached in box # These parts are not illustrated ORDERING REPLACEMENT PARTS To order replacement parts, call our Customer Service Department toll-free at 1-888-825-2588, Monday through Friday, 6 a.m. Description 119 2 120 1 121 1 # 2 # 1 # 1 # 1 # 1 # 1 # 1 # 1 # 1 # 1 Handrail Foam Left Rear Foot Right Rear Foot Thick Base Pad 14" Blue Wire...
... SERIAL NUMBER OF THE PRODUCT (see the PART LIST on pages 30 and 31 and the EXPLODED DRAWING attached in box # These parts are not illustrated ORDERING REPLACEMENT PARTS To order replacement parts, call our Customer Service Department toll-free at 1-888-825-2588, Monday through Friday, 6 a.m. Description 119 2 120 1 121 1 # 2 # 1 # 1 # 1 # 1 # 1 # 1 # 1 # 1 # 1 Handrail Foam Left Rear Foot Right Rear Foot Thick Base Pad 14" Blue Wire...
English Manual
Page 34
... revenues or profits, loss of enjoyment or use, costs of removal, installation or other rights which vary from our Customer Service Department; notify our Customer Service Department of any implied warranties of purchase. Some states do not allow limitations on your User's Manual ("Manual"). The belt and deck are performed by an ICON trained and authorized service provider, or, at 1-888-825-2588 and...
... revenues or profits, loss of enjoyment or use, costs of removal, installation or other rights which vary from our Customer Service Department; notify our Customer Service Department of any implied warranties of purchase. Some states do not allow limitations on your User's Manual ("Manual"). The belt and deck are performed by an ICON trained and authorized service provider, or, at 1-888-825-2588 and...


