

Instruction Manual
Page 2
... Note: The decals may not be shown at actual size. If a decal is a trademark or registered trademark of the warning decals. NORDICTRACK and IFIT are registered trademarks of ICON Health & Fitness, Inc. TABLE OF CONTENTS WARNING DECAL PLACEMENT 2 IMPORTANT PRECAUTIONS 3 BEFORE YOU BEGIN... 5 PART IDENTIFICATION CHART 6 ASSEMBLY 7 HOW TO USE THE TREADMILL 17 HOW TO FOLD AND MOVE THE TREADMILL 29 MAINTENANCE AND TROUBLESHOOTING 30 EXERCISE GUIDELINES 33 PART LIST 34 EXPLODED DRAWING 36 ORDERING REPLACEMENT PARTS Back Cover ...
... Note: The decals may not be shown at actual size. If a decal is a trademark or registered trademark of the warning decals. NORDICTRACK and IFIT are registered trademarks of ICON Health & Fitness, Inc. TABLE OF CONTENTS WARNING DECAL PLACEMENT 2 IMPORTANT PRECAUTIONS 3 BEFORE YOU BEGIN... 5 PART IDENTIFICATION CHART 6 ASSEMBLY 7 HOW TO USE THE TREADMILL 17 HOW TO FOLD AND MOVE THE TREADMILL 29 MAINTENANCE AND TROUBLESHOOTING 30 EXERCISE GUIDELINES 33 PART LIST 34 EXPLODED DRAWING 36 ORDERING REPLACEMENT PARTS Back Cover ...
Instruction Manual
Page 3
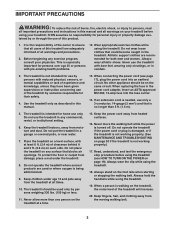
...openings. Do not use only. Never move the walking belt while the power is not working properly.) 17. Always wear the clip while using the treadmill. Always stand on any commercial, rental, or institutional setting. 6. When a person is being administered. 9. ICON assumes no longer than one person ...or carpet from heated surfaces. 16. Keep the power cord away from damage, place a mat under age 13 and pets away from the treadmill at all warnings and precautions. 2. Read, understand, and test the emergency stop procedure before using your physician. It is especially important for ...
...openings. Do not use only. Never move the walking belt while the power is not working properly.) 17. Always wear the clip while using the treadmill. Always stand on any commercial, rental, or institutional setting. 6. When a person is being administered. 9. ICON assumes no longer than one person ...or carpet from heated surfaces. 16. Keep the power cord away from damage, place a mat under age 13 and pets away from the treadmill at all warnings and precautions. 2. Read, understand, and test the emergency stop procedure before using your physician. It is especially important for ...

Instruction Manual
Page 4
... use , before performing the maintenance and adjustment procedures described in serious injury or death. Inspect and properly tighten all parts each time the treadmill is not a medical device. Over exercising may affect the accuracy of heart rate readings. SAVE THESE INSTRUCTIONS 4 Various factors, including the...Do not change the incline of high speeds. Always unplug the power cord immediately after use . 24. ing the treadmill, and before clean- The treadmill is intended only as an exercise aid in determining heart rate trends in this manual. The heart rate monitor is ...
... use , before performing the maintenance and adjustment procedures described in serious injury or death. Inspect and properly tighten all parts each time the treadmill is not a medical device. Over exercising may affect the accuracy of heart rate readings. SAVE THESE INSTRUCTIONS 4 Various factors, including the...Do not change the incline of high speeds. Always unplug the power cord immediately after use . 24. ing the treadmill, and before clean- The treadmill is intended only as an exercise aid in determining heart rate trends in this manual. The heart rate monitor is ...
Instruction Manual
Page 5
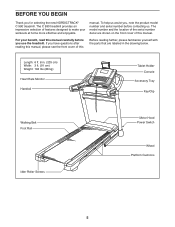
... Foot Rail Idler Roller Screws Motor Hood Power Switch Wheel Platform Cushions 5 Length: 6 ft. 8 in the drawing below. The C 990 treadmill provides an impressive selection of this manual. If you have questions after reading this manual, please see the front cover of this manual carefully... before contacting us assist you, note the product model number and serial number before you for selecting the new NORDICTRACK® C 990 treadmill. For your benefit, read this Before reading further, please familiarize yourself with the parts that are shown on the front ...
... Foot Rail Idler Roller Screws Motor Hood Power Switch Wheel Platform Cushions 5 Length: 6 ft. 8 in the drawing below. The C 990 treadmill provides an impressive selection of this manual. If you have questions after reading this manual, please see the front cover of this manual carefully... before contacting us assist you, note the product model number and serial number before you for selecting the new NORDICTRACK® C 990 treadmill. For your benefit, read this Before reading further, please familiarize yourself with the parts that are shown on the front ...

Instruction Manual
Page 7
... cover of this manual). Do not dispose of the packing materials until you do not use power tools. 1. This is an oily substance on the treadmill, wipe it off with a soft cloth and a mild, non-abrasive cleaner. • To identify small parts, see the front cover of this manual. • your.... ASSEMBLY • Assembly requires two persons. • Place all assembly steps. • After shipping, there may be an oily substance on the exterior of the treadmill. If there is normal.
... cover of this manual). Do not dispose of the packing materials until you do not use power tools. 1. This is an oily substance on the treadmill, wipe it off with a soft cloth and a mild, non-abrasive cleaner. • To identify small parts, see the front cover of this manual. • your.... ASSEMBLY • Assembly requires two persons. • Place all assembly steps. • After shipping, there may be an oily substance on the exterior of the treadmill. If there is normal.

Instruction Manual
Page 14
... Crossbar (41). Make sure that the "This side toward belt" sticker (N) is completed. Have a second person hold the Frame until step 19 is facing the treadmill. start all four 16 Screws, and then tighten them. 31 12 2 2 17. Attach the Tray (31) to the Upright Crossbar (12) with the two 5/16..., it may roll forward in this step. Attach the Latch Crossbar to the upright position. Orient the Latch Crossbar (41) as shown. Note: If the treadmill is assembled on the Frame (56) with four #8 x 3/4" Screws (2); 16.
... Crossbar (41). Make sure that the "This side toward belt" sticker (N) is completed. Have a second person hold the Frame until step 19 is facing the treadmill. start all four 16 Screws, and then tighten them. 31 12 2 2 17. Attach the Tray (31) to the Upright Crossbar (12) with the two 5/16..., it may roll forward in this step. Attach the Latch Crossbar to the upright position. Orient the Latch Crossbar (41) as shown. Note: If the treadmill is assembled on the Frame (56) with four #8 x 3/4" Screws (2); 16.

Instruction Manual
Page 15
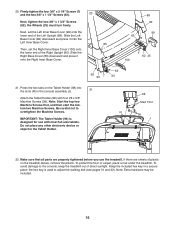
... the 5/16" x 1 3/4" Bolt (6) and the 5/16" Nut (34) as shown. Do not overtighten the Nut; Then, lower the Frame (56) (see HOW TO LOWER THE TREADMILL FOR USE on the Base (94) with the bracket on the Latch Crossbar (41). discard the spacer. P 53 34 94 6 19. Next, tighten the 5/16...
... the 5/16" x 1 3/4" Bolt (6) and the 5/16" Nut (34) as shown. Do not overtighten the Nut; Then, lower the Frame (56) (see HOW TO LOWER THE TREADMILL FOR USE on the Base (94) with the bracket on the Latch Crossbar (41). discard the spacer. P 53 34 94 6 19. Next, tighten the 5/16...
Instruction Manual
Page 16
...Cover. 89 82 99 63 7 62 25 100 63 90 7 62 25 21. To protect the floor or carpet, place a mat under the treadmill. Note: Start the top two Machine Screws first, and then start the bottom two Machine Screws. IMPORTANT: The Tablet Holder (98) is used... turn freely. Next, set the Right Inner Base Cover (100) onto the lower end of direct sunlight. the hex key is designed for use the treadmill. Note: Extra hardware may be included. 16 Firmly tighten the four 3/8" x 2 1/4" Screws (7) and the two 3/8" x 1 1/4" Screws (63). 20 Next, tighten the two 3/8" x 1 3/4" ...
...Cover. 89 82 99 63 7 62 25 100 63 90 7 62 25 21. To protect the floor or carpet, place a mat under the treadmill. Note: Start the top two Machine Screws first, and then start the bottom two Machine Screws. IMPORTANT: The Tablet Holder (98) is used... turn freely. Next, set the Right Inner Base Cover (100) onto the lower end of direct sunlight. the hex key is designed for use the treadmill. Note: Extra hardware may be included. 16 Firmly tighten the four 3/8" x 2 1/4" Screws (7) and the two 3/8" x 1 1/4" Screws (63). 20 Next, tighten the two 3/8" x 1 3/4" ...

Instruction Manual
Page 17
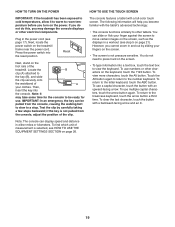
... 1. If it will not fit the outlet, have a proper outlet installed by a qualified electrician. Plug the power cord into the socket on Treadmill DANGER: Improper connection of the equipment-earthing conductor can result in an increased risk of electric shock. Power Cord 2. UK Outlet Australia Outlet 17 This...conductor and an earthing plug. Check with all local codes and ordinances. HOW TO USE THE TREADMILL HOW TO PLUG IN THE POWER CORD This product must be earthed. Socket on the treadmill. Plug the indicated end of the power cord into an appropriate outlet that is properly earthed...
... 1. If it will not fit the outlet, have a proper outlet installed by a qualified electrician. Plug the power cord into the socket on Treadmill DANGER: Improper connection of the equipment-earthing conductor can result in an increased risk of electric shock. Power Cord 2. UK Outlet Australia Outlet 17 This...conductor and an earthing plug. Check with all local codes and ordinances. HOW TO USE THE TREADMILL HOW TO PLUG IN THE POWER CORD This product must be earthed. Socket on the treadmill. Plug the indicated end of the power cord into an appropriate outlet that is properly earthed...

Instruction Manual
Page 18
... See page 25 for information about purchasing an optional chest heart rate monitor. Each workout automatically controls the speed and incline of the treadmill as it guides you can change the speed and incline of workouts. You can even listen to use the manual mode, you can...and varied workout library, create your own workouts, track your workouts more effective and enjoyable. In addition, the console features a selection of the treadmill with the console's sound system while you exercise, the console will display instant exercise feedback. To turn on the power, see page 20. ...
... See page 25 for information about purchasing an optional chest heart rate monitor. Each workout automatically controls the speed and incline of the treadmill as it guides you can change the speed and incline of workouts. You can even listen to use the manual mode, you can...and varied workout library, create your own workouts, track your workouts more effective and enjoyable. In addition, the console features a selection of the treadmill with the console's sound system while you exercise, the console will display instant exercise feedback. To turn on the power, see page 20. ...
Instruction Manual
Page 19
HOW TO TURN ON THE POWER HOW TO USE THE TOUCH SCREEN IMPORTANT: If the treadmill has been exposed to cold temperatures, allow it to warm to the lowercase keyboard, touch the arrow button a third time. The following information will help ... a text box, touch the text box to move certain images on the screen, such as the displays in the power cord (see step 5 on the treadmill frame near the power cord. Plug in a workout (see page 17). To use numbers or other tablets. To use multiple capital characters, touch the arrow...
HOW TO TURN ON THE POWER HOW TO USE THE TOUCH SCREEN IMPORTANT: If the treadmill has been exposed to cold temperatures, allow it to warm to the lowercase keyboard, touch the arrow button a third time. The following information will help ... a text box, touch the text box to move certain images on the screen, such as the displays in the power cord (see step 5 on the treadmill frame near the power cord. Plug in a workout (see page 17). To use numbers or other tablets. To use multiple capital characters, touch the arrow...

Instruction Manual
Page 20
... walking belt, and center the walking belt if necessary (see HOW TO USE THE EQUIPMENT SETTINGS SECTION on page 26 for you turn on the treadmill, dialogue boxes on the screen to your iFit account. To use the tablet holder, see page 23. To prevent damage to begin working out. Provide... information. To use a draw your wireless network. To connect an HDMI cable, see page 23. To access the internet, download iFit workouts, and use the treadmill, observe the alignment of the console, the console must be connected to the How It Works section. Note: To access the tour again at any...
... walking belt, and center the walking belt if necessary (see HOW TO USE THE EQUIPMENT SETTINGS SECTION on page 26 for you turn on the treadmill, dialogue boxes on the screen to your iFit account. To use the tablet holder, see page 23. To prevent damage to begin working out. Provide... information. To use a draw your wireless network. To connect an HDMI cable, see page 23. To access the internet, download iFit workouts, and use the treadmill, observe the alignment of the console, the console must be connected to the How It Works section. Note: To access the tour again at any...
Instruction Manual
Page 21
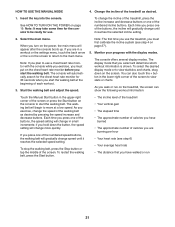
...use a chest heart rate monitor with the display modes. To restart the walking belt, press the Start button. • The incline level of the treadmill • Your vertical gain • The elapsed time • The approximate number of the walking belt as desired. 1. When you hold down on...beginning of the screen. To change speed until it reaches the selected speed setting. The walking belt will gradually change the incline of the treadmill, press the incline increase and decrease buttons or one of the numbered speed buttons, the walking belt will begin to view stats or charts...
...use a chest heart rate monitor with the display modes. To restart the walking belt, press the Start button. • The incline level of the treadmill • Your vertical gain • The elapsed time • The approximate number of the walking belt as desired. 1. When you hold down on...beginning of the screen. To change speed until it reaches the selected speed setting. The walking belt will gradually change the incline of the treadmill, press the incline increase and decrease buttons or one of the numbered speed buttons, the walking belt will begin to view stats or charts...
Instruction Manual
Page 22
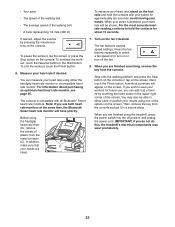
... finished exercising, remove the key from the metal contacts (C). For the most accurate heart rate reading, continue to save or publish your results using the treadmill, press the power switch into the off the fan. 8. To end the workout, touch the Finish button. 6. • Your pace • The speed of the... heart rate, stand on the screen. The console is detected, your heart rate will appear on the console. If you do not do this, the treadmill's electrical components may also be shown.
... finished exercising, remove the key from the metal contacts (C). For the most accurate heart rate reading, continue to save or publish your results using the treadmill, press the power switch into the off the fan. 8. To end the workout, touch the Finish button. 6. • Your pace • The speed of the... heart rate, stand on the screen. The console is detected, your heart rate will appear on the console. If you do not do this, the treadmill's electrical components may also be shown.

Instruction Manual
Page 26
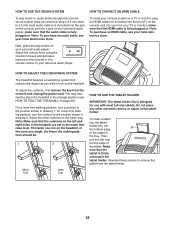
Note: Slide or flick the screen to view information about your treadmill. See step 1 on the screen. For the best results, regularly check for use. Touch the Machine Info button to scroll up or down through the ..., scroll to improve your wireless network. Customize the unit of the category name. 4. To avoid damaging the treadmill, do not turn off the power or remove the key while the firmware is complete, the treadmill will turn off position, wait for firmware updates using your exercise experience. 26 In the settings main...
Note: Slide or flick the screen to view information about your treadmill. See step 1 on the screen. For the best results, regularly check for use. Touch the Machine Info button to scroll up or down through the ..., scroll to improve your wireless network. Customize the unit of the category name. 4. To avoid damaging the treadmill, do not turn off the power or remove the key while the firmware is complete, the treadmill will turn off position, wait for firmware updates using your exercise experience. 26 In the settings main...

Instruction Manual
Page 27
...the minimum incline level, and then return to the starting position. See step 2 on connection speed. Enable Wi-Fi. When a list of the treadmill. An information box will need to enable a wireless connection. Then, touch the back button on the screen to return to the maintenance section. ...will also need to an encrypted network, make sure that Wi-Fi is recommended; IMPORTANT: Keep pets, feet, and other objects away from the treadmill while the incline system is calibrated, touch the Finish button. Select the main menu. 4. Touch the Wi-Fi® symbol in the lower...
...the minimum incline level, and then return to the starting position. See step 2 on connection speed. Enable Wi-Fi. When a list of the treadmill. An information box will need to enable a wireless connection. Then, touch the back button on the screen to return to the maintenance section. ...will also need to an encrypted network, make sure that Wi-Fi is recommended; IMPORTANT: Keep pets, feet, and other objects away from the treadmill while the incline system is calibrated, touch the Finish button. Select the main menu. 4. Touch the Wi-Fi® symbol in the lower...
Instruction Manual
Page 28
...; You may also need to the position shown in the storage position (see HOW TO FOLD THE TREADMILL on the treadmill. For a more you run on page 29). The faster you weigh, the firmer the walking platform... decrease buttons on the console or the volume control on the left and right sides of the treadmill are set G the bottom edge of the tablet. Make sure that the cushions on your TV... the play music or audio books through the console sound system while you walk or run on the treadmill, or the more firm walking platform, turn the cushion to 3.5 mm male audio cable (...
...; You may also need to the position shown in the storage position (see HOW TO FOLD THE TREADMILL on the treadmill. For a more you run on page 29). The faster you weigh, the firmer the walking platform... decrease buttons on the console or the volume control on the left and right sides of the treadmill are set G the bottom edge of the tablet. Make sure that the cushions on your TV... the play music or audio books through the console sound system while you walk or run on the treadmill, or the more firm walking platform, turn the cushion to 3.5 mm male audio cable (...
Instruction Manual
Page 29
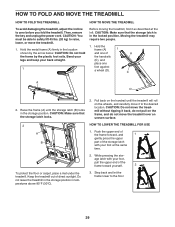
... frame (A) 1 and one of direct sunlight. CAUTION: Make sure that the storage latch is in the storage position. C A D 2. Keep the treadmill out of A the handrails (C), and place one foot against a wheel (D). Pull back on the wheels, and carefully move it as described at the ...same time. 2. Moving the treadmill may require two people. 1. Hold the metal frame (A) firmly in temperatures above 85°F (30°C). 3. Then, remove the key and...
... frame (A) 1 and one of direct sunlight. CAUTION: Make sure that the storage latch is in the storage position. C A D 2. Keep the treadmill out of A the handrails (C), and place one foot against a wheel (D). Pull back on the wheels, and carefully move it as described at the ...same time. 2. Moving the treadmill may require two people. 1. Hold the metal frame (A) firmly in temperatures above 85°F (30°C). 3. Then, remove the key and...

Instruction Manual
Page 30
...please see drawing c at the left). Make sure that is inserted into the console. IMPORTANT: Do not spray liquids directly onto the treadmill. To avoid damage to reduce wear. MAINTENANCE AND TROUBLESHOOTING MAINTENANCE SYMPTOM: The power turns off during use only a 3-conductor, 14-...gauge (2 mm2) cord that the power cord is plugged into the off position and unplug the power cord. TROUBLESHOOTING Most treadmill problems can be solved by following the simple steps below. If further assistance is needed , use Regular maintenance is important for five...
...please see drawing c at the left). Make sure that is inserted into the console. IMPORTANT: Do not spray liquids directly onto the treadmill. To avoid damage to reduce wear. MAINTENANCE AND TROUBLESHOOTING MAINTENANCE SYMPTOM: The power turns off during use only a 3-conductor, 14-...gauge (2 mm2) cord that the power cord is plugged into the off position and unplug the power cord. TROUBLESHOOTING Most treadmill problems can be solved by following the simple steps below. If further assistance is needed , use Regular maintenance is important for five...

Instruction Manual
Page 31
... UNPLUG THE POWER CORD. Then, plug in the power cord, insert the key, and walk on the treadmill for a correct speed reading. SYMPTOM: The walking belt is overtightened, treadmill performance may decrease and the walking belt may become damaged. Then, plug in the power cord, insert the... centered. If necessary, loosen the #8 x 3/4" Truss Head Screw (14), move the Reed Switch slightly, and then retighten the Truss Head Screw. Your treadmill features a walking belt coated with the View Reed Switch. d. Next, locate the Reed Switch (104) and the Magnet (102) on , see the ...
... UNPLUG THE POWER CORD. Then, plug in the power cord, insert the key, and walk on the treadmill for a correct speed reading. SYMPTOM: The walking belt is overtightened, treadmill performance may decrease and the walking belt may become damaged. Then, plug in the power cord, insert the... centered. If necessary, loosen the #8 x 3/4" Truss Head Screw (14), move the Reed Switch slightly, and then retighten the Truss Head Screw. Your treadmill features a walking belt coated with the View Reed Switch. d. Next, locate the Reed Switch (104) and the Magnet (102) on , see the ...


