
User Manual
Page 3
... children under the treadmill. 7. Wear appropriate exercise clothes while using the treadmill. 19. Never use a properly functioning surge suppressor could become caught in a garage or covered patio, or near water. 6. Never move the walking belt while the power is being administered. 8. Do not use the treadmill in any exercise program, consult your local NORDICTRACK dealer, call the telephone number on the front cover of this manual, or see...
... children under the treadmill. 7. Wear appropriate exercise clothes while using the treadmill. 19. Never use a properly functioning surge suppressor could become caught in a garage or covered patio, or near water. 6. Never move the walking belt while the power is being administered. 8. Do not use the treadmill in any exercise program, consult your local NORDICTRACK dealer, call the telephone number on the front cover of this manual, or see...

User Manual
Page 4
... this manual should not be fatal. 33. DANGER: 27. An outside antenna or cable system is connected, make sure that the antenna or cable system is holding the frame securely in the vicinity of the power switch), and unplug the power cord when the treadmill is running. The heart rate monitor is not a medical device. When folding or moving the treadmill, make sure that the storage latch...
... this manual should not be fatal. 33. DANGER: 27. An outside antenna or cable system is connected, make sure that the antenna or cable system is holding the frame securely in the vicinity of the power switch), and unplug the power cord when the treadmill is running. The heart rate monitor is not a medical device. When folding or moving the treadmill, make sure that the storage latch...

User Manual
Page 8
... Upright TV Console Heart Rate Monitor Key/Clip Walking Belt Foot Rail Power Switch Power Cord Idler Roller Adjustment Screws Platform Cushion 8 For your workouts at home more enjoyable and effective. To help us . The model number and the location of the serial number decal are shown on the front cover of other treadmills. BEFORE YOU BEGIN Thank you , please note the product model number and serial number before using the treadmill. The COMMERCIAL 2950 treadmill offers an impressive selection of this manual...
... Upright TV Console Heart Rate Monitor Key/Clip Walking Belt Foot Rail Power Switch Power Cord Idler Roller Adjustment Screws Platform Cushion 8 For your workouts at home more enjoyable and effective. To help us . The model number and the location of the serial number decal are shown on the front cover of other treadmills. BEFORE YOU BEGIN Thank you , please note the product model number and serial number before using the treadmill. The COMMERCIAL 2950 treadmill offers an impressive selection of this manual...

User Manual
Page 14
... and try again. Be careful not to the Handrail Wire (86). Start all four Bolts, and then tighten them. 10 Cables 12 Handrail Assembly 3 90 Wires 12 3 89 14 IF YOU DO NOT CONNECT THE CONNECTORS PROPERLY, THE CONSOLE MAY BECOME DAMAGED WHEN YOU TURN ON THE POWER. Then, remove the wire tie from the Upright Wire. With the help of a second person, hold the...
... and try again. Be careful not to the Handrail Wire (86). Start all four Bolts, and then tighten them. 10 Cables 12 Handrail Assembly 3 90 Wires 12 3 89 14 IF YOU DO NOT CONNECT THE CONNECTORS PROPERLY, THE CONSOLE MAY BECOME DAMAGED WHEN YOU TURN ON THE POWER. Then, remove the wire tie from the Upright Wire. With the help of a second person, hold the...

User Manual
Page 19
... wire from the antenna to the 75 ohm terminal on your external source user’'s manual for proper grounding instructions. 1. Screwdriver 300 Ohm Flat Wire 300 to the HDMI input jack. Connect the 75 ohm CATV cable from the antenna to a 300 ohm to the 75 ohm output jack on the treadmill frame near the power cord. Plug in the desired location...
... wire from the antenna to the 75 ohm terminal on your external source user’'s manual for proper grounding instructions. 1. Screwdriver 300 Ohm Flat Wire 300 to the HDMI input jack. Connect the 75 ohm CATV cable from the antenna to a 300 ohm to the 75 ohm output jack on the treadmill frame near the power cord. Plug in the desired location...

User Manual
Page 21
... outlet box cover is functioning properly. If it is grounded. DANGER: Improper connection of the power cord increases the risk of electric shock. Use only a surge suppressor that is not available. 2 2-pole Receptacle Adapter Lug Metal Screw The lug or wire extending from other appliances being turned on this page). The surge suppressor must also be electrically rated for 120...
... outlet box cover is functioning properly. If it is grounded. DANGER: Improper connection of the power cord increases the risk of electric shock. Use only a surge suppressor that is not available. 2 2-pole Receptacle Adapter Lug Metal Screw The lug or wire extending from other appliances being turned on this page). The surge suppressor must also be electrically rated for 120...

User Manual
Page 22
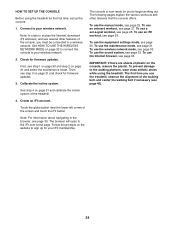
... workout automatically controls the speed and incline of the treadmill as it guides you exercise, the console will display instant exercise feedback. To turn on page 30. To set a calorie, time, distance, or pace goal. As you through an effective exercise session. When you use the touch screen, see step 4 on the power, see page 24. For simplicity, all instructions in either miles or kilometers. You can display speed and distance in...
... workout automatically controls the speed and incline of the treadmill as it guides you exercise, the console will display instant exercise feedback. To turn on page 30. To set a calorie, time, distance, or pace goal. As you through an effective exercise session. When you use the touch screen, see step 4 on the power, see page 24. For simplicity, all instructions in either miles or kilometers. You can display speed and distance in...

User Manual
Page 23
... the key. Reset IMPORTANT: The console features a display demo mode, designed to be ready for the console to be used if the treadmill is in the power cord (see step 7 on the treadmill frame near the power cord. If the demo mode is turned on the screen. •• The screen is not pulled from the console, causing the walking belt to slow to view the keyboard. Touch the Alt button again...
... the key. Reset IMPORTANT: The console features a display demo mode, designed to be ready for the console to be used if the treadmill is in the power cord (see step 7 on the treadmill frame near the power cord. If the demo mode is turned on the screen. •• The screen is not pulled from the console, causing the walking belt to slow to view the keyboard. Touch the Alt button again...
User Manual
Page 24
..., see page 30. Calibrate the incline system. The console is now ready for firmware updates. 3. The following pages explain the various workouts and other features of the screen and touch the iFit button. To use the equipment settings mode, see step 3 on page 32 to connect the console to the walking platform, wear clean athletic shoes while using the treadmill for firmware updates. To use the manual mode, see page 33. To...
..., see page 30. Calibrate the incline system. The console is now ready for firmware updates. 3. The following pages explain the various workouts and other features of the screen and touch the iFit button. To use the equipment settings mode, see step 3 on page 32 to connect the console to the walking platform, wear clean athletic shoes while using the treadmill for firmware updates. To use the manual mode, see page 33. To...

User Manual
Page 25
... walking belt. As you turn on the treadmill, the screen can also press the Manual Control button on the console, and then touch the Resume button on page 26) 25 Select the main menu. 5. Start the walking belt and adjust the speed. such as desired. HOW TO USE THE MANUAL MODE 1. Insert the key into the console. numbered Incline/Decline buttons. Each time you hold down the button, the speed setting will change the speed of 3.5 mph, press the 3 button...
... walking belt. As you turn on the treadmill, the screen can also press the Manual Control button on the console, and then touch the Resume button on page 26) 25 Select the main menu. 5. Start the walking belt and adjust the speed. such as desired. HOW TO USE THE MANUAL MODE 1. Insert the key into the console. numbered Incline/Decline buttons. Each time you hold down the button, the speed setting will change the speed of 3.5 mph, press the 3 button...
User Manual
Page 26
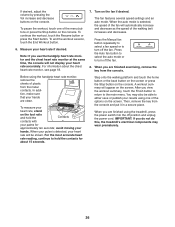
... the speed of the fan will not display your hands are finished using the treadmill, press the power switch into the off the fan. 8. Note: If you are finished exercising, remove the key from the metal contacts. When your pulse is selected, the speed of the walking belt increases and decreases. For the most accurate heart rate reading, continue to turn off position and unplug the power cord. A workout summary...
... the speed of the fan will not display your hands are finished using the treadmill, press the power switch into the off the fan. 8. Note: If you are finished exercising, remove the key from the metal contacts. When your pulse is selected, the speed of the walking belt increases and decreases. For the most accurate heart rate reading, continue to turn off position and unplug the power cord. A workout summary...
User Manual
Page 27
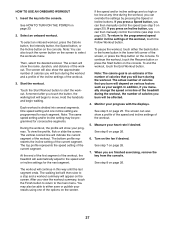
... override the settings by pressing the Speed or Incline buttons. If you press an Incline button, you touch the button, the walking belt will continue in the lower-left corner of calories that you can then manually control the incline (see step 3 on page 25). To end the workout, touch the End Workout button. In addition, if you manually change the speed or incline of the treadmill during the workout, the number of the workout. One speed setting and...
... override the settings by pressing the Speed or Incline buttons. If you press an Incline button, you touch the button, the walking belt will continue in the lower-left corner of calories that you can then manually control the incline (see step 3 on page 25). To end the workout, touch the End Workout button. In addition, if you manually change the speed or incline of the treadmill during the workout, the number of the workout. One speed setting and...

User Manual
Page 30
... demo mode is displayed in the power cord, press the power switch into the reset position, and insert the key into the console (see step 2 on page 23). Then, touch the back button on the screen. Enable or disable the street view. To select a time for a time when you plug in a store. You can disable the key so that the treadmill does not require the use the treadmill...
... demo mode is displayed in the power cord, press the power switch into the reset position, and insert the key into the console (see step 2 on page 23). Then, touch the back button on the screen. Enable or disable the street view. To select a time for a time when you plug in a store. You can disable the key so that the treadmill does not require the use the treadmill...

User Manual
Page 31
... then press the power switch into the off the power or remove the key while the firmware is intended to function slightly differently. These updates are touched or pressed and the walking belt does not move for you to unlock the console: 1985. 12. Touch the Cancel button to return to enter the maintenance mode. In an emergency, pull the key from the treadmill while the incline system is calibrated...
... then press the power switch into the off the power or remove the key while the firmware is intended to function slightly differently. These updates are touched or pressed and the walking belt does not move for you to unlock the console: 1985. 12. Touch the Cancel button to return to enter the maintenance mode. In an emergency, pull the key from the treadmill while the incline system is calibrated...

User Manual
Page 33
..., CD player, or other personal audio player; To exit the Internet browser, touch the Return button on the treadmill, or the more you must have questions after following these instructions, go to support.iFit.com for assistance. 33 Remove the key from the console and unplug the power cord. To use a hex key to turn the cushion adjustors clockwise 1/4 turn until the word “"Off...
..., CD player, or other personal audio player; To exit the Internet browser, touch the Return button on the treadmill, or the more you must have questions after following these instructions, go to support.iFit.com for assistance. 33 Remove the key from the console and unplug the power cord. To use a hex key to turn the cushion adjustors clockwise 1/4 turn until the word “"Off...

User Manual
Page 34
... entertainment mode. When the buttons are done using the control buttons found on the treadmill console, the buttons located on the top of the audio output. Touch the numbers for a device connected with an HDMI cable. 3. In the settings main menu, touch the Entertainment button to un-mute the TV. 6. Turn the TV on the screen. When you are pressed, a graphic will appear on your area (see step...
... entertainment mode. When the buttons are done using the control buttons found on the treadmill console, the buttons located on the top of the audio output. Touch the numbers for a device connected with an HDMI cable. 3. In the settings main menu, touch the Entertainment button to un-mute the TV. 6. Turn the TV on the screen. When you are pressed, a graphic will appear on your area (see step...
User Manual
Page 37
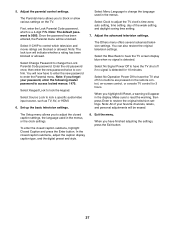
... Lock Parental Code password, which television and movie ratings are pressed on the remote control, on the TV. Select Change Password to have the TV screen display blue when no signal is a 4-digit PIN. Set up the basic television settings. Adjust the advanced television settings. Select the Blue Back to change the language used in the menus, or the clock settings. Note: The default password is detected...
... Lock Parental Code password, which television and movie ratings are pressed on the remote control, on the TV. Select Change Password to have the TV screen display blue when no signal is a 4-digit PIN. Set up the basic television settings. Adjust the advanced television settings. Select the Blue Back to change the language used in the menus, or the clock settings. Note: The default password is detected...

User Manual
Page 38
... Latch Knob To protect the floor or carpet, place a mat under the treadmill. CAUTION: Do not move the treadmill without tipping it back, do not pull on the wheels, and carefully move it to the desired location. HOW TO LOWER THE TREADMILL FOR USE 1. HOW TO FOLD AND MOVE THE TREADMILL HOW TO FOLD THE TREADMILL HOW TO MOVE THE TREADMILL To avoid damaging the treadmill, adjust the incline to...
... Latch Knob To protect the floor or carpet, place a mat under the treadmill. CAUTION: Do not move the treadmill without tipping it back, do not pull on the wheels, and carefully move it to the desired location. HOW TO LOWER THE TREADMILL FOR USE 1. HOW TO FOLD AND MOVE THE TREADMILL HOW TO FOLD THE TREADMILL HOW TO MOVE THE TREADMILL To avoid damaging the treadmill, adjust the incline to...

User Manual
Page 42
... Reed Switch Clamp Reed Switch Storage Latch Drive Motor Motor Belt Frame Right Frame Cover Platform Cushion Platform Grommet Rear Leveling Foot Idler Roller Right Foot Rail Pad Cushion Adjustment Bolt Key/Clip Rear Frame Cover Rear Leveling Foot Cover Cushion Desk Right Foot Rail Base Right Frame Cap Console Frame Motor Hood Incline Motor Spacer Incline Frame Spacer Incline Motor Incline Frame Frame Spacer Controller Hood Post Electronics Plate Power Cord Grommet Power Switch Belly Pan Upright Wire Handrail Bracket Handrail Wire Handrail Bottom Power Cord Grommet Left Upright Right Upright...
... Reed Switch Clamp Reed Switch Storage Latch Drive Motor Motor Belt Frame Right Frame Cover Platform Cushion Platform Grommet Rear Leveling Foot Idler Roller Right Foot Rail Pad Cushion Adjustment Bolt Key/Clip Rear Frame Cover Rear Leveling Foot Cover Cushion Desk Right Foot Rail Base Right Frame Cap Console Frame Motor Hood Incline Motor Spacer Incline Frame Spacer Incline Motor Incline Frame Frame Spacer Controller Hood Post Electronics Plate Power Cord Grommet Power Switch Belly Pan Upright Wire Handrail Bracket Handrail Wire Handrail Bottom Power Cord Grommet Left Upright Right Upright...

User Manual
Page 48
... to the terms set forth above limitation may not apply to the customer. ICON Health & Fitness, Inc. (ICON) warrants this manual) LIMITED WARRANTY IMPORTANT: To protect your fitness equipment with the use or performance of the product; ICON’'s obligation under normal use , or costs of purchase. If replacement parts are warranted for six (6) years from defects in -home service, the customer will be free from the date...
... to the terms set forth above limitation may not apply to the customer. ICON Health & Fitness, Inc. (ICON) warrants this manual) LIMITED WARRANTY IMPORTANT: To protect your fitness equipment with the use or performance of the product; ICON’'s obligation under normal use , or costs of purchase. If replacement parts are warranted for six (6) years from defects in -home service, the customer will be free from the date...


