

English Manual
Page 2
TABLE OF CONTENTS IMPORTANT PRECAUTIONS 3 BEFORE YOU BEGIN 4 ASSEMBLY 5 HOW TO USE THE ELLIPTICAL CROSSTRAINER 9 MAINTENANCE AND TROUBLESHOOTING 20 CONDITIONING GUIDELINES 21 PART LIST 22 EXPLODED DRAWING 23 HOW TO ORDER REPLACEMENT PARTS Back Cover LIMITED WARRANTY Back Cover NordicTrack® is a registered trademark of ICON Health & Fitness, Inc. 2
TABLE OF CONTENTS IMPORTANT PRECAUTIONS 3 BEFORE YOU BEGIN 4 ASSEMBLY 5 HOW TO USE THE ELLIPTICAL CROSSTRAINER 9 MAINTENANCE AND TROUBLESHOOTING 20 CONDITIONING GUIDELINES 21 PART LIST 22 EXPLODED DRAWING 23 HOW TO ORDER REPLACEMENT PARTS Back Cover LIMITED WARRANTY Back Cover NordicTrack® is a registered trademark of ICON Health & Fitness, Inc. 2

English Manual
Page 3
... heart rate trends in this or any worn parts immediately. 6. Various factors, including the user's movement, may affect the accuracy of serious injury, read the following important precau- When you feel pain or dizziness at all parts regularly. Do not use the elliptical crosstrainer in -home use of the owner to move until the flywheel stops. Always hold the handlebar or the upper body arms...
... heart rate trends in this or any worn parts immediately. 6. Various factors, including the user's movement, may affect the accuracy of serious injury, read the following important precau- When you feel pain or dizziness at all parts regularly. Do not use the elliptical crosstrainer in -home use of the owner to move until the flywheel stops. Always hold the handlebar or the upper body arms...
English Manual
Page 4
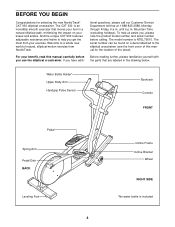
..., elliptical-motion exercise from your exercise. For your knees and ankles. Water Bottle Holder* Upper Body Arm Handgrip Pulse Sensor Bookrack Console FRONT Pedal Spring Arm Pedal Disk BACK Leveling Foot Incline Frame Incline Bracket Wheel RIGHT SIDE *No water bottle is NTEL79010. If you use the elliptical crosstrainer. Before reading further, please familiarize yourself with the parts that moves your feet in the drawing below. until 6 p.m. The serial number...
..., elliptical-motion exercise from your exercise. For your knees and ankles. Water Bottle Holder* Upper Body Arm Handgrip Pulse Sensor Bookrack Console FRONT Pedal Spring Arm Pedal Disk BACK Leveling Foot Incline Frame Incline Bracket Wheel RIGHT SIDE *No water bottle is NTEL79010. If you use the elliptical crosstrainer. Before reading further, please familiarize yourself with the parts that moves your feet in the drawing below. until 6 p.m. The serial number...

English Manual
Page 5
... (26)-5 M10 x 56mm Button Screw (60)-4 M10 x 36mm Carriage Bolt (61)-2 M10 x 85mm Bolt (25)-1 1. Attach the Rear Stabilizer to the two included allen wrenches, assembly requires a phillips screwdriver , an adjustable wrench , a rubber mallet , and pliers . As you assemble the elliptical crosstrainer, use the drawings below each drawing refers to the key number of the Frame (1) as shown. Note: Some small parts may have been...
... (26)-5 M10 x 56mm Button Screw (60)-4 M10 x 36mm Carriage Bolt (61)-2 M10 x 85mm Bolt (25)-1 1. Attach the Rear Stabilizer to the two included allen wrenches, assembly requires a phillips screwdriver , an adjustable wrench , a rubber mallet , and pliers . As you assemble the elliptical crosstrainer, use the drawings below each drawing refers to the key number of the Frame (1) as shown. Note: Some small parts may have been...

English Manual
Page 7
... (1). To install batteries, turn the Console face down and remove the Battery Cover (84), as shown. Be careful to the Extension Wire Harness (51). Make sure that both Pedals are inserted into the Console. Attach the Left Pedal to the Upright (2) with the four Console Screws (35) and the four Console Washers (93) packaged with the welded bolts on page 9). Attach the Console (87) to the Left Spring Arm (3) with...
... (1). To install batteries, turn the Console face down and remove the Battery Cover (84), as shown. Be careful to the Extension Wire Harness (51). Make sure that both Pedals are inserted into the Console. Attach the Left Pedal to the Upright (2) with the four Console Screws (35) and the four Console Washers (93) packaged with the welded bolts on page 9). Attach the Console (87) to the Left Spring Arm (3) with...

English Manual
Page 8
... front of the Console. 1 Screws 87 2. Using the included pedal tool, tap two Push Nuts (15) about 1/8" onto each end of the lubricant onto the Chrome Tubes (21) on the Console (87). Make sure that the Upper Body Arms are turned as shown, and press it onto the Console (87) in the indicated location. INSTALLING THE RECEIVER FOR THE OPTIONAL CHEST PULSE SENSOR If you tap...
... front of the Console. 1 Screws 87 2. Using the included pedal tool, tap two Push Nuts (15) about 1/8" onto each end of the lubricant onto the Chrome Tubes (21) on the Console (87). Make sure that the Upper Body Arms are turned as shown, and press it onto the Console (87) in the indicated location. INSTALLING THE RECEIVER FOR THE OPTIONAL CHEST PULSE SENSOR If you tap...

English Manual
Page 9
... pedals, first loosen the knob beneath each Pedal Knob HOW TO USE THE UPPER BODY ARMS The upper body arms are in the direction shown by side. HOW TO USE THE ELLIPTICAL CROSSTRAINER EXERCISING ON THE ELLIPTICAL CROSSTRAINER To mount the elliptical crosstrainer, hold the handgrip pulse sensor as you may turn the pedal disks in the same position. Next, step onto the other pedal. INCLINE ADJUSTMENT To further adjust the intensity of the incline bracket. Pedal Disk Pedal Upright Incline Bracket Incline...
... pedals, first loosen the knob beneath each Pedal Knob HOW TO USE THE UPPER BODY ARMS The upper body arms are in the direction shown by side. HOW TO USE THE ELLIPTICAL CROSSTRAINER EXERCISING ON THE ELLIPTICAL CROSSTRAINER To mount the elliptical crosstrainer, hold the handgrip pulse sensor as you may turn the pedal disks in the same position. Next, step onto the other pedal. INCLINE ADJUSTMENT To further adjust the intensity of the incline bracket. Pedal Disk Pedal Upright Incline Bracket Incline...

English Manual
Page 10
... plastic on the face of the console, remove it guides you exercise. In addition, you can connect the elliptical crosstrainer to vary your pace as iFIT.com CDs and videocassettes are available separately). For information about an optional chest pulse sensor, refer to page 20.) The console also offers four preset workout programs. Each program automatically changes the resistance of a button. Using the included audio cable, you can also go to your...
... plastic on the face of the console, remove it guides you exercise. In addition, you can connect the elliptical crosstrainer to vary your pace as iFIT.com CDs and videocassettes are available separately). For information about an optional chest pulse sensor, refer to page 20.) The console also offers four preset workout programs. Each program automatically changes the resistance of a button. Using the included audio cable, you can also go to your...

English Manual
Page 11
... your heart rate (when you exercise, the training zone display will appear. The indicator beside the button will appear. To use iFIT.com CDs or videos, refer to page 18. A. Note: The console can select a single mode for information about the chest pulse sensor]). Important: The target pace is the most challenging. Training zone display-As you use the manual mode of the program, and then gradually decrease during preset program 4, both bar...
... your heart rate (when you exercise, the training zone display will appear. The indicator beside the button will appear. To use iFIT.com CDs or videos, refer to page 18. A. Note: The console can select a single mode for information about the chest pulse sensor]). Important: The target pace is the most challenging. Training zone display-As you use the manual mode of the program, and then gradually decrease during preset program 4, both bar...
English Manual
Page 12
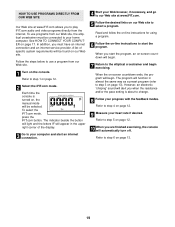
... turned on the console. If desired, you use the handgrip pulse sensor, place your heart rate if desired. Each time the console is selected, the display will show the resistance level for fat burning. gram, a heart rate program, or the iFIT.com mode has been selected, select the manual mode by pressing the Resistance buttons. level 10 is ideal for six seconds. In addition, the training zone display will show your current speed...
... turned on the console. If desired, you use the handgrip pulse sensor, place your heart rate if desired. Each time the console is selected, the display will show the resistance level for fat burning. gram, a heart rate program, or the iFIT.com mode has been selected, select the manual mode by pressing the Resistance buttons. level 10 is ideal for six seconds. In addition, the training zone display will show your current speed...

English Manual
Page 13
fingers must be completed. For the most accurate heart rate reading, continue to step 6 above. 13 If the pedals are not moved and the console buttons are finished exercising, the console will gradually increase during the last half. 3 Start the program. The profiles numbered 1 through 4 on the left bar graph will automatically change if a different resistance setting is selected, both bar graphs. gram will be slower than the...
fingers must be completed. For the most accurate heart rate reading, continue to step 6 above. 13 If the pedals are not moved and the console buttons are finished exercising, the console will gradually increase during the last half. 3 Start the program. The profiles numbered 1 through 4 on the left bar graph will automatically change if a different resistance setting is selected, both bar graphs. gram will be slower than the...

English Manual
Page 14
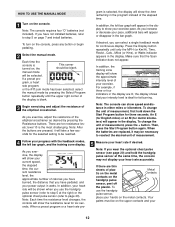
... seconds. To start the program, press the Start Program button or simply begin exercising. The right bar graph will show a target pace. (The left bar graph will show the resistance settings for the heart rate programs. For example, profile number 5 shows that when heart rate program 5 is selected, the resistance level will automatically change if a different resistance setting is designed to use a heart rate program. 1 Turn on page 12. 2 Select one heart rate setting are replaced. 4 Hold the handgrip pulse sensor. if necessary...
... seconds. To start the program, press the Start Program button or simply begin exercising. The right bar graph will show a target pace. (The left bar graph will show the resistance settings for the heart rate programs. For example, profile number 5 shows that when heart rate program 5 is selected, the resistance level will automatically change if a different resistance setting is designed to use a heart rate program. 1 Turn on page 12. 2 Select one heart rate setting are replaced. 4 Hold the handgrip pulse sensor. if necessary...

English Manual
Page 15
... program, the display will automatically turn off. Important: The pace settings for the program are finished exercising, the console will show your exercise feedback. 6 Follow your home computer. A. Plug one jack, see instruction A below. Plug the other end of the audio cable into the PHONES jack on page 12. 7 When you . Plug the Y-adapter into the jack beneath the console. To use iFIT.com programs directly from our Web site, the elliptical crosstrainer...
... program, the display will automatically turn off. Important: The pace settings for the program are finished exercising, the console will show your exercise feedback. 6 Follow your home computer. A. Plug one jack, see instruction A below. Plug the other end of the audio cable into the PHONES jack on page 12. 7 When you . Plug the Y-adapter into the jack beneath the console. To use iFIT.com programs directly from our Web site, the elliptical crosstrainer...

English Manual
Page 17
... RF OUT RCA Y-adapter Audio Cable Adapter Wire removed from AUDIO OUT jack 17 IN VIDEO AUDIO IN CH 34 OUT RF OUT AUDIO OUT RIGHT LEFT Adapter Audio Cable B. A LINE OUT HOW TO CONNECT YOUR VCR Note: If your VCR and plug the wire into the adapter. If your VCR is currently plugged into the AUDIO OUT jack on your home stereo, see instruction B. Plug the Y-adapter into the AUDIO OUT jack on...
... RF OUT RCA Y-adapter Audio Cable Adapter Wire removed from AUDIO OUT jack 17 IN VIDEO AUDIO IN CH 34 OUT RF OUT AUDIO OUT RIGHT LEFT Adapter Audio Cable B. A LINE OUT HOW TO CONNECT YOUR VCR Note: If your VCR and plug the wire into the adapter. If your VCR is currently plugged into the AUDIO OUT jack on your home stereo, see instruction B. Plug the Y-adapter into the AUDIO OUT jack on...

English Manual
Page 18
... audio cable is properly connected and that the indicator beside the iFIT.com button is fully plugged in. 5 Follow your personal trainer's instructions. Refer to step 4 on page 12. 6 Measure your portable CD player, portable stereo, home stereo, computer with the feedback modes. The program will automatically turn off. Follow the steps below to use iFIT.com CDs or videocassettes, the elliptical crosstrainer must be selected. Note: For information...
... audio cable is properly connected and that the indicator beside the iFIT.com button is fully plugged in. 5 Follow your personal trainer's instructions. Refer to step 4 on page 12. 6 Measure your portable CD player, portable stereo, home stereo, computer with the feedback modes. The program will automatically turn off. Follow the steps below to use iFIT.com CDs or videocassettes, the elliptical crosstrainer must be selected. Note: For information...
English Manual
Page 19
To select the iFIT.com mode, press the iFIT.com button. Follow the steps below to change. 8 Follow your progress with the feedback modes. Each time the console is about to use programs from our Web site, the elliptical crosstrainer must have an internet connection and an internet service provider. Refer to play iFIT.com audio and video programs directly from our Web site. 1 Turn on page 13). Refer to step 5 on page...
To select the iFIT.com mode, press the iFIT.com button. Follow the steps below to change. 8 Follow your progress with the feedback modes. Each time the console is about to use programs from our Web site, the elliptical crosstrainer must have an internet connection and an internet service provider. Refer to play iFIT.com audio and video programs directly from our Web site. 1 Turn on page 13). Refer to step 5 on page...
English Manual
Page 20
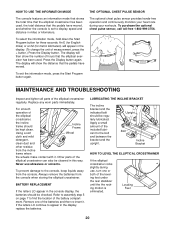
... it . Press the Display button again. THE OPTIONAL CHEST PULSE SENSOR The optional chest pulse sensor provides hands-free operation and continuously monitors your workouts. Replace any worn parts immediately. For smooth operation of the elliptical crosstrainer can also be cleaned in the console display, the batteries should be regularly lubricated. Other parts of the elliptical crosstrainer, the incline frame should be checked. Leveling Feet 20 To select the information mode, hold down the Start Program button for metric...
... it . Press the Display button again. THE OPTIONAL CHEST PULSE SENSOR The optional chest pulse sensor provides hands-free operation and continuously monitors your workouts. Replace any worn parts immediately. For smooth operation of the elliptical crosstrainer can also be cleaned in the console display, the batteries should be regularly lubricated. Other parts of the elliptical crosstrainer, the incline frame should be checked. Leveling Feet 20 To select the information mode, hold down the Start Program button for metric...

English Manual
Page 21
... three workouts each week if desired. The chart below shows recommended heart rates for energy. CONDITIONING GUIDELINES WARNING: Before beginning this or any exercise program, consult your body A cool-down, with 5 to 10 minutes of stretching. Various factors may complete up , consisting of 5 to oxygenate the blood. The pulse sensor is intended only as an exercise aid in determining heart rate trends...
... three workouts each week if desired. The chart below shows recommended heart rates for energy. CONDITIONING GUIDELINES WARNING: Before beginning this or any exercise program, consult your body A cool-down, with 5 to 10 minutes of stretching. Various factors may complete up , consisting of 5 to oxygenate the blood. The pulse sensor is intended only as an exercise aid in determining heart rate trends...
English Manual
Page 22
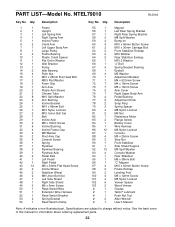
... M6 Nut Resistance Motor Flange Screw Battery Cover Wire Harness M6 Nylon Locknut Console M5 x 25mm Screw Stop Nut Front Stabilizer Side Shield Support M6 Split Washer Console Washer Rear Stabilizer M6 x 38mm Bolt "C" Magnet M10 x 43mm Button Screw Frame Endcap Leveling Foot M5 x 12mm Screw M5 Nylon Locknut Veneer Spacer Wood Veneer Grease Teflon® Lubricant Push Nut Tool Allen Wrench User's Manual Note: # indicates a non-illustrated part. Specifications are subject...
... M6 Nut Resistance Motor Flange Screw Battery Cover Wire Harness M6 Nylon Locknut Console M5 x 25mm Screw Stop Nut Front Stabilizer Side Shield Support M6 Split Washer Console Washer Rear Stabilizer M6 x 38mm Bolt "C" Magnet M10 x 43mm Button Screw Frame Endcap Leveling Foot M5 x 12mm Screw M5 Nylon Locknut Veneer Spacer Wood Veneer Grease Teflon® Lubricant Push Nut Tool Allen Wrench User's Manual Note: # indicates a non-illustrated part. Specifications are subject...

English Manual
Page 24
... (NordicTrack® CXT 930 elliptical crosstrainer) • The SERIAL NUMBER of the product (see the front cover of this limited warranty. USER'S MANUAL-It is warranted to be prepared to state. Remember to change, modify or extend the terms of this manual) • The KEY NUMBER and DESCRIPTION of the part(s) from our Customer Service Department; HOW TO GET PARTS AND SERVICE-Simply call our Customer Service Department toll-free...
... (NordicTrack® CXT 930 elliptical crosstrainer) • The SERIAL NUMBER of the product (see the front cover of this limited warranty. USER'S MANUAL-It is warranted to be prepared to state. Remember to change, modify or extend the terms of this manual) • The KEY NUMBER and DESCRIPTION of the part(s) from our Customer Service Department; HOW TO GET PARTS AND SERVICE-Simply call our Customer Service Department toll-free...


