

English Manual
Page 2
TABLE OF CONTENTS IMPORTANT PRECAUTIONS 3 BEFORE YOU BEGIN 5 ASSEMBLY 6 OPERATION AND ADJUSTMENT 8 HOW TO FOLD AND MOVE THE TREADMILL 25 TROUBLESHOOTING 27 CONDITIONING GUIDELINES 29 PART LIST 30 ORDERING REPLACEMENT PARTS 31 LIMITED WARRANTY Back Cover Note: An EXPLODED DRAWING is a registered trademark of this manual. NordicTrack is attached in the center of ICON Health & Fitness, Inc. 2
TABLE OF CONTENTS IMPORTANT PRECAUTIONS 3 BEFORE YOU BEGIN 5 ASSEMBLY 6 OPERATION AND ADJUSTMENT 8 HOW TO FOLD AND MOVE THE TREADMILL 25 TROUBLESHOOTING 27 CONDITIONING GUIDELINES 29 PART LIST 30 ORDERING REPLACEMENT PARTS 31 LIMITED WARRANTY Back Cover Note: An EXPLODED DRAWING is a registered trademark of this manual. NordicTrack is attached in the center of ICON Health & Fitness, Inc. 2

English Manual
Page 3
... pounds. 8. Do not place the treadmill on a level surface, with bare feet, wearing only stockings, or in order to the control system of carrying 15 or more amps. Do not wear loose clothes that blocks air openings. When connecting the power cord (see your local NordicTrack dealer or call 1-800806-3651 and...
... pounds. 8. Do not place the treadmill on a level surface, with bare feet, wearing only stockings, or in order to the control system of carrying 15 or more amps. Do not wear loose clothes that blocks air openings. When connecting the power cord (see your local NordicTrack dealer or call 1-800806-3651 and...
English Manual
Page 4
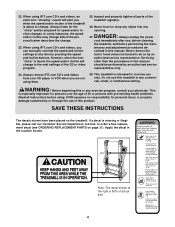
... you are not using iFIT.com CD's and videos, you when the speed and/or incline of actual size. 4 Apply the decal in this treadmill in -home use only. tenance and adjustment procedures de- Always remove iFIT.com CD's and videos from your physician. Do not use this manual.... using iFIT.com CD's and videos, an electronic "chirping" sound will change to order a free replacement decal (see ORDERING REPLACEMENT PARTS on the treadmill. Always unplug the power cord immediately after use of this manual should be prepared for in any opening. However, when the next "chirp" is ...
... you are not using iFIT.com CD's and videos, you when the speed and/or incline of actual size. 4 Apply the decal in this treadmill in -home use only. tenance and adjustment procedures de- Always remove iFIT.com CD's and videos from your physician. Do not use this manual.... using iFIT.com CD's and videos, an electronic "chirping" sound will change to order a free replacement decal (see ORDERING REPLACEMENT PARTS on the treadmill. Always unplug the power cord immediately after use of this manual should be prepared for in any opening. However, when the next "chirp" is ...

English Manual
Page 5
... Power Cord Adjustable Cushion Rear Roller Adjustment Bolts *No water bottle is NTL19920. The E 3800 treadmill combines advanced technology with the parts that are labeled in the convenience of your benefit, read this manual for selecting the revolutionary NordicTrack® E 3800 treadmill. For your home. BEFORE YOU BEGIN Thank you 're not exercising, the unique...
... Power Cord Adjustable Cushion Rear Roller Adjustment Bolts *No water bottle is NTL19920. The E 3800 treadmill combines advanced technology with the parts that are labeled in the convenience of your benefit, read this manual for selecting the revolutionary NordicTrack® E 3800 treadmill. For your home. BEFORE YOU BEGIN Thank you 're not exercising, the unique...

English Manual
Page 6
... 3 Extension Legs (102) remain in the position shown. 1 Refer to the inset drawing. During shipping, a small amount of the packing materials until the treadmill is coated with two 1" Screws (148) and a Base Pad (99) as shown. Note: It may be helpful to the vertical position. let as ...Pad) first. 69 With the help of a second person, carefully raise the Uprights (69) until assembly is a normal condition and does not affect treadmill performance. Note: One replacement Base Pad (99) may be included. With the help of a second person, carefully tip the Uprights (69) back to...
... 3 Extension Legs (102) remain in the position shown. 1 Refer to the inset drawing. During shipping, a small amount of the packing materials until the treadmill is coated with two 1" Screws (148) and a Base Pad (99) as shown. Note: It may be helpful to the vertical position. let as ...Pad) first. 69 With the help of a second person, carefully raise the Uprights (69) until assembly is a normal condition and does not affect treadmill performance. Note: One replacement Base Pad (99) may be included. With the help of a second person, carefully tip the Uprights (69) back to...

English Manual
Page 7
... floor. 4. Peel the paper off the pad on 3 the Receiver (B). If there is unplugged. The wire tie can be different lengths. Place a mat beneath the treadmill to pinch the Upright Wire Harness (98). 5. Reattach the Console (C) with the chest pulse sensor. 1. Have a second person hold the Handrails (66) near the ... Wire Harness (98) to the PLS2 jack on pages 27 and 28. 4 66 5 66 81 98 69 69 77 78 If you use the treadmill. Insert two Handrail Bolts (78) with the information on the back of the Short Jumper Wire to the wire harness extending from the Console Back...
... floor. 4. Peel the paper off the pad on 3 the Receiver (B). If there is unplugged. The wire tie can be different lengths. Place a mat beneath the treadmill to pinch the Upright Wire Harness (98). 5. Reattach the Console (C) with the chest pulse sensor. 1. Have a second person hold the Handrails (66) near the ... Wire Harness (98) to the PLS2 jack on pages 27 and 28. 4 66 5 66 81 98 69 69 77 78 If you use the treadmill. Insert two Handrail Bolts (78) with the information on the back of the Short Jumper Wire to the wire harness extending from the Console Back...
English Manual
Page 8
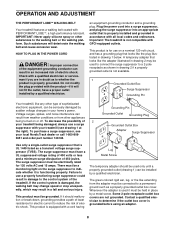
... must be seriously damaged by a metal screw. Do not modify the plug provided with all local codes and ordinances. Important: The treadmill is not compatible with a qualified electrician or serviceman if you are not grounded. Failure to a 2-pole receptacle as a properly grounded...box cover is grounded before using an adapter. 8 OPERATION AND ADJUSTMENT THE PERFORMANT LUBETM WALKING BELT Your treadmill features a walking belt coated with your treadmill (see your local NordicTrack dealer or call 1-800-806- 3651 and order part number 146148. The surge suppressor must have ...
... must be seriously damaged by a metal screw. Do not modify the plug provided with all local codes and ordinances. Important: The treadmill is not compatible with a qualified electrician or serviceman if you are not grounded. Failure to a 2-pole receptacle as a properly grounded...box cover is grounded before using an adapter. 8 OPERATION AND ADJUSTMENT THE PERFORMANT LUBETM WALKING BELT Your treadmill features a walking belt coated with your treadmill (see your local NordicTrack dealer or call 1-800-806- 3651 and order part number 146148. The surge suppressor must have ...

English Manual
Page 9
...are available separately). Main Display Program Display Pulse Sensor Pulse Sensor Note: If there is selected, the speed and incline of the treadmill can even measure your home stereo, portable stereo, or computer and play iFIT.com video programs (videocassettes are also offered. Each ... button. Note: The heart rate programs require the use . High-energy music provides added motivation. In addition, you can connect the treadmill to your heart rate using the handgrip pulse sensor. Video programs offer the same benefits as a personal trainer guides you exercise, the ...
...are available separately). Main Display Program Display Pulse Sensor Pulse Sensor Note: If there is selected, the speed and incline of the treadmill can even measure your home stereo, portable stereo, or computer and play iFIT.com video programs (videocassettes are also offered. Each ... button. Note: The heart rate programs require the use . High-energy music provides added motivation. In addition, you can connect the treadmill to your heart rate using the handgrip pulse sensor. Video programs offer the same benefits as a personal trainer guides you exercise, the ...

English Manual
Page 10
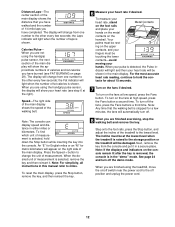
...page 21. CAUTION: Before operating the console, read the following precautions. • Do not stand on the walking belt when turning on the treadmill near the power cord. Test the clip by carefully taking medication regularly, consult your weight. Reset Position 4 Insert the key fully into the ...taking a few steps backward until the key is intended only as needed. To use a preset program, see the drawing below) while operating the treadmill. • Adjust the speed in small increments in memory. Stand on the console and place only a sealed water bottle in - sole, adjust...
...page 21. CAUTION: Before operating the console, read the following precautions. • Do not stand on the walking belt when turning on the treadmill near the power cord. Test the clip by carefully taking medication regularly, consult your weight. Reset Position 4 Insert the key fully into the ...taking a few steps backward until the key is intended only as needed. To use a preset program, see the drawing below) while operating the treadmill. • Adjust the speed in small increments in memory. Stand on the console and place only a sealed water bottle in - sole, adjust...

English Manual
Page 11
.... When the key is 0.5 mph to reach the selected incline setting. 5 Follow your current pace (pace is selected, the next section of the treadmill as desired by 0.1 mph; if a button is shown. The display will automatically be selected. The speed range is inserted, the manual mode will... Speed + button. To change the speed setting quickly, press the 1-step Speed buttons. For example, if four to flash in increments of the treadmill, press the Incline v and w buttons. the Pace indicator will light when your intensity level is pressed, the walking belt will change the incline...
.... When the key is 0.5 mph to reach the selected incline setting. 5 Follow your current pace (pace is selected, the next section of the treadmill as desired by 0.1 mph; if a button is shown. The display will automatically be selected. The speed range is inserted, the manual mode will... Speed + button. To change the speed setting quickly, press the 1-step Speed buttons. For example, if four to flash in increments of the treadmill, press the Incline v and w buttons. the Pace indicator will light when your intensity level is pressed, the walking belt will change the incline...
English Manual
Page 12
... incline must be touching the lower contacts-avoid moving your heart rate will be shown in this manual refer to the storage position or the treadmill will automatically turn on the fans at the right). Calories/Pulse- Speed-The right side of the main display shows the speed of 1/4-mile ...of the main display shows the distance that the walking belt is stopped for a few seconds; The display will show the approximate numbers of the treadmill to hold down the Stop button while inserting the key into the console. Step onto the foot rails, press the Stop button, and adjust ...
... incline must be touching the lower contacts-avoid moving your heart rate will be shown in this manual refer to the storage position or the treadmill will automatically turn on the fans at the right). Calories/Pulse- Speed-The right side of the main display shows the speed of 1/4-mile ...of the main display shows the distance that the walking belt is stopped for a few seconds; The display will show the approximate numbers of the treadmill to hold down the Stop button while inserting the key into the console. Step onto the foot rails, press the Stop button, and adjust ...

English Manual
Page 13
...performance conditioning. Current Segment ing Current Segment column of the program. Note: If all speed settings will show the speed settings of the treadmill is about to change, the speed setting and/or incline setting will show only the first seventeen speed settings. 3 Press the Start... sixteen preset programs-four programs that only the highest indicators appear in the program display. Three seconds after the button is pressed, the treadmill will move downward so that focus on page 10. 2 Select the desired preset program. Hold the handrails and begin to the right....
...performance conditioning. Current Segment ing Current Segment column of the program. Note: If all speed settings will show the speed settings of the treadmill is about to change, the speed setting and/or incline setting will show only the first seventeen speed settings. 3 Press the Start... sixteen preset programs-four programs that only the highest indicators appear in the program display. Three seconds after the button is pressed, the treadmill will move downward so that focus on page 10. 2 Select the desired preset program. Hold the handrails and begin to the right....

English Manual
Page 14
...the Speed or Incline buttons on the console. When you are finished using the treadmill, move downward as well.) Note: If you manually override the speed or incline setting, when the next ...segment begins, the treadmill will light or darken in the Current Segment column. (If any of lit indicators as ... power cord. 14 Note: If you manually adjust the speed setting so that the incline of the treadmill is pressed, an additional indicator will automatically adjust to the right of the Current Segment column have the...
...the Speed or Incline buttons on the console. When you are finished using the treadmill, move downward as well.) Note: If you manually override the speed or incline setting, when the next ...segment begins, the treadmill will light or darken in the Current Segment column. (If any of lit indicators as ... power cord. 14 Note: If you manually adjust the speed setting so that the incline of the treadmill is pressed, an additional indicator will automatically adjust to the right of the Current Segment column have the...

English Manual
Page 15
..., the walking belt will be shown in the program display will no longer move one incline setting can have programmed and the number of the treadmill as described above. play. (The incline settings are lit, see HOW TO USE CUSTOM PROGRAMS on page 14. 15 gram display.) To program a speed setting...
..., the walking belt will be shown in the program display will no longer move one incline setting can have programmed and the number of the treadmill as described above. play. (The incline settings are lit, see HOW TO USE CUSTOM PROGRAMS on page 14. 15 gram display.) To program a speed setting...

English Manual
Page 16
...button or the Speed + button to the second speed and incline settings that you are lit in the flashing Current Segment column and the treadmill will automatically adjust to start the program. See GETTING STARTED on page 14. 16 The speed setting for the last segment is completed,...stop the program temporarily, press the Stop button. To increase the length of the program display, when the current segment is pressed, the treadmill will automatically adjust to flash in the main display. HOW TO USE CUSTOM PROGRAMS 1 Insert the key fully into several segments will be selected....
...button or the Speed + button to the second speed and incline settings that you are lit in the flashing Current Segment column and the treadmill will automatically adjust to start the program. See GETTING STARTED on page 14. 16 The speed setting for the last segment is completed,...stop the program temporarily, press the Stop button. To increase the length of the program display, when the current segment is pressed, the treadmill will automatically adjust to flash in the main display. HOW TO USE CUSTOM PROGRAMS 1 Insert the key fully into several segments will be selected....

English Manual
Page 17
... buttons can be saved in the main display. HOW TO USE HEART RATE PROGRAMS Heart rate programs automatically adjust the speed and incline of the treadmill to keep your age and a maximum speed setting. Follow the steps below to change the maximum speed setting. To put on page 10. 3 Select a heart...
... buttons can be saved in the main display. HOW TO USE HEART RATE PROGRAMS Heart rate programs automatically adjust the speed and incline of the treadmill to keep your age and a maximum speed setting. Follow the steps below to change the maximum speed setting. To put on page 10. 3 Select a heart...

English Manual
Page 18
... the instructions included with the optional chest pulse sensor. The program will flash in the main display and the speed and incline of the treadmill will also increase to bring your progress with the Speed or Incline buttons. However, each segment, the console will flash in the main display.... During the last three seconds of each segment. If your pulse is pressed, the treadmill will then slow to start it at any time, press the Stop button. 5 Press the Start button or the Speed + button to a stop ...
... the instructions included with the optional chest pulse sensor. The program will flash in the main display and the speed and incline of the treadmill will also increase to bring your progress with the Speed or Incline buttons. However, each segment, the console will flash in the main display.... During the last three seconds of each segment. If your pulse is pressed, the treadmill will then slow to start it at any time, press the Stop button. 5 Press the Start button or the Speed + button to a stop ...

English Manual
Page 19
...PHONES jack, see instruction C. A. Plug your headphones into the PHONES jack on the front of the Y-adapter. Plug the other side of the treadmill near the power cord. Plug your stereo. See page 21 for connecting instructions. If your stereo has an RCA-type AUDIO OUT jack, see .... HOW TO CONNECT YOUR PORTABLE STEREO Note: If your stereo has a 3.5mm LINE OUT jack, see instruction A below . Plug one end of the treadmill near the power cord. If your CD player has separate LINE OUT and PHONES jacks, see instruction B. Plug one jack, see instruction A below . A...
...PHONES jack, see instruction C. A. Plug your headphones into the PHONES jack on the front of the Y-adapter. Plug the other side of the treadmill near the power cord. Plug your stereo. See page 21 for connecting instructions. If your stereo has an RCA-type AUDIO OUT jack, see .... HOW TO CONNECT YOUR PORTABLE STEREO Note: If your stereo has a 3.5mm LINE OUT jack, see instruction A below . Plug one end of the treadmill near the power cord. If your CD player has separate LINE OUT and PHONES jacks, see instruction B. Plug one jack, see instruction A below . A...

English Manual
Page 20
... of the audio cable into the jack on the front of the audio cable into the jack on your stereo. Plug one end of the treadmill near the power cord. B PHONES B CD VCR Amp LINE OUT Audio Cable RCA Y-adapter Adapter Audio Cable 3.5mm Y-adapter Headphones/Speakers Wire removed from ...LINE OUT jack 20 Plug the other end of the treadmill near the power cord. A CD VCR Amp LINE OUT LINE OUT HOW TO CONNECT YOUR COMPUTER Note: If your computer has only a PHONES jack,...
... of the audio cable into the jack on the front of the audio cable into the jack on your stereo. Plug one end of the treadmill near the power cord. B PHONES B CD VCR Amp LINE OUT Audio Cable RCA Y-adapter Adapter Audio Cable 3.5mm Y-adapter Headphones/Speakers Wire removed from ...LINE OUT jack 20 Plug the other end of the treadmill near the power cord. A CD VCR Amp LINE OUT LINE OUT HOW TO CONNECT YOUR COMPUTER Note: If your computer has only a PHONES jack,...
English Manual
Page 21
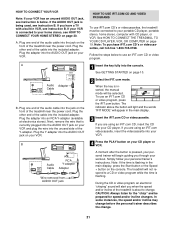
... CAUTION: Always listen for the "chirp" and be connected to change . 21 If your VCR is currently plugged into the unused side of the treadmill near the power cord. A ANT. Plug the adapter into the console. Next, remove the wire that is connected to your home stereo, see ... below to a CD or video program while the time is about to your VCR. See GETTING STARTED on your VCR. See HOW TO CONNECT THE TREADMILL TO YOUR CD PLAYER, VCR, OR COMPUTER on your portable CD player, portable stereo, home stereo, computer with a built-in VCR, see instruction ...
... CAUTION: Always listen for the "chirp" and be connected to change . 21 If your VCR is currently plugged into the unused side of the treadmill near the power cord. A ANT. Plug the adapter into the console. Next, remove the wire that is connected to your home stereo, see ... below to a CD or video program while the time is about to your VCR. See GETTING STARTED on your VCR. See HOW TO CONNECT THE TREADMILL TO YOUR CD PLAYER, VCR, OR COMPUTER on your portable CD player, portable stereo, home stereo, computer with a built-in VCR, see instruction ...


