

Instruction Manual
Page 2
TABLE OF CONTENTS WARNING DECAL PLACEMENT 2 IMPORTANT PRECAUTIONS 3 BEFORE YOU BEGIN 4 ASSEMBLY 5 HOW TO USE THE ELLIPTICAL 12 MAINTENANCE AND TROUBLESHOOTING 21 EXERCISE GUIDELINES 22 PART LIST 23 EXPLODED DRAWING 25 ORDERING REPLACEMENT PARTS Back Cover RECYCLING INFORMATION Back ...Cover WARNING DECAL PLACEMENT This drawing shows the location(s) of ICON IP, Inc. 2 Note: The decal(s) may not be shown at actual size. NordicTrack is missing or illegible, see the front cover of this manual and request a free replacement decal. Apply the decal in the location shown. If a...
TABLE OF CONTENTS WARNING DECAL PLACEMENT 2 IMPORTANT PRECAUTIONS 3 BEFORE YOU BEGIN 4 ASSEMBLY 5 HOW TO USE THE ELLIPTICAL 12 MAINTENANCE AND TROUBLESHOOTING 21 EXERCISE GUIDELINES 22 PART LIST 23 EXPLODED DRAWING 25 ORDERING REPLACEMENT PARTS Back Cover RECYCLING INFORMATION Back ...Cover WARNING DECAL PLACEMENT This drawing shows the location(s) of ICON IP, Inc. 2 Note: The decal(s) may not be shown at actual size. NordicTrack is missing or illegible, see the front cover of this manual and request a free replacement decal. Apply the decal in the location shown. If a...
Instruction Manual
Page 3
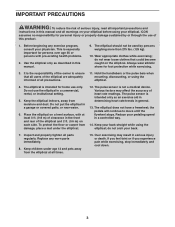
... Wear appropriate clothes while exercising; The pulse sensor is intended only as described in a controlled way. 14. Place the elliptical on the elliptical. The elliptical does not have a freewheel; the pedals will continue to ensure that could become caught on a level surface, with pre-... you experience pain while exercising, stop immediately and cool down. 3 Before beginning any worn parts immediately. 8. Keep the elliptical indoors, away from the elliptical at least 3 ft. (0.9 m) of clearance in general. 13. The pulse sensor is the responsibility of the owner...
... Wear appropriate clothes while exercising; The pulse sensor is intended only as described in a controlled way. 14. Place the elliptical on the elliptical. The elliptical does not have a freewheel; the pedals will continue to ensure that could become caught on a level surface, with pre-... you experience pain while exercising, stop immediately and cool down. 3 Before beginning any worn parts immediately. 8. Keep the elliptical indoors, away from the elliptical at least 3 ft. (0.9 m) of clearance in general. 13. The pulse sensor is the responsibility of the owner...

Instruction Manual
Page 4
The E7 SV FRONT DRIVE elliptical provides a wide array of this manual. Before reading further, please familiarize yourself ... manual carefully before contacting us assist you, note the product model number and serial number before you use the elliptical. To help us . For your workouts at home more effective and enjoyable. Console Water Bottle Holder* Handgrip ...Wheel Roller *Water bottle is not included 4 If you for selecting the new NordicTrack® E7 SV FRONT DRIVE elliptical. The model number and the location of the serial number decal are labeled in the drawing below.
The E7 SV FRONT DRIVE elliptical provides a wide array of this manual. Before reading further, please familiarize yourself ... manual carefully before contacting us assist you, note the product model number and serial number before you use the elliptical. To help us . For your workouts at home more effective and enjoyable. Console Water Bottle Holder* Handgrip ...Wheel Roller *Water bottle is not included 4 If you for selecting the new NordicTrack® E7 SV FRONT DRIVE elliptical. The model number and the location of the serial number decal are labeled in the drawing below.

Instruction Manual
Page 5
... (82)-15 M8 x 38mm Bolt (96)-8 M8 x 80mm Patch Screw (84)-2 M10 x 45mm Patch Screw (99)-4 M10 x 60mm Bolt (100)-2 5 Do not dispose of the elliptical in parentheses below to see if it has been preassembled. The number following the key number is completed. ASSEMBLY Assembly requires two persons.
... (82)-15 M8 x 38mm Bolt (96)-8 M8 x 80mm Patch Screw (84)-2 M10 x 45mm Patch Screw (99)-4 M10 x 60mm Bolt (100)-2 5 Do not dispose of the elliptical in parentheses below to see if it has been preassembled. The number following the key number is completed. ASSEMBLY Assembly requires two persons.
Instruction Manual
Page 7
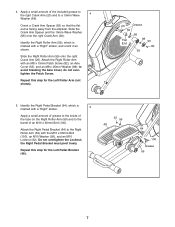
...). Attach the Right Roller Arm with a "Right" sticker, and orient it as shown. Identify the Right Pedal Bracket (64), which is facing away from the elliptical. Identify the Right Roller Arm (59), which is marked with the M10 x 60mm Bolt (100), an M10 Washer (95), and an M10 Locknut (92). to...
...). Attach the Right Roller Arm with a "Right" sticker, and orient it as shown. Identify the Right Pedal Bracket (64), which is facing away from the elliptical. Identify the Right Roller Arm (59), which is marked with the M10 x 60mm Bolt (100), an M10 Washer (95), and an M10 Locknut (92). to...
Instruction Manual
Page 9
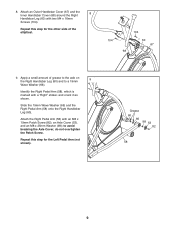
... Pedal Arm (58) with an M8 x 19mm Patch Screw (82), an Axle Cover (53), and an M8 x 25mm Washer (98); Apply a small amount of the elliptical. 104 104 68 60 67 9. to a 19mm Wave Washer (66). 8.
... Pedal Arm (58) with an M8 x 19mm Patch Screw (82), an Axle Cover (53), and an M8 x 25mm Washer (98); Apply a small amount of the elliptical. 104 104 68 60 67 9. to a 19mm Wave Washer (66). 8.
Instruction Manual
Page 11
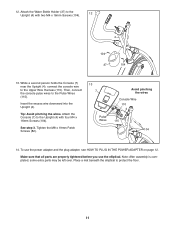
... and the plug adapter, see HOW TO PLUG IN THE POWER ADAPTER on page 12. Place a mat beneath the elliptical to the Upright (4) with four M4 x 16mm Screws (104). To use the elliptical. 12. Attach the Water Bottle Holder (37) to protect the floor. 11 Attach the Console (7) to the Upright (4) with...
... and the plug adapter, see HOW TO PLUG IN THE POWER ADAPTER on page 12. Place a mat beneath the elliptical to the Upright (4) with four M4 x 16mm Screws (104). To use the elliptical. 12. Attach the Water Bottle Holder (37) to protect the floor. 11 Attach the Console (7) to the Upright (4) with...
Instruction Manual
Page 12
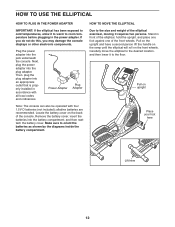
... also be operated with all local codes and ordinances. Pull on the upright and have a second person lift the handle on the ramp until the elliptical will roll on the back of the front wheels. Next, plug the power adapter into the battery compartment, and then reattach the battery cover. Stand... in front of the elliptical, hold the upright, and place one foot against one of the console. Pull on upright Place your foot here Lift here 12 Plug the power...
... also be operated with all local codes and ordinances. Pull on the upright and have a second person lift the handle on the ramp until the elliptical will roll on the back of the front wheels. Next, plug the power adapter into the battery compartment, and then reattach the battery cover. Stand... in front of the elliptical, hold the upright, and place one foot against one of the console. Pull on upright Place your foot here Lift here 12 Plug the power...
Instruction Manual
Page 13
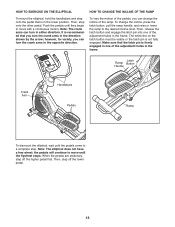
..., step off the lower pedal. 13 To change the incline of the ramp. Latch Ramp Button Handle Crank Arm Handlebars Pedals Ramp To dismount the elliptical, wait until the pedals come to move with a continuous motion. Then, release the latch button and engage the latch pin into one of the adjustment... on the latch button must be visible or the latch pin is firmly engaged in one of the adjustment holes in the frame. Note: The elliptical does not have a free wheel; the pedals will continue to a complete stop. Push the pedals until the flywheel stops. Note: The crank arms can ...
..., step off the lower pedal. 13 To change the incline of the ramp. Latch Ramp Button Handle Crank Arm Handlebars Pedals Ramp To dismount the elliptical, wait until the pedals come to move with a continuous motion. Then, release the latch button and engage the latch pin into one of the adjustment... on the latch button must be visible or the latch pin is firmly engaged in one of the adjustment holes in the frame. Note: The elliptical does not have a free wheel; the pedals will continue to a complete stop. Push the pedals until the flywheel stops. Note: The crank arms can ...

Instruction Manual
Page 15
... your heart rate when you press the buttons, it will again begin pedaling or press a button, a tone will sound, and the display will show your elliptical, the display will appear in the display. 3. Note: After you use the handgrip pulse sensor (see step 5 on the model of the Workouts buttons repeatedly...
... your heart rate when you press the buttons, it will again begin pedaling or press a button, a tone will sound, and the display will show your elliptical, the display will appear in the display. 3. Note: After you use the handgrip pulse sensor (see step 5 on the model of the Workouts buttons repeatedly...

Instruction Manual
Page 16
... to squeeze the metal contacts tightly. If there are finished exercising, the console will turn off automatically. To view the total distance pedaled since the elliptical was purchased, press the Odometer button a second time. Note: If you hold the contacts for at the same time, the console will appear in either...
... to squeeze the metal contacts tightly. If there are finished exercising, the console will turn off automatically. To view the total distance pedaled since the elliptical was purchased, press the Odometer button a second time. Note: If you hold the contacts for at the same time, the console will appear in either...
Instruction Manual
Page 20
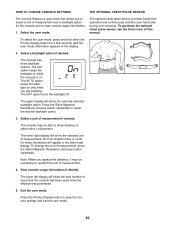
... mode. 20 HOW TO CHANGE CONSOLE SETTINGS THE OPTIONAL CHEST PULSE SENSOR The console features a user mode that the console has been used since the elliptical was purchased. 5. The upper display will appear in either miles or kilometers. To change the unit of measurement and a backlight option for the console and...
... mode. 20 HOW TO CHANGE CONSOLE SETTINGS THE OPTIONAL CHEST PULSE SENSOR The console features a user mode that the console has been used since the elliptical was purchased. 5. The upper display will appear in either miles or kilometers. To change the unit of measurement and a backlight option for the console and...
Instruction Manual
Page 21
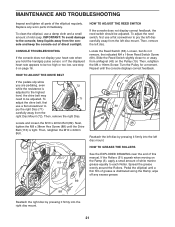
...left disc by pressing it firmly into the right disc mount. 21 Spread the grease evenly around the Rollers. Pedal the elliptical until the console displays correct feedback. To clean the elliptical, use a damp cloth and a small amount of white marine grease equally to pry the left disc mount. Then,...screwdriver to each Roller. Then, remove the left disc mount. HOW TO GREASE THE ROLLERS See the EXPLODED DRAWING near the end of the elliptical regularly. Turn the Pulley for a moment. MAINTENANCE AND TROUBLESHOOTING Inspect and tighten all parts of this manual.
...left disc by pressing it firmly into the right disc mount. 21 Spread the grease evenly around the Rollers. Pedal the elliptical until the console displays correct feedback. To clean the elliptical, use a damp cloth and a small amount of white marine grease equally to pry the left disc mount. Then,...screwdriver to each Roller. Then, remove the left disc mount. HOW TO GREASE THE ROLLERS See the EXPLODED DRAWING near the end of the elliptical regularly. Turn the Pulley for a moment. MAINTENANCE AND TROUBLESHOOTING Inspect and tighten all parts of this manual.


