
C330/C530 Safety Warranty Regulatory Guide
Page 3
... damaged replace it to fire or electric shock. Ensure all around the product to prevent possible risk of injury. Do not throw toner cartridges or image drum cartridges into the ventilation holes or operate this range could result in a fire. If the product is already supplied with your dealer. Ensure the power...
... damaged replace it to fire or electric shock. Ensure all around the product to prevent possible risk of injury. Do not throw toner cartridges or image drum cartridges into the ventilation holes or operate this range could result in a fire. If the product is already supplied with your dealer. Ensure the power...
C330/C530 Safety Warranty Regulatory Guide
Page 4
... business day-or no charge, any request or claim for authorized service locations or if you ship the Product, remove the image drums and toner cartridges to prevent damage to the Product during shipment: failure to abuse, misuse, misapplication, accident, improper storage, ...or installation, an unsuitable physical operating environment, or as toner cartridges, image drums, ribbon cartridges, fuses, etc. You will be new or reconditioned, at 1-800-654-3282 (1-800-OKI-DATA), or www.okiprintingsolutions.com. When Overnight Exchange is warranted for the Product, showing ...
... business day-or no charge, any request or claim for authorized service locations or if you ship the Product, remove the image drums and toner cartridges to prevent damage to the Product during shipment: failure to abuse, misuse, misapplication, accident, improper storage, ...or installation, an unsuitable physical operating environment, or as toner cartridges, image drums, ribbon cartridges, fuses, etc. You will be new or reconditioned, at 1-800-654-3282 (1-800-OKI-DATA), or www.okiprintingsolutions.com. When Overnight Exchange is warranted for the Product, showing ...

Safety Warranty Manual
Page 3
... extension cable or power strip ensure that the total current rating (amperes) of electric shock, fire and/or injury. Do not throw toner cartridges or image drum cartridges into the ventilation holes or operate this product with this product is a risk of all necessary precautions to be damaged or cause a trip hazard...
... extension cable or power strip ensure that the total current rating (amperes) of electric shock, fire and/or injury. Do not throw toner cartridges or image drum cartridges into the ventilation holes or operate this product with this product is a risk of all necessary precautions to be damaged or cause a trip hazard...

Safety Warranty Manual
Page 4
Overnight Exchange US and Canada Only Oki Data offers Overnight Exchange of incidental or consequential damages, so the above limitation may not apply to you ship the Product, remove the image drums and toner cartridges to prevent damage to the Product during shipment: ... abuse, misuse, misapplication, accident, improper storage, or installation, an unsuitable physical operating environment, or as toner cartridges, image drums, ribbon cartridges, fuses, etc. Oki Data will remedy any other than the second business day. Limited Warranty, US and Canada U.S. This Limited Warranty shall...
Overnight Exchange US and Canada Only Oki Data offers Overnight Exchange of incidental or consequential damages, so the above limitation may not apply to you ship the Product, remove the image drums and toner cartridges to prevent damage to the Product during shipment: ... abuse, misuse, misapplication, accident, improper storage, or installation, an unsuitable physical operating environment, or as toner cartridges, image drums, ribbon cartridges, fuses, etc. Oki Data will remedy any other than the second business day. Limited Warranty, US and Canada U.S. This Limited Warranty shall...

Image Drum Replacement Instructions (English, Fran栩s, Espa?ol, Poetugu鱩
Page 1
... on . 2. Holding it by the blue handles, lift the image drum assembly, complete with Priming Cartridges Installing the Image Drum 1. c 6. To maintain the high quality output from marking your printer, you must prime the new image drum using the priming cartridges supplied. Open the top cover: printer ... Slide the colored collars in a single swift motion to the left to prevent toner from your furniture. 5. Do not touch. 1 English b Warning! Image Drum Replacement Français, consultez la page 3 • Español, ver página 5 • Português, ver página 7...
... on . 2. Holding it by the blue handles, lift the image drum assembly, complete with Priming Cartridges Installing the Image Drum 1. c 6. To maintain the high quality output from marking your printer, you must prime the new image drum using the priming cartridges supplied. Open the top cover: printer ... Slide the colored collars in a single swift motion to the left to prevent toner from your furniture. 5. Do not touch. 1 English b Warning! Image Drum Replacement Français, consultez la page 3 • Español, ver página 5 • Português, ver página 7...
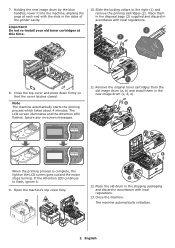
Image Drum Replacement Instructions (English, Fran栩s, Espa?ol, Poetugu鱩
Page 2
...The LCD screen illuminates and the Attention LED flashes. Remove the original toner cartridges from the old image drum (a, b) and install them in the disposal bags (3) supplied and discard in the new image drum (c, d, e). Open the machine's top cover fully. The machine automatically initializes. 2 English ...-install your old toner cartridges at each end with the slots in accordance with local regulations. 8. b a c a b c 12. Holding the new image drum by the blue handles, lower it . 9. Ignore any on the LCD screen goes out and the motor stops turning. b a e d When the ...
...The LCD screen illuminates and the Attention LED flashes. Remove the original toner cartridges from the old image drum (a, b) and install them in the disposal bags (3) supplied and discard in the new image drum (c, d, e). Open the machine's top cover fully. The machine automatically initializes. 2 English ...-install your old toner cartridges at each end with the slots in accordance with local regulations. 8. b a c a b c 12. Holding the new image drum by the blue handles, lower it . 9. Ignore any on the LCD screen goes out and the motor stops turning. b a e d When the ...
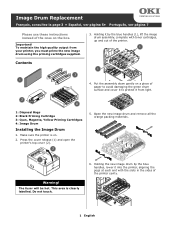
Image Drum Replacement: Priming Cartridges Separate
Page 1
To maintain the high quality output from light. 1: Disposal Bags 2: Black Priming Cartridge 3: Cyan, Magenta, Yellow Priming Cartridges 4: Image Drum Installing the Image Drum 1. Contents 3. The fuser will be hot. Holding it into the printer, aligning the pegs at each end with toner cartridges... of the printer. 4. Press the cover release (1) and open the printer's top cover (2). 5. Holding the new image drum by the blue handles, lower it by the blue handles (1), lift the image drum assembly, complete with the slots in the sides of the printer cavity. 1 English Do not touch...
To maintain the high quality output from light. 1: Disposal Bags 2: Black Priming Cartridge 3: Cyan, Magenta, Yellow Priming Cartridges 4: Image Drum Installing the Image Drum 1. Contents 3. The fuser will be hot. Holding it into the printer, aligning the pegs at each end with toner cartridges... of the printer. 4. Press the cover release (1) and open the printer's top cover (2). 5. Holding the new image drum by the blue handles, lower it by the blue handles (1), lift the image drum assembly, complete with the slots in the sides of the printer cavity. 1 English Do not touch...

Image Drum Replacement: Priming Cartridges Separate
Page 2
... the top cover. The machine automatically initializes. 2 English in the disposal bags (3) supplied and discard in the new image drum (3, 4). Remove the original toner cartridges from the old image drum (1, 2) and install them c 12. The Attention LED flashes and the LCD screen illuminates. Important! Note The machine... automatically starts the priming process which takes about 4 minutes. Place them in accordance with the image drum. Be sure to flash, ignore it. 9. Do not re-install your old toner cartridges at this time. Ignore any on...
... the top cover. The machine automatically initializes. 2 English in the disposal bags (3) supplied and discard in the new image drum (3, 4). Remove the original toner cartridges from the old image drum (1, 2) and install them c 12. The Attention LED flashes and the LCD screen illuminates. Important! Note The machine... automatically starts the priming process which takes about 4 minutes. Place them in accordance with the image drum. Be sure to flash, ignore it. 9. Do not re-install your old toner cartridges at this time. Ignore any on...


