
Instruction Manual
Page 1
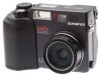
PREPARATION BASIC FUNCTIONS MOVIE FUNCTIONS INSTRUCTIONS STORING DATA FOR PRINTING PICTURES USING A PERSONAL COMPUTER CAMERA SETTINGS DIGITAL CAMERA MISCELLANEOUS C-3030ZOOM Ⅲ Before using your camera, read this manual carefully to ensure correct use. Ⅲ We recommend that you take test shots to get accustomed to your camera before taking important photographs.
PREPARATION BASIC FUNCTIONS MOVIE FUNCTIONS INSTRUCTIONS STORING DATA FOR PRINTING PICTURES USING A PERSONAL COMPUTER CAMERA SETTINGS DIGITAL CAMERA MISCELLANEOUS C-3030ZOOM Ⅲ Before using your camera, read this manual carefully to ensure correct use. Ⅲ We recommend that you take test shots to get accustomed to your camera before taking important photographs.

Instruction Manual
Page 12
... of the camera's internal parts. Ⅲ Do not use or store the camera near a heater, cooler, or humidifier, or near a fire, magnetic fields, or volatile materials. Ⅲ Do not shake the camera or subject it may cause battery leakage and can cause the flash to direct sunlight (e.g. Before using, press the Shutter release button to check operation. Ⅲ Do not turn the camera when it...
... of the camera's internal parts. Ⅲ Do not use or store the camera near a heater, cooler, or humidifier, or near a fire, magnetic fields, or volatile materials. Ⅲ Do not shake the camera or subject it may cause battery leakage and can cause the flash to direct sunlight (e.g. Before using, press the Shutter release button to check operation. Ⅲ Do not turn the camera when it...
Instruction Manual
Page 14
... Adjusting the date and time 34 Learning the basics 36 Basic operating procedure 36 How to use the Mode dial 37 Holding the camera 38 Adjusting the diopter 39 Proper shutter release 39 Checking the card 40 Checking the batteries 41 Checking the number of storable pictures 42 How to use the menu 44 2 BASIC FUNCTIONS 47 [Record Mode] Taking pictures 48 Taking pictures using the optical viewfinder 48 Taking pictures using the LCD monitor 50 Quick view 52 Focus lock...
... Adjusting the date and time 34 Learning the basics 36 Basic operating procedure 36 How to use the Mode dial 37 Holding the camera 38 Adjusting the diopter 39 Proper shutter release 39 Checking the card 40 Checking the batteries 41 Checking the number of storable pictures 42 How to use the menu 44 2 BASIC FUNCTIONS 47 [Record Mode] Taking pictures 48 Taking pictures using the optical viewfinder 48 Taking pictures using the LCD monitor 50 Quick view 52 Focus lock...

Instruction Manual
Page 15
... Manual focus 71 Still picture record menu 73 Sequence mode 74 Selftimer/Remote control 76 Auto bracket 80 White balance 82 ISO 84 Flash correction 86 Slow shutter synchronization flash mode 88 Extension flash photography 90 Taking photographs using the FL-40 extension flash ...........90 Taking photographs with the FL-40 extension flash only 92 Taking photographs with another brand of extension flash 93 Digital zoom mode 96 Picture effects 98 Sound record mode 99 Panorama mode 101 Card setup (card format 103 Selecting the recording mode 105 A/S/M mode 107 [Display Mode...
... Manual focus 71 Still picture record menu 73 Sequence mode 74 Selftimer/Remote control 76 Auto bracket 80 White balance 82 ISO 84 Flash correction 86 Slow shutter synchronization flash mode 88 Extension flash photography 90 Taking photographs using the FL-40 extension flash ...........90 Taking photographs with the FL-40 extension flash only 92 Taking photographs with another brand of extension flash 93 Digital zoom mode 96 Picture effects 98 Sound record mode 99 Panorama mode 101 Card setup (card format 103 Selecting the recording mode 105 A/S/M mode 107 [Display Mode...

Instruction Manual
Page 16
... mode 115 Picture information 116 Recording sound 118 Card setup 120 All-frame erase 120 Card format 122 Connecting to a television 124 3 MOVIE FUNCTIONS 127 [Record Mode] Recording movies 128 Recording movies using the LCD monitor 128 Quick view 130 Focus lock 131 Working range 132 Zoom 133 Exposure compensation 134 Manual focus 135 Movie picture record menu 137 Selftimer/Remote control 138 White balance 142 ISO 144 Picture effect 146 Card setup (card format 147 Selecting the recording mode 149 [Display Mode] Movie picture display menu 151 Playing movies 152 Picture...
... mode 115 Picture information 116 Recording sound 118 Card setup 120 All-frame erase 120 Card format 122 Connecting to a television 124 3 MOVIE FUNCTIONS 127 [Record Mode] Recording movies 128 Recording movies using the LCD monitor 128 Quick view 130 Focus lock 131 Working range 132 Zoom 133 Exposure compensation 134 Manual focus 135 Movie picture record menu 137 Selftimer/Remote control 138 White balance 142 ISO 144 Picture effect 146 Card setup (card format 147 Selecting the recording mode 149 [Display Mode] Movie picture display menu 151 Playing movies 152 Picture...
Instruction Manual
Page 17
4 STORING DATA FOR PRINTING PICTURES .....165 About print settings 166 Print-reserve 168 All-frame print reserve 168 Single-frame print reserve 170 Trimming print reserve 174 Resetting print reserve 177 5 USING A PERSONAL COMPUTER 179 Computer system requirements 180 Installing provided software 181 Connecting to a personal computer 182 Using a personal computer 183 Transferring data from SmartMedia 184 PC card adapter 184 FlashPath floppydisk adapter 184 SmartMedia READER/WRITER 184 Using CAMEDIA Master 185 Processing images using CAMEDIA Master 187 17
4 STORING DATA FOR PRINTING PICTURES .....165 About print settings 166 Print-reserve 168 All-frame print reserve 168 Single-frame print reserve 170 Trimming print reserve 174 Resetting print reserve 177 5 USING A PERSONAL COMPUTER 179 Computer system requirements 180 Installing provided software 181 Connecting to a personal computer 182 Using a personal computer 183 Transferring data from SmartMedia 184 PC card adapter 184 FlashPath floppydisk adapter 184 SmartMedia READER/WRITER 184 Using CAMEDIA Master 185 Processing images using CAMEDIA Master 187 17
Instruction Manual
Page 18
CONTENTS (Cont.) 6 CAMERA SETTINGS 192 All reset 194 Custom settings 196 Sharpness 199 TIFF settings 200 SQ1, SQ2 settings 202 Beep sound 204 Full-time AF 205 Rec view 207 File number 212 LCD brightness 215 Meters/Feet selection 217 Index-display adjustment 218 7 MISCELLANEOUS 219 Questions and answers 220 Troubleshooting 222 System chart 226 Error codes 227 Optional items 229 Notes on display and backlight 229 Compatibility of the picture data 230 Specifications 231 18
CONTENTS (Cont.) 6 CAMERA SETTINGS 192 All reset 194 Custom settings 196 Sharpness 199 TIFF settings 200 SQ1, SQ2 settings 202 Beep sound 204 Full-time AF 205 Rec view 207 File number 212 LCD brightness 215 Meters/Feet selection 217 Index-display adjustment 218 7 MISCELLANEOUS 219 Questions and answers 220 Troubleshooting 222 System chart 226 Error codes 227 Optional items 229 Notes on display and backlight 229 Compatibility of the picture data 230 Specifications 231 18
Instruction Manual
Page 19
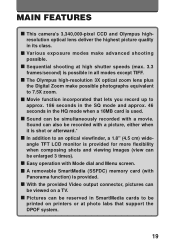
... support the DPOF system. 19 Sound can also be simultaneously recorded with Panorama function) is possible in all modes except TIFF. Ⅲ The Olympus high-resolution 3X optical zoom lens plus the Digital Zoom make advanced shooting possible. Ⅲ Sequential shooting at photo labs that lets you record up to an optical viewfinder, a 1.8" (4.5 cm) wide- angle TFT LCD monitor is provided for more flexibility when composing shots and viewing images (view...
... support the DPOF system. 19 Sound can also be simultaneously recorded with Panorama function) is possible in all modes except TIFF. Ⅲ The Olympus high-resolution 3X optical zoom lens plus the Digital Zoom make advanced shooting possible. Ⅲ Sequential shooting at photo labs that lets you record up to an optical viewfinder, a 1.8" (4.5 cm) wide- angle TFT LCD monitor is provided for more flexibility when composing shots and viewing images (view...
Instruction Manual
Page 25
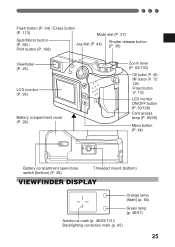
Flash button (P. 64) / Erase button (P. 113) Mode dial (P. 37) Spot/Macro button (P. 68) / Print button (P. 168) Jog dial (P. 44) Shutter release button (P. 39) Viewfinder (P. 25) LCD monitor (P. 26) Battery compartment cover (P. 28) Zoom lever (P. 62/133) OK button (P. 45) MF button (P. 72/ 136) Protect button (P. 112) LCD monitor ON/OFF button (P. 50/128) Card access lamp (P. 36/39) Menu button (P. 44) Battery compartment open/close switch (bottom) (P. 28) Threaded mount (bottom) VIEWFINDER DISPLAY Orange lamp (flash) (p. 64) Green lamp (p. 48...
Flash button (P. 64) / Erase button (P. 113) Mode dial (P. 37) Spot/Macro button (P. 68) / Print button (P. 168) Jog dial (P. 44) Shutter release button (P. 39) Viewfinder (P. 25) LCD monitor (P. 26) Battery compartment cover (P. 28) Zoom lever (P. 62/133) OK button (P. 45) MF button (P. 72/ 136) Protect button (P. 112) LCD monitor ON/OFF button (P. 50/128) Card access lamp (P. 36/39) Menu button (P. 44) Battery compartment open/close switch (bottom) (P. 28) Threaded mount (bottom) VIEWFINDER DISPLAY Orange lamp (flash) (p. 64) Green lamp (p. 48...
Instruction Manual
Page 26
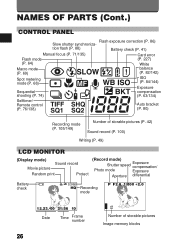
...shooting (P. 74) ISO (P. 84/144) Exposure compensation (P. 63/134) Selftimer/ Remote control (P. 76/138) Auto bracket (P. 80) Recording mode (P. 105/149) Number of storable pictures (P. 42) Sound record (P. 100) Writing (P. 49) LCD MONITOR (Display mode) Sound record Movie picture Random print Protect (Record mode) Shutter speed Exposure compensation/ Photo mode Exposure Aperture differential Battery check HQ Recording mode P F2.8 1/800 +2.0 12.23.,00 21:56 10 Date Time Frame number 26 Number of storable pictures Image memory blocks NAMES OF PARTS (Cont.) CONTROL...
...shooting (P. 74) ISO (P. 84/144) Exposure compensation (P. 63/134) Selftimer/ Remote control (P. 76/138) Auto bracket (P. 80) Recording mode (P. 105/149) Number of storable pictures (P. 42) Sound record (P. 100) Writing (P. 49) LCD MONITOR (Display mode) Sound record Movie picture Random print Protect (Record mode) Shutter speed Exposure compensation/ Photo mode Exposure Aperture differential Battery check HQ Recording mode P F2.8 1/800 +2.0 12.23.,00 21:56 10 Date Time Frame number 26 Number of storable pictures Image memory blocks NAMES OF PARTS (Cont.) CONTROL...
Instruction Manual
Page 36
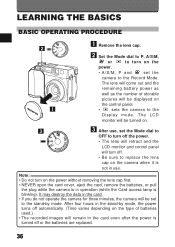
... card, remove the batteries, or pull the plug while the camera is in operation (while the Card access lamp is blinking). The LCD monitor will be displayed on the control panel. • sets the camera to replace the lens cap on the camera when it is turned off automatically. (Time varies depending on the type of batteries used.) • The recorded images will be turned on. 3 P OFF POWER/ A/S/M MODE DIAL 3 After use, set the camera to the Record Mode...
... card, remove the batteries, or pull the plug while the camera is in operation (while the Card access lamp is blinking). The LCD monitor will be displayed on the control panel. • sets the camera to replace the lens cap on the camera when it is turned off automatically. (Time varies depending on the type of batteries used.) • The recorded images will be turned on. 3 P OFF POWER/ A/S/M MODE DIAL 3 After use, set the camera to the Record Mode...

Instruction Manual
Page 39
... pictures. 39 ADJUSTING THE DIOPTER Diopter adjustment dial Viewfinder • Turn the Diopter adjustment dial to release the shutter and take the picture. • The camera emits a beep sound when the shutter is released. • The Card access lamp blinks while the picture is being recorded. Note: • Press the Shutter release button gently using the ball of the picture is outside the auto focus mark, use focus lock. (p. 53/131) Press the Shutter release button...
... pictures. 39 ADJUSTING THE DIOPTER Diopter adjustment dial Viewfinder • Turn the Diopter adjustment dial to release the shutter and take the picture. • The camera emits a beep sound when the shutter is released. • The Card access lamp blinks while the picture is being recorded. Note: • Press the Shutter release button gently using the ball of the picture is outside the auto focus mark, use focus lock. (p. 53/131) Press the Shutter release button...
Instruction Manual
Page 41
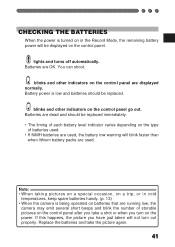
... displayed normally. Battery power is being operated on batteries that are running low, the camera may emit several short beeps and blink the number of storable pictures on the control panel after you take the picture again. 41 You can shoot. Note: • When taking pictures on a special occasion, on a trip, or in the Record Mode, the remaining battery power will not turn on the type of batteries used. • If NiMH batteries...
... displayed normally. Battery power is being operated on batteries that are running low, the camera may emit several short beeps and blink the number of storable pictures on the control panel after you take the picture again. 41 You can shoot. Note: • When taking pictures on a special occasion, on a trip, or in the Record Mode, the remaining battery power will not turn on the type of batteries used. • If NiMH batteries...
Instruction Manual
Page 42
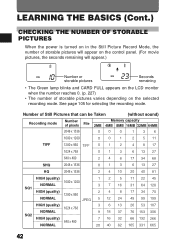
... recording mode. Number of Still Pictures that can be Taken (without sound) Recording mode Number of storable pictures varies depending on the selected recording mode. LEARNING THE BASICS (Cont.) CHECKING THE NUMBER OF STORABLE PICTURES When the power is turned on in the Still Picture Record Mode, the number of storable pictures will appear on the control panel. (For movie pictures, the seconds remaining will appear.) Number or storable pictures Seconds remaining • The Green lamp blinks...
... recording mode. Number of Still Pictures that can be Taken (without sound) Recording mode Number of storable pictures varies depending on the selected recording mode. LEARNING THE BASICS (Cont.) CHECKING THE NUMBER OF STORABLE PICTURES When the power is turned on in the Still Picture Record Mode, the number of storable pictures will appear on the control panel. (For movie pictures, the seconds remaining will appear.) Number or storable pictures Seconds remaining • The Green lamp blinks...

Instruction Manual
Page 48
Check the working distance. (p. 56) 4 Press the Shutter release button fully to the viewfinder lights. • If the Green lamp blinks, the focus or exposure is not locked. TAKING PICTURES TAKING PICTURES USING THE OPTICAL VIEWFINDER ER/MODE 2 A/S/M P DIAL 1 Set the Mode dial to P or A/S/M. 1 34 OFF POW 2 Compose the picture by placing the subject within the autofocus marks in the viewfinder or using focus lock. (p. 53) • Turn the Diopter adjustment dial to...
Check the working distance. (p. 56) 4 Press the Shutter release button fully to the viewfinder lights. • If the Green lamp blinks, the focus or exposure is not locked. TAKING PICTURES TAKING PICTURES USING THE OPTICAL VIEWFINDER ER/MODE 2 A/S/M P DIAL 1 Set the Mode dial to P or A/S/M. 1 34 OFF POW 2 Compose the picture by placing the subject within the autofocus marks in the viewfinder or using focus lock. (p. 53) • Turn the Diopter adjustment dial to...
Instruction Manual
Page 50
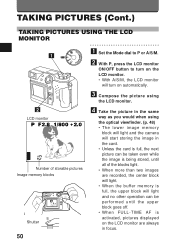
... +2.0 Number of storable pictures Image memory blocks Shutter 50 DIAL 1 Set the Mode dial to P or A/S/M. 2 With P, press the LCD monitor ON/OFF button to turn on the LCD monitor. • With A/S/M, the LCD monitor will turn on automatically. 3 Compose the picture using the LCD monitor. 4 Take the picture in the same way as you would when using the optical viewfinder. (p. 48) • The lower image memory block will light and the camera...
... +2.0 Number of storable pictures Image memory blocks Shutter 50 DIAL 1 Set the Mode dial to P or A/S/M. 2 With P, press the LCD monitor ON/OFF button to turn on the LCD monitor. • With A/S/M, the LCD monitor will turn on automatically. 3 Compose the picture using the LCD monitor. 4 Take the picture in the same way as you would when using the optical viewfinder. (p. 48) • The lower image memory block will light and the camera...

Instruction Manual
Page 51
...; It is recommended to use the optical viewfinder for less camera movement and battery consumption. • It will take longer to take the next picture. • The recorded image will not be slightly larger compared with what you can select whether to save the photographed image or erase it will be less noticeable in Display mode. • A strip of light may appear on the...
...; It is recommended to use the optical viewfinder for less camera movement and battery consumption. • It will take longer to take the next picture. • The recorded image will not be slightly larger compared with what you can select whether to save the photographed image or erase it will be less noticeable in Display mode. • A strip of light may appear on the...

Instruction Manual
Page 61
... to select the aperture. MANUAL MODE You can set the aperture and shutter speed manually in All Reset, the setting will be selected from 16 to select the shutter speed. • The shutter speed can be canceled when the power is especially useful for taking portrait pictures with blurred backgrounds or expressing motion. It is turned off. (p. 194) 61 Note: • The differential (ranging from the Menu. (p. 107) Shutter speed Aperture Exposure differential (see...
... to select the aperture. MANUAL MODE You can set the aperture and shutter speed manually in All Reset, the setting will be selected from 16 to select the shutter speed. • The shutter speed can be canceled when the power is especially useful for taking portrait pictures with blurred backgrounds or expressing motion. It is turned off. (p. 194) 61 Note: • The differential (ranging from the Menu. (p. 107) Shutter speed Aperture Exposure differential (see...

Instruction Manual
Page 73
... Taking photographs of night views. (p. 88) FLASH DIGITAL ZOOM Selecting the extension flash or main flash + extension flash. (p. 92) Using the Digital zoom mode. (p. 96) FUNCTION Using picture effects. (p. 98) Recording sound in the still picture recording mode. (p. 99) Taking panorama pictures. (p. 101) CARD SETUP Formatting the card. (p. 103) MODE SETUP Making adjustments. [All reset (p. 194), Sharpness (p. 199), TIFF settings (p. 200), SQ settings (p. 202), Beep sound (p. 204), Full-time AF (p. 205), Rec view (p. 207), File number (p. 212), Brightness (p. 215), Date set to set...
... Taking photographs of night views. (p. 88) FLASH DIGITAL ZOOM Selecting the extension flash or main flash + extension flash. (p. 92) Using the Digital zoom mode. (p. 96) FUNCTION Using picture effects. (p. 98) Recording sound in the still picture recording mode. (p. 99) Taking panorama pictures. (p. 101) CARD SETUP Formatting the card. (p. 103) MODE SETUP Making adjustments. [All reset (p. 194), Sharpness (p. 199), TIFF settings (p. 200), SQ settings (p. 202), Beep sound (p. 204), Full-time AF (p. 205), Rec view (p. 207), File number (p. 212), Brightness (p. 215), Date set to set...
Instruction Manual
Page 75
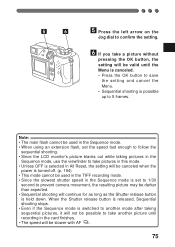
... if the Sequence mode is switched to another mode after taking pictures in the card finishes. • The speed will continue for as long as the Shutter release button is possible up to save the setting and cancel the Menu. • Sequential shooting is held down. Note: • The main flash cannot be used in the Sequence mode. • When using an extension flash, set the speed fast enough to follow...
... if the Sequence mode is switched to another mode after taking pictures in the card finishes. • The speed will continue for as long as the Shutter release button is possible up to save the setting and cancel the Menu. • Sequential shooting is held down. Note: • The main flash cannot be used in the Sequence mode. • When using an extension flash, set the speed fast enough to follow...


