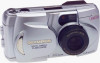

D-400 Zoom Instruction Manual (3.4 MB)
Page 10
... interference to Part 15 of any service or repairs to provide reasonable protection against harmful interference in fire, electric shock, or other products (including amplifiers) that the product is in performance - Safety Check - The product should be sure the service technician has used in accordance with the instructions, may result in a residential installation.This equipment generates, uses, and can...
... interference to Part 15 of any service or repairs to provide reasonable protection against harmful interference in fire, electric shock, or other products (including amplifiers) that the product is in performance - Safety Check - The product should be sure the service technician has used in accordance with the instructions, may result in a residential installation.This equipment generates, uses, and can...

D-400 Zoom Instruction Manual (3.4 MB)
Page 26
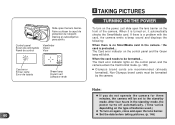
... camera, press the Shutter release button to become excessively hot. This will damage the lens. Ⅲ Do not leave the camera unused for extended periods as this can cause the flash to check operation. Ⅲ Do not turn the camera when it is mounted on a tripod. To avoid malfunction or mechanical problems, do not use the flash for a long period of the camera's internal parts...
... camera, press the Shutter release button to become excessively hot. This will damage the lens. Ⅲ Do not leave the camera unused for extended periods as this can cause the flash to check operation. Ⅲ Do not turn the camera when it is mounted on a tripod. To avoid malfunction or mechanical problems, do not use the flash for a long period of the camera's internal parts...

D-400 Zoom Instruction Manual (3.4 MB)
Page 36
Display 142 Date print 144 Adjusting the date and time 146 Card format 148 36 Index-Display adjustment 150 Brightness 152 E Macro mode 104 Digital Tele mode 104 Panorama mode 106 Menu 108 Exposure compensation 110 Spot metering mode 112 Selecting the recording mode 114 White balance 116 Setting the beep sound 118 DISPLAYING PICTURES ON THE LCD MONITOR Turning on the LCD monitor 120 Quick view 122 Displaying pictures 122 Index-Display mode 124 Close-Up display 126 Function button 128 Slide-Show mode 130 Protection 132 One-Frame erase 134 Connecting to...
Display 142 Date print 144 Adjusting the date and time 146 Card format 148 36 Index-Display adjustment 150 Brightness 152 E Macro mode 104 Digital Tele mode 104 Panorama mode 106 Menu 108 Exposure compensation 110 Spot metering mode 112 Selecting the recording mode 114 White balance 116 Setting the beep sound 118 DISPLAYING PICTURES ON THE LCD MONITOR Turning on the LCD monitor 120 Quick view 122 Displaying pictures 122 Index-Display mode 124 Close-Up display 126 Function button 128 Slide-Show mode 130 Protection 132 One-Frame erase 134 Connecting to...

D-400 Zoom Instruction Manual (3.4 MB)
Page 48
E Control Panel Macro mode Sequential shooting Preset white balance Flash mode Card error Exposure compensation mode Spot metering mode Recording mode Number of remaining pictures Battery check Selftimer Function card mode 48
E Control Panel Macro mode Sequential shooting Preset white balance Flash mode Card error Exposure compensation mode Spot metering mode Recording mode Number of remaining pictures Battery check Selftimer Function card mode 48
D-400 Zoom Instruction Manual (3.4 MB)
Page 60
... turned on the control panel, and the camera enters the Card format mode. (p. 148) ● Olympus brand cards are recommended (already formatted). The Card error indicator on the control panel and the Green lamp will be set to be formatted by the camera. Non-Olympus brand cards must be formatted... Faire coulisser le capot de protection de l'objectif. Slide open the lens barrier on the front of batteries used.) x To turn on the power, just slide open the lens...
... turned on the control panel, and the camera enters the Card format mode. (p. 148) ● Olympus brand cards are recommended (already formatted). The Card error indicator on the control panel and the Green lamp will be set to be formatted by the camera. Non-Olympus brand cards must be formatted... Faire coulisser le capot de protection de l'objectif. Slide open the lens barrier on the front of batteries used.) x To turn on the power, just slide open the lens...

D-400 Zoom Instruction Manual (3.4 MB)
Page 64
... de control E CHECKING THE NUMBER OF REMAINING PICTURES When you turn on the power, the number of remaining pictures is shown on the control panel. ● When the number reaches 0, the camera emits a beep sound and the Green lamp blinks every time the lens barrier is opened. ● The number of remaining pictures varies depending on the selected recording mode setting. ● See page 114 for selecting the recording mode for each image. ●...
... de control E CHECKING THE NUMBER OF REMAINING PICTURES When you turn on the power, the number of remaining pictures is shown on the control panel. ● When the number reaches 0, the camera emits a beep sound and the Green lamp blinks every time the lens barrier is opened. ● The number of remaining pictures varies depending on the selected recording mode setting. ● See page 114 for selecting the recording mode for each image. ●...

D-400 Zoom Instruction Manual (3.4 MB)
Page 66
... the recording time is erased. Note: x The number of Storable Pictures Recording mode Memory capacity 2MB Card 4MB SQ 30 60 HQ 9 18 SHQ 4 9 Non- It may not be reduced every time a picture is taken, or 66 increased when a picture is the longest in the SHQ mode. (See p. 114 for better image quality when enlarged. E The Minimum Number of remaining pictures may take a little longer to record or display images...
... the recording time is erased. Note: x The number of Storable Pictures Recording mode Memory capacity 2MB Card 4MB SQ 30 60 HQ 9 18 SHQ 4 9 Non- It may not be reduced every time a picture is taken, or 66 increased when a picture is the longest in the SHQ mode. (See p. 114 for better image quality when enlarged. E The Minimum Number of remaining pictures may take a little longer to record or display images...

D-400 Zoom Instruction Manual (3.4 MB)
Page 70
... again. 1 2 70 E Proper Shutter Release 1 Depress the Shutter release button halfway. ● The Green lamp next to the viewfinder lights. ● The exposure will be locked. ● The focus will be adjusted. 2 Depress the Shutter release button fully to release the shutter and take the picture. ● The camera emits a beep sound when the shutter is released. ● The Writing indicator on the control panel blinks, and the Green lamp next to...
... again. 1 2 70 E Proper Shutter Release 1 Depress the Shutter release button halfway. ● The Green lamp next to the viewfinder lights. ● The exposure will be locked. ● The focus will be adjusted. 2 Depress the Shutter release button fully to release the shutter and take the picture. ● The camera emits a beep sound when the shutter is released. ● The Writing indicator on the control panel blinks, and the Green lamp next to...

D-400 Zoom Instruction Manual (3.4 MB)
Page 72
...; Turn the Diopter adjustment dial to take the picture. 4 The camera emits two short beeps to indicate that the shot has been taken. 5 When the Green lamp stops blinking (after about 2 ~ 40 seconds), the camera is ready to see the Autofocus mark clearly. 2 Depress the Shutter release button halfway. Green lamp Voyant vert Lámpara verde Caution: x NEVER open the card cover, eject the card, remove the batteries...
...; Turn the Diopter adjustment dial to take the picture. 4 The camera emits two short beeps to indicate that the shot has been taken. 5 When the Green lamp stops blinking (after about 2 ~ 40 seconds), the camera is ready to see the Autofocus mark clearly. 2 Depress the Shutter release button halfway. Green lamp Voyant vert Lámpara verde Caution: x NEVER open the card cover, eject the card, remove the batteries...

D-400 Zoom Instruction Manual (3.4 MB)
Page 78
... 8" ~ ∞ (0.2 m ~ ∞). ● Subjects closer than 8" (0.2 m) may turn out to be out of picture at close -up pictures (turns on automatically in the Macro mode). Working range Macro mode (p.104) Standard mode 8" ~ 32" (0.2 m ~ 0.8 m) 32" ~ ∞ (0.8 m ~ ∞) 78 However, the picture area will move lower in the viewfinder as a viewfinder makes it easy to take close distance Zone d'image d'une vue prise à courte distance Area...
... 8" ~ ∞ (0.2 m ~ ∞). ● Subjects closer than 8" (0.2 m) may turn out to be out of picture at close -up pictures (turns on automatically in the Macro mode). Working range Macro mode (p.104) Standard mode 8" ~ 32" (0.2 m ~ 0.8 m) 32" ~ ∞ (0.8 m ~ ∞) 78 However, the picture area will move lower in the viewfinder as a viewfinder makes it easy to take close distance Zone d'image d'une vue prise à courte distance Area...

D-400 Zoom Instruction Manual (3.4 MB)
Page 84
... 8ft. It is especially useful when quick shooting is required. 1 Press the Shutter release button halfway while pressing the ∞ or 8ft (2.5m) Quick focus button depending on the distance to the subject. ● The Green lamp lights when the focus and the exposure are locked. ● The Quick Focus is not engaged if you can select a pre-adjusted focal length of flash working range 2.5ft 3.3ft 5.6ft...
... 8ft. It is especially useful when quick shooting is required. 1 Press the Shutter release button halfway while pressing the ∞ or 8ft (2.5m) Quick focus button depending on the distance to the subject. ● The Green lamp lights when the focus and the exposure are locked. ● The Quick Focus is not engaged if you can select a pre-adjusted focal length of flash working range 2.5ft 3.3ft 5.6ft...
D-400 Zoom Instruction Manual (3.4 MB)
Page 86
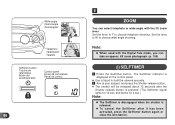
... control 86 E ZOOM You can select telephoto or wide-angle with the Digital Tele mode, you can take an approx. 6X zoom photograph. (p. 104) SELFTIMER 1 Press the Selftimer button. and blinks for 10 sec. The Selftimer indicator is released. Note: x When used with the 3X zoom lever. Set the lever to W to choose wide-angle shooting. x To cancel the Selftimer after the Shutter release button...
... control 86 E ZOOM You can select telephoto or wide-angle with the Digital Tele mode, you can take an approx. 6X zoom photograph. (p. 104) SELFTIMER 1 Press the Selftimer button. and blinks for 10 sec. The Selftimer indicator is released. Note: x When used with the 3X zoom lever. Set the lever to W to choose wide-angle shooting. x To cancel the Selftimer after the Shutter release button...

D-400 Zoom Instruction Manual (3.4 MB)
Page 88
... lamp Voyant orange Lámpara naranja E USING THE FLASH MODES When the flash is necessary, the Orange lamp blinks. 1 Push up the flash before use or to take the picture. Press the Shutter all the way to select a flash mode. 2 Press the Shutter release button halfway when the Orange lamp goes off to take the picture. x When using the flash in the Macro mode, 88 light/dark colors may be exaggerated. (p. 104)
... lamp Voyant orange Lámpara naranja E USING THE FLASH MODES When the flash is necessary, the Orange lamp blinks. 1 Push up the flash before use or to take the picture. Press the Shutter all the way to select a flash mode. 2 Press the Shutter release button halfway when the Orange lamp goes off to take the picture. x When using the flash in the Macro mode, 88 light/dark colors may be exaggerated. (p. 104)

D-400 Zoom Instruction Manual (3.4 MB)
Page 112
... the lens barrier is also locked (AE lock). ● The Green lamp next to obtain the right exposure regardless of the autofocus mark. 1 Press the Menu button in the picture frame while keeping the Shutter release button depressed halfway. Place the subject in the center of the backlight. buttons. 3 Press the OK button to confirm the setting. ● The Spot mode indicator appears on the control...
... the lens barrier is also locked (AE lock). ● The Green lamp next to obtain the right exposure regardless of the autofocus mark. 1 Press the Menu button in the picture frame while keeping the Shutter release button depressed halfway. Place the subject in the center of the backlight. buttons. 3 Press the OK button to confirm the setting. ● The Spot mode indicator appears on the control...

D-400 Zoom Instruction Manual (3.4 MB)
Page 122
button to the Record mode, press either the LCD monitor ON/OFF button or the Shutter release button. To return to see the next picture. DISPLAYING PICTURES You can immediately shift to see the previous picture. This function works when the lens barrier is fully displayed before pressing any buttons. ● If similar pictures have taken on the LCD monitor ON/OFF button. 2 Press the - buttons Touches (+/-) Botones +/- 2 E QUICK VIEW You can display the...
button to the Record mode, press either the LCD monitor ON/OFF button or the Shutter release button. To return to see the next picture. DISPLAYING PICTURES You can immediately shift to see the previous picture. This function works when the lens barrier is fully displayed before pressing any buttons. ● If similar pictures have taken on the LCD monitor ON/OFF button. 2 Press the - buttons Touches (+/-) Botones +/- 2 E QUICK VIEW You can display the...

D-400 Zoom Instruction Manual (3.4 MB)
Page 136
... picture with the +/- buttons. x The picture may look peculiar when printed to a video printer. E CONNECTING TO A TELEVISION Recorded images can be saved to be viewed on the TV screen because of the TV adjustment. x The use of the optional AC adapter is closed before connecting. 1 Connect the cable by inserting it into the video output connector of the camera and the input connector of the camera is recommended. Make sure that the power...
... picture with the +/- buttons. x The picture may look peculiar when printed to a video printer. E CONNECTING TO A TELEVISION Recorded images can be saved to be viewed on the TV screen because of the TV adjustment. x The use of the optional AC adapter is closed before connecting. 1 Connect the cable by inserting it into the video output connector of the camera and the input connector of the camera is recommended. Make sure that the power...

D-400 Zoom Instruction Manual (3.4 MB)
Page 188
... when the Shutter release button is pressed. 1 The flash has not finished charging or the previous picture is being written into the SmartMedia. [ Remove your finger from the Shutter release button and wait until the Green lamp or the Orange lamp stops blinking. (P. 72/88) 2 SmartMedia is full. [ Replace the SmartMedia, erase unwanted pictures, or transfer the entire picture data to function. [ Keep the batteries warm while using the camera.
... when the Shutter release button is pressed. 1 The flash has not finished charging or the previous picture is being written into the SmartMedia. [ Remove your finger from the Shutter release button and wait until the Green lamp or the Orange lamp stops blinking. (P. 72/88) 2 SmartMedia is full. [ Replace the SmartMedia, erase unwanted pictures, or transfer the entire picture data to function. [ Keep the batteries warm while using the camera.

D-400 Zoom Instruction Manual (3.4 MB)
Page 192
... used with the Macro mode when the subject is too dark. 1 The flash was blocked by a finger. [ Hold the camera correctly, keeping your fingers away from right in front of the camera in the Selftimer mode. [ Press the Shutter release button while looking into the viewfinder, not while standing in front of 8"~31" (0.2 m~0.8 m). 192 E Problems with Images The picture is out of focus...
... used with the Macro mode when the subject is too dark. 1 The flash was blocked by a finger. [ Hold the camera correctly, keeping your fingers away from right in front of the camera in the Selftimer mode. [ Press the Shutter release button while looking into the viewfinder, not while standing in front of 8"~31" (0.2 m~0.8 m). 192 E Problems with Images The picture is out of focus...
D-400 Zoom Instruction Manual (3.4 MB)
Page 200
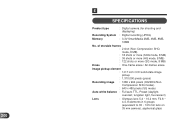
... SHQ mode, 8 MB) : 18 shots or more (SHQ mode, 8 MB) : 36 shots or more (HQ mode, 8 MB) : 122 shots or more (SQ mode, 8 MB) Erase : One-frame erase / All-frames erase Image pickup element : 1/2.7 inch CCD solid-state image pickup : 1,310,000 pixels (gross) Recording image : 1280 x 960 pixels (HQ/SHQ/NonCompression SHQ modes) : 640 x 480 pixels (SQ mode) Auto white balance : Full auto TTL, Preset (daylight, overcast, tungsten light, fluorescent) Lens : Olympus lens...
... SHQ mode, 8 MB) : 18 shots or more (SHQ mode, 8 MB) : 36 shots or more (HQ mode, 8 MB) : 122 shots or more (SQ mode, 8 MB) Erase : One-frame erase / All-frames erase Image pickup element : 1/2.7 inch CCD solid-state image pickup : 1,310,000 pixels (gross) Recording image : 1280 x 960 pixels (HQ/SHQ/NonCompression SHQ modes) : 640 x 480 pixels (SQ mode) Auto white balance : Full auto TTL, Preset (daylight, overcast, tungsten light, fluorescent) Lens : Olympus lens...

D-400 Zoom Instruction Manual (3.4 MB)
Page 202
...-screen display : Date/Time, Frame number, Protect, Recording mode, One/All erase, Battery check, File No. display, Menu Battery charging time for flash : Approx. 8 sec. (at normal temperature with mechanical shutter) * Manual setting not available Working range : 8" ~ 31" (Macro mode) 31" ~ ∞ (Standard mode) Viewfinder : Optical real image viewfinder (Autofocus mark/Backlighting correction mark), LCD monitor LCD monitor : 1.8" TFT color LCD display No. 202 E Photometric system : Digital ESP metering system, Spot metering system Exposure control : Program auto exposure...
...-screen display : Date/Time, Frame number, Protect, Recording mode, One/All erase, Battery check, File No. display, Menu Battery charging time for flash : Approx. 8 sec. (at normal temperature with mechanical shutter) * Manual setting not available Working range : 8" ~ 31" (Macro mode) 31" ~ ∞ (Standard mode) Viewfinder : Optical real image viewfinder (Autofocus mark/Backlighting correction mark), LCD monitor LCD monitor : 1.8" TFT color LCD display No. 202 E Photometric system : Digital ESP metering system, Spot metering system Exposure control : Program auto exposure...


