

SP-620UZ Instruction Manual (English)
Page 8
... display the function menu. Function menu Press H during shooting to change camera settings such as the shooting mode. Selected option Program Auto P Shooting mode 0.0 WB AUTO ISO AUTO 4 16M NORM ESP Shooting Function menu Setup menu To select the shooting mode Use HI to select a menu option. To select the function menu Use FG to select a menu and use HI to select the shooting mode and press the A button. The function menu is used to choose the shooting mode and provides access to set the function menu. 8 EN Press the A button to frequently used shooting settings...
... display the function menu. Function menu Press H during shooting to change camera settings such as the shooting mode. Selected option Program Auto P Shooting mode 0.0 WB AUTO ISO AUTO 4 16M NORM ESP Shooting Function menu Setup menu To select the shooting mode Use HI to select a menu option. To select the function menu Use FG to select a menu and use HI to select the shooting mode and press the A button. The function menu is used to choose the shooting mode and provides access to set the function menu. 8 EN Press the A button to frequently used shooting settings...

SP-620UZ Instruction Manual (English)
Page 9
... the function menu, display options, and the time and date. 1 Press the m button. ● The setup menu is selected, the display returns to display the setup menu. Page tab Submenu 1 1 Reset 2 Image Size Compression Shadow Adjust 1 AF Mode 2 ESP/ 3 Digital Zoom Exit MENU 16M Normal Auto Face/iESP ESP Off Set OK 1 Reset 2 Image Size Compression Shadow Adjust 1 AF Mode 2 ESP/ 3 Digital Zoom Exit MENU 16M Normal Auto Face/iESP ESP Off Set OK 3 Use FG to select the page tabs. EN 9 Submenu 2 1 Reset 2 Image Size...
... the function menu, display options, and the time and date. 1 Press the m button. ● The setup menu is selected, the display returns to display the setup menu. Page tab Submenu 1 1 Reset 2 Image Size Compression Shadow Adjust 1 AF Mode 2 ESP/ 3 Digital Zoom Exit MENU 16M Normal Auto Face/iESP ESP Off Set OK 1 Reset 2 Image Size Compression Shadow Adjust 1 AF Mode 2 ESP/ 3 Digital Zoom Exit MENU 16M Normal Auto Face/iESP ESP Off Set OK 3 Use FG to select the page tabs. EN 9 Submenu 2 1 Reset 2 Image Size...

SP-620UZ Instruction Manual (English)
Page 10
Rec View Pic Orientation Icon Guide Date Stamp a A (Movie menu p. 34 Image Size Image Quality IS Movie Mode R (Movie sound recording) b q (Playback p. 38 Slideshow Photo Surfing Edit Erase Print Order R (Protect) y (Rotate) cr (Settings 1 p. 42 Memory Format/Format Backup Eye-Fi USB Connection q Power On KeepzSettings Pw On Setup d s (Settings 2 p. 44 Sound Settings File Name Pixel Mapping s (Monitor) TV Out Power Save l (Language) e t (Settings 3 p. 48 X (Date/time) World Time Reset Database 10 EN Menu Index Program Auto 4 16M NORM ESP P 1 2 3 4 0.0 5 WB AUTO 6 ISO AUTO...
Rec View Pic Orientation Icon Guide Date Stamp a A (Movie menu p. 34 Image Size Image Quality IS Movie Mode R (Movie sound recording) b q (Playback p. 38 Slideshow Photo Surfing Edit Erase Print Order R (Protect) y (Rotate) cr (Settings 1 p. 42 Memory Format/Format Backup Eye-Fi USB Connection q Power On KeepzSettings Pw On Setup d s (Settings 2 p. 44 Sound Settings File Name Pixel Mapping s (Monitor) TV Out Power Save l (Language) e t (Settings 3 p. 48 X (Date/time) World Time Reset Database 10 EN Menu Index Program Auto 4 16M NORM ESP P 1 2 3 4 0.0 5 WB AUTO 6 ISO AUTO...
SP-620UZ Instruction Manual (English)
Page 12
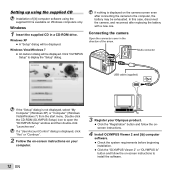
... the "OLYMPUS Viewer 2" or "OLYMPUS ib" button and follow the on Windows computers only. Setting up using the supplied CD Installation of the arrow. Windows 1 Insert the supplied CD in the direction of [ib] computer software using the supplied CD is not displayed, select "My Computer" (Windows XP) or "Computer" (Windows Vista/Windows 7) from the start menu. Multi-connector USB cable (supplied) If the "Setup" dialog is available on -screen instructions to...
... the "OLYMPUS Viewer 2" or "OLYMPUS ib" button and follow the on Windows computers only. Setting up using the supplied CD Installation of the arrow. Windows 1 Insert the supplied CD in the direction of [ib] computer software using the supplied CD is not displayed, select "My Computer" (Windows XP) or "Computer" (Windows Vista/Windows 7) from the start menu. Multi-connector USB cable (supplied) If the "Setup" dialog is available on -screen instructions to...
SP-620UZ Instruction Manual (English)
Page 13
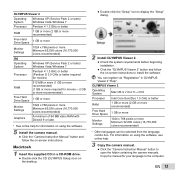
... on using the software, see online help for information on using the software. 5 Install the camera manual. ● Click the "Camera Instruction Manual" button and follow the on-screen instructions to display the "Setup" dialog. 2 Install OLYMPUS Viewer 2. ● Check the system requirements before beginning installation. ● Click the "OLYMPUS Viewer 2" button and follow the on the desktop. ● Double-click the "Setup" icon to install the software. Copy the manual for your language to open the folder containing the camera manuals. EN...
... on using the software, see online help for information on using the software. 5 Install the camera manual. ● Click the "Camera Instruction Manual" button and follow the on-screen instructions to display the "Setup" dialog. 2 Install OLYMPUS Viewer 2. ● Check the system requirements before beginning installation. ● Click the "OLYMPUS Viewer 2" button and follow the on the desktop. ● Double-click the "Setup" icon to install the software. Copy the manual for your language to open the folder containing the camera manuals. EN...

SP-620UZ Instruction Manual (English)
Page 14
... also choose the language for the menus and messages displayed in Steps 2 and 3, use FGHI to image file names, date prints, and other data. X Y M D Time 2012. 01 Y/M/D Cancel MENU 4 As in the monitor. 1 Press the n button to turn daylight saving time ([Summer]) on the camera. ● The date and time setting screen is displayed when the date and time are saved to set . To change the date and time, adjust the setting from the menu. [X] (Date/time) (p. 48) 5 Use HI to select...
... also choose the language for the menus and messages displayed in Steps 2 and 3, use FGHI to image file names, date prints, and other data. X Y M D Time 2012. 01 Y/M/D Cancel MENU 4 As in the monitor. 1 Press the n button to turn daylight saving time ([Summer]) on the camera. ● The date and time setting screen is displayed when the date and time are saved to set . To change the date and time, adjust the setting from the menu. [X] (Date/time) (p. 48) 5 Use HI to select...

SP-620UZ Instruction Manual (English)
Page 16
...When the camera focuses on the camera. P mode indicator P Current shooting mode display Program Auto P 0.0 WB AUTO ISO AUTO 4 16M NORM ESP MENU 3 Hold the camera and compose the shot. as exposure compensation, white balance, etc. Shooting, Playback, and Erasing Shooting with the optimum aperture value and shutter speed (P mode) In this mode, automatic shooting settings are activated while also allowing changes to turn on the subject, the exposure is not displayed, press H to display the function menu screen and then set the shooting mode to green. 16 EN The default settings of...
...When the camera focuses on the camera. P mode indicator P Current shooting mode display Program Auto P 0.0 WB AUTO ISO AUTO 4 16M NORM ESP MENU 3 Hold the camera and compose the shot. as exposure compensation, white balance, etc. Shooting, Playback, and Erasing Shooting with the optimum aperture value and shutter speed (P mode) In this mode, automatic shooting settings are activated while also allowing changes to turn on the subject, the exposure is not displayed, press H to display the function menu screen and then set the shooting mode to green. 16 EN The default settings of...

SP-620UZ Instruction Manual (English)
Page 24
... camera C Sport/N Indoor/W Candle*1/ takes a picture R Self Portrait/S Sunset*1/ using the X Fireworks*1/V Cuisine/ optimum settings d Documents/q Beach & Snow/ for specific shooting scenes. 0.0 WB Functions may be limited in some modes. Magic Filter In s modes, the optimum shooting settings are both saved. ● If the image cannot be taken. Shooting with special effects (P mode) 00:34 4 16M Icon indicating the scene mode that is set To add expression to your photo...
... camera C Sport/N Indoor/W Candle*1/ takes a picture R Self Portrait/S Sunset*1/ using the X Fireworks*1/V Cuisine/ optimum settings d Documents/q Beach & Snow/ for specific shooting scenes. 0.0 WB Functions may be limited in some modes. Magic Filter In s modes, the optimum shooting settings are both saved. ● If the image cannot be taken. Shooting with special effects (P mode) 00:34 4 16M Icon indicating the scene mode that is set To add expression to your photo...

SP-620UZ Instruction Manual (English)
Page 25
... by the camera. Taking pictures with [Auto] 1 Press the shutter button to take the first frame. 2 Move the camera slightly in some settings cannot be applied depending on installing the PC software, see "Setting up using the guide frame and manually releases the shutter. AUTO Target mark Pointer Cancel MENU Save OK Screen when combining images from left to the movie. Creating panoramic images (p mode) 1 Set the shooting mode to $ (Flash Off) mode. For details on the shooting mode. The fl...
... by the camera. Taking pictures with [Auto] 1 Press the shutter button to take the first frame. 2 Move the camera slightly in some settings cannot be applied depending on installing the PC software, see "Setting up using the guide frame and manually releases the shutter. AUTO Target mark Pointer Cancel MENU Save OK Screen when combining images from left to the movie. Creating panoramic images (p mode) 1 Set the shooting mode to $ (Flash Off) mode. For details on the shooting mode. The fl...

SP-620UZ Instruction Manual (English)
Page 32
... press the A button. Then press FGHI to this camera using [Auto] or [Manual] can be possible. If any files are composed of the pressed button. Viewing area To control panorama image playback Zoom in the instruction manual for viewing. "Shooting 3D images (W mode)" (p. 27) When playing back 3D images, read the warnings in /Zoom out: Press the A button to pause playback. Playback direction: Press the A button to pause playback. "Creating panoramic images (p mode)" (p. 25) 1 Select a panorama image during playback. Pause: Press the A button.
... press the A button. Then press FGHI to this camera using [Auto] or [Manual] can be possible. If any files are composed of the pressed button. Viewing area To control panorama image playback Zoom in the instruction manual for viewing. "Shooting 3D images (W mode)" (p. 27) When playing back 3D images, read the warnings in /Zoom out: Press the A button to pause playback. Playback direction: Press the A button to pause playback. "Creating panoramic images (p mode)" (p. 25) 1 Select a panorama image during playback. Pause: Press the A button.

SP-620UZ Instruction Manual (English)
Page 36
... on to aid focusing. When the shutter button is too severe. AF illuminator Submenu 2 Application The image stabilizer is not used. [Digital Zoom] is not available when [a Super Macro] (p. 28) is pressed halfway. "To take larger images" (p. 18) Reducing the blur caused by the camera shake when shooting [Image Stabilizer] (still images)/ [IS Movie Mode] (movies) J (Shooting menu 2) XImage Stabilizer (still images)/ A (Movie menu) X IS Movie Mode (movies) Using the assist lamp for the next shot while following...
... on to aid focusing. When the shutter button is too severe. AF illuminator Submenu 2 Application The image stabilizer is not used. [Digital Zoom] is not available when [a Super Macro] (p. 28) is pressed halfway. "To take larger images" (p. 18) Reducing the blur caused by the camera shake when shooting [Image Stabilizer] (still images)/ [IS Movie Mode] (movies) J (Shooting menu 2) XImage Stabilizer (still images)/ A (Movie menu) X IS Movie Mode (movies) Using the assist lamp for the next shot while following...

SP-620UZ Instruction Manual (English)
Page 46
... camera. Before viewing camera images on the camera, and use FGHI to your TV's video signal type. Multi-connector Connect to the HDMI connector on the TV. Open the connector cover in the direction of the arrow. To play back camera images on the countries and regions. The TV video signal system varies depending on a TV ● Connection via HDMI cable 1 On the camera, select the digital signal format...
... camera. Before viewing camera images on the camera, and use FGHI to your TV's video signal type. Multi-connector Connect to the HDMI connector on the TV. Open the connector cover in the direction of the arrow. To play back camera images on the countries and regions. The TV video signal system varies depending on a TV ● Connection via HDMI cable 1 On the camera, select the digital signal format...
SP-620UZ Instruction Manual (English)
Page 49
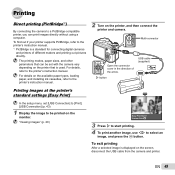
...I to start printing. 4 To print another image, use HI to the printer's instruction manual. The printing modes, paper sizes, and other parameters that is used. Multi-connector Open the connector cover in the direction of different makers and printing out pictures directly. "Viewing images" (p. 20) Easy Print Start Custom Print OK 3 Press I button USB cable (supplied) Printing images at the printer's standard settings [Easy Print] In the setup menu, set [USB Connection] to [Print]. [USB Connection] (p. 43) 1 Display the image to be set with the camera vary depending on the screen...
...I to start printing. 4 To print another image, use HI to the printer's instruction manual. The printing modes, paper sizes, and other parameters that is used. Multi-connector Open the connector cover in the direction of different makers and printing out pictures directly. "Viewing images" (p. 20) Easy Print Start Custom Print OK 3 Press I button USB cable (supplied) Printing images at the printer's standard settings [Easy Print] In the setup menu, set [USB Connection] to [Print]. [USB Connection] (p. 43) 1 Display the image to be set with the camera vary depending on the screen...

SP-620UZ Instruction Manual (English)
Page 54
... temperature. "Date, time, time zone, and language" (p. 14) Miscellaneous "The camera makes a noise when taking pictures. ● With prolonged camera use , however this mode. Troubleshooting Battery "The camera does not work as it automatically turns off the power, and wait for the camera body to become acclimated to the default setting". ● If the batteries are removed and left for 3 minutes when the camera is turned on. Card/Internal memory "An error message is pressed". ● Cancel sleep mode. "Vertical...
... temperature. "Date, time, time zone, and language" (p. 14) Miscellaneous "The camera makes a noise when taking pictures. ● With prolonged camera use , however this mode. Troubleshooting Battery "The camera does not work as it automatically turns off the power, and wait for the camera body to become acclimated to the default setting". ● If the batteries are removed and left for 3 minutes when the camera is turned on. Card/Internal memory "An error message is pressed". ● Cancel sleep mode. "Vertical...
SP-620UZ Instruction Manual (English)
Page 55
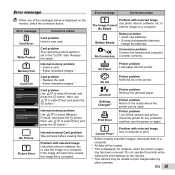
... Changed*3 Print Error Printer problem Remove the jammed paper. Printer problem Turn off the camera and printer, check the printer for instance, when the printer's paper tray has been removed. Error message Corrective action Card Error Write Protect Memory Full Card problem Insert a new card. Card problem The card write-protect switch is corrupted. Error message Corrective action Problem with selected image Use photo retouch software, etc. Printer problem Return to select [Format], and press the A button. Internal memory problem • Insert a card. • Erase...
... Changed*3 Print Error Printer problem Remove the jammed paper. Printer problem Turn off the camera and printer, check the printer for instance, when the printer's paper tray has been removed. Error message Corrective action Card Error Write Protect Memory Full Card problem Insert a new card. Card problem The card write-protect switch is corrupted. Error message Corrective action Problem with selected image Use photo retouch software, etc. Printer problem Return to select [Format], and press the A button. Internal memory problem • Insert a card. • Erase...

SP-620UZ Instruction Manual (English)
Page 58
... memory card or Eye-Fi card (commercially available)" (p. 15) "Viewing images with high picture quality on a highdefinition TV" ● Connect the camera to the TV using an HDMI cable (sold separately) ● "To play back camera images on a TV" (p. 46) Editing "Erasing the sound recorded to still images [R]" (p. 39) 58 EN "Creating panoramic images (p mode)" (p. 25) Batteries "Making batteries last longer" ● Avoid any of the following operations when not actually taking pictures of the image. Panorama Playback...
... memory card or Eye-Fi card (commercially available)" (p. 15) "Viewing images with high picture quality on a highdefinition TV" ● Connect the camera to the TV using an HDMI cable (sold separately) ● "To play back camera images on a TV" (p. 46) Editing "Erasing the sound recorded to still images [R]" (p. 39) 58 EN "Creating panoramic images (p mode)" (p. 25) Batteries "Making batteries last longer" ● Avoid any of the following operations when not actually taking pictures of the image. Panorama Playback...

SP-620UZ Instruction Manual (English)
Page 60
... the card During shooting, the current memory indicator lights up in the card is writing data. Image], or [All Erase] is performed, the data in red while the camera is not completely erased. Never open the battery/card compartment cover or unplug the USB cable. SD/SDHC/SDXC card write-protect switch The SD/SDHC/SDXC card body has a write-protect switch. If you set the switch to the "LOCK" side, you will not be able to write to the card, delete data or format...
... the card During shooting, the current memory indicator lights up in the card is writing data. Image], or [All Erase] is performed, the data in red while the camera is not completely erased. Never open the battery/card compartment cover or unplug the USB cable. SD/SDHC/SDXC card write-protect switch The SD/SDHC/SDXC card body has a write-protect switch. If you set the switch to the "LOCK" side, you will not be able to write to the card, delete data or format...

SP-620UZ Instruction Manual (English)
Page 66
... to turn off without displaying the battery level warning. • Olympus NiMH batteries (included in shooting mode, activating the auto focus. • A picture is displayed on the monitor for an extended period of time. • The camera is recommended. • When operating the camera with this camera. Using a non-genuine rechargeable battery, battery charger and/or USB-AC adapter may be sure to help save our planet's resources. AA NiMH batteries (rechargeable batteries) Being rechargeable, Olympus NiMH batteries...
... to turn off without displaying the battery level warning. • Olympus NiMH batteries (included in shooting mode, activating the auto focus. • A picture is displayed on the monitor for an extended period of time. • The camera is recommended. • When operating the camera with this camera. Using a non-genuine rechargeable battery, battery charger and/or USB-AC adapter may be sure to help save our planet's resources. AA NiMH batteries (rechargeable batteries) Being rechargeable, Olympus NiMH batteries...

SP-620UZ Instruction Manual (English)
Page 67
... OLYMPUS-supplied USB cable should be reproduced or used to connect the camera to Part 15 of Warranty • Olympus makes no representations or warranties regarding any damages or any form or by the manufacturer may become vague, resulting in a playback mode failure or damage to the structure of the information contained in the camera, the edges may take a long time to turn on the image...
... OLYMPUS-supplied USB cable should be reproduced or used to connect the camera to Part 15 of Warranty • Olympus makes no representations or warranties regarding any damages or any form or by the manufacturer may become vague, resulting in a playback mode failure or damage to the structure of the information contained in the camera, the edges may take a long time to turn on the image...

SP-620UZ Instruction Manual (English)
Page 73
..., USB connector, A/V OUT jack)/ HDMI micro connector (type D) : 2000 up to 2099 EN 73 SPECIFICATIONS Camera Product type : Digital camera (for shooting and displaying) Recording system Still pictures : Digital recording, JPEG (in accordance with Design rule for Camera File system (DCF)) Applicable standards : Exif 2.2, Digital Print Order Format (DPOF), PRINT Image Matching III, PictBridge 3D still image : MP format Sound with still : Wave format pictures Movie : MPEG-4AVC./H.264 Memory : Internal memory SD/SDHC/SDXC/Eye-Fi card No...
..., USB connector, A/V OUT jack)/ HDMI micro connector (type D) : 2000 up to 2099 EN 73 SPECIFICATIONS Camera Product type : Digital camera (for shooting and displaying) Recording system Still pictures : Digital recording, JPEG (in accordance with Design rule for Camera File system (DCF)) Applicable standards : Exif 2.2, Digital Print Order Format (DPOF), PRINT Image Matching III, PictBridge 3D still image : MP format Sound with still : Wave format pictures Movie : MPEG-4AVC./H.264 Memory : Internal memory SD/SDHC/SDXC/Eye-Fi card No...


