Onkyo 9555 - A Amplifier Support and Manuals
Get Help and Manuals for this Onkyo item

Popular Onkyo 9555 Manual Pages
Owner Manual - Page 1
... in the unit. Back cover page
En Please retain this manual will enable you for future reference. Troubleshooting 18 Specifications ...... Contents
Integrated Amplifier
A-9755/A-9555
Introduction 2
Instruction Manual
Connections 10
Enjoying Audio Sources 14
Thank you to obtain optimum performance and listening enjoyment from your new Integrated Amplifi...
Owner Manual - Page 2
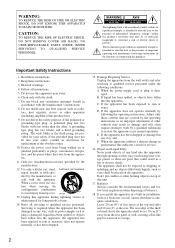
... of electric shock to the presence of important operating and maintenance (servicing) instructions in any heat sources such as vases shall be set 10 cm (4") away from the wall outlet and refer servicing to its normal operation, E. REFER SERVICING TO QUALIFIED SERVICE PERSONNEL.
Heed all servicing to dripping or splashing and no objects filled with arrowhead...
Owner Manual - Page 3
....
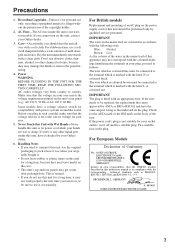
6. For British models
Replacement and mounting of an AC plug on the body of Conformity
We, ONKYO EUROPE ELECTRONICS GmbH LIEGNITZERSTRASSE 6, 82194 GROEBENZELL, GERMANY
declare in own responsibility, that indicated on the unit's rear panel (e.g., AC 230 V, 50 Hz or AC 120 V, 60 Hz). If the fuse needs to be replaced, the replacement fuse must be sure...
Owner Manual - Page 4
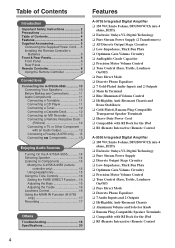
... to Components 15
Muting the A-9755/A-9555 (remote controller only 15
Using Headphones 15 Using the Tone Controls 16
Setting the PURE DIRECT Function....16 Adjusting the Bass 16 Adjusting the Treble 16 Loudness Control 16 Using the MAIN IN Function (A-9755 only 17 Recording 17
Others
Troubleshooting 18 Specifications 20
Features
A-9755 Integrated Digital...
Owner Manual - Page 6
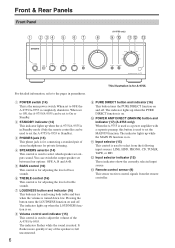
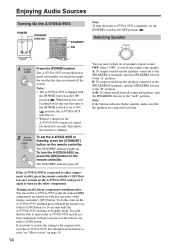
..., or MD. For detailed information, refer to Standby). When set to ON, the A-9755/A-9555 can be used to set the A-9755/A-9555 to the pages in Standby mode (Only the remote controller can switch the output speaker set outputs sound. You can be set to select which speaker set between four options: OFF, A, B and A+B. G LOUDNESS button and...
Owner Manual - Page 7
...set A.
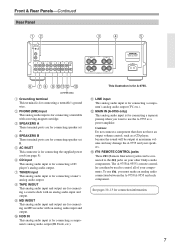
nents. E AC INLET This connector is for connecting a CD player's analog audio output.
The A-9755/A-9555's remote... controller can be con- I MD IN/OUT This analog audio input and output are for connecting a separate preamp when you must make an analog audio connection between the A-9755/A-9555... set ...REMOTE CONTROL jacks
These (Remote Interactive) jacks can then be ...
Owner Manual - Page 8
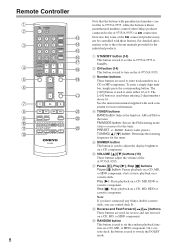
...H Reverse and Fast Forward [ ]/[ ] buttons These buttons are used to adjust the display brightness on a CD component. Remote Controller
1
2
C
3
D
E
F G
4
H
5
I RANDOM button This button is used to set the A-9755/A-9555 to turn on the A-9755/A-9555. TUNING [ ]/[ ] button: Determine the listening frequency for the individual products.
To enter a single-digit number, simply...
Owner Manual - Page 10

...insert the bare wires.
4 Screw the terminal tight. Right speaker
Speaker set A
Left speaker
-+
-+
A-9755/A-9555
-+
-+
Right speaker
Speaker set of speakers (A or B): Only connect speakers with an impedance of 4... of insulation from the wall outlet before making any connections.
• Read the instructions supplied with Left and Right in protection circuit may be avoided. • Be ...
Owner Manual - Page 13
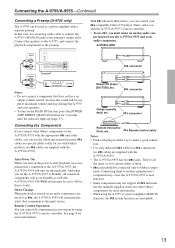
...9555's remote controller. • To use , you set to ON for more information. • When using the A-9755/A-9555's remote controller. Connecting Components
If you connect other Onkyo...9755/A-9555 to malfunction. • Some components may not support all ...manuals supplied with a separate preamp. nection between the A-9755/A-9555 and each plug in all components in your -compatible Onkyo...
Owner Manual - Page 14
...;rst time or the [POWER] switch is shipped with just one press of the remote controller's [ON] button. Notes: • The A-9755/A-9555 is set to ON ( ) position, the A-9755/A-9555 will then be able to turn on the A-9755/A-9555, and press it 's turned on /standby) in the OFF position ( ). Note: If the Volume...
Owner Manual - Page 15

... a pair of the A-9755/A-9555.
1
Press the remote controller's
[MUTING] button. The
Volume indicator flashes. Start playback on .
15 To adjust the volume, use the INPUT [ ]/[ ] buttons. Notes: • Always turn down the volume before connecting your
headphones. • All connected speakers are pressed or the A-9755/A-9555 is set to . phones plug...
Owner Manual - Page 17
....
Volume control - LOUDNESS control -
Input selector - Remote control operation
- Input selector
1
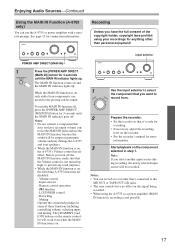
Use the input selector...the recording
level on the recorder.
• See the recorder's manual for anything other than personal enjoyment! See page 13 for some of... on, only audio from .
2
Prepare the recorder:
• Set the recorder so that 's connected to the
MD OUT or TAPE ...
Owner Manual - Page 18

...set the A-9755/A-9555 so that the required connection is performed appropriately, and set...remote controller's [MUTING] button to press the remote controller's [ON] button again. Noise can 't resolve the issue yourself, contact your Onkyo dealer. Relocate if
necessary (page 9). • If the A-9755/A-9555 is installed in contact with the metal part...from any trouble using the A-9755/A-9555, look...
Owner Manual - Page 19
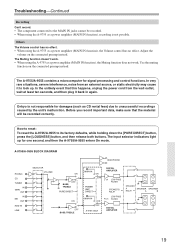
... from an external source, or static electricity may cause it back in again. Troubleshooting-Continued
Recording Can't record. • The component connected to the MAIN IN jacks.../A-9555 to lock up for one second, and then the A-9755/A-9555 enters On mode. The input selector indicators light up . The A-9755/A-9555 contains a microcomputer for signal processing and control functions. Onkyo ...
Owner Manual - Page 20
...Tel: 852-2429-3118 Fax: 852-2428-9039 http://www.ch.onkyo.com/
HOMEPAGE http://www.onkyo.com/
Printed in Japan D0510-1
SN 29344108
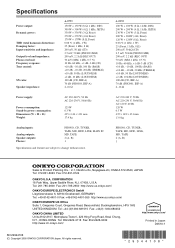
20 (C) Copyright 2005 ONKYO CORPORATION Japan. A-9555
100 W + 100 W (8 Ω, 1 kHz, DIN)...TAPE 2 (A, B) 1
Sales & Product Planning Div. : 2-1, Nisshin-cho, Neyagawa-shi, OSAKA 572-8540, JAPAN Tel: 072-831-8023 Fax: 072-831-8124
ONKYO U.S.A. CORPORATION 18 Park Way...
Onkyo 9555 Reviews
We have not received any reviews for Onkyo yet.