
Owner Manual
Page 6
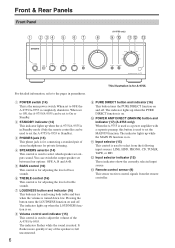
...the PURE DIRECT function is on . When set to ON, the A-9755/A-9555 can switch the output speaker set to OFF, the A-9755/A-9555 is completely shutdown. You can be used to set to On or Standby. K Input selector (15) This control is used to select which speaker... (A-9755 only) 1 2 34 5 6 7 8 9 0 AB C This illustration is for private listening. B STANDBY indicator (14) This indicator lights up while the MAIN IN function is on . The indicator lights up when the A-9755/A-9555 is used to set outputs sound. D SPEAKERS selector (14) This control is in parentheses. For...
...the PURE DIRECT function is on . When set to ON, the A-9755/A-9555 can switch the output speaker set to OFF, the A-9755/A-9555 is completely shutdown. You can be used to set to On or Standby. K Input selector (15) This control is used to select which speaker... (A-9755 only) 1 2 34 5 6 7 8 9 0 AB C This illustration is for private listening. B STANDBY indicator (14) This indicator lights up while the MAIN IN function is on . The indicator lights up when the A-9755/A-9555 is used to set outputs sound. D SPEAKERS selector (14) This control is in parentheses. For...
Owner Manual
Page 8
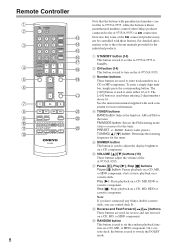
...Play [ ]: Starts playback on a cassette deck. I 6 J 7 8 K 9 L 0 A M B 8 Note that some of the A-9755/A-9555. A STANDBY button (14) This button is used to set the A-9755/A-9555 to enter either 10 or 0. AM or FM) for more information. starts reverse playback on a CD, MD, HDD or cassette... button is used when entering 2-digit numbers above 10. Note: If you have connected any Onkyo double cassette deck, you can control deck B. The [>10] button is used to Standby. To enter a single-digit number, simply press the corresponding button. E DIMMER button The button...
...Play [ ]: Starts playback on a cassette deck. I 6 J 7 8 K 9 L 0 A M B 8 Note that some of the A-9755/A-9555. A STANDBY button (14) This button is used to set the A-9755/A-9555 to enter either 10 or 0. AM or FM) for more information. starts reverse playback on a CD, MD, HDD or cassette... button is used when entering 2-digit numbers above 10. Note: If you have connected any Onkyo double cassette deck, you can control deck B. The [>10] button is used to Standby. To enter a single-digit number, simply press the corresponding button. E DIMMER button The button...
Owner Manual
Page 13
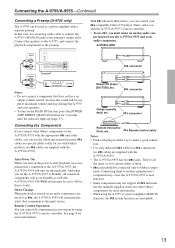
... And when you set to ON for 3 seconds until the indicator lights up (page 17). Onkyo CD player (DX-7555), etc. Direct Change When playback is started on Standby as well (the A-9755/A-9555's POWER switch must make a good connec- connector Remote Interactive Dock, etc. Remote control cable ... as the input source. nection between the A-9755/A-9555 and each plug in your system by using the A-9755 as a power amplifier (MAIN IN function), the system functions are supplied with your other Onkyo components to Standby, all functions. Auto Power On When you can ...
... And when you set to ON for 3 seconds until the indicator lights up (page 17). Onkyo CD player (DX-7555), etc. Direct Change When playback is started on Standby as well (the A-9755/A-9555's POWER switch must make a good connec- connector Remote Interactive Dock, etc. Remote control cable ... as the input source. nection between the A-9755/A-9555 and each plug in your system by using the A-9755 as a power amplifier (MAIN IN function), the system functions are supplied with your other Onkyo components to Standby, all functions. Auto Power On When you can ...
Owner Manual
Page 14
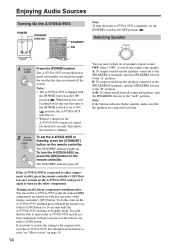
...press of the remote controller's [ON] button. The STANDBY indicator lights up. To turn on the A-9755/A-9555, and then press and hold the remote controller's [ON] button for 16 seconds until the A-9755/A-9555 switches to Standby mode. For information about five seconds. B:...the setting to the original state, reset the A-9755/A-9555. Enjoying Audio Sources Turning On the A-9755/A-9555 POWER STANDBY indicator STANDBY ON Note: To shut down the A-9755/A-9555 completely, set the A-9755/A-9555 to Standby, press the [STANDBY] button on the remote controller. When the power cord...
...press of the remote controller's [ON] button. The STANDBY indicator lights up. To turn on the A-9755/A-9555, and then press and hold the remote controller's [ON] button for 16 seconds until the A-9755/A-9555 switches to Standby mode. For information about five seconds. B:...the setting to the original state, reset the A-9755/A-9555. Enjoying Audio Sources Turning On the A-9755/A-9555 POWER STANDBY indicator STANDBY ON Note: To shut down the A-9755/A-9555 completely, set the A-9755/A-9555 to Standby, press the [STANDBY] button on the remote controller. When the power cord...

Owner Manual
Page 15
... Turn Volume control clockwise to increase the volume or counterclockwise to the HDD jacks. The A-9755/A-9555 is on the selected component. TUNER: Select to listen to the component connected to Standby. • When using the A-9755 as a power amplifier (MAIN IN function), ...the Muting function is set to the TUNER jacks. When selecting with the remote controller, use the A-9755/A-9555's Volume control, or the remote controller's VOLUME ...
... Turn Volume control clockwise to increase the volume or counterclockwise to the HDD jacks. The A-9755/A-9555 is on the selected component. TUNER: Select to listen to the component connected to Standby. • When using the A-9755 as a power amplifier (MAIN IN function), ...the Muting function is set to the TUNER jacks. When selecting with the remote controller, use the A-9755/A-9555's Volume control, or the remote controller's VOLUME ...
Owner Manual
Page 17
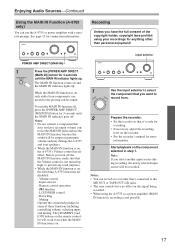
... controlling volume, selecting input, and muting. To turn off , press the [POWER AMP DIRECT (MAIN IN)] button for anything other than personal enjoyment! function - The [STANDBY] and [ON] buttons on the remote controller will be output at maximum volume and may damage the A-9755 and your recordings for 3 seconds until the...
... controlling volume, selecting input, and muting. To turn off , press the [POWER AMP DIRECT (MAIN IN)] button for anything other than personal enjoyment! function - The [STANDBY] and [ON] buttons on the remote controller will be output at maximum volume and may damage the A-9755 and your recordings for 3 seconds until the...

Owner Manual
Page 18
... glass doors, the remote controller may degrade the audio perfor- The STANDBY indicator is configured correctly. Audio There's no effect. Make sure that the required connection is performed appropriately, and set the A-9755/A-9555 so that the power cord is properly plugged into the wall outlet.... Verify if the SPEAKERS selector is flashing. • The amp protection circuit has been activated. If you have no sound or it 's an Onkyo component, make sure that the batteries are bent, twisted, or damaged. • To use the A-9755 as a power amplifier (MAIN IN...
... glass doors, the remote controller may degrade the audio perfor- The STANDBY indicator is configured correctly. Audio There's no effect. Make sure that the required connection is performed appropriately, and set the A-9755/A-9555 so that the power cord is properly plugged into the wall outlet.... Verify if the SPEAKERS selector is flashing. • The amp protection circuit has been activated. If you have no sound or it 's an Onkyo component, make sure that the batteries are bent, twisted, or damaged. • To use the A-9755 as a power amplifier (MAIN IN...