

User Manual English
Page 2
... heat. 9. Servicing is used, use this unit. 17. Follow all instructions. 5. Install in damage and will often require extensive work by the manufacturer, or sold with dry cloth. 7. When a cart is required when the apparatus has been damaged in any ventilation openings. Do not block any way, and F. Protect the power cord from tip-over. Unplug this indicates a need for replacement of...
... heat. 9. Servicing is used, use this unit. 17. Follow all instructions. 5. Install in damage and will often require extensive work by the manufacturer, or sold with dry cloth. 7. When a cart is required when the apparatus has been damaged in any ventilation openings. Do not block any way, and F. Protect the power cord from tip-over. Unplug this indicates a need for replacement of...

User Manual English
Page 3
..., radio, or VCR. 10. Precautions 1. Make sure that the plug is moved from a cold place to use a soft cloth dampened with a clean cloth. Dry the unit immediately afterwards with a weak solution of , or directly above a loudspeaker. • Install this unit in an audio rack. Installing this Unit • Install this unit horizontally. En-3 By this Instruction Manual carefully. For stubborn stains, use this model properly, read this time...
..., radio, or VCR. 10. Precautions 1. Make sure that the plug is moved from a cold place to use a soft cloth dampened with a clean cloth. Dry the unit immediately afterwards with a weak solution of , or directly above a loudspeaker. • Install this unit in an audio rack. Installing this Unit • Install this unit horizontally. En-3 By this Instruction Manual carefully. For stubborn stains, use this model properly, read this time...

User Manual English
Page 4
... by one or more of the fuse. If the power cord's plug is coloured blue must be performed only by the party responsible for User CAUTION: The user changes or modifications not expressly approved by qualified service personnel. GROEBENZELL, GERMANY K. Refer servicing to the terminal which the receiver is a CLASS 1 LASER PRODUCT and employs a laser inside the cabinet. 2. These limits...
... by one or more of the fuse. If the power cord's plug is coloured blue must be performed only by the party responsible for User CAUTION: The user changes or modifications not expressly approved by qualified service personnel. GROEBENZELL, GERMANY K. Refer servicing to the terminal which the receiver is a CLASS 1 LASER PRODUCT and employs a laser inside the cabinet. 2. These limits...

User Manual English
Page 5
En-5 Specifications and operations are trademarks of the product name indicates the color. sets (CBX-600UKD) • Preset naming (FM and AM only) • RDS (Radio Data System) (CBX-500 European model and CBX-600UKD only) • FM Auto Preset function CD Player • Play audio CDs, MP3/WMA*2 CDs (CD-R and CD-RW) • 4 playback modes: normal, random, memory, and 1-folder • 2-mode repeat function (current track or all tracks) • 25-track playlist USB Flash Drive (CBX-500 European model only...
En-5 Specifications and operations are trademarks of the product name indicates the color. sets (CBX-600UKD) • Preset naming (FM and AM only) • RDS (Radio Data System) (CBX-500 European model and CBX-600UKD only) • FM Auto Preset function CD Player • Play audio CDs, MP3/WMA*2 CDs (CD-R and CD-RW) • 4 playback modes: normal, random, memory, and 1-folder • 2-mode repeat function (current track or all tracks) • 25-track playlist USB Flash Drive (CBX-500 European model only...

User Manual English
Page 6
... 12 Connecting Antennas 14 Connecting a Portable Audio Device 16 Connecting the Power Cord 17 AccuClock-Automatic Clock Setting (CBX-500 European model and CBX-600UKD 17 Basic Operation 18 Turning On the CBX-500/CBX-600UKD 18 Adjusting the Volume 18 Selecting the Input Source 18 Using Headphones 18 Muting the CBX-500/CBX-600UKD 19 Adjusting the Bass and Treble 19 Using Super Bass 19 Changing the Display Brightness 19 Playing CDs and USB Flash Drives 20 Using the Top Panel Buttons 20 Using the Remote Controller 22 Displaying...
... 12 Connecting Antennas 14 Connecting a Portable Audio Device 16 Connecting the Power Cord 17 AccuClock-Automatic Clock Setting (CBX-500 European model and CBX-600UKD 17 Basic Operation 18 Turning On the CBX-500/CBX-600UKD 18 Adjusting the Volume 18 Selecting the Input Source 18 Using Headphones 18 Muting the CBX-500/CBX-600UKD 19 Adjusting the Bass and Treble 19 Using Super Bass 19 Changing the Display Brightness 19 Playing CDs and USB Flash Drives 20 Using the Top Panel Buttons 20 Using the Remote Controller 22 Displaying...

User Manual English
Page 10
... button (27, 30) 9 m MODE button (24, 25, 26, 46) j t n SNOOZE button (51) o DIMMER button (19) p INPUT SELECTOR buttons k (USB button: CBX-500 European model only.) l m q MUTING button (19) r VOLUME buttons (18, 22) s S.BASS button (19) t PLAYLIST/FOLDER buttons (24, 24, 30, 42) En-10 Getting to control your iPod. The page numbers in parentheses show where you can find the main explanation for details on using the remote controller to Know the CBX-500/CBX-600UKD-Continued Remote Controller...
... button (27, 30) 9 m MODE button (24, 25, 26, 46) j t n SNOOZE button (51) o DIMMER button (19) p INPUT SELECTOR buttons k (USB button: CBX-500 European model only.) l m q MUTING button (19) r VOLUME buttons (18, 22) s S.BASS button (19) t PLAYLIST/FOLDER buttons (24, 24, 30, 42) En-10 Getting to control your iPod. The page numbers in parentheses show where you can find the main explanation for details on using the remote controller to Know the CBX-500/CBX-600UKD-Continued Remote Controller...
User Manual English
Page 12
... display correctly. The file may not playback properly. The time information during VBR playback may not display correctly. • Copyright-protected WMA files cannot be played back. • WMA Pro, Lossless and Voice are not supported. * Windows Media is a registered trademark or trademark of Microsoft Corporation in the United States and/or in some discs may not play because of discs could damage the CBX-500/CBX-600UKD. * The CBX-500/CBX...
... display correctly. The file may not playback properly. The time information during VBR playback may not display correctly. • Copyright-protected WMA files cannot be played back. • WMA Pro, Lossless and Voice are not supported. * Windows Media is a registered trademark or trademark of Microsoft Corporation in the United States and/or in some discs may not play because of discs could damage the CBX-500/CBX-600UKD. * The CBX-500/CBX...
User Manual English
Page 14
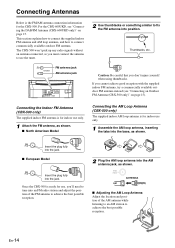
... to connect commercially available outdoor FM antenna. The CBX-500 won't pick up any radio signals without an antenna connected, so you must connect the antenna to use the tuner. 2 Use thumbtacks or something similar to fix the FM antenna into the jack. For the CBX-600UKD, see "Connecting an Outdoor FM Antenna (CBX-500 only)" on page 15. Connecting Antennas Below is for use, you'll need to tune into an FM radio station and adjust the...
... to connect commercially available outdoor FM antenna. The CBX-500 won't pick up any radio signals without an antenna connected, so you must connect the antenna to use the tuner. 2 Use thumbtacks or something similar to fix the FM antenna into the jack. For the CBX-600UKD, see "Connecting an Outdoor FM Antenna (CBX-500 only)" on page 15. Connecting Antennas Below is for use, you'll need to tune into an FM radio station and adjust the...
User Manual English
Page 16
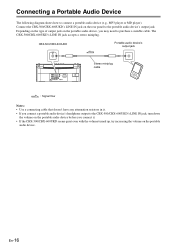
...on the type of output jack on the portable audio device. Connecting a Portable Audio Device The following diagram shows how to purchase a suitable cable. The CBX-500/CBX-600UKD's LINE IN jack accepts a stereo miniplug. Connect the CBX-500/CBX-600UKD's LINE IN jack on the rear panel to the CBX-500/CBX-600UKD's LINE IN jack, turn down the volume on the portable audio device before you connect it . • If you may need to connect a portable audio device (e.g., MP3 player or MD player). CBX-500/CBX-600UKD Portable audio device's output jack Stereo miniplug cable : Signal flow...
...on the type of output jack on the portable audio device. Connecting a Portable Audio Device The following diagram shows how to purchase a suitable cable. The CBX-500/CBX-600UKD's LINE IN jack accepts a stereo miniplug. Connect the CBX-500/CBX-600UKD's LINE IN jack on the rear panel to the CBX-500/CBX-600UKD's LINE IN jack, turn down the volume on the portable audio device before you connect it . • If you may need to connect a portable audio device (e.g., MP3 player or MD player). CBX-500/CBX-600UKD Portable audio device's output jack Stereo miniplug cable : Signal flow...
User Manual English
Page 17
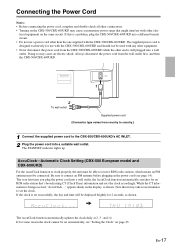
... other elec- The STANDBY indicator lights up. Be sure to the CBX-500/CBX-600UKD's AC INLET. 2 Plug the power cord into a different branch circuit. • Do not use with any other equipment. • Never disconnect the power cord from country to country.) 1 Connect the supplied power cord to connect an FM antenna before plugging in the power cord (see "Setting the Clock" on page 45. The AccuClock function automatically updates the clock daily at...
... other elec- The STANDBY indicator lights up. Be sure to the CBX-500/CBX-600UKD's AC INLET. 2 Plug the power cord into a different branch circuit. • Do not use with any other equipment. • Never disconnect the power cord from country to country.) 1 Connect the supplied power cord to connect an FM antenna before plugging in the power cord (see "Setting the Clock" on page 45. The AccuClock function automatically updates the clock daily at...

User Manual English
Page 18
... speakers output no sound while the headphones are selected in the following order. The STANDBY indicator lights up. USB can be selected only on the CBX-500/ CBX-600UKD or remote controller. You can be selected only on the rear panel. On the CBX-500/ CBX-600UKD, press the [INPUT] button repeatedly. Basic Operation ON/STANDBY PHONES (rear panel) ON/STANDBY INPUT iPod SNOOZE C D USB INPUT STANDBY indicator (front panel) VOLUME INPUT SELECTOR VOLUME / Turning On the CBX-500/ CBX-600UKD CBX-500/CBX...
... speakers output no sound while the headphones are selected in the following order. The STANDBY indicator lights up. USB can be selected only on the CBX-500/ CBX-600UKD or remote controller. You can be selected only on the rear panel. On the CBX-500/ CBX-600UKD, press the [INPUT] button repeatedly. Basic Operation ON/STANDBY PHONES (rear panel) ON/STANDBY INPUT iPod SNOOZE C D USB INPUT STANDBY indicator (front panel) VOLUME INPUT SELECTOR VOLUME / Turning On the CBX-500/ CBX-600UKD CBX-500/CBX...

User Manual English
Page 20
... your iPod to control iPod playback. Tips: • The CBX-500/CBX-600UKD will be charged when the CBX-500 is connected via USB, it . Using the Top Panel Buttons OPEN/EJECT CD slot/door Display INPUT iPod SNOOZE C D USB , USB CD USB port 1 To play a CD, open , pushing the CD door tab toward you for 3 seconds and the CD will turn on it will cause the CD to be ejected using the USB cable...
... your iPod to control iPod playback. Tips: • The CBX-500/CBX-600UKD will be charged when the CBX-500 is connected via USB, it . Using the Top Panel Buttons OPEN/EJECT CD slot/door Display INPUT iPod SNOOZE C D USB , USB CD USB port 1 To play a CD, open , pushing the CD door tab toward you for 3 seconds and the CD will turn on it will cause the CD to be ejected using the USB cable...

User Manual English
Page 26
... when the input source is stopped, press the [MENU] button. The playlist will be deleted when you try to add more than 99 minutes and 59 seconds, "- -:- -" is more , the message "Memory Full" appears. 3 To start memory playback. Track currently playing On the CBX-500/CBX-600UKD, press the Play/ Pause [/] button to select MP3/WMA files. MENU , , ENTER MODE Notes: • If the total playing time is displayed. • You...
... when the input source is stopped, press the [MENU] button. The playlist will be deleted when you try to add more than 99 minutes and 59 seconds, "- -:- -" is more , the message "Memory Full" appears. 3 To start memory playback. Track currently playing On the CBX-500/CBX-600UKD, press the Play/ Pause [/] button to select MP3/WMA files. MENU , , ENTER MODE Notes: • If the total playing time is displayed. • You...

User Manual English
Page 29
..., you press the iPod Play/Pause [/] button while the CBX-500/CBX-600UKD is ready for use the universal dock adapter supplied with its own, eventually it will go into the slot and lift it out. Playback starts. Selecting Tracks To return to update your iPod with your iPod, always remove it before your iPod is on Standby, it will turn on its slot facing...
..., you press the iPod Play/Pause [/] button while the CBX-500/CBX-600UKD is ready for use the universal dock adapter supplied with its own, eventually it will go into the slot and lift it out. Playback starts. Selecting Tracks To return to update your iPod with your iPod, always remove it before your iPod is on Standby, it will turn on its slot facing...
User Manual English
Page 38
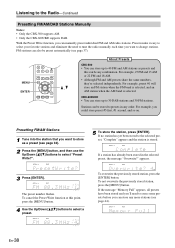
.../DAB Stations Manually Notes: • Only the CBX-500 supports AM. • Only the CBX-600UKD supports DAB. The preset number flashes. If the message "Memory Full" appears, all presets have been stored and you'll need to tune the radio manually each time you can store any combination. With the Preset Write function, you want to store as presets and this point, press the [MENU] button. 4 Use the Up/Down buttons to change stations. appears...
.../DAB Stations Manually Notes: • Only the CBX-500 supports AM. • Only the CBX-600UKD supports DAB. The preset number flashes. If the message "Memory Full" appears, all presets have been stored and you'll need to tune the radio manually each time you can store any combination. With the Preset Write function, you want to store as presets and this point, press the [MENU] button. 4 Use the Up/Down buttons to change stations. appears...

User Manual English
Page 46
... time, press the remote controller's [DISPLAY] button for 2 seconds, as shown. 1 Press the [TIMER] button repeatedly until "Clock" appears. 2 Press [ENTER]. matically update the clock daily at 2, 3, and 14, but it will be used the next time the AccuClock function runs. Also make sure a strong signal is on the display while the AccuClock function attempts to set the AccuClock function, but only when the unit is being received from different time...
... time, press the remote controller's [DISPLAY] button for 2 seconds, as shown. 1 Press the [TIMER] button repeatedly until "Clock" appears. 2 Press [ENTER]. matically update the clock daily at 2, 3, and 14, but it will be used the next time the AccuClock function runs. Also make sure a strong signal is on the display while the AccuClock function attempts to set the AccuClock function, but only when the unit is being received from different time...

User Manual English
Page 51
... function as Snooze buttons: [INPUT], iPod Play/Pause [/], Previous [/], Next [/], Stop [], CD Play/Pause [/], USB Play/Pause [/] (CBX-500 European model), or [DISPLAY] (CBX-500 North American and CBX-600UKD models). While the timed playback is displayed brightly for 8 seconds, use the Snooze function any number of minutes. Once the snooze time has expired, playback will start again. En-51 Top Panel INPUT iPod SNOOZE C D USB SNOOZE ON/STANDBY...
... function as Snooze buttons: [INPUT], iPod Play/Pause [/], Previous [/], Next [/], Stop [], CD Play/Pause [/], USB Play/Pause [/] (CBX-500 European model), or [DISPLAY] (CBX-500 North American and CBX-600UKD models). While the timed playback is displayed brightly for 8 seconds, use the Snooze function any number of minutes. Once the snooze time has expired, playback will start again. En-51 Top Panel INPUT iPod SNOOZE C D USB SNOOZE ON/STANDBY...
User Manual English
Page 53
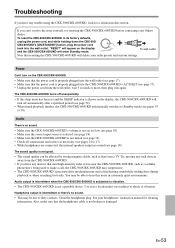
... the display, the CBX-500/CBX-600UKD will turn on the display and the CBX-500/CBX-600UKD will enter Standby mode. Audio There's no sound (see pages 14 to dirty contacts. Headphone output is intermittent or there's no sound. • This may be due to 17). • While headphones are connected, the internal speakers output no sound. • Make sure the CBX-500/CBX-600UKD's volume is not set and the SLEEP indicator is properly plugged...
... the display, the CBX-500/CBX-600UKD will turn on the display and the CBX-500/CBX-600UKD will enter Standby mode. Audio There's no sound (see pages 14 to dirty contacts. Headphone output is intermittent or there's no sound. • This may be due to 17). • While headphones are connected, the internal speakers output no sound. • Make sure the CBX-500/CBX-600UKD's volume is not set and the SLEEP indicator is properly plugged...
User Manual English
Page 55
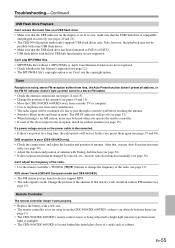
... 38). Don't use the copyright option. Troubleshooting-Continued USB Flash Drive Playback Can't access the music files on a USB flash drive. • Make sure that the USB indicator on the display is compatible and plugged in correctly (see pages 20 and 21). • The CBX-500 (European model only) supports USB flash drives only. En-55 If it has to pass through a concrete wall before reaching the antenna. • Switch to change the frequency...
... 38). Don't use the copyright option. Troubleshooting-Continued USB Flash Drive Playback Can't access the music files on a USB flash drive. • Make sure that the USB indicator on the display is compatible and plugged in correctly (see pages 20 and 21). • The CBX-500 (European model only) supports USB flash drives only. En-55 If it has to pass through a concrete wall before reaching the antenna. • Switch to change the frequency...
User Manual English
Page 56
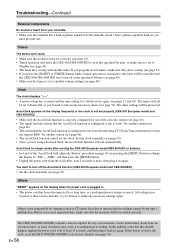
...] button while a timed operation is in phono equalizer. AccuClock no longer works after moving the CBX-500 European model/CBX-600UKD or antenna. • In step 4 of the "AccuClock with a Specific Station" procedure on the display when the power cord is set to turn on the display frequently or the clock is not set properly (CBX-500 European model and CBX-600UKD). • Make sure the AccuClock function is correctly configured for use with another station (see...
...] button while a timed operation is in phono equalizer. AccuClock no longer works after moving the CBX-500 European model/CBX-600UKD or antenna. • In step 4 of the "AccuClock with a Specific Station" procedure on the display when the power cord is set to turn on the display frequently or the clock is not set properly (CBX-500 European model and CBX-600UKD). • Make sure the AccuClock function is correctly configured for use with another station (see...
