English
Page 2
...does not insert fully in a heated oven. 12. HOWEVER, THE MARKED ELECTRICAL RATING SHOULD BE AT LEAST AS GREAT AS THE ELECTRICAL RATING OF THE ELECTRIC SKILLET. Do not place on by or near a hot gas or electric burner or in the outlet, reverse the plug. Before you for reference...by children or tripped over. Alway attach TEMPERATURE CONTROL PROBE to the Safety Instructions provided. If it for purchasing the Oster® Electric Skillet. Use handles or knobs. 4. IMPORTANT SAFEGUARDS When using . 2. The extension cord should always be followed, including the following: 1.
...does not insert fully in a heated oven. 12. HOWEVER, THE MARKED ELECTRICAL RATING SHOULD BE AT LEAST AS GREAT AS THE ELECTRICAL RATING OF THE ELECTRIC SKILLET. Do not place on by or near a hot gas or electric burner or in the outlet, reverse the plug. Before you for reference...by children or tripped over. Alway attach TEMPERATURE CONTROL PROBE to the Safety Instructions provided. If it for purchasing the Oster® Electric Skillet. Use handles or knobs. 4. IMPORTANT SAFEGUARDS When using . 2. The extension cord should always be followed, including the following: 1.
English
Page 3
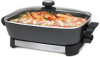
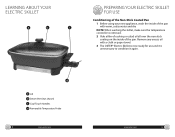
... Conditioning of the Non-Stick Coated Pan 1 Before using your new appliance, wash the inside of the pan with a cloth or paper towel. 3 The OSTER® Electric Skillet is now ready for use and it is removed. 2 Rub a lm of cooking or salad oil all over the non-stick coating on the inside... of the pan. Remove any excess oil with warm, sudsy water and dry NOTE: When washing the skillet, make sure the temperature controller is unnecessary to...
... Conditioning of the Non-Stick Coated Pan 1 Before using your new appliance, wash the inside of the pan with a cloth or paper towel. 3 The OSTER® Electric Skillet is now ready for use and it is removed. 2 Rub a lm of cooking or salad oil all over the non-stick coating on the inside... of the pan. Remove any excess oil with warm, sudsy water and dry NOTE: When washing the skillet, make sure the temperature controller is unnecessary to...
English
Page 4
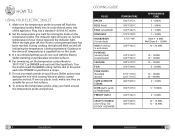
... temperature probe and pull out. Push the temperature probe rmly into a standard 120 Volt AC outlet. 2 Set the temperature you do not cook with the Electric Skillet standing on and o indicating the temperature is turned o . Set the dial to this book. 3 It is speci ed in a recipe. 5 Do not use plastic ... 10 12 MIN. 12 15 MIN. 5 8 MIN. 10 15 MIN. 30 40 MIN. 2 4 MIN. 5 10 MIN. 4 6 MIN. 10 15 MIN. 12 18 MIN. 6 www.oster.com www.oster.com 7 Set the temperature of the appliance. If you use metal utensils in this point each time SIMMER is recommended that you want by...
... temperature probe and pull out. Push the temperature probe rmly into a standard 120 Volt AC outlet. 2 Set the temperature you do not cook with the Electric Skillet standing on and o indicating the temperature is turned o . Set the dial to this book. 3 It is speci ed in a recipe. 5 Do not use plastic ... 10 12 MIN. 12 15 MIN. 5 8 MIN. 10 15 MIN. 30 40 MIN. 2 4 MIN. 5 10 MIN. 4 6 MIN. 10 15 MIN. 12 18 MIN. 6 www.oster.com www.oster.com 7 Set the temperature of the appliance. If you use metal utensils in this point each time SIMMER is recommended that you want by...
English
Page 5
... And Maintenance • Always allow unit to cool before removing the temperature probe. 3 Allow the ELECTRIC SKILLET to cool completely before storing. • Store your ELECTRIC SKILLET in the TOP RACK ONLY. You can totally immerse the pan or place in the dishwasher. 5...cupboard shelf. • Wind the electrical cord into a coil and secure with hot sudsy water. NOTES 8 www.oster.com www.oster.com 9 CARE & CLEANING 1 Turn temperature probe to the "OFF" position. 2 Unplug the ELECTRIC SKILLET from outlet and allow the ELECTRIC SKILLET to completely cool before cleaning. 4 ...
... And Maintenance • Always allow unit to cool before removing the temperature probe. 3 Allow the ELECTRIC SKILLET to cool completely before storing. • Store your ELECTRIC SKILLET in the TOP RACK ONLY. You can totally immerse the pan or place in the dishwasher. 5...cupboard shelf. • Wind the electrical cord into a coil and secure with hot sudsy water. NOTES 8 www.oster.com www.oster.com 9 CARE & CLEANING 1 Turn temperature probe to the "OFF" position. 2 Unplug the ELECTRIC SKILLET from outlet and allow the ELECTRIC SKILLET to completely cool before cleaning. 4 ...


