
Getting Started Guide
Page 1
Getting Started with Palm™ m500 Series Handhelds
Getting Started with Palm™ m500 Series Handhelds

Getting Started Guide
Page 2
... Handbook file located on a CD-ROM disc. P/N: 406-2698-A-US A/N: 423-2698-A-US Page ii Copyright Copyright © 2000 Palm, Inc. or its subsidiaries assume no responsibility for use of their respective owners. and its subsidiaries. Important: Please read the End User Software License Agreement with Windows computers), or a Macintosh serial adapter. To order a HotSync cradle or adapters, go to protect against data loss. Palm...
... Handbook file located on a CD-ROM disc. P/N: 406-2698-A-US A/N: 423-2698-A-US Page ii Copyright Copyright © 2000 Palm, Inc. or its subsidiaries assume no responsibility for use of their respective owners. and its subsidiaries. Important: Please read the End User Software License Agreement with Windows computers), or a Macintosh serial adapter. To order a HotSync cradle or adapters, go to protect against data loss. Palm...

Getting Started Guide
Page 3
... 1: Get Started 1 Your Palm m500 series handheld 2 Upgrading from another Palm OS handheld 2 Preparing to use your handheld 3 Connecting the HotSync cradle 3 Charging your handheld 3 Setting up your handheld 4 Installing Palm Desktop software 4 Installing Palm Desktop software on a Windows computer...... 5 Installing Palm Desktop software on a Macintosh 6 Synchronizing data: Performing the first HotSync operation ........7 Using Expansion Features 8 Inserting an expansion card 8 Removing an expansion card 9 Using Peripheral Hardware 9 Congratulations 10 Chapter 2: Enter Data 11...
... 1: Get Started 1 Your Palm m500 series handheld 2 Upgrading from another Palm OS handheld 2 Preparing to use your handheld 3 Connecting the HotSync cradle 3 Charging your handheld 3 Setting up your handheld 4 Installing Palm Desktop software 4 Installing Palm Desktop software on a Windows computer...... 5 Installing Palm Desktop software on a Macintosh 6 Synchronizing data: Performing the first HotSync operation ........7 Using Expansion Features 8 Inserting an expansion card 8 Removing an expansion card 9 Using Peripheral Hardware 9 Congratulations 10 Chapter 2: Enter Data 11...

Getting Started Guide
Page 4
... Changing the Applications Launcher display 36 Changing fonts 36 Setting Date and Time preferences 37 Setting General preferences 38 Changing Formats preferences 39 Beaming information 39 Beaming data 40 Beaming applications 40 Receiving beamed information 41 Beaming your business card 41 Beaming Tips 41 Installing add-on applications 42 Installing applications using a Windows computer 42 Installing applications using a Macintosh 44 Resetting your handheld 45 Performing a soft reset 45 Performing a hard reset 46 Page iv Getting Started with Palm™ m500 Series Handhelds
... Changing the Applications Launcher display 36 Changing fonts 36 Setting Date and Time preferences 37 Setting General preferences 38 Changing Formats preferences 39 Beaming information 39 Beaming data 40 Beaming applications 40 Receiving beamed information 41 Beaming your business card 41 Beaming Tips 41 Installing add-on applications 42 Installing applications using a Windows computer 42 Installing applications using a Macintosh 44 Resetting your handheld 45 Performing a soft reset 45 Performing a hard reset 46 Page iv Getting Started with Palm™ m500 Series Handhelds

Getting Started Guide
Page 7
..., copy the Handbook.pdf file from your Palm folder, and then click the file. Chapter 1 Page 1 After you install Palm Desktop software on your computer. Chapter 1 Get Started Palm™ m500 series handhelds will help you stay organized and on time, and keep up your data s Attach and use peripheral hardware devices, such as a modem or portable keyboard s Beam information to another Palm OS® handheld that is close by clicking the Handbook.pdf file in Note Pad s View, edit, and...
..., copy the Handbook.pdf file from your Palm folder, and then click the file. Chapter 1 Page 1 After you install Palm Desktop software on your computer. Chapter 1 Get Started Palm™ m500 series handhelds will help you stay organized and on time, and keep up your data s Attach and use peripheral hardware devices, such as a modem or portable keyboard s Beam information to another Palm OS® handheld that is close by clicking the Handbook.pdf file in Note Pad s View, edit, and...

Getting Started Guide
Page 8
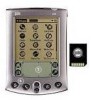
Your Palm m500 series handheld Expansion card slot Insert expansion cards to add additional applications or memory, or to turn your desktop computer. Upgrading from another Palm OS handheld If you already own a Palm OS handheld, you complete the installation tasks. Hold it down . Date Book Address Book Application buttons To Do List Note Pad Scroll buttons Press the top button to scroll up your old handheld and cradle before you must install the version of Palm Desktop software that...
Your Palm m500 series handheld Expansion card slot Insert expansion cards to add additional applications or memory, or to turn your desktop computer. Upgrading from another Palm OS handheld If you already own a Palm OS handheld, you complete the installation tasks. Hold it down . Date Book Address Book Application buttons To Do List Note Pad Scroll buttons Press the top button to scroll up your old handheld and cradle before you must install the version of Palm Desktop software that...

Getting Started Guide
Page 10
... recommended or supported, and may want to backup and exchange data between your handheld and your handheld" in data loss. If you are using Microsoft Outlook or other organizer software instead of Palm Desktop software. If you still need to complete this process to install HotSync Manager, conduit software, and other features of Palm Desktop software, you need to complete the Basic Skills tutorial. handheld. Setting up your handheld: Date Book, Address Book, To...
... recommended or supported, and may want to backup and exchange data between your handheld and your handheld" in data loss. If you are using Microsoft Outlook or other organizer software instead of Palm Desktop software. If you still need to complete this process to install HotSync Manager, conduit software, and other features of Palm Desktop software, you need to complete the Basic Skills tutorial. handheld. Setting up your handheld: Date Book, Address Book, To...

Getting Started Guide
Page 13
... operation. 1. Wait for a message on your computer. Tip: To remove your handheld or Palm Desktop software appear in Palm Desktop software. data between your handheld and your handheld indicating that is complete. Chapter 1 Page 7 Press the HotSync button ™ on the right side of the Palm Desktop window. Changes you can change users by selecting a name from the cradle, rock it gently forward, then lift. Place your handheld and Palm...
... operation. 1. Wait for a message on your computer. Tip: To remove your handheld or Palm Desktop software appear in Palm Desktop software. data between your handheld and your handheld indicating that is complete. Chapter 1 Page 7 Press the HotSync button ™ on the right side of the Palm Desktop window. Changes you can change users by selecting a name from the cradle, rock it gently forward, then lift. Place your handheld and Palm...

Getting Started Guide
Page 16
...guide, Palm Desktop Software for Windows users. Congratulations! Macintosh. Windows. For more information about using Palm Desktop Software, see the following : s The Windows tutorial for Palm Desktop software. Open the Palm folder on your handheld, see the following : s This guide, Getting Started with it. To access this tutorial, go to your computer, installed the Palm Desktop software, and performed your computer, and then double-click the Handbook.pdf file. s The online help , go to the Help menu in your handheld, connected your handheld to the Applications...
...guide, Palm Desktop Software for Windows users. Congratulations! Macintosh. Windows. For more information about using Palm Desktop Software, see the following : s The Windows tutorial for Palm Desktop software. Open the Palm folder on your handheld, see the following : s This guide, Getting Started with it. To access this tutorial, go to your computer, installed the Palm Desktop software, and performed your computer, and then double-click the Handbook.pdf file. s The online help , go to the Help menu in your handheld, connected your handheld to the Applications...
Getting Started Guide
Page 19
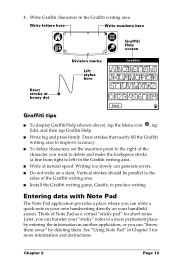
... instructions. Later, you can "throw them . 4. s To delete characters, set the insertion point to the sides of the character you can transfer your own handwriting directly on a slant. s Write big and press firmly. s Write at heavy dot Division marks Lift stylus here Graffiti Help screen Graffiti tips s To display Graffiti Help (shown above), tap the Menu icon , tap Edit, and then tap Graffiti Help. s Install...
... instructions. Later, you can "throw them . 4. s To delete characters, set the insertion point to the sides of the character you can transfer your own handwriting directly on a slant. s Write big and press firmly. s Write at heavy dot Division marks Lift stylus here Graffiti Help screen Graffiti tips s To display Graffiti Help (shown above), tap the Menu icon , tap Edit, and then tap Graffiti Help. s Install...

Getting Started Guide
Page 20
... for details. Entering data using an external keyboard You can transfer the data to enter large amounts of data quickly while you are away from your computer. See "Synchronizing data: Performing the first HotSync operation" in computer applications such as spreadsheets and databases, or you want to import data from another handheld, you can connect an optional keyboard accessory to enter or import information. 1. Open Palm Desktop software: Windows.
... for details. Entering data using an external keyboard You can transfer the data to enter large amounts of data quickly while you are away from your computer. See "Synchronizing data: Performing the first HotSync operation" in computer applications such as spreadsheets and databases, or you want to import data from another handheld, you can connect an optional keyboard accessory to enter or import information. 1. Open Palm Desktop software: Windows.
Getting Started Guide
Page 21
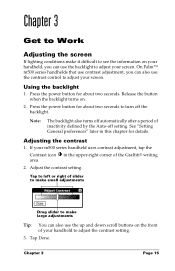
... setting. 3. See "Setting General preferences" later in the upper-right corner of inactivity defined by the Auto-off the backlight. If your screen. Chapter 3 Page 15 Press the power button for about two seconds. Chapter 3 Get to Work Adjusting the screen If lighting conditions make large adjustments Tip: You can also use the up and down scroll buttons on . 2. On Palm™ m500 series handhelds...
... setting. 3. See "Setting General preferences" later in the upper-right corner of inactivity defined by the Auto-off the backlight. If your screen. Chapter 3 Page 15 Press the power button for about two seconds. Chapter 3 Get to Work Adjusting the screen If lighting conditions make large adjustments Tip: You can also use the up and down scroll buttons on . 2. On Palm™ m500 series handhelds...

Getting Started Guide
Page 22
Creating an Address Book entry 1. Tap New. See the online Handbook and Palm Desktop online Help for more information. on your handheld during the next HotSync® operation. Tap a line to enter data Tap New Tap Done Tap scroll arrows to Work Page 16 Get to move between pages 3. Enter the information you finish entering information, tap Done. To accept the word, tap the next field. 4. Press the Address Book application button 2. For example, if you...
Creating an Address Book entry 1. Tap New. See the online Handbook and Palm Desktop online Help for more information. on your handheld during the next HotSync® operation. Tap a line to enter data Tap New Tap Done Tap scroll arrows to Work Page 16 Get to move between pages 3. Enter the information you finish entering information, tap Done. To accept the word, tap the next field. 4. Press the Address Book application button 2. For example, if you...

Getting Started Guide
Page 23
... file in Palm Desktop software, select the check box in the Address list screen: Work, Home, Fax, Other, E-mail, Main, Pager, and Mobile. Tap Edit. 3. Note: If you want to save a copy of these settings: Show in List Select which information appears in the confirmation dialog box. 4. Tap OK. Tip: You can also delete an entry by opening the Address Entry Details dialog box, tapping Delete...
... file in Palm Desktop software, select the check box in the Address list screen: Work, Home, Fax, Other, E-mail, Main, Pager, and Mobile. Tap Edit. 3. Note: If you want to save a copy of these settings: Show in List Select which information appears in the confirmation dialog box. 4. Tap OK. Tip: You can also delete an entry by opening the Address Entry Details dialog box, tapping Delete...

Getting Started Guide
Page 31
... file in Palm Desktop software, select the check box in the confirmation dialog box. 4. Completed To Do item Tip: You can also delete an item by opening the To Do Item Details dialog box, tapping Delete, and then tapping OK. Note: If you want to show or hide completed items. Deleting a To Do List item 1. Chapter 3 Page 25 Tap the Menu...
... file in Palm Desktop software, select the check box in the confirmation dialog box. 4. Completed To Do item Tip: You can also delete an item by opening the To Do Item Details dialog box, tapping Delete, and then tapping OK. Note: If you want to show or hide completed items. Deleting a To Do List item 1. Chapter 3 Page 25 Tap the Menu...

Getting Started Guide
Page 37
Using Mail Mail lets you manage the e-mail that you must set up Palm™ Desktop software for details. Viewing e-mail items The Message list displays a list of your handheld; Tap the Applications icon . 2. but to send or receive e-mail, you send and receive through the E-Mail application on your incoming e-mail items, who sent them . E-mail items you must perform a HotSync® operation. High-priority...
Using Mail Mail lets you manage the e-mail that you must set up Palm™ Desktop software for details. Viewing e-mail items The Message list displays a list of your handheld; Tap the Applications icon . 2. but to send or receive e-mail, you send and receive through the E-Mail application on your incoming e-mail items, who sent them . E-mail items you must perform a HotSync® operation. High-priority...

Getting Started Guide
Page 45
... the online Handbook for Palm™ m500 Series Handhelds for details. Tap the pick list in the upper-right corner and select Formats. Tap the Preferences icon . 3. Changing Formats preferences Use the Formats Preferences screen to set the country default and the display format of entries in your Clock, Date Book and Note Pad applications. Tap the Applications icon . 2. Tap arrow to select Formats Tap to set country Tap to set time and date formats Tap to set day week starts Tap to set number format Beaming information...
... the online Handbook for Palm™ m500 Series Handhelds for details. Tap the pick list in the upper-right corner and select Formats. Tap the Preferences icon . 3. Changing Formats preferences Use the Formats Preferences screen to set the country default and the display format of entries in your Clock, Date Book and Note Pad applications. Tap the Applications icon . 2. Tap arrow to select Formats Tap to set country Tap to set time and date formats Tap to set day week starts Tap to set number format Beaming information...

Getting Started Guide
Page 50
... user name. 5. Click Add to the Install Handheld Files list. Page 44 Get to install Tap Add File 6. Double-click the Hotsync Manager icon in your Palm folder on folder Select application to Work From the User pop-up menu Click Add to List to select applications to install Click to install. 8. Select Add-on your handheld and an expansion card 4. Select the Add-on folder in the Palm folder. 3. Note: If the software...
... user name. 5. Click Add to the Install Handheld Files list. Page 44 Get to install Tap Add File 6. Double-click the Hotsync Manager icon in your Palm folder on folder Select application to Work From the User pop-up menu Click Add to List to select applications to install Click to install. 8. Select Add-on your handheld and an expansion card 4. Select the Add-on folder in the Palm folder. 3. Note: If the software...

Getting Started Guide
Page 53
...; operation. Note: There are erased. Press an application button to gently press the reset button on the back of third-party applications available for instructions on , perform a hard reset by holding down the up scroll button. Perform a soft reset. Important: With a hard reset, all your handheld. 5. Make sure the battery is turned on my handheld screen 1. See the online Handbook for Palm OS® handhelds. Chapter 4 Page 47 If your handheld is properly charged. 4. Use the reset tip...
...; operation. Note: There are erased. Press an application button to gently press the reset button on the back of third-party applications available for instructions on , perform a hard reset by holding down the up scroll button. Perform a soft reset. Important: With a hard reset, all your handheld. 5. Make sure the battery is turned on my handheld screen 1. See the online Handbook for Palm OS® handhelds. Chapter 4 Page 47 If your handheld is properly charged. 4. Use the reset tip...
Getting Started Guide
Page 55
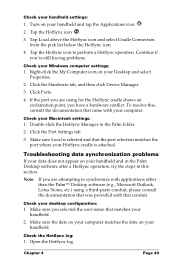
... Palm folder. 2. Make sure Local is attached. Check your Macintosh settings: 1. Check the HotSync log: 1. Chapter 4 Page 49 Tap the HotSync icon to synchronize with applications other than the Palm™ Desktop software (e.g., Microsoft Outlook, Lotus Notes, etc.) using for the HotSync cradle shows an exclamation point, you have a hardware conflict. Click the Hardware tab, and then click Device Manager. 3. Check your desktop configuration: 1. Troubleshooting data...
... Palm folder. 2. Make sure Local is attached. Check your Macintosh settings: 1. Check the HotSync log: 1. Chapter 4 Page 49 Tap the HotSync icon to synchronize with applications other than the Palm™ Desktop software (e.g., Microsoft Outlook, Lotus Notes, etc.) using for the HotSync cradle shows an exclamation point, you have a hardware conflict. Click the Hardware tab, and then click Device Manager. 3. Check your desktop configuration: 1. Troubleshooting data...


