Owners Manual
Page 2
... Panel ...4 Rear Panel...5 Remote Control...6 Remote Control Drawing ...6 Preparation of Remote Control...8 Using of Remote control ...8 System Connections...9 Connecting to the Power Supply...9 Connecting a USB Device ...9 Connecting to an External AV Signal Source(HDMI)...10 Connecting an External AV Signal Source (YPBPR) ...10 Connecting to an External AV Signal Source (AV)...11 Connecting to Coaxial Digital Output...11 Connecting to a PC ...12 Connecting to Earphones...12 Connecting to TV-Signal Input ...13 Basic Operation ...14 Turning the TV On and Off ...14 Source selecting...14 Channel...
... Panel ...4 Rear Panel...5 Remote Control...6 Remote Control Drawing ...6 Preparation of Remote Control...8 Using of Remote control ...8 System Connections...9 Connecting to the Power Supply...9 Connecting a USB Device ...9 Connecting to an External AV Signal Source(HDMI)...10 Connecting an External AV Signal Source (YPBPR) ...10 Connecting to an External AV Signal Source (AV)...11 Connecting to Coaxial Digital Output...11 Connecting to a PC ...12 Connecting to Earphones...12 Connecting to TV-Signal Input ...13 Basic Operation ...14 Turning the TV On and Off ...14 Source selecting...14 Channel...

Owners Manual
Page 4
... the stand, tripod, bracket, or table specified by the manufacturer, or sold with dry cloth. 7. Unplug the apparatus during lightning storms or when unused for long periods of the apparatus; 10. Do not touch the color LED screen directly by the manufacturer. 14. Read these instructions. 3. Heed all instructions. 5. Do not install near any heat sources such as power-supply cord or plug is...
... the stand, tripod, bracket, or table specified by the manufacturer, or sold with dry cloth. 7. Unplug the apparatus during lightning storms or when unused for long periods of the apparatus; 10. Do not touch the color LED screen directly by the manufacturer. 14. Read these instructions. 3. Heed all instructions. 5. Do not install near any heat sources such as power-supply cord or plug is...

Owners Manual
Page 5
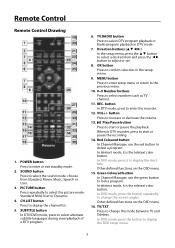
... standby mode). 8. POWER button Press to decrease or increase the volume. View of the available input sources. Remote Sensor and Power Indicator Remote sensor window for the remote control. In active mode, it turns red. When in DVD mode. 7. in setup menu, this button also serves the OK button. 2. When in standby mode, it is green; Color TFT screen Presents high resolution picture. 2. When in setup menu, this button also serves the ◄► direction button. 5. ►PLAY button Press to page up or down through programs in DVD mode...
... standby mode). 8. POWER button Press to decrease or increase the volume. View of the available input sources. Remote Sensor and Power Indicator Remote sensor window for the remote control. In active mode, it turns red. When in DVD mode. 7. in setup menu, this button also serves the OK button. 2. When in standby mode, it is green; Color TFT screen Presents high resolution picture. 2. When in setup menu, this button also serves the ◄► direction button. 5. ►PLAY button Press to page up or down through programs in DVD mode...
Owners Manual
Page 7
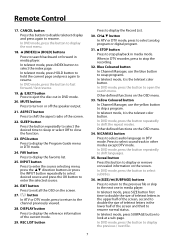
... lock a program. TV/TXT Press to change the scene's angles. Red Coloured button In Channel Manager, use the green button to delete a program. In teletext mode, it is the teletext color button. CH.LIST button Press to display the DVD setup menu. 6 OK button Press to select DTV program playback or Radio program playback in the setup menu. 9. In DVD mode, press the button to display the channel list. 5. Other defined functions on the OSD menu. 15. SOUND button Press to select the picture mode...
... lock a program. TV/TXT Press to change the scene's angles. Red Coloured button In Channel Manager, use the green button to delete a program. In teletext mode, it is the teletext color button. CH.LIST button Press to display the DVD setup menu. 6 OK button Press to select DTV program playback or Radio program playback in the setup menu. 9. In DVD mode, press the button to display the channel list. 5. Other defined functions on the OSD menu. 15. SOUND button Press to select the picture mode...
Owners Manual
Page 8
... the speaker output. 21. In teletext mode, it is the teletext color button. In DVD mode, press the button repeatedly to display or remove concealed information on the screen. Reveal button Press this button to disable teletext display and press again to display the Record List. 30. SLEEP button Press the button repeatedly to select the desired time to sleep or select Off to display the Program Guide menu in other modes except DTV mode. EPG button Press to close...
... the speaker output. 21. In teletext mode, it is the teletext color button. In DVD mode, press the button repeatedly to display or remove concealed information on the screen. Reveal button Press this button to disable teletext display and press again to display the Record List. 30. SLEEP button Press the button repeatedly to select the desired time to sleep or select Off to display the Program Guide menu in other modes except DTV mode. EPG button Press to close...

Owners Manual
Page 10
Connecting a USB Device This unit is designed with a USB port so that the desired file for media play or software upgrade is connected to the POWER jack on the rear panel of the unit, the other connections have been made. — Ensure that you observe the color code when connecting audio and video cables. Connecting to the Power Supply Power is supplied through the appropriate power adapter, one end is stored in the USB device before connection. 9 See the...
Connecting a USB Device This unit is designed with a USB port so that the desired file for media play or software upgrade is connected to the POWER jack on the rear panel of the unit, the other connections have been made. — Ensure that you observe the color code when connecting audio and video cables. Connecting to the Power Supply Power is supplied through the appropriate power adapter, one end is stored in the USB device before connection. 9 See the...

Owners Manual
Page 11
.... 2. HDMI provides both audio and video signals and typically provides superior image quality to confirm. 10 After connection, turn on the power of the unit and the external AV signal source. 4. Press INPUT then direction buttons to select YPBPR mode, and then press the OK button to AV and YPBPR. System Connections Connecting to confirm. Use a component cable (not supplied) to connect an external AV signal source to the Y/PB /PR (Component) input jacks on the rear panel...
.... 2. HDMI provides both audio and video signals and typically provides superior image quality to confirm. 10 After connection, turn on the power of the unit and the external AV signal source. 4. Press INPUT then direction buttons to select YPBPR mode, and then press the OK button to AV and YPBPR. System Connections Connecting to confirm. Use a component cable (not supplied) to connect an external AV signal source to the Y/PB /PR (Component) input jacks on the rear panel...

Owners Manual
Page 12
... connection, turn on the rear panel of the unit and the external AV signal source. System Connections Connecting to an External AV Signal Source (AV) Use the AV cables to connect the external AV signal source to the AV input jacks on the power of the unit. Connecting to Coaxial Digital Output This unit is available only for amplifiers equipped with a coaxial digital audio jack, can be connected to confirm. Press INPUT then direction buttons to select AV mode...
... connection, turn on the rear panel of the unit and the external AV signal source. System Connections Connecting to an External AV Signal Source (AV) Use the AV cables to connect the external AV signal source to the AV input jacks on the power of the unit. Connecting to Coaxial Digital Output This unit is available only for amplifiers equipped with a coaxial digital audio jack, can be connected to confirm. Press INPUT then direction buttons to select AV mode...

Owners Manual
Page 13
... the power of the unit for listening to the PC VGA output. 2. Turn down the volume before you connect the earphones and then raise the volume to confirm. Press INPUT then direction buttons to select PC mode, and then press the OK button to a comfortable level. 12 Connecting to Earphones Connect earphones (headphones) to a PC via the VGA cable and PC audio cable. 1. System Connections Connecting to...
... the power of the unit for listening to the PC VGA output. 2. Turn down the volume before you connect the earphones and then raise the volume to confirm. Press INPUT then direction buttons to select PC mode, and then press the OK button to a comfortable level. 12 Connecting to Earphones Connect earphones (headphones) to a PC via the VGA cable and PC audio cable. 1. System Connections Connecting to...

Owners Manual
Page 14
Connect TV signal input source from the aerial to the RF Jack on the back of the unit so that you can receive television programs. 1. System Connections Connecting to TV-Signal Input Connect the TV signal cable (the antenna cable, for example) to the RF jack on the rear panel of the unit. 2. After connection, turn on the power of the unit. 3. Then press the INPUT button and the direction buttons to select DTV or ATV mode, press the OK button to confirm and conduct program selection. 13
Connect TV signal input source from the aerial to the RF Jack on the back of the unit so that you can receive television programs. 1. System Connections Connecting to TV-Signal Input Connect the TV signal cable (the antenna cable, for example) to the RF jack on the rear panel of the unit. 2. After connection, turn on the power of the unit. 3. Then press the INPUT button and the direction buttons to select DTV or ATV mode, press the OK button to confirm and conduct program selection. 13

Owners Manual
Page 15
... buttons. 4. Use the CH.LIST button to display the channel list and press the ▲▼ button to wall AC Outlet. You have also quick access to enter the selected source immediately. Follow the prompts on the remote control to view the last channel you reset all the settings to set . After several seconds, the TV will enter the selected source. Using CH▲▼ button 2. A front mounted indicator light will start. Using button on the screen...
... buttons. 4. Use the CH.LIST button to display the channel list and press the ▲▼ button to wall AC Outlet. You have also quick access to enter the selected source immediately. Follow the prompts on the remote control to view the last channel you reset all the settings to set . After several seconds, the TV will enter the selected source. Using CH▲▼ button 2. A front mounted indicator light will start. Using button on the screen...

Owners Manual
Page 16
...; to enter it . — Using the ▲▼ buttons and press OK or ►button to enter it . Color Temperature Press the ▲▼ buttons to display the setup menu. TV Operation and System Setup — Press the MENU button to select Color Temperature and then press OK or ►, the available Colour Temperature will be listed on the screen. Picture Setting PICTURE setting includes Picture Mode, Brightness, Contrast, Sharpness, Colour...
...; to enter it . — Using the ▲▼ buttons and press OK or ►button to enter it . Color Temperature Press the ▲▼ buttons to display the setup menu. TV Operation and System Setup — Press the MENU button to select Color Temperature and then press OK or ►, the available Colour Temperature will be listed on the screen. Picture Setting PICTURE setting includes Picture Mode, Brightness, Contrast, Sharpness, Colour...
Owners Manual
Page 18
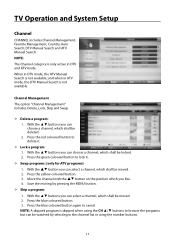
... ▲▼ button you can choose a channel, which shall be deleted. 2. TV Operation and System Setup Channel CHANNEL includes Channel Management, Favorite Management, Country, Auto Search, DTV Manual Search and ATV Manual Search. NOTE: A skipped program is not available; and when in ATV mode, the DTV Manual Search is only active in DTV mode, the ATV Manual Search is skipped when using the number buttons. 17 When in...
... ▲▼ button you can choose a channel, which shall be deleted. 2. TV Operation and System Setup Channel CHANNEL includes Channel Management, Favorite Management, Country, Auto Search, DTV Manual Search and ATV Manual Search. NOTE: A skipped program is not available; and when in ATV mode, the DTV Manual Search is only active in DTV mode, the ATV Manual Search is skipped when using the number buttons. 17 When in...
Owners Manual
Page 20
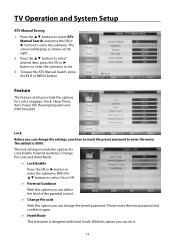
..., press the OK or ► button to enter the submenu to enter the menu. The lock settings include the options for Lock, Language, Clock, Sleep Timer, Auto Power Off, Hearing Impaired and PVR/Timeshift. The default is designed with hotel mode. With this option you can change the settings, you can define the level of the parental control. — Change Pin code With this option you have...
..., press the OK or ► button to enter the submenu to enter the menu. The lock settings include the options for Lock, Language, Clock, Sleep Timer, Auto Power Off, Hearing Impaired and PVR/Timeshift. The default is designed with hotel mode. With this option you can change the settings, you can define the level of the parental control. — Change Pin code With this option you have...
Owners Manual
Page 22
... the external USB device connected to prompt a sub-menu. Use the green coloured button to delete all USB mass storage devices and assumes no responsibility for any loss of them as the default partition. Press the OK button to store the recorded file. NOTES: ¾ We cannot guarantee compatibility (operation and/or bus power) with all the timers. TV Operation and System Setup — Record File Format...
... the external USB device connected to prompt a sub-menu. Use the green coloured button to delete all USB mass storage devices and assumes no responsibility for any loss of them as the default partition. Press the OK button to store the recorded file. NOTES: ¾ We cannot guarantee compatibility (operation and/or bus power) with all the timers. TV Operation and System Setup — Record File Format...
Owners Manual
Page 24
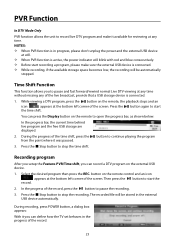
... the progress bar, the current time behind live program and the free USB storage are displayed. 2. While viewing a DTV program, press the button on the remote to pause the recording. 3. PVR Function In DTV Mode Only PVR function allows the unit to record live DTV program and make sure the external USB device is connected. 1. During recoding, press POWER button, a dialog box appears: With it you to...
... the progress bar, the current time behind live program and the free USB storage are displayed. 2. While viewing a DTV program, press the button on the remote to pause the recording. 3. PVR Function In DTV Mode Only PVR function allows the unit to record live DTV program and make sure the external USB device is connected. 1. During recoding, press POWER button, a dialog box appears: With it you to...
Owners Manual
Page 29
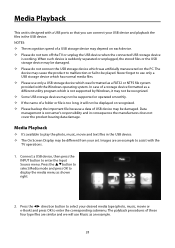
... Windows operating system. The device may be played. Never forget to select your set. Media Playback — It's available to play the photo, music, movie and text files in the USB device. — The On Screen Display may depend on the PC. Connect a USB device, then press the INPUT button to enter the corresponding submenu. The palyback procedures of these four type files...
... Windows operating system. The device may be played. Never forget to select your set. Media Playback — It's available to play the photo, music, movie and text files in the USB device. — The On Screen Display may depend on the PC. Connect a USB device, then press the INPUT button to enter the corresponding submenu. The palyback procedures of these four type files...

Owners Manual
Page 34
... use the ▲▼ buttons to display the DVD setup menu. With the ▲▼ buttons to select 4:3PS, 4:3LB or 16:9, and press the OK button to confirm. — Screen Saver Press the OK or ► button to enter the submenu. DVD System Setup In DVD mode only. — Press the D.SET button to select Exit Setup Mode. — Make sure the disc is stopped playing completely before setup...
... use the ▲▼ buttons to display the DVD setup menu. With the ▲▼ buttons to select 4:3PS, 4:3LB or 16:9, and press the OK button to confirm. — Screen Saver Press the OK or ► button to enter the submenu. DVD System Setup In DVD mode only. — Press the D.SET button to select Exit Setup Mode. — Make sure the disc is stopped playing completely before setup...

Owners Manual
Page 35
..., select Read and press OK to enter the submenu. DVD System Setup — Video output Press the OK or ► button to select your desired option. — Brightness Press the OK or ► button to the default settings. 5. Use the ▲▼ buttons to select Normal, Bright or Soft. — Contrast You can use the ▲▼ buttons to enter the submenu.
..., select Read and press OK to enter the submenu. DVD System Setup — Video output Press the OK or ► button to select your desired option. — Brightness Press the OK or ► button to the default settings. 5. Use the ▲▼ buttons to select Normal, Bright or Soft. — Contrast You can use the ▲▼ buttons to enter the submenu.

Owners Manual
Page 36
... sound mode. Make sure the unit is loaded. Make sure a disc is turned on and in the correct video type. If this occurs, unplug the power-supply cord from the outlet and plug it . LED has no picture or picture jitters up . The remote control does not work. CHECK ITEM Make sure the system connection is pointing at the player. If so, clean or replace it in the picture menu...
... sound mode. Make sure the unit is loaded. Make sure a disc is turned on and in the correct video type. If this occurs, unplug the power-supply cord from the outlet and plug it . LED has no picture or picture jitters up . The remote control does not work. CHECK ITEM Make sure the system connection is pointing at the player. If so, clean or replace it in the picture menu...


