Optio 60 Operating Manual
Page 2
...Epson Corporation. Contact your dealer for the purpose of explanation and may be different from the actual design of your digital camera. The illustrations in this user manual. SD logo ( ) is registered in this manual. Product Information Product design ...support. Occasionally a retailer will specify a unique product color, appearance, and internal memory capacity. READ THIS FIRST Trademark Information PENTAX and Optio are trademarks or registered trademarks of their respective owners. This includes primary product specifications, software, software drivers, and user's ...
...Epson Corporation. Contact your dealer for the purpose of explanation and may be different from the actual design of your digital camera. The illustrations in this user manual. SD logo ( ) is registered in this manual. Product Information Product design ...support. Occasionally a retailer will specify a unique product color, appearance, and internal memory capacity. READ THIS FIRST Trademark Information PENTAX and Optio are trademarks or registered trademarks of their respective owners. This includes primary product specifications, software, software drivers, and user's ...

Optio 60 Operating Manual
Page 3
... care during rain, snow, on inclined or unstable surfaces. This might cause fire or electric shock. EN-3 Continued use the camera in this state might cause the camera to fall or tilt over or result in this state might cause you are walking, driving or riding a motorcycle. If the...the batteries out of the reach of purchase. This might cause fire or electric shock. Warnings If foreign objects or water have entered the camera, turn the power off and remove the batteries and the AC power adapter. Use with the indicated power supply voltage. Swallowing batteries might ...
... care during rain, snow, on inclined or unstable surfaces. This might cause fire or electric shock. EN-3 Continued use the camera in this state might cause the camera to fall or tilt over or result in this state might cause you are walking, driving or riding a motorcycle. If the...the batteries out of the reach of purchase. This might cause fire or electric shock. Warnings If foreign objects or water have entered the camera, turn the power off and remove the batteries and the AC power adapter. Use with the indicated power supply voltage. Swallowing batteries might ...
Optio 60 Operating Manual
Page 4
... the LCD monitor to anyone's eyes. This might cause fire or electric shock. Do not use . Do not wrap the camera or place it or use . Do not leave the camera in places where the temperature may rise significantly, such as inside , resulting in humid, steamy, smoky, or dusty places....to leak. Do not remove the battery immediately after long period of the terminals. The battery becomes hot during use excessive force when handling the camera. This might cause fire and injury, or damage to the surrounding areas due to the battery rupturing or leaking. Do not drop it, strike...
... the LCD monitor to anyone's eyes. This might cause fire or electric shock. Do not use . Do not wrap the camera or place it or use . Do not leave the camera in places where the temperature may rise significantly, such as inside , resulting in humid, steamy, smoky, or dusty places....to leak. Do not remove the battery immediately after long period of the terminals. The battery becomes hot during use excessive force when handling the camera. This might cause fire and injury, or damage to the surrounding areas due to the battery rupturing or leaking. Do not drop it, strike...
Optio 60 Operating Manual
Page 5
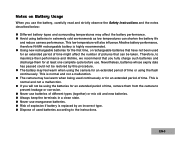
... Risk of used continuously or for an extended period of pictures that you fully charge such batteries and discharge them from the camera to prevent leakage or corrosion. Never use the battery, carefully read and strictly observe the Safety Instructions and the notes described ... warm when being used batteries according to maximize their performance and lifetime, we recommend that can shorten the battery life and reduce camera performance. Avoid using the flash continuously. If you use manganese batteries. Notes on Battery Usage When you will also influence Alkaline ...
... Risk of used continuously or for an extended period of pictures that you fully charge such batteries and discharge them from the camera to prevent leakage or corrosion. Never use the battery, carefully read and strictly observe the Safety Instructions and the notes described ... warm when being used batteries according to maximize their performance and lifetime, we recommend that can shorten the battery life and reduce camera performance. Avoid using the flash continuously. If you use manganese batteries. Notes on Battery Usage When you will also influence Alkaline ...
Optio 60 Operating Manual
Page 6
CONTENTS INTRODUCTION 8 Package Contents 9 GETTING TO KNOW YOUR CAMERA 10 Front View 10 Rear View 11 Mode Dial 12 LCD Monitor Information 13 PREPARING THE CAMERA 15 Installing the Batteries (Optional Accessory) ....... 15 Using the AC Power Adapter (Optional Accessory 16 Inserting and Removing an SD ...Memory Card (Optional Accessory 17 Attaching the Camera Strap 18 LED Indicators 18 GETTING STARTED 19 Turning the Power On/Off 19 Choosing the Screen Language 20 Setting the Date and Time...
CONTENTS INTRODUCTION 8 Package Contents 9 GETTING TO KNOW YOUR CAMERA 10 Front View 10 Rear View 11 Mode Dial 12 LCD Monitor Information 13 PREPARING THE CAMERA 15 Installing the Batteries (Optional Accessory) ....... 15 Using the AC Power Adapter (Optional Accessory 16 Inserting and Removing an SD ...Memory Card (Optional Accessory 17 Attaching the Camera Strap 18 LED Indicators 18 GETTING STARTED 19 Turning the Power On/Off 19 Choosing the Screen Language 20 Setting the Date and Time...

Optio 60 Operating Manual
Page 7
... or movie clips............57 EDITING SOFTWARE INSTALLATION 58 Installing ACDSee for PENTAX 58 USING THE DIGITAL CAMERA AS A PC CAMERA...59 Step 1: Install the PC camera driver 59 Step 2: Connect the digital camera to your computer 60 Step 3: Run your application software (i.e. Windows NetMeeting 60 MENU OPTIONS 61 Camera Menu 61 Movie Menu 65 Playback Menu 66 Setup Menu 68...
... or movie clips............57 EDITING SOFTWARE INSTALLATION 58 Installing ACDSee for PENTAX 58 USING THE DIGITAL CAMERA AS A PC CAMERA...59 Step 1: Install the PC camera driver 59 Step 2: Connect the digital camera to your computer 60 Step 3: Run your application software (i.e. Windows NetMeeting 60 MENU OPTIONS 61 Camera Menu 61 Movie Menu 65 Playback Menu 66 Setup Menu 68...

Optio 60 Operating Manual
Page 8
...PictBridge and perform image selection and printing using the camera monitor screen and controls. EN-8 PictBridge support You can connect the camera directly to printer that you for purchasing this new digital camera! Support for SD memory card for memory expansion... You may wish to expand the memory capacity (up to 1GB capacity) by using an additional memory card. Equipped with a 6.0 Megapixels CCD sensor, your camera delivers high quality, 2848 x 2136 resolution images. Provided editing software: ACDSee for PENTAX...
...PictBridge and perform image selection and printing using the camera monitor screen and controls. EN-8 PictBridge support You can connect the camera directly to printer that you for purchasing this new digital camera! Support for SD memory card for memory expansion... You may wish to expand the memory capacity (up to 1GB capacity) by using an additional memory card. Equipped with a 6.0 Megapixels CCD sensor, your camera delivers high quality, 2848 x 2136 resolution images. Provided editing software: ACDSee for PENTAX...

Optio 60 Operating Manual
Page 9
..., promptly contact your dealer. EN-9 Common Product Components: Digital Camera Operating manuals Quick Start Guide USB Cable Software CD-ROM (S-SW38) AV Cable Camera Strap Two AA alkaline batteries (for checking the camera's functionality) Common (Optional) Accessories (not included with the camera): AC power adapter (supplied by PENTAX) SD memory card (commercially available) Battery Charger (commercially...
..., promptly contact your dealer. EN-9 Common Product Components: Digital Camera Operating manuals Quick Start Guide USB Cable Software CD-ROM (S-SW38) AV Cable Camera Strap Two AA alkaline batteries (for checking the camera's functionality) Common (Optional) Accessories (not included with the camera): AC power adapter (supplied by PENTAX) SD memory card (commercially available) Battery Charger (commercially...
Optio 60 Operating Manual
Page 12
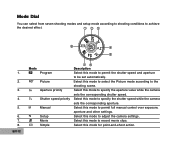
...this mode to select the Picture mode according to specify the shutter speed while the camera sets the corresponding aperture. Select this mode to specify the aperture value while the camera sets the corresponding shutter speed. Select this mode to record movie clips. Select this... mode to permit full manual control over exposure, aperture and other settings. Select this mode to adjust the camera settings. Select this mode to permit the shutter speed and aperture to achieve the desired effect. 1 23 8 4 5 1. 2. 3. 4. 5. 6. 7. 8....
...this mode to select the Picture mode according to specify the shutter speed while the camera sets the corresponding aperture. Select this mode to specify the aperture value while the camera sets the corresponding shutter speed. Select this mode to record movie clips. Select this... mode to permit full manual control over exposure, aperture and other settings. Select this mode to adjust the camera settings. Select this mode to permit the shutter speed and aperture to achieve the desired effect. 1 23 8 4 5 1. 2. 3. 4. 5. 6. 7. 8....
Optio 60 Operating Manual
Page 13
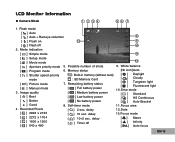
LCD Monitor Information Camera Mode 1 2 34 56 7 1. Image quality [ ] Best [ ] Better [ ] Good 4. Recorded Pixels [ 6M ] 2848 x 2136 [ 4M ] 2272 x 1704 [ 2 M ] 1600 x 1200 [ 0.3 M ] 640 x 480 01.07.2005 12 5. Possible ...
LCD Monitor Information Camera Mode 1 2 34 56 7 1. Image quality [ ] Best [ ] Better [ ] Good 4. Recorded Pixels [ 6M ] 2848 x 2136 [ 4M ] 2272 x 1704 [ 2 M ] 1600 x 1200 [ 0.3 M ] 640 x 480 01.07.2005 12 5. Possible ...
Optio 60 Operating Manual
Page 15
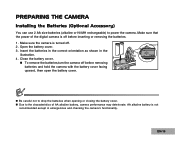
...orientation as shown in emergencies and checking the camera's functionality. Make sure the camera is off . 2. Open the battery cover. 3. Due to the characteristics of the digital camera is turned off before removing batteries and hold the camera with the battery cover facing upward, then... open the battery cover. EN-15 PREPARING THE CAMERA Installing the Batteries (Optional Accessory) You can use 2 ...
...orientation as shown in emergencies and checking the camera's functionality. Make sure the camera is off . 2. Open the battery cover. 3. Due to the characteristics of the digital camera is turned off before removing batteries and hold the camera with the battery cover facing upward, then... open the battery cover. EN-15 PREPARING THE CAMERA Installing the Batteries (Optional Accessory) You can use 2 ...
Optio 60 Operating Manual
Page 16
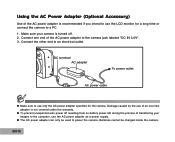
... you intend to use only the AC power adapter specified for a long time or connect the camera to the camera jack labeled "DC IN 3.0V". 3. DC terminal AC adapter To power outlet DC IN ...3.0V AC power cable Make sure to use the LCD monitor for the camera. Damage caused by the use the AC power adapter as a power supply. EN-16 To prevent unexpected... auto power off resulting from no battery power left during the process of transferring your camera is not covered under the warranty. Make sure your images to the computer, use of the AC ...
... you intend to use only the AC power adapter specified for a long time or connect the camera to the camera jack labeled "DC IN 3.0V". 3. DC terminal AC adapter To power outlet DC IN ...3.0V AC power cable Make sure to use the LCD monitor for the camera. Damage caused by the use the AC power adapter as a power supply. EN-16 To prevent unexpected... auto power off resulting from no battery power left during the process of transferring your camera is not covered under the warranty. Make sure your images to the computer, use of the AC ...
Optio 60 Operating Manual
Page 17
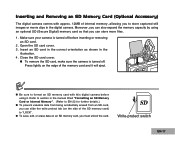
... still images or movie clips in the digital camera. Inserting and Removing an SD Memory Card (Optional Accessory) The digital camera comes with this digital camera before inserting or removing an SD card. 2. Make sure your camera is turned off before using an optional SD (Secure Digital) memory card so that you can slide... the write protect tab (on an SD memory card, you can store more files. 1. Close the SD card cover. To remove the SD card, make sure the camera is turned off . Press lightly on...
... still images or movie clips in the digital camera. Inserting and Removing an SD Memory Card (Optional Accessory) The digital camera comes with this digital camera before inserting or removing an SD card. 2. Make sure your camera is turned off before using an optional SD (Secure Digital) memory card so that you can slide... the write protect tab (on an SD memory card, you can store more files. 1. Close the SD card cover. To remove the SD card, make sure the camera is turned off . Press lightly on...
Optio 60 Operating Manual
Page 18
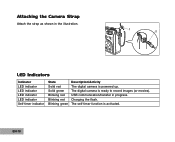
Charging the flash. EN-18 USB communication/transfer in the illustration. 1 2 MEMU DISPLAY LED Indicators Indicator LED indicator LED indicator LED indicator LED indicator Self-timer indicator State Solid red Solid green Blinking red Blinking red Blinking green Description/Activity The digital camera is activated. The self-timer function is powered up. Attaching the Camera Strap Attach the strap as shown in progress. The digital camera is ready to record images (or movies).
Charging the flash. EN-18 USB communication/transfer in the illustration. 1 2 MEMU DISPLAY LED Indicators Indicator LED indicator LED indicator LED indicator LED indicator Self-timer indicator State Solid red Solid green Blinking red Blinking red Blinking green Description/Activity The digital camera is activated. The self-timer function is powered up. Attaching the Camera Strap Attach the strap as shown in progress. The digital camera is ready to record images (or movies).

Optio 60 Operating Manual
Page 19
To turn the power off, press the button again. Power button PENTAX DISPLAY EN-19 GETTING STARTED Turning the Power On/Off Press the button until the digital camera turns on.
To turn the power off, press the button again. Power button PENTAX DISPLAY EN-19 GETTING STARTED Turning the Power On/Off Press the button until the digital camera turns on.
Optio 60 Operating Manual
Page 20
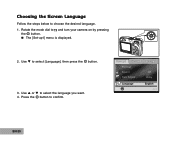
Choosing the Screen Language Follow the steps below to select [Language], then press the button. 3. Use to choose the desired language. 1. The [Set-up1] menu is displayed. 2. Rotate the mode dial to select the language you want. 4. Use or to and turn your camera on by pressing the button. PENTAX DISPLAY Set-up1 Set-up2 Format Sound Date Adjust Set-up3 Off d/m/y Language OK : English 4 / 4 EN-20 Press the button to confirm.
Choosing the Screen Language Follow the steps below to select [Language], then press the button. 3. Use to choose the desired language. 1. The [Set-up1] menu is displayed. 2. Rotate the mode dial to select the language you want. 4. Use or to and turn your camera on by pressing the button. PENTAX DISPLAY Set-up1 Set-up2 Format Sound Date Adjust Set-up3 Off d/m/y Language OK : English 4 / 4 EN-20 Press the button to confirm.
Optio 60 Operating Manual
Page 21
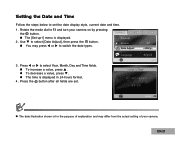
Press the button after all fields are set the date display style, current date and time. 1. Use to and turn your camera. The time is displayed. 2. Rotate the mode dial to select [Date Adjust], then press the button. The [Set-up1] menu is displayed in 24-...Off d/m/y 3. To decrease a value, press . Language OK : English 3 / 4 Date Adjust 01 /07 / 2005 0 4 : 0 0 OK : Select : The date illustration shown is for the purpose of your camera on by pressing the button. EN-21 Setting the Date and Time Follow the steps below to select Year, Month, Day and Time fields.
Press the button after all fields are set the date display style, current date and time. 1. Use to and turn your camera. The time is displayed. 2. Rotate the mode dial to select [Date Adjust], then press the button. The [Set-up1] menu is displayed in 24-...Off d/m/y 3. To decrease a value, press . Language OK : English 3 / 4 Date Adjust 01 /07 / 2005 0 4 : 0 0 OK : Select : The date illustration shown is for the purpose of your camera on by pressing the button. EN-21 Setting the Date and Time Follow the steps below to select Year, Month, Day and Time fields.
Optio 60 Operating Manual
Page 22
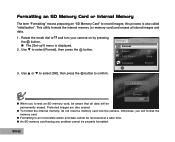
Rotate the mode dial to confirm. Use or to select [OK], then press the button to and turn your camera on by pressing the button. Otherwise, you format an SD memory card, be permanently erased. Language OK : English 1 / 4 Format OK Cancel OK : When you will ...be aware that all stored images and data. 1. To format the internal memory, do not insert a memory card into the camera. The [Set-up1] menu is also called "initialization". Set-up1 Set-up2 Format Sound Date Adjust Set-up3 Off d/m/y 3. An SD memory card having any...
Rotate the mode dial to confirm. Use or to select [OK], then press the button to and turn your camera on by pressing the button. Otherwise, you format an SD memory card, be permanently erased. Language OK : English 1 / 4 Format OK Cancel OK : When you will ...be aware that all stored images and data. 1. To format the internal memory, do not insert a memory card into the camera. The [Set-up1] menu is also called "initialization". Set-up1 Set-up2 Format Sound Date Adjust Set-up3 Off d/m/y 3. An SD memory card having any...
Optio 60 Operating Manual
Page 23
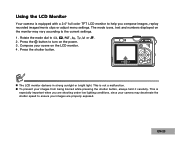
... to the current settings. 1. To prevent your images from being blurred while pressing the shutter button, always hold it carefully. Using the LCD Monitor Your camera is equipped with a 2.0" full color TFT LCD monitor to help you are shooting under low lighting conditions, since your...
... to the current settings. 1. To prevent your images from being blurred while pressing the shutter button, always hold it carefully. Using the LCD Monitor Your camera is equipped with a 2.0" full color TFT LCD monitor to help you are shooting under low lighting conditions, since your...

Optio 60 Operating Manual
Page 24
...press the shutter button down half way, the camera's Auto Focus feature automatically focuses the image. The Basics 1. Compose the image on by the LCD after the image has been captured. Press the shutter button down to , , , , or and turn your camera on the monitor screen so that the main ...subject is determined and locked at the same time. 4. PENTAX DISPLAY The actual captured image appears to focus the image. Rotate the mode dial to capture the...
...press the shutter button down half way, the camera's Auto Focus feature automatically focuses the image. The Basics 1. Compose the image on by the LCD after the image has been captured. Press the shutter button down to , , , , or and turn your camera on the monitor screen so that the main ...subject is determined and locked at the same time. 4. PENTAX DISPLAY The actual captured image appears to focus the image. Rotate the mode dial to capture the...


