
K1000 Manual
Page 2
TABLE OF THE CONTENTS Nomenclature of Working Parts Specifications Using SMC PENTAX-A/-F Lens • Attaching and Detaching Lens Inserting Battery Basic Operating Instructions Loading Film and Winding Setting ASA/ISO Film Speed Focusing Shutter Dial Holding Camera Unloading Film • Using Flash Unit Depth of Field Helpful Hints on Exposure Problems Battery Precautions Infrared Index Mark Metering Range Open-Aperture or Stop-Down Metering Mount Adapter K Temperature Taking Care of the commercially available 11 12 lenses and accessories produced 13 by other manufacturers are...
TABLE OF THE CONTENTS Nomenclature of Working Parts Specifications Using SMC PENTAX-A/-F Lens • Attaching and Detaching Lens Inserting Battery Basic Operating Instructions Loading Film and Winding Setting ASA/ISO Film Speed Focusing Shutter Dial Holding Camera Unloading Film • Using Flash Unit Depth of Field Helpful Hints on Exposure Problems Battery Precautions Infrared Index Mark Metering Range Open-Aperture or Stop-Down Metering Mount Adapter K Temperature Taking Care of the commercially available 11 12 lenses and accessories produced 13 by other manufacturers are...
K1000 Manual
Page 3
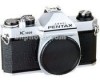
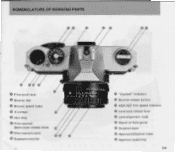
NOMENCLATURE OF WORKING PARTS 3 4 O/ O 0 O Film-wind lever Shutter dial 0 Shutter speed index O X contact O Hot shoe O Film-rewind/ Back-cover-release knob • Film-rewind crank O Exposure counter 14 II 16 Z 9 Z. 7 95 8 II 8e/Z,, u, 0„,8, E 3t .3) 17 )6 O O "Cocked" indicator e Shutter-release button ASA/ISO film speed indicator ® Lens-lock-release lever Lens-alignment node fD Depth-of-field guide m Distance scale • Aperture/distance index fp Aperture scale/ring 1 •
NOMENCLATURE OF WORKING PARTS 3 4 O/ O 0 O Film-wind lever Shutter dial 0 Shutter speed index O X contact O Hot shoe O Film-rewind/ Back-cover-release knob • Film-rewind crank O Exposure counter 14 II 16 Z 9 Z. 7 95 8 II 8e/Z,, u, 0„,8, E 3t .3) 17 )6 O O "Cocked" indicator e Shutter-release button ASA/ISO film speed indicator ® Lens-lock-release lever Lens-alignment node fD Depth-of-field guide m Distance scale • Aperture/distance index fp Aperture scale/ring 1 •

K1000 Manual
Page 4
U )C1000 PENTAX 4? • 'fir 12 ED Focusing ring e Strap-lug co X flash sync terminal ED Accessory groove ED Film guide rail ED Film rail • 2 ED Viewfinder eyepiece ED Film chamber ED Battery-chamber cap ED Tripod socket ED Shutter curtain ED Film-rewind button ED Film-sprocket spool ED Film-take-up spool m Film-roller ED Back cover ED Film-pressure plate
U )C1000 PENTAX 4? • 'fir 12 ED Focusing ring e Strap-lug co X flash sync terminal ED Accessory groove ED Film guide rail ED Film rail • 2 ED Viewfinder eyepiece ED Film chamber ED Battery-chamber cap ED Tripod socket ED Shutter curtain ED Film-rewind button ED Film-sprocket spool ED Film-take-up spool m Film-roller ED Back cover ED Film-pressure plate

K1000 Manual
Page 6
... sytem with automatic resetting. Film Rewind: Flash Synchronization: Exposure Metering: Metering Range: Power Source: Power Switch: Crank type Hot shoe, X-Sync at infinity. -1 diopter eyepiece. Type: Film: Mount: 35mm SLR with built-in photoswitch Size & Weight: 143(W) x 93.5(H) x 49.5(D) mm (5.6" x 3.7" x 1.9"), 525g (18.5 ozs) without battery SPECIFICATIONS ARE SUBJECT TO CHANGE WITHOUT ANY OBLIGATION ON THE PART OF THE MANUFACTURER. • 4 Speeds: B, 1 to 3200 Pentax K bayonet mount Shutter: Rubberized silk focal plane shutter. Viewfinder: Pentaprism finder with...
... sytem with automatic resetting. Film Rewind: Flash Synchronization: Exposure Metering: Metering Range: Power Source: Power Switch: Crank type Hot shoe, X-Sync at infinity. -1 diopter eyepiece. Type: Film: Mount: 35mm SLR with built-in photoswitch Size & Weight: 143(W) x 93.5(H) x 49.5(D) mm (5.6" x 3.7" x 1.9"), 525g (18.5 ozs) without battery SPECIFICATIONS ARE SUBJECT TO CHANGE WITHOUT ANY OBLIGATION ON THE PART OF THE MANUFACTURER. • 4 Speeds: B, 1 to 3200 Pentax K bayonet mount Shutter: Rubberized silk focal plane shutter. Viewfinder: Pentaprism finder with...
K1000 Manual
Page 7
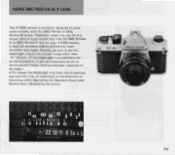
... Pentax-F lens on your K1000 camera, it must be operated slightly differently from the A position, just turn the ring, as illustrated, in the direction of the arrow while depressing the Aperture Auto Lock Button also indicated by the arrow. }Clout] PE NToN>C e7 • I ft m C°10 15 I I III If1-r I 38 I 26 2- 16 8 4 1 4 8 16 22 22 16 11 8 5.6 4 2. 5• Namely, be sure to set...
... Pentax-F lens on your K1000 camera, it must be operated slightly differently from the A position, just turn the ring, as illustrated, in the direction of the arrow while depressing the Aperture Auto Lock Button also indicated by the arrow. }Clout] PE NToN>C e7 • I ft m C°10 15 I I III If1-r I 38 I 26 2- 16 8 4 1 4 8 16 22 22 16 11 8 5.6 4 2. 5• Namely, be sure to set...
K1000 Manual
Page 8
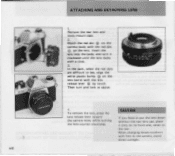
... until the lens locks with film in the camera, avoid direct sunlight. CAUTION If you have to tee, align the e white plastic bump on the lens. Then turn it ~ol~ e f enit 7u ri tip oa ,u 71 • 4 To remove the lens, press the lens release lever toward the camera body while turning the lens counter-clockwise. When changing lenses outdoors with a click. 3. Remove the rear lens and body mount caps...
... until the lens locks with film in the camera, avoid direct sunlight. CAUTION If you have to tee, align the e white plastic bump on the lens. Then turn it ~ol~ e f enit 7u ri tip oa ,u 71 • 4 To remove the lens, press the lens release lever toward the camera body while turning the lens counter-clockwise. When changing lenses outdoors with a click. 3. Remove the rear lens and body mount caps...

K1000 Manual
Page 9
... the photo. BATTERY CHECK Set the ASA/ISO to 100 and the shutter speed dial to insert it into the battery chamber before operating the camera. Take spare battery when traveling or photographing outdoors. To minimize the battery consumption, keep the lens cap on as soon as shown in photoswitch, the exposure meter turns on while the camera is not used. 7 • The battery is packed separately. Insert a 1.5V alkaline battery...
... the photo. BATTERY CHECK Set the ASA/ISO to 100 and the shutter speed dial to insert it into the battery chamber before operating the camera. Take spare battery when traveling or photographing outdoors. To minimize the battery consumption, keep the lens cap on as soon as shown in photoswitch, the exposure meter turns on while the camera is not used. 7 • The battery is packed separately. Insert a 1.5V alkaline battery...
K1000 Manual
Page 10
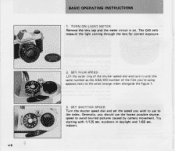
... blurred pictures caused by camera movement. SET FILM SPEED Lift the outer ring of the shutter speed dial and turn it until the same number as the ASA/ISO number of the film you should use to the small orange index alongside the figure 1. 3. Try starting with 1/125 sec. Generally, you 're using appears next to the index. indoors. 4( • 8 BASIC OPERATING INSTRUCTIONS 1. TURN ON LIGHT METER Remove the lens...
... blurred pictures caused by camera movement. SET FILM SPEED Lift the outer ring of the shutter speed dial and turn it until the same number as the ASA/ISO number of the film you should use to the small orange index alongside the figure 1. 3. Try starting with 1/125 sec. Generally, you 're using appears next to the index. indoors. 4( • 8 BASIC OPERATING INSTRUCTIONS 1. TURN ON LIGHT METER Remove the lens...
K1000 Manual
Page 12
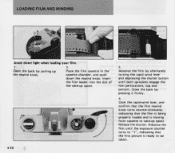
... in the cassette chamber, and push down the rewind knob. Open the back by pressing it firmly. 4. LOADING FILM AND WINDING ImM.flau mm Avoid direct light when loading your film. 2. Advance the film by alternately turning the rapid wind lever and depressing the shutter button until the exposure counter turns to "1", indicating that the film is being properly loaded and is ready to take -up spool.
... in the cassette chamber, and push down the rewind knob. Open the back by pressing it firmly. 4. LOADING FILM AND WINDING ImM.flau mm Avoid direct light when loading your film. 2. Advance the film by alternately turning the rapid wind lever and depressing the shutter button until the exposure counter turns to "1", indicating that the film is being properly loaded and is ready to take -up spool.
K1000 Manual
Page 13
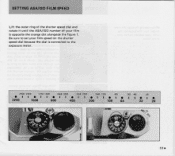
SETTING ASA/ISO FILM SPEED Lift the outer ring of the shutter speed dial and rotate it until the ASA/ISO number of your film speed on the shutter speed dial because the dial is opposite the orange dot alongside the figure 1. Be sure to set your film is connected to the exposure meter. 2500 2000 1250 1000 640 500 320 250 160 125 60 50 40 25 • I I • I I • II • I I • I I• I • I I• I • 3200 1600 800 400 200 100 64 32 20 5 en 4 1" 10 • Si, .44/ 'tr"_'111. /t"-- 04.4N o Of ll•
SETTING ASA/ISO FILM SPEED Lift the outer ring of the shutter speed dial and rotate it until the ASA/ISO number of your film speed on the shutter speed dial because the dial is opposite the orange dot alongside the figure 1. Be sure to set your film is connected to the exposure meter. 2500 2000 1250 1000 640 500 320 250 160 125 60 50 40 25 • I I • I I • II • I I • I I• I • I I• I • 3200 1600 800 400 200 100 64 32 20 5 en 4 1" 10 • Si, .44/ 'tr"_'111. /t"-- 04.4N o Of ll•
K1000 Manual
Page 15
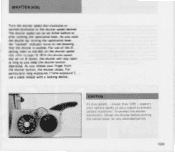
... as you release your camera rigidly or use a cable release with a locking device. () de; 600°0 .. 25 0 11) cgs Co J /, • 0 CAUTION At slow speeds - For particularly long exposures ("time exposure"), use a tripod to page 16. To protect the shutter mechanism, release the shutter before or after cocking the rapid-wind lever. support your finger from the shutter button, the shutter closes. slower than 1/30 - SHUTTER DIAL Turn the shutter speed dial...
... as you release your camera rigidly or use a cable release with a locking device. () de; 600°0 .. 25 0 11) cgs Co J /, • 0 CAUTION At slow speeds - For particularly long exposures ("time exposure"), use a tripod to page 16. To protect the shutter mechanism, release the shutter before or after cocking the rapid-wind lever. support your finger from the shutter button, the shutter closes. slower than 1/30 - SHUTTER DIAL Turn the shutter speed dial...
K1000 Manual
Page 16
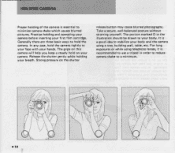
... film cartridge. Take a secure, well-balanced posture without straining yourself. For long exposures or while using a tree, building wall, table, etc. Release the shutter gently while holding your body. The portion marked 0 in order to reduce camera shake to your face with your camera. O O • 14 HOLDING CAMERA Proper holding of the camera is essential to hold the camera. Practice holding and operating...
... film cartridge. Take a secure, well-balanced posture without straining yourself. For long exposures or while using a tree, building wall, table, etc. Release the shutter gently while holding your body. The portion marked 0 in order to reduce camera shake to your face with your camera. O O • 14 HOLDING CAMERA Proper holding of the camera is essential to hold the camera. Practice holding and operating...

K1000 Manual
Page 18
... "X" setting is no need to "hot" (switched on the body front. When using an electronic flash with its cord plugged into the X terminal on ) only when you insert a shoemount electronic flash. NT,gX • IMP • ...1; 4- ,,;j4'. O IC loop I, r.? The hot shoe flash contact turns to plug the flash cord into the X terminal on the shoe bracket. A'''r T • 16 USING FLASH UNIT The K1000 has...
... "X" setting is no need to "hot" (switched on the body front. When using an electronic flash with its cord plugged into the X terminal on ) only when you insert a shoemount electronic flash. NT,gX • IMP • ...1; 4- ,,;j4'. O IC loop I, r.? The hot shoe flash contact turns to plug the flash cord into the X terminal on the shoe bracket. A'''r T • 16 USING FLASH UNIT The K1000 has...
K1000 Manual
Page 22
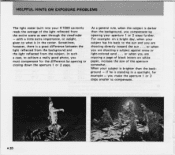
... back to the sun and you make the aperture 1 or 2 steps smaller to what is brighter than the background, you are shooting directly toward the sun . . . with a little extra importance, or weight, given to compensate. - .7 • 20 HELPFUL HINTS ON EXPOSURE PROBLEMS The light meter built into your K1000 correctly reads the average of the light reflected from the subject.
... back to the sun and you make the aperture 1 or 2 steps smaller to what is brighter than the background, you are shooting directly toward the sun . . . with a little extra importance, or weight, given to compensate. - .7 • 20 HELPFUL HINTS ON EXPOSURE PROBLEMS The light meter built into your K1000 correctly reads the average of the light reflected from the subject.

K1000 Manual
Page 23
... usage of time, you must determine the correct combination of performance. 21 • the shutter mechanism is used batteries into fire to prevent lowering of shutter speed and aperture size yourself, from the camera. Also, packed in with most types of 35mm film is erroneously inserted, unexpected mishap may occur. •When not using the camera for powering the exposure meter; Polarity mark should remove battery from your K1000 is a totally manual operation.
... usage of time, you must determine the correct combination of performance. 21 • the shutter mechanism is used batteries into fire to prevent lowering of shutter speed and aperture size yourself, from the camera. Also, packed in with most types of 35mm film is erroneously inserted, unexpected mishap may occur. •When not using the camera for powering the exposure meter; Polarity mark should remove battery from your K1000 is a totally manual operation.

K1000 Manual
Page 24
INFRARED INDEX MARK If you focus through the viewfinder and turn the focusing ring until that distance setting aligns with the red infrared index mark. The figure shows an example in which the subjectto-camera distance is necessary to compensate for the difference between visible light focus and infrared focus. For details on the lens distance scale as you intend to the...
INFRARED INDEX MARK If you focus through the viewfinder and turn the focusing ring until that distance setting aligns with the red infrared index mark. The figure shows an example in which the subjectto-camera distance is necessary to compensate for the difference between visible light focus and infrared focus. For details on the lens distance scale as you intend to the...

K1000 Manual
Page 26
... should be interpreted as the camera's total range of the aperture settings is beyond the measurability range (6), as shown in combination with any shutter speed from 1/2 sec. However, the combination of the ground glass. METERING RANGE The exposure meter of the K1000 measures the brightness of f/22 (minimum aperture) and 1/1000 sec. As the ASA/ISO film speed changes, the measurability range varies...
... should be interpreted as the camera's total range of the aperture settings is beyond the measurability range (6), as shown in combination with any shutter speed from 1/2 sec. However, the combination of the ground glass. METERING RANGE The exposure meter of the K1000 measures the brightness of f/22 (minimum aperture) and 1/1000 sec. As the ASA/ISO film speed changes, the measurability range varies...

K1000 Manual
Page 27
A 25. Some of special lenses do not have a diaphragm coupling lever 0 on the back of the lens which locks into the camera body to permit open -aperture metering. Extension Tube Set K, Helicoid Extension Tube K, Auto-Bellows A - requires stop -down metering. OPEN-APERTURE OR STOP-DOWN METERING Open-aperture SMC Pentax lenses have the diaphragm coupler, so they must be used with the stop -down metering system. Use of the Auto-Extension Tube Set K permits open -aperture metering. Use of other K Series accessories -
A 25. Some of special lenses do not have a diaphragm coupling lever 0 on the back of the lens which locks into the camera body to permit open -aperture metering. Extension Tube Set K, Helicoid Extension Tube K, Auto-Bellows A - requires stop -down metering. OPEN-APERTURE OR STOP-DOWN METERING Open-aperture SMC Pentax lenses have the diaphragm coupler, so they must be used with the stop -down metering system. Use of the Auto-Extension Tube Set K permits open -aperture metering. Use of other K Series accessories -

K1000 Manual
Page 32
...possible. Always keep the viewfinder eyepiece, lens and filter as clean as fingerprints, should be sure to drop the camera or knock it 's an excellent way of damage. To remove loose dust and dirt, first use the blower and then the brush of your pictures. 3. Clean, plain cotton...completely. Your camera is effective; Do not try to wipe off granular dirt or dust - TAKING CARE OF YOUR CAMERA • ' ; • • e fa 1-2 0 • 30 1. Breathing on the mirror will not affect the clarity of a lens brush. Never touch the mirror or the shutter curtains.
...possible. Always keep the viewfinder eyepiece, lens and filter as clean as fingerprints, should be sure to drop the camera or knock it 's an excellent way of damage. To remove loose dust and dirt, first use the blower and then the brush of your pictures. 3. Clean, plain cotton...completely. Your camera is effective; Do not try to wipe off granular dirt or dust - TAKING CARE OF YOUR CAMERA • ' ; • • e fa 1-2 0 • 30 1. Breathing on the mirror will not affect the clarity of a lens brush. Never touch the mirror or the shutter curtains.

K1000 Manual
Page 34
... to you owing to instruction. Because the tolerances, quality, and design compatibility of lenses other indirect or consequential damages of any repair or alterations except those made and parts replaced free of charge, and the equipment will take a considerable length of time before the equipment can be borne by the sender. WARRANTY POLICY All Pentax cameras purchased through authorized...
... to you owing to instruction. Because the tolerances, quality, and design compatibility of lenses other indirect or consequential damages of any repair or alterations except those made and parts replaced free of charge, and the equipment will take a considerable length of time before the equipment can be borne by the sender. WARRANTY POLICY All Pentax cameras purchased through authorized...


