Operation Manual
Page 8
... Operating Manual 9 Checking the Contents of the Package 10 Names of Parts 11 Names of Operating Parts 12 Getting Started 13 Attaching the Strap 13 Powering the Camera 14 Installing the Battery 14 Removing the Battery 14 Charging the Battery 15 Charging the Battery Abroad 17 Using the AC Adapter (optional 19 Installing the SD Memory Card 21 Image Size and Quality of Still Pictures 23 Size and Quality of Movies 24 Initial Settings (Setting the Display Language and the Date...
... Operating Manual 9 Checking the Contents of the Package 10 Names of Parts 11 Names of Operating Parts 12 Getting Started 13 Attaching the Strap 13 Powering the Camera 14 Installing the Battery 14 Removing the Battery 14 Charging the Battery 15 Charging the Battery Abroad 17 Using the AC Adapter (optional 19 Installing the SD Memory Card 21 Image Size and Quality of Still Pictures 23 Size and Quality of Movies 24 Initial Settings (Setting the Display Language and the Date...
Operation Manual
Page 9
... Taking Movies (Movie Mode 68 Taking Pictures in Frame Composite mode 70 Using the Self-timer 72 Continuous Shooting (Continuous Shooting Mode 73 Using the Remote Control Unit (optional 74 Using the Zoom to Change the Subject Size 76 Setting the Shooting Functions 78 Selecting the Focus Mode 78 Selecting the Flash Mode 81 Selecting the Recorded Pixels of Still Pictures 83 Selecting the Quality Level of Still Pictures 85 Adjusting the White Balance 86 Selecting the Autofocus Settings 88 Setting the Light Metering Mode to Determine the Exposure 91 Setting...
... Taking Movies (Movie Mode 68 Taking Pictures in Frame Composite mode 70 Using the Self-timer 72 Continuous Shooting (Continuous Shooting Mode 73 Using the Remote Control Unit (optional 74 Using the Zoom to Change the Subject Size 76 Setting the Shooting Functions 78 Selecting the Focus Mode 78 Selecting the Flash Mode 81 Selecting the Recorded Pixels of Still Pictures 83 Selecting the Quality Level of Still Pictures 85 Adjusting the White Balance 86 Selecting the Autofocus Settings 88 Setting the Light Metering Mode to Determine the Exposure 91 Setting...

Operation Manual
Page 10
... SD Memory Card or the Built-in Memory 158 Changing the Sound Settings 159 Changing the Date and Time 162 Setting the World Time 164 Changing the Display Language 166 Changing the Image Folder Name 167 Changing the USB Connection Mode 168 Changing the Video Output Format 169 Adjusting the Brightness of the LCD Monitor 170 Setting Power Saving 171 Setting Auto Power Off 172 Setting the Guide Display 172 Resetting to Default Settings 173 Appendix 174 List of City 174 Default Settings 175 Optional Accessories 180 Messages 181 Troubleshooting 183 Main Specifications...
... SD Memory Card or the Built-in Memory 158 Changing the Sound Settings 159 Changing the Date and Time 162 Setting the World Time 164 Changing the Display Language 166 Changing the Image Folder Name 167 Changing the USB Connection Mode 168 Changing the Video Output Format 169 Adjusting the Brightness of the LCD Monitor 170 Setting Power Saving 171 Setting Auto Power Off 172 Setting the Guide Display 172 Resetting to Default Settings 173 Appendix 174 List of City 174 Default Settings 175 Optional Accessories 180 Messages 181 Troubleshooting 183 Main Specifications...
Operation Manual
Page 13
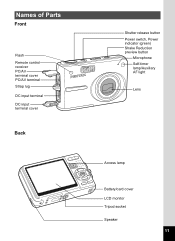
Names of Parts Front Flash Remote control receiver PC/AV terminal cover PC/AV terminal Strap lug DC input terminal DC input terminal cover Back Shutter release button Power switch, Power indicator (green) Shake Reduction preview button Microphone Self-timer lamp/Auxiliary AF light Lens Access lamp Battery/card cover LCD monitor Tripod socket Speaker 11
Names of Parts Front Flash Remote control receiver PC/AV terminal cover PC/AV terminal Strap lug DC input terminal DC input terminal cover Back Shutter release button Power switch, Power indicator (green) Shake Reduction preview button Microphone Self-timer lamp/Auxiliary AF light Lens Access lamp Battery/card cover LCD monitor Tripod socket Speaker 11

Operation Manual
Page 24
...-shelf secure data deletion software programs available that will not necessarily delete the data so that formatting the SD Memory Card will completely delete the data. If it unusable. • The data on another camera. There are taking movies even when there is being recorded on your nearest PENTAX service center. • If you remove the SD Memory Card immediately after using the camera, as the card may be exposed to rapid changes in...
...-shelf secure data deletion software programs available that will not necessarily delete the data so that formatting the SD Memory Card will completely delete the data. If it unusable. • The data on another camera. There are taking movies even when there is being recorded on your nearest PENTAX service center. • If you remove the SD Memory Card immediately after using the camera, as the card may be exposed to rapid changes in...
Operation Manual
Page 28
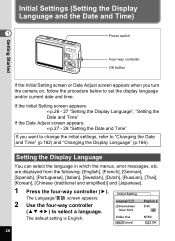
... default setting is English. Video Out MENU Cancel NTSC OK OK 26 The Language/ screen appears. 2 Use the four-way controller (2345) to set the display language and/or current date and time. Initial Settings (Setting the Display Language and the Date and Time) 1 Power switch Getting Started Four-way controller OK button If the Initial Setting screen or Date Adjust screen appears when you want to change the initial settings, refer to "Changing the Date and Time" (p.162) and "Changing the Display Language" (p.166). If the Initial Setting screen...
... default setting is English. Video Out MENU Cancel NTSC OK OK 26 The Language/ screen appears. 2 Use the four-way controller (2345) to set the display language and/or current date and time. Initial Settings (Setting the Display Language and the Date and Time) 1 Power switch Getting Started Four-way controller OK button If the Initial Setting screen or Date Adjust screen appears when you want to change the initial settings, refer to "Changing the Date and Time" (p.162) and "Changing the Display Language" (p.166). If the Initial Setting screen...
Operation Manual
Page 31
... Setting or Date Adjust screen will appear next time you can change the format following the steps in conjunction with the language you have selected as listed below for details. 1 Language: "Changing the Display Language" (p.166) City, Daylight saving time: "Setting the World Time" (p.164) Date and Time: "Changing the Date and Time" (p.162) • The video output format is different from the one used in your country or region, change the settings on the menu. Language Video Output Format English (English...
... Setting or Date Adjust screen will appear next time you can change the format following the steps in conjunction with the language you have selected as listed below for details. 1 Language: "Changing the Display Language" (p.166) City, Daylight saving time: "Setting the World Time" (p.164) Date and Time: "Changing the Date and Time" (p.162) • The video output format is different from the one used in your country or region, change the settings on the menu. Language Video Output Format English (English...

Operation Manual
Page 32
... light green when the camera is recorded on the LCD monitor for taking still pictures is described below. The camera turns on. 2 Confirm the subject and shooting 36 information on the light conditions. 1 Press the power switch. The image appears on the SD Memory Card or in the built-in memory. 30 The flash fires automatically depending on the LCD monitor. You can change the size of automatic focusing. Quick Start Quick Start Taking Still Pictures Power switch Shutter release button 2 Zoom button OK button Green button...
... light green when the camera is recorded on the LCD monitor for taking still pictures is described below. The camera turns on. 2 Confirm the subject and shooting 36 information on the light conditions. 1 Press the power switch. The image appears on the SD Memory Card or in the built-in memory. 30 The flash fires automatically depending on the LCD monitor. You can change the size of automatic focusing. Quick Start Quick Start Taking Still Pictures Power switch Shutter release button 2 Zoom button OK button Green button...
Operation Manual
Page 35
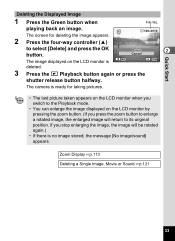
... LCD monitor is no image stored, the message [No image/sound] appears. The screen for taking pictures. • The last picture taken appears on the LCD monitor when you stop enlarging the image, the image will return to its original position. Zoom Display 1p.113 Deleting a Single Image, Movie or Sound 1p.121 33 If you switch to select [Delete] and press the OK Delete 2 button. playing back an image. Quick Start Deleting the Displayed Image 1 Press the Green button when File...
... LCD monitor is no image stored, the message [No image/sound] appears. The screen for taking pictures. • The last picture taken appears on the LCD monitor when you stop enlarging the image, the image will return to its original position. Zoom Display 1p.113 Deleting a Single Image, Movie or Sound 1p.121 33 If you switch to select [Delete] and press the OK Delete 2 button. playing back an image. Quick Start Deleting the Displayed Image 1 Press the Green button when File...
Operation Manual
Page 36
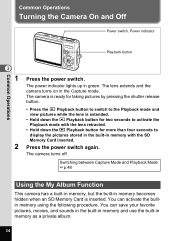
... Q Playback button for more than four seconds to display the pictures stored in the built-in memory with the SD Memory Card inserted. The lens extends and the camera turns on in green. Common Operations Turning the Camera On and Off Power switch, Power indicator Playback button Common Operations 3 1 2 Press the power switch. The camera is ready for taking pictures by pressing the shutter release button. • Press the Q Playback button to switch to the Playback mode and view pictures while the lens is inserted. The camera turns...
... Q Playback button for more than four seconds to display the pictures stored in the built-in memory with the SD Memory Card inserted. The lens extends and the camera turns on in green. Common Operations Turning the Camera On and Off Power switch, Power indicator Playback button Common Operations 3 1 2 Press the power switch. The camera is ready for taking pictures by pressing the shutter release button. • Press the Q Playback button to switch to the Playback mode and view pictures while the lens is inserted. The camera turns...
Operation Manual
Page 38
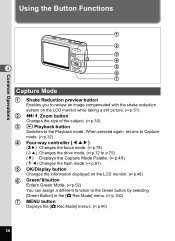
...-way controller (425) (q5) Changes the focus mode. (1p.78) (g2) Changes the drive mode. (1p.72 to p.75) (3) Displays the Capture Mode Palette. (1p.45) (b4) Changes the flash mode. (1p.81) 5 OK/Display button Changes the information displayed on the LCD monitor while taking a still picture. (1p.51) 2 w/x Zoom button Changes the size of the subject. (1p.30) 3 Q Playback button Switches to the Green button by selecting [Green Button] in the [A Rec.Mode] menu. (1p.100) 7 MENU button Displays the [A Rec.Mode] menus...
...-way controller (425) (q5) Changes the focus mode. (1p.78) (g2) Changes the drive mode. (1p.72 to p.75) (3) Displays the Capture Mode Palette. (1p.45) (b4) Changes the flash mode. (1p.81) 5 OK/Display button Changes the information displayed on the LCD monitor while taking a still picture. (1p.51) 2 w/x Zoom button Changes the size of the subject. (1p.30) 3 Q Playback button Switches to the Green button by selecting [Green Button] in the [A Rec.Mode] menu. (1p.100) 7 MENU button Displays the [A Rec.Mode] menus...
Operation Manual
Page 46
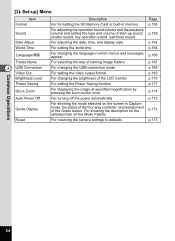
...-way controller, and assignment of start-up ] Menu Item Format Sound Date Adjust World Time Language/ Folder Name 3 USB Connection Video Out Brightness Level Power Saving Quick Zoom Auto Power Off Guide Display Reset Description For formatting the SD Memory Card or built-in which menus and messages appear For selecting the way of naming image folders For changing the USB connection mode For setting the video output format For changing the brightness of the LCD monitor For setting the Power Saving function For displaying the image at specified magnification by pressing the zoom button...
...-way controller, and assignment of start-up ] Menu Item Format Sound Date Adjust World Time Language/ Folder Name 3 USB Connection Video Out Brightness Level Power Saving Quick Zoom Auto Power Off Guide Display Reset Description For formatting the SD Memory Card or built-in which menus and messages appear For selecting the way of naming image folders For changing the USB connection mode For setting the video output format For changing the brightness of the LCD monitor For setting the Power Saving function For displaying the image at specified magnification by pressing the zoom button...
Operation Manual
Page 47
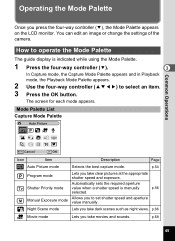
... mode Shutter Priority mode Manual Exposure mode A Night Scene mode C Movie mode Lets you to select an item. 3 Press the OK button. Automatically sets the required aperture value when a shutter speed is indicated while using the Mode Palette. 1 Press the four-way controller (3). 3 In Capture mode, the Capture Mode Palette appears and in Playback mode, the Playback Mode Palette appears. 2 Use the four-way controller (2345) to set shutter speed and aperture value manually. How to operate the Mode Palette The guide display is manually p.56...
... mode Shutter Priority mode Manual Exposure mode A Night Scene mode C Movie mode Lets you to select an item. 3 Press the OK button. Automatically sets the required aperture value when a shutter speed is indicated while using the Mode Palette. 1 Press the four-way controller (3). 3 In Capture mode, the Capture Mode Palette appears and in Playback mode, the Playback Mode Palette appears. 2 Use the four-way controller (2345) to set shutter speed and aperture value manually. How to operate the Mode Palette The guide display is manually p.56...
Operation Manual
Page 50
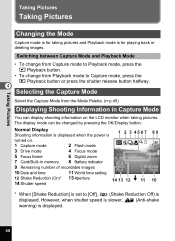
... Display Shooting information is displayed when the power is 1 2 3 4567 89 turned on the LCD monitor when taking pictures and Playback mode is for taking pictures. However, when shutter speed is slower, (Anti-shake warning) is displayed. The display mode can display shooting information on . 36 1 Capture mode 2 Flash mode 3 Drive mode 4 Focus mode 5 Focus frame 6 Digital zoom 7 Card/Built-in memory 8 Battery indicator 9 Remaining number of recordable images 10 Date and time 11 World time setting 1/160 F2.6 08/25/2006 12:00 12 Shake Reduction (On)* 13 Aperture...
... Display Shooting information is displayed when the power is 1 2 3 4567 89 turned on the LCD monitor when taking pictures and Playback mode is for taking pictures. However, when shutter speed is slower, (Anti-shake warning) is displayed. The display mode can display shooting information on . 36 1 Capture mode 2 Flash mode 3 Drive mode 4 Focus mode 5 Focus frame 6 Digital zoom 7 Card/Built-in memory 8 Battery indicator 9 Remaining number of recordable images 10 Date and time 11 World time setting 1/160 F2.6 08/25/2006 12:00 12 Shake Reduction (On)* 13 Aperture...
Operation Manual
Page 88
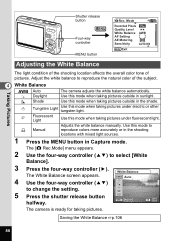
...tungsten light. K Manual Adjusts the white balance manually. White Balance The White Balance screen appears. Daylight Use this mode when taking pictures outside in Capture mode. J Fluorescent Light Use this mode when taking pictures. MENU Cancel OK OK The camera is ready for taking pictures outside in the shade. Saving the White Balance 1p.106 86 Mode Recorded Pixels Quality Level White Balance AF Setting AE Metering Sensitivity 10M AWB AUTO 800 MENU Exit Adjusting the White Balance The light condition of the shooting location affects the overall color...
...tungsten light. K Manual Adjusts the white balance manually. White Balance The White Balance screen appears. Daylight Use this mode when taking pictures outside in Capture mode. J Fluorescent Light Use this mode when taking pictures. MENU Cancel OK OK The camera is ready for taking pictures outside in the shade. Saving the White Balance 1p.106 86 Mode Recorded Pixels Quality Level White Balance AF Setting AE Metering Sensitivity 10M AWB AUTO 800 MENU Exit Adjusting the White Balance The light condition of the shooting location affects the overall color...
Operation Manual
Page 108
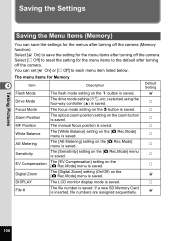
...camera. P Digital Zoom The [Digital Zoom] setting (On/Off) on the [A Rec.Mode] menu is saved. Select [P Off] to reset the setting for Memory 4 Item Flash Mode Drive Mode Focus Mode Description The flash mode setting on the zoom button is saved. O 106 O DISPLAY The LCD monitor display mode is saved. If a new SD Memory Card is saved. P Sensitivity The [Sensitivity] setting on the [A Rec.Mode] menu is saved. The drive mode setting (gj, etc.) selected using the four-way controller (2) is inserted, file numbers are assigned sequentially. Taking Pictures Saving...
...camera. P Digital Zoom The [Digital Zoom] setting (On/Off) on the [A Rec.Mode] menu is saved. Select [P Off] to reset the setting for Memory 4 Item Flash Mode Drive Mode Focus Mode Description The flash mode setting on the zoom button is saved. O 106 O DISPLAY The LCD monitor display mode is saved. If a new SD Memory Card is saved. P Sensitivity The [Sensitivity] setting on the [A Rec.Mode] menu is saved. The drive mode setting (gj, etc.) selected using the four-way controller (2) is inserted, file numbers are assigned sequentially. Taking Pictures Saving...
Operation Manual
Page 163
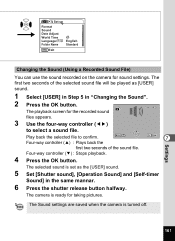
.... The Sound settings are saved when the camera is ready for sound settings. Four-way controller (3) : Stops playback. 4 Press the OK button. Set-up OK Format Sound Date Adjust World Time Language/ English Folder Name Standard MENU Exit Changing the Sound (Using a Recorded Sound File) You can use the sound recorded on the camera for taking pictures. Play back the selected file to select a sound file. The selected sound is set as [USER] sound. 1 Select [USER] in Step 5 in the same mannar. 6 Press the shutter release button halfway. The camera is turned off. The...
.... The Sound settings are saved when the camera is ready for sound settings. Four-way controller (3) : Stops playback. 4 Press the OK button. Set-up OK Format Sound Date Adjust World Time Language/ English Folder Name Standard MENU Exit Changing the Sound (Using a Recorded Sound File) You can use the sound recorded on the camera for taking pictures. Play back the selected file to select a sound file. The selected sound is set as [USER] sound. 1 Select [USER] in Step 5 in the same mannar. 6 Press the shutter release button halfway. The camera is turned off. The...

Operation Manual
Page 166
Mode Recorded Pixels Quality Level White Balance AF Setting AE Metering Sensitivity 10M AWB AUTO 800 MENU Exit Setting the World Time Settings The date and time selected in a city other than the Home Time city (World Time). You can display the time in "Initial Settings (Setting the Display Language and the Date and Time)" (p.26) serve as the Home Time setting. World Time The World Time screen appears. The Destination screen appears. The location of the destination and...
Mode Recorded Pixels Quality Level White Balance AF Setting AE Metering Sensitivity 10M AWB AUTO 800 MENU Exit Setting the World Time Settings The date and time selected in a city other than the Home Time city (World Time). You can display the time in "Initial Settings (Setting the Display Language and the Date and Time)" (p.26) serve as the Home Time setting. World Time The World Time screen appears. The Destination screen appears. The location of the destination and...
Operation Manual
Page 183
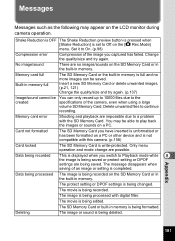
... compatible with this camera. (p.158) Card locked The SD Memory Card is completed. Change the quality/size and try again. (p.137) Image/sound cannot be saved. No image/sound There are being recorded on the [A Rec.Mode] menu. Card not formatted The SD Memory Card you have inserted is being saved. Only menu operation and mode change are impossible due to continue recording. Appendix 181 Memory card error Shooting and playback are possible. Deleting The image or sound is being deleted. Delete unwanted files to a problem with digital filter. The movie...
... compatible with this camera. (p.158) Card locked The SD Memory Card is completed. Change the quality/size and try again. (p.137) Image/sound cannot be saved. No image/sound There are being recorded on the [A Rec.Mode] menu. Card not formatted The SD Memory Card you have inserted is being saved. Only menu operation and mode change are impossible due to continue recording. Appendix 181 Memory card error Shooting and playback are possible. Deleting The image or sound is being deleted. Delete unwanted files to a problem with digital filter. The movie...

Operation Manual
Page 189
Self-timer. 2-sec. In/Out Port USB/AV terminal (PC communication type USB 2.0, high-speedcompatible), external power supply terminal Video Output Format NTSC, PAL Size 88.5 (W) × 54.5 (H) × 23 (D) mm (excluding operating members and projections) Weight 125 g (excluding battery and SD Memory Card) Weight When Shooting 145 g (including battery and SD Memory Card) 8 Accessories Rechargeable lithium-ion battery, battery charger, AC plug cord, USB cable, software (CD-ROM), AV cable, strap, operating manual Power Supply Rated input...
Self-timer. 2-sec. In/Out Port USB/AV terminal (PC communication type USB 2.0, high-speedcompatible), external power supply terminal Video Output Format NTSC, PAL Size 88.5 (W) × 54.5 (H) × 23 (D) mm (excluding operating members and projections) Weight 125 g (excluding battery and SD Memory Card) Weight When Shooting 145 g (including battery and SD Memory Card) 8 Accessories Rechargeable lithium-ion battery, battery charger, AC plug cord, USB cable, software (CD-ROM), AV cable, strap, operating manual Power Supply Rated input...


