

User Guide
Page 2
... subject to suit their respective owners. Contact your digital camera may differ from those described in this manual are trademarks used under license. Occasionally a retailer will specify a unique product color, appearance, and internal memory capacity. The QuickTime logo is due to the fact that come with accessories such as batteries, chargers, AC adapters, memory cards, cables, carrying cases/pouches, and language support. This is registered in...
... subject to suit their respective owners. Contact your digital camera may differ from those described in this manual are trademarks used under license. Occasionally a retailer will specify a unique product color, appearance, and internal memory capacity. The QuickTime logo is due to the fact that come with accessories such as batteries, chargers, AC adapters, memory cards, cables, carrying cases/pouches, and language support. This is registered in...

User Guide
Page 6
... Using the Zoom Function 26 Using the Flash 27 Using the Self-Timer 28 Adjusting the Exposure (EV Compensation)......... 29 Setting White Balance 30 USING THE MODE DIAL 31 Simple Mode 31 Program Mode 31 Portrait Mode 32 Landscape Mode 32 Sport Mode 33 Night Mode 33 ADVANCED SHOOTING 34 High Speed Continuous 34 Auto Bracket 35 Selecting the Metering Mode 36 EN-6 CONTENTS INTRODUCTION 8 Package Contents 9 GETTING TO KNOW YOUR CAMERA 10 Front View 10 Rear View 11 Mode...
... Using the Zoom Function 26 Using the Flash 27 Using the Self-Timer 28 Adjusting the Exposure (EV Compensation)......... 29 Setting White Balance 30 USING THE MODE DIAL 31 Simple Mode 31 Program Mode 31 Portrait Mode 32 Landscape Mode 32 Sport Mode 33 Night Mode 33 ADVANCED SHOOTING 34 High Speed Continuous 34 Auto Bracket 35 Selecting the Metering Mode 36 EN-6 CONTENTS INTRODUCTION 8 Package Contents 9 GETTING TO KNOW YOUR CAMERA 10 Front View 10 Rear View 11 Mode...

User Guide
Page 7
... 37 Viewing Images 37 Magnifying Images 38 Thumbnail Display 39 Slideshow Display 40 Resizing an Image 41 MOVIE MODE 42 Recording Movie Clips 42 Playing Back Movie Clips 43 PLAYBACK MODE - PLAYBACK MODE - Windows NetMeeting 59 MENU OPTIONS 60 Camera Menu 60 Movie Menu 64 Playback Menu 65 Setup Menu 67 CONNECTING THE DIGITAL CAMERA TO OTHER DEVICES 70 SPECIFICATIONS 71 APPENDIX 72 WARRANTY POLICY 75 EN-7 ADVANCED FEATURES...44 Playing Back Still Images/Movie Clips on TV ........44 Deleting Images/Movie Clips 45 Protecting Images/Movie Clips 46 Setting...
... 37 Viewing Images 37 Magnifying Images 38 Thumbnail Display 39 Slideshow Display 40 Resizing an Image 41 MOVIE MODE 42 Recording Movie Clips 42 Playing Back Movie Clips 43 PLAYBACK MODE - PLAYBACK MODE - Windows NetMeeting 59 MENU OPTIONS 60 Camera Menu 60 Movie Menu 64 Playback Menu 65 Setup Menu 67 CONNECTING THE DIGITAL CAMERA TO OTHER DEVICES 70 SPECIFICATIONS 71 APPENDIX 72 WARRANTY POLICY 75 EN-7 ADVANCED FEATURES...44 Playing Back Still Images/Movie Clips on TV ........44 Deleting Images/Movie Clips 45 Protecting Images/Movie Clips 46 Setting...
User Guide
Page 8
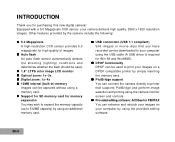
... auto flash sensor automatically detects the shooting (lighting) conditions and determines whether the flash should be used. „ 1.8" LTPS color image LCD monitor „ Optical zoom: 1x~3x „ Digital zoom: 1x~4x „ 12MB internal (built-in) memory Images can be used to 512MB capacity) by using an additional memory card. „ USB connection (USB 1.1 compliant) Still images or movie clips that supports PictBridge and perform image selection and printing using the camera monitor screen and controls. „ Provided editing software...
... auto flash sensor automatically detects the shooting (lighting) conditions and determines whether the flash should be used. „ 1.8" LTPS color image LCD monitor „ Optical zoom: 1x~3x „ Digital zoom: 1x~4x „ 12MB internal (built-in) memory Images can be used to 512MB capacity) by using an additional memory card. „ USB connection (USB 1.1 compliant) Still images or movie clips that supports PictBridge and perform image selection and printing using the camera monitor screen and controls. „ Provided editing software...

User Guide
Page 12
.... Select this mode to permit the shutter speed and aperture to adjust the camera settings. EN-12 Mode Program Portrait Landscape Sports Night Setup Movie Simple 8 4 5 76 Description Select this mode to be set automatically. Select this mode for point-and-shoot action. Mode Dial You can select from seven shooting modes and setup mode according to shooting conditions to take photographs of -focus. Select this mode to record movie clips. Use this mode to make people stand...
.... Select this mode to permit the shutter speed and aperture to adjust the camera settings. EN-12 Mode Program Portrait Landscape Sports Night Setup Movie Simple 8 4 5 76 Description Select this mode to be set automatically. Select this mode for point-and-shoot action. Mode Dial You can select from seven shooting modes and setup mode according to shooting conditions to take photographs of -focus. Select this mode to record movie clips. Use this mode to make people stand...

User Guide
Page 13
... number of shots 6. Self-timer mode [ 2 ] 2 sec. delay [ ] 10+2 sec. White balance Auto [ ] Daylight [ ] Cloudy [ ] Sunset [ ] Tungsten [ ] Fluorescent 10.Drive mode [ ] Standard [ ] HS Continuous [ ] Auto Bracket 11.Focus area 12.Date EN-13 Flash mode [ ] Auto Flash 5M [ ] Red Eye Reduction [ ] Forced flash [ ] No Flash 2. Image quality [ ] Best [ ] Better [ ] Good 4. delay [ 10 ] 10 sec. LCD Monitor Information „ Camera Mode 1 2 34 1. Rec. delay 56 7 52 8 9 10 11 2004.09.17 12 9. Memory status : Built-in memory (without card...
... number of shots 6. Self-timer mode [ 2 ] 2 sec. delay [ ] 10+2 sec. White balance Auto [ ] Daylight [ ] Cloudy [ ] Sunset [ ] Tungsten [ ] Fluorescent 10.Drive mode [ ] Standard [ ] HS Continuous [ ] Auto Bracket 11.Focus area 12.Date EN-13 Flash mode [ ] Auto Flash 5M [ ] Red Eye Reduction [ ] Forced flash [ ] No Flash 2. Image quality [ ] Best [ ] Better [ ] Good 4. delay [ 10 ] 10 sec. LCD Monitor Information „ Camera Mode 1 2 34 1. Rec. delay 56 7 52 8 9 10 11 2004.09.17 12 9. Memory status : Built-in memory (without card...
User Guide
Page 17
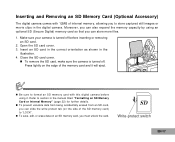
... the memory card and it . Press lightly on an SD memory card, you must unlock the card. Make sure your camera is turned off before using an optional SD (Secure Digital) memory card so that you to section in the illustration. 4. Refer to store captured still images or movie clips in the digital camera. Close the SD card cover. „ To remove the SD card, make sure the camera is turned off . Write-protect switch EN...
... the memory card and it . Press lightly on an SD memory card, you must unlock the card. Make sure your camera is turned off before using an optional SD (Secure Digital) memory card so that you to section in the illustration. 4. Refer to store captured still images or movie clips in the digital camera. Close the SD card cover. „ To remove the SD card, make sure the camera is turned off . Write-protect switch EN...

User Guide
Page 21
... Rotate the mode dial to select the [Set-up2] menu. 3. Use T to select [Date Adjust], then press the button. „ You may press W or X to select Year, Month, Day and Time fields. „ To increase a value, press S. „ To decrease a value, press T. „ The time is displayed in 24-hours format. 5. Press W or X to switch the date types. Set-up1 Date Adjust Video Out Language Set-up2 d/m/y PAL English Brightness...
... Rotate the mode dial to select the [Set-up2] menu. 3. Use T to select [Date Adjust], then press the button. „ You may press W or X to select Year, Month, Day and Time fields. „ To increase a value, press S. „ To decrease a value, press T. „ The time is displayed in 24-hours format. 5. Press W or X to switch the date types. Set-up1 Date Adjust Video Out Language Set-up2 d/m/y PAL English Brightness...
User Guide
Page 25
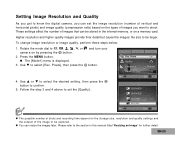
... 1.2 M 1280X960 0.3 M 640X480 OK : Exit : 4 / 4 „ The possible number of vertical and horizontal pixels) and image quality (compression ratio) based on by pressing the button. 2. Higher resolution and higher quality images provide finer detail but cause the images' file size to set the image resolution (number of shots and recording time depend on a memory card. To change image resolution or image quality, perform these steps below: 1. Follow the step...
... 1.2 M 1280X960 0.3 M 640X480 OK : Exit : 4 / 4 „ The possible number of vertical and horizontal pixels) and image quality (compression ratio) based on by pressing the button. 2. Higher resolution and higher quality images provide finer detail but cause the images' file size to set the image resolution (number of shots and recording time depend on a memory card. To change image resolution or image quality, perform these steps below: 1. Follow the step...
User Guide
Page 27
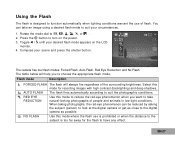
.... AUTO FLASH The flash fires automatically according to turn on the LCD monitor. 4. RED EYE REDUCTION Use this mode where the flash use of flash. The table below will always fire regardless of people and animals in low-light conditions. NO FLASH Use this mode to reduce the red-eye phenomenon when you to choose the appropriate flash mode: Flash mode Description FORCED FLASH The flash will help you want to take an image using a desired flash mode to , , , , or . 2. Using...
.... AUTO FLASH The flash fires automatically according to turn on the LCD monitor. 4. RED EYE REDUCTION Use this mode where the flash use of flash. The table below will always fire regardless of people and animals in low-light conditions. NO FLASH Use this mode to reduce the red-eye phenomenon when you to choose the appropriate flash mode: Flash mode Description FORCED FLASH The flash will help you want to take an image using a desired flash mode to , , , , or . 2. Using...

User Guide
Page 31
... mode dial to and turn your camera on by pressing the button. 2. EN-31 You can adjust other functions, such as flash mode or continuous shooting mode. 1. Press the shutter button to focus the image. „ When you to take still pictures without having to capture the image. Press the shutter button down half way, the camera's Auto Focus feature automatically focuses the image. Program Mode [ ] In the (Program) mode, the camera automatically sets the shutter speed and aperture for taking still images. Proper exposure...
... mode dial to and turn your camera on by pressing the button. 2. EN-31 You can adjust other functions, such as flash mode or continuous shooting mode. 1. Press the shutter button to focus the image. „ When you to take still pictures without having to capture the image. Press the shutter button down half way, the camera's Auto Focus feature automatically focuses the image. Program Mode [ ] In the (Program) mode, the camera automatically sets the shutter speed and aperture for taking still images. Proper exposure...

User Guide
Page 47
... using DPOF, you can select an image to select [DPOF], then press the button. The DPOF/ card-compatible printer will disappear after 2 seconds. Setting the DPOF DPOF (Digital Print Order Format) allows you to embed printing information on the LCD monitor will read the embedded information on the memory card and print your images as specified. „ To configure print settings for all images. [Reset All]: Returns all images. Playback Resize 2 DPOF Copy Image...
... using DPOF, you can select an image to select [DPOF], then press the button. The DPOF/ card-compatible printer will disappear after 2 seconds. Setting the DPOF DPOF (Digital Print Order Format) allows you to embed printing information on the LCD monitor will read the embedded information on the memory card and print your images as specified. „ To configure print settings for all images. [Reset All]: Returns all images. Playback Resize 2 DPOF Copy Image...
User Guide
Page 53
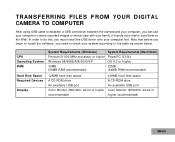
TRANSFERRING FILES FROM YOUR DIGITAL CAMERA TO COMPUTER After using USB cable to establish a USB connection between the camera and your computer, you can use your computer to the table as shown below. CPU Operating System RAM Hard Disk Space Required Devices Display System Requirements (Windows) System Requirements (Macintosh) Pentium III 600 MHz processor or higher PowerPC G3/G4 Windows 98/98SE/ME/2000/XP OS 9.0 or...
TRANSFERRING FILES FROM YOUR DIGITAL CAMERA TO COMPUTER After using USB cable to establish a USB connection between the camera and your computer, you can use your computer to the table as shown below. CPU Operating System RAM Hard Disk Space Required Devices Display System Requirements (Windows) System Requirements (Macintosh) Pentium III 600 MHz processor or higher PowerPC G3/G4 Windows 98/98SE/ME/2000/XP OS 9.0 or...

User Guide
Page 55
... end of the USB cable to an available USB port on your recorded images or movie clips. (For Mac users, double-click [untitled] or [unlabeled] disk drive icon on by pressing the button. 2. Press the button. OK : 5 / 5 USB Con. Set-up1 USB Con. Set-up2 PC 4. Step 2: Connect the digital camera to your camera on our desktop.) PC/AV terminal EN-55 Press X to select the [Set-up2] menu, then use T to select...
... end of the USB cable to an available USB port on your recorded images or movie clips. (For Mac users, double-click [untitled] or [unlabeled] disk drive icon on by pressing the button. 2. Press the button. OK : 5 / 5 USB Con. Set-up1 USB Con. Set-up2 PC 4. Step 2: Connect the digital camera to your camera on our desktop.) PC/AV terminal EN-55 Press X to select the [Set-up2] menu, then use T to select...

User Guide
Page 59
... view live video. 3. The person that you are calling. 5. Step 2: Connect the digital camera to your application software (i.e. Press the button. 4. Click the Place Call button. 4. Press X to select the [Set-up2] menu, then use Windows NetMeeting for videoconferencing applications is necessary to and turn your camera on PC PictBridge PC Camera your computer monitor or use a tripod. EN-59 Click Call. Rotate the mode dial to install...
... view live video. 3. The person that you are calling. 5. Step 2: Connect the digital camera to your application software (i.e. Press the button. 4. Click the Place Call button. 4. Press X to select the [Set-up2] menu, then use Windows NetMeeting for videoconferencing applications is necessary to and turn your camera on PC PictBridge PC Camera your computer monitor or use a tripod. EN-59 Click Call. Rotate the mode dial to install...

User Guide
Page 65
... LCD monitor. 2. Refer to the section in this manual titled "Slideshow Display" for further details. * 3 sec. / 5 sec. / 10 sec. EN-65 Press the MENU button, then use S or T to prevent images from being erased by mistake. Item Delete Slideshow Protect Functional Description Delete one or all images you have captured. Playback Delete Slideshow Protect Playback Resize DPOF Copy Image OK : Exit : 0 / 7 OK : Exit : 5 / 7 1. You can play back recorded images in this manual titled "Protecting Images/Movie...
... LCD monitor. 2. Refer to the section in this manual titled "Slideshow Display" for further details. * 3 sec. / 5 sec. / 10 sec. EN-65 Press the MENU button, then use S or T to prevent images from being erased by mistake. Item Delete Slideshow Protect Functional Description Delete one or all images you have captured. Playback Delete Slideshow Protect Playback Resize DPOF Copy Image OK : Exit : 0 / 7 OK : Exit : 5 / 7 1. You can play back recorded images in this manual titled "Protecting Images/Movie...

User Guide
Page 66
... size of prints and date displayed in this if you can print images easily just by inserting the memory card to a DPOF-compatible printer or taking it to a print shop. You can only do this manual titled "Setting the DPOF" for further details. Item Quality Change Resize DPOF Copy Image Functional Description Change to set the number of a recorded image. * 5M 2560x1920 * 3M 2048x1536 * 1.2 M 1280x960 * 0.3 M 640x480 Allows you to copy your files from the digital camera's internal memory to a memory card...
... size of prints and date displayed in this if you can print images easily just by inserting the memory card to a DPOF-compatible printer or taking it to a print shop. You can only do this manual titled "Setting the DPOF" for further details. Item Quality Change Resize DPOF Copy Image Functional Description Change to set the number of a recorded image. * 5M 2560x1920 * 3M 2048x1536 * 1.2 M 1280x960 * 0.3 M 640x480 Allows you to copy your files from the digital camera's internal memory to a memory card...

User Guide
Page 67
... another mode. To exit the setup menu, rotate the mode dial to select the desired option item, then press the 4. This feature is useful to reduce battery wear. * 2 min. / 3 min. / 5 min. / Off Digital Zoom This sets whether or not to use digital zoom at the time of time, the power to mode and turn your camera. Date Imprint Format Quick View OK : Set-up2 On Off 5 / 8 Set-up1 Date Adjust Video Out Language Brightness OK : Set-up2 d/m/y PAL English 0 0 / 5 Set-up1 USB...
... another mode. To exit the setup menu, rotate the mode dial to select the desired option item, then press the 4. This feature is useful to reduce battery wear. * 2 min. / 3 min. / 5 min. / Off Digital Zoom This sets whether or not to use digital zoom at the time of time, the power to mode and turn your camera. Date Imprint Format Quick View OK : Set-up2 On Off 5 / 8 Set-up1 Date Adjust Video Out Language Brightness OK : Set-up2 d/m/y PAL English 0 0 / 5 Set-up1 USB...

User Guide
Page 68
... take photographs. Refer to the digital camera's default settings. The time setting will not be removed later. * On / Off Format Quick View 14/02/2004 Erases all basic settings to the section in the internal memory or the SD memory card. * OK / Cancel The date of the captured picture. Protected images are recorded to reset the file number when you have taken the shot. * On / Off EN-68 When images are recorded in this manual titled "Formatting an SD Memory Card or Internal Memory...
... take photographs. Refer to the digital camera's default settings. The time setting will not be removed later. * On / Off Format Quick View 14/02/2004 Erases all basic settings to the section in the internal memory or the SD memory card. * OK / Cancel The date of the captured picture. Protected images are recorded to reset the file number when you have taken the shot. * On / Off EN-68 When images are recorded in this manual titled "Formatting an SD Memory Card or Internal Memory...

User Guide
Page 72
... power adapter (optional) * Properly connect the AC power is in the (movie) mode. * Switch the mode dial to [Off]. * The battery has run out. APPENDIX „ Troubleshooting Guide Symptom Power does not turn on your computer and then delete unnecessary files, or use a different memory card. * NO FLASH is selected in the [Drive Mode]. Camera suddenly powers down. or [Auto Bracket]. * The camera is disconnected. option of [Auto Off] in memory or * Insert a new SD memory card. adapter. * The function...
... power adapter (optional) * Properly connect the AC power is in the (movie) mode. * Switch the mode dial to [Off]. * The battery has run out. APPENDIX „ Troubleshooting Guide Symptom Power does not turn on your computer and then delete unnecessary files, or use a different memory card. * NO FLASH is selected in the [Drive Mode]. Camera suddenly powers down. or [Auto Bracket]. * The camera is disconnected. option of [Auto Off] in memory or * Insert a new SD memory card. adapter. * The function...


